
How to Save a Copy of a PowerPoint? [Step-by-Step Guide!]
By: Author Shrot Katewa
![How to Save a Copy of a PowerPoint? [Step-by-Step Guide!]](https://artofpresentations.com/wp-content/uploads/2022/03/Featured-Image-How-to-Save-a-Copy-of-PowerPoint-Presentation.webp "make a copy of this powerpoint presentation to the desktop")
When creating a presentation using PowerPoint, you may be used to saving the presentation from time to time in order to prevent any data loss. But, what if you want to create another copy of your presentation? How do you save a copy of your PowerPoint presentation?
In this article, we shall understand the process of saving a copy of any PowerPoint presentation in a step-by-step manner. Plus, we shall also take a look at how to save a presentation as a read-only file! That, and much more!
So, let’s get started!
1. How to Save a Copy of a PowerPoint Presentation?
Let’s address the elephant in the room straight away! How do you create a copy of a PowerPoint presentation?
Microsoft PowerPoint offers a “Save A Copy” feature which allows you to save the changes in your PowerPoint presentation in a separate copied file rather than the original file.
In some versions of Microsoft PowerPoint, the “Save A Copy” option is replaced by the “Save As” option. However, the features available through both options are fully identical.
Let’s understand the process of saving a copy of a PowerPoint presentation in further detail –
1a. How to Save a Copy of PowerPoint to Desktop?
To save a copy of a PowerPoint presentation on your desktop, follow the 3 simple steps.
Step-1: Click on the “File” tab
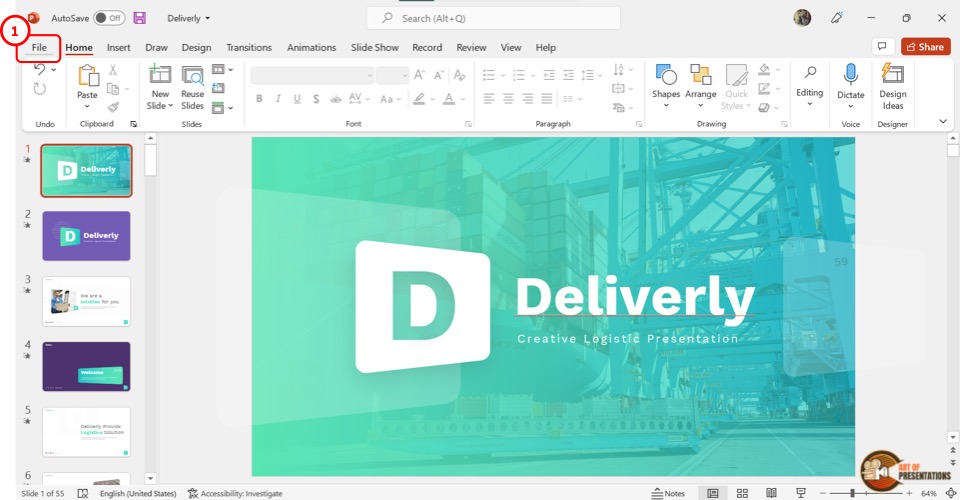
The first step is to click on the “File” tab. It is located on the left corner of the menu ribbon at the top of the screen. This will open the “File” menu.
Step-2: Click on the “Save A Copy” option

Depending on the version of your Microsoft PowerPoint, you have to click on the “Save A Copy” or the “Save As” option from the sidebar located on the left side in the “File” menu.
Step-3: Click on the “Save” button
In the “Save A Copy” screen, you can click on the “Save As Options” box and save a copy of your presentation in several different formats. Then all you have to do is click on the “Save” button beside the “Save As Options” box to save a copy of your presentation.
1b. Shortcut to Save a Copy of a PowerPoint Presentation
In Microsoft PowerPoint, you can also save a copy of your presentation using the keyboard shortcuts. All you have to do is press the “Alt+F2” keys (Cmd+Shift+S on Mac) on your keyboard.
This will directly open the “Save As” dialog box where you can click on the “Save as type” box to change the file format.
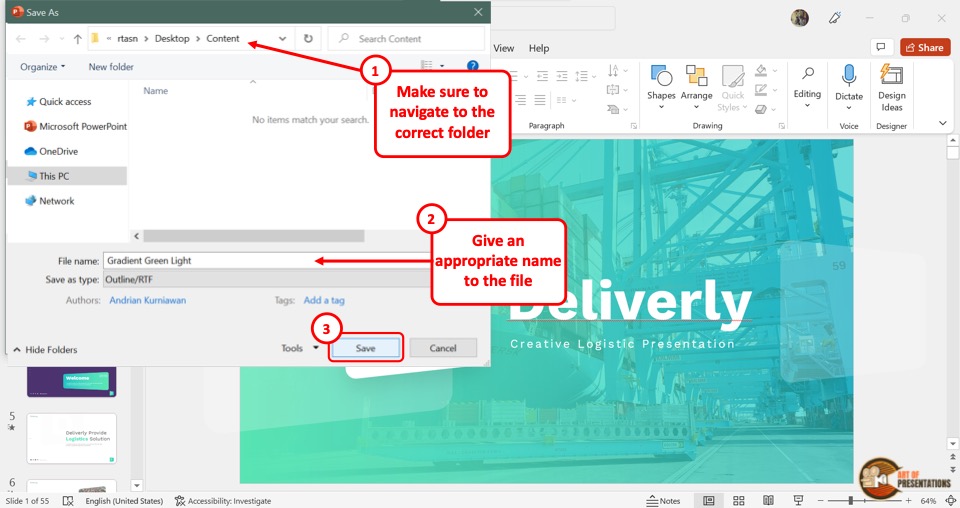
Make sure that you choose the correct location for saving the file from the navigation pane. Give an appropriate name to the file. Finally, click on the “Save” button.
2. How to Save a Copy of a Read-Only PowerPoint Presentation?
By saving the “Read-Only” version of a PowerPoint presentation , you can avoid any accidental edits in the original presentation file. A “Read-Only” PowerPoint file will force the user to create a copy of the presentation if any changes are made.
Thus, the original file is maintained as-in. To save a PowerPoint presentation as a read-only copy, follow the easy steps mentioned below –
Step-1: Click on the “File” Tab
In the menu ribbon located at the top of the screen, click on the “File” tab. In the sidebar located on the left side of the “File” menu, click on the “Info” option.
Step-2: Click on the “Alway Open Read-Only” option
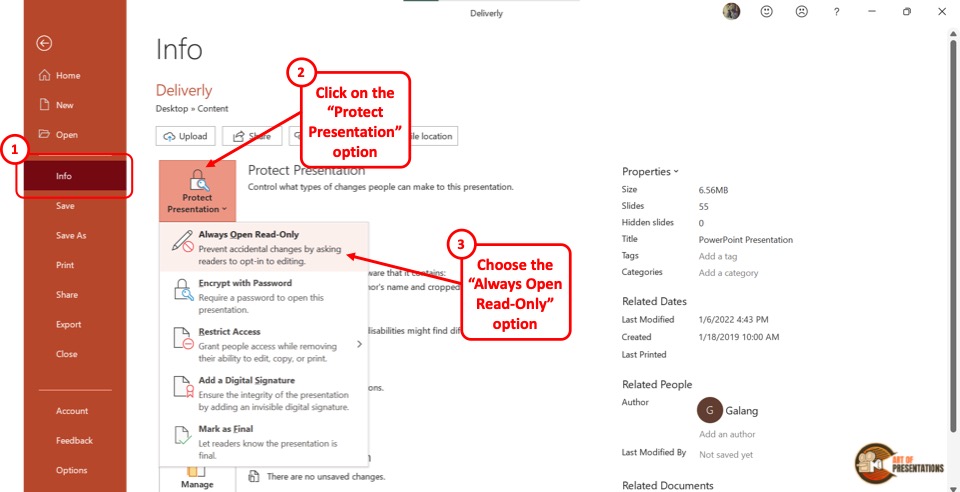
In the “Info” screen, click on the “Protect Presentation” button which is the first button in the left column. In the dropdown menu under “Protect Presentation” , click on the “Always Open Read-Only” option.
Also Read – 7 Ways to Protect Your PowerPoint Presentation from Editing!
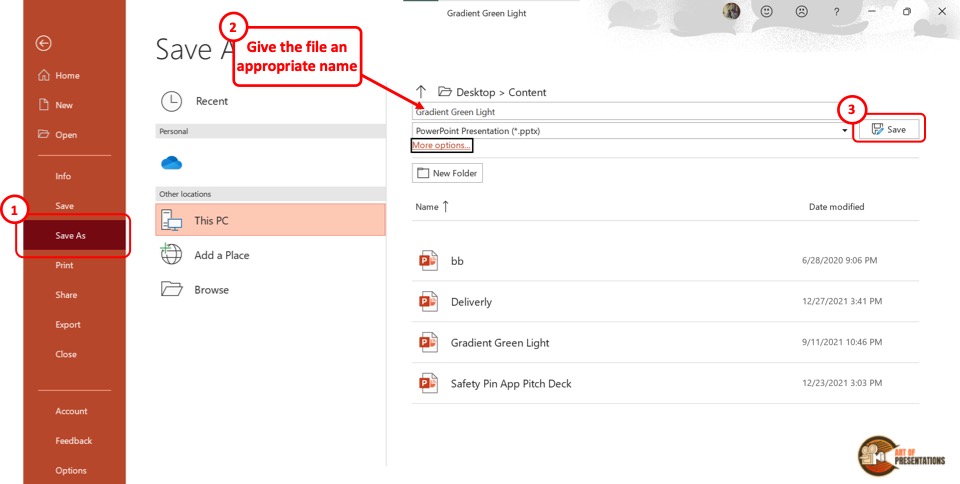
Finally, you have to click on the “Save A Copy” option in the sidebar on the left side of the “File” screen. Then click on the “Save” button to save a read-only copy of the PowerPoint presentation.
3. How to Save a Copy of a Shared PowerPoint Presentation?
If your colleague or client has shared a copy of a PowerPoint presentation using PowerPoint for the web or Shared Drive, you can easily download and save a copy of the shared presentation to your device.
Here’s what you need to do –
Step-1: Click on the “Save as” option
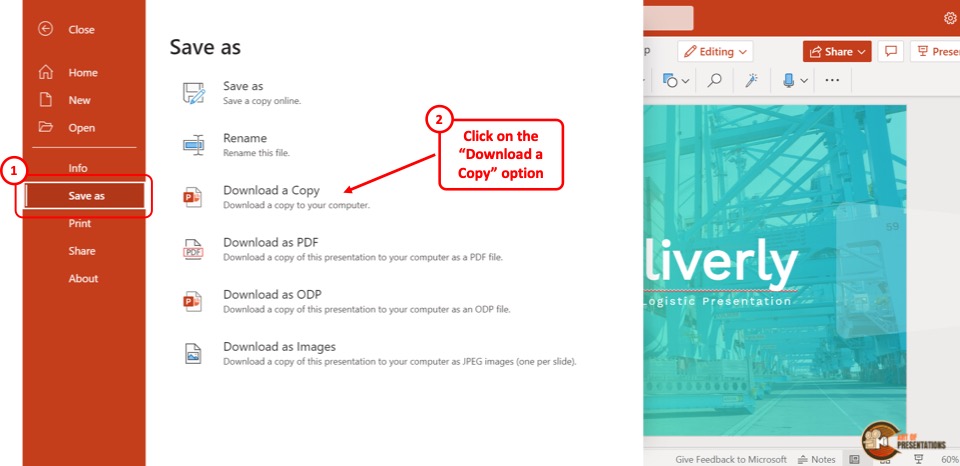
In the menu ribbon located at the top of the screen, click on the “File” tab. Then click on the “Save as” option from the “File” menu. Under the “Save As” option, click on the “Download a Copy” option.
Step-2: Click on “Download”
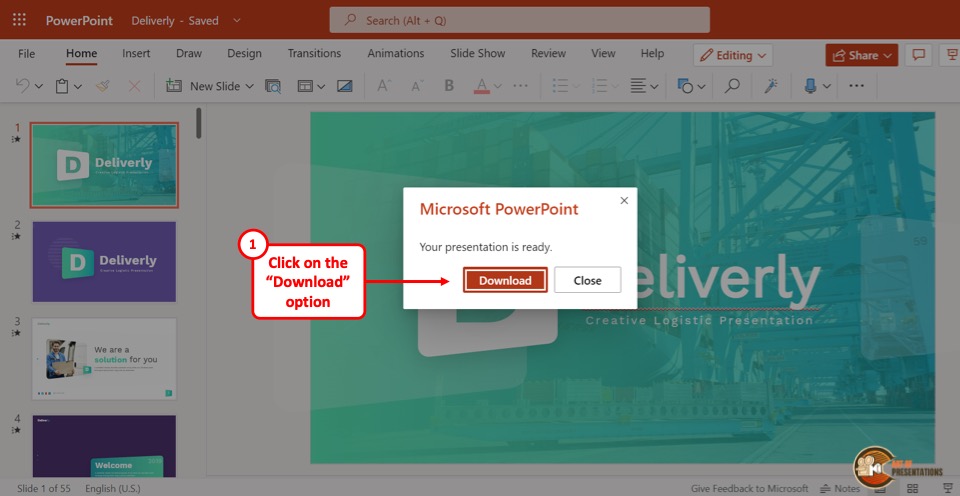
Now all you have to do is click on the “Download” button in the dialog box prompted by Microsoft PowerPoint.
4. How to Save a Copy of PowerPoint Without Notes?
In Microsoft PowerPoint, you can save a copy of the file without the notes.
To do so, you have to first remove the speaker notes, and then use the “Save A Copy” option. Here are 5 quick and easy steps that you can follow in order to save a copy of your PowerPoint file without notes –
In the menu ribbon, click on the “File” tab. Then click on the “Info” option from the “File” menu.
Step-2: Click on “Check for Issues”
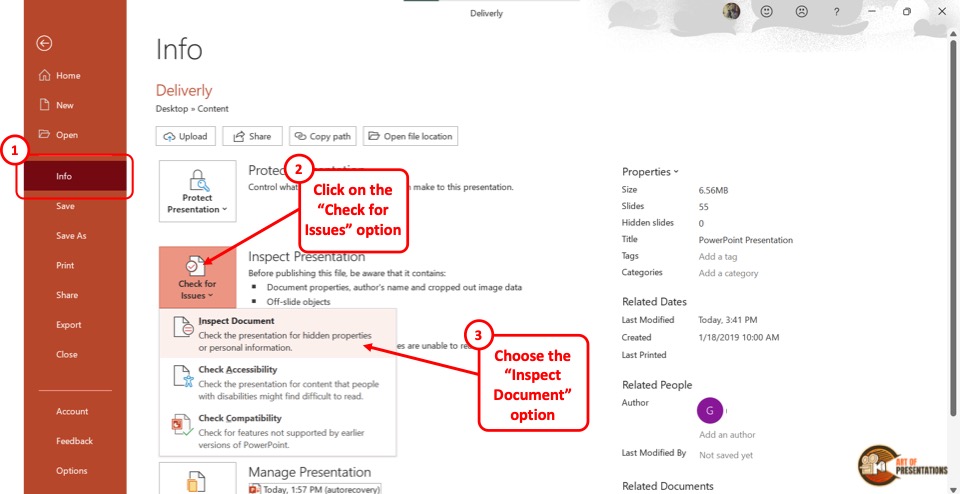
In the “Info” screen, click on the “Check for Issues” button. Then click on the “Inspect Document” option from the dropdown menu. This will prompt a dialog box.
Step-3: Click on the “Inspect” option
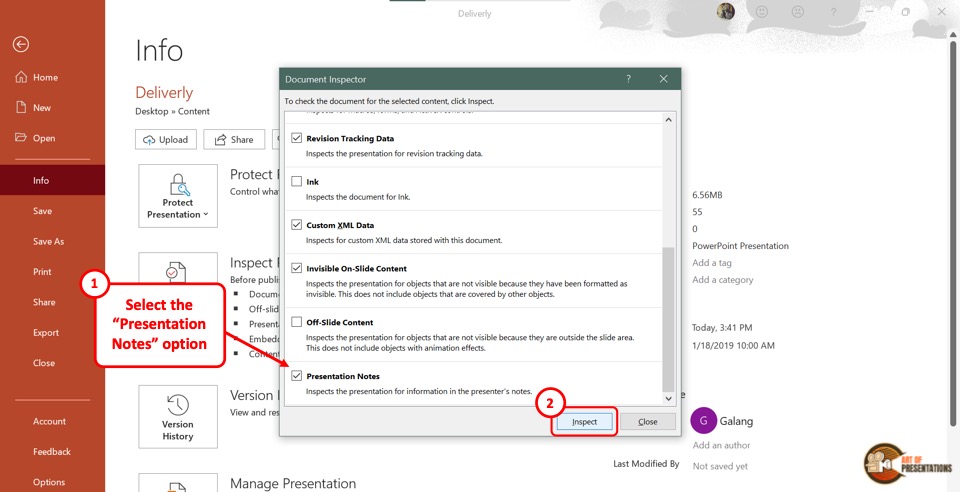
In the “Document Inspector” dialog box, scroll all the way to the bottom and make sure the “Presentation Notes” option is selected. Then click on the “Inspect” button at the bottom of the dialog box.
Step-4: Click on the “Remove All” option
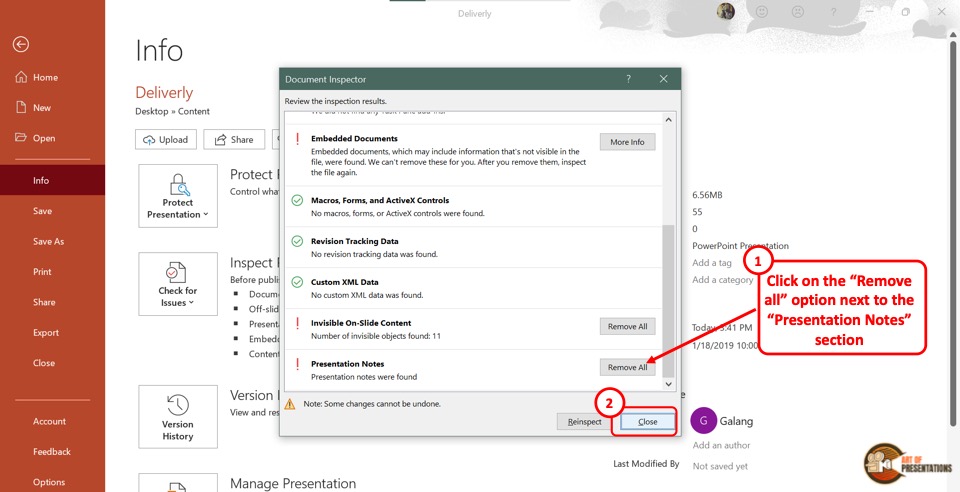
Once the inspection results are shown in the “Document Inspector” dialog, scroll to the bottom again to find the “Presentation Notes” option.
Then click on the “Remove All” button at the right side of the “Presentation Notes” option. Now all you have to do is click on the “Close” button at the bottom of the dialog box to finish the process.
Step-5: Click on the “Save” option
The final step is to click on the “Save A Copy” option in the sidebar of the “File” menu. In the “Save A Copy” screen, click on the “Save” button to save the presentation without notes.
5. How to Create a Copy of an Existing Presentation in a New PowerPoint File?
To create a copy of an existing presentation, you have to first open a new Microsoft PowerPoint file.
Then you can use the “Reuse Slides” feature to copy the existing presentation. The detailed process is explained in the following steps –
Step-1: Click on the “Reuse Slides” button
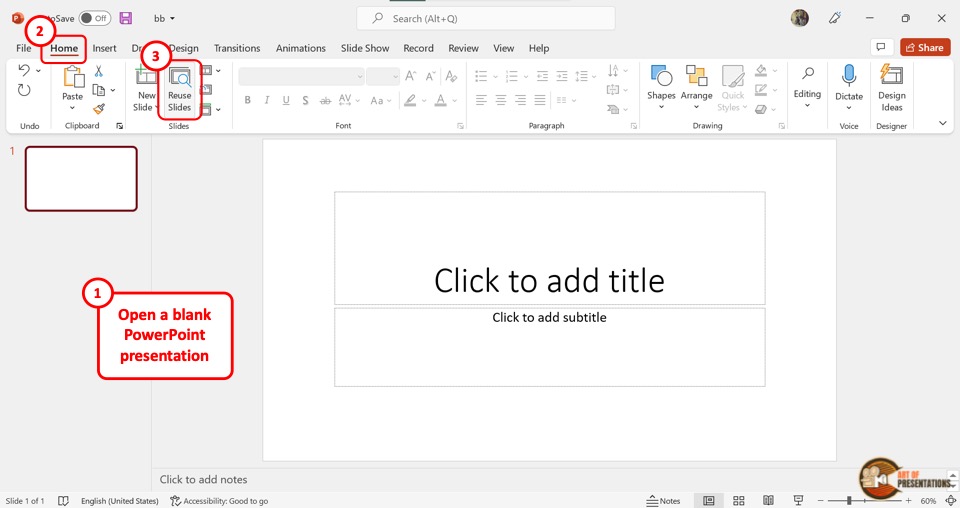
In the new PowerPoint presentation, click on the “Reuse Slides” button. It is located in the “Slides” group of the “Home” menu. This will open a sidebar on the right side of the screen.
Step-2: Click on “Choose Content”
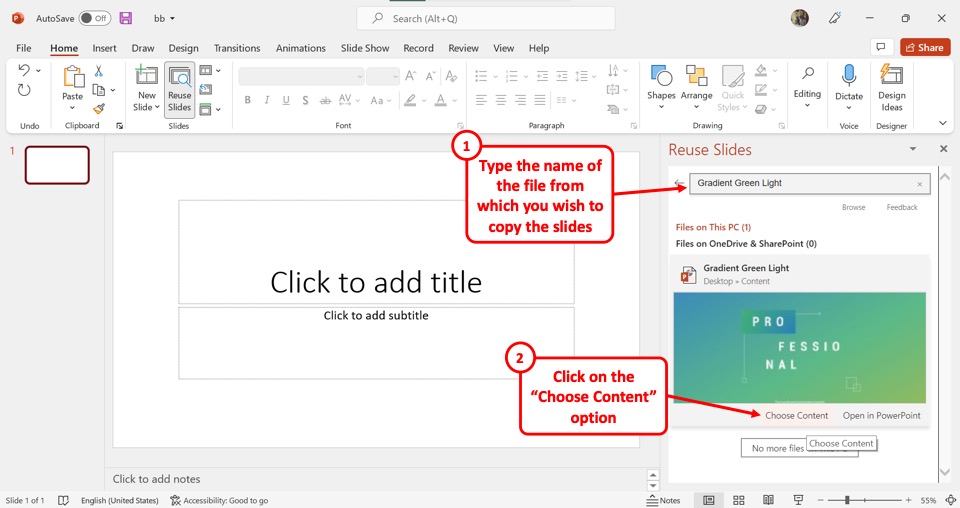
In the “Reuse Slides” sidebar, click on the “Search” box.
Then type in the file name of the presentation which you want to copy. Under the thumbnail of the PowerPoint presentation, click on the “Choose Content” option.
Step-3: Click on the “Insert All” option
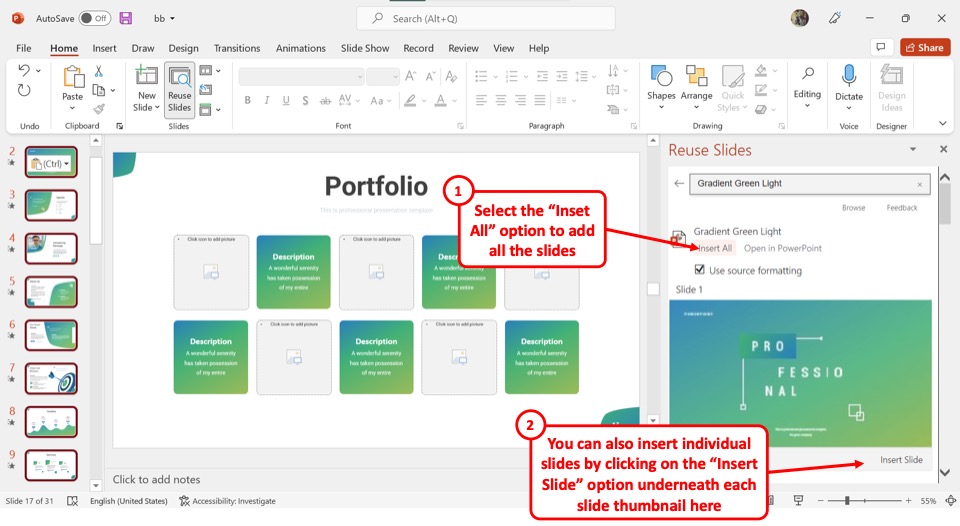
Now all you have to do is click on the “Insert All” option to copy the entire PowerPoint presentation into the new file.
You can also click on the “Insert Slide” option under each slide thumbnail to copy a few selected slides.
6. How to Save a Copy of PowerPoint Presentation in Other Formats?
Microsoft PowerPoint allows you to save a copy of your presentation in multiple file formats. I’ve written an entire article detailing the various formats in which you can save a PowerPoint presentation.
Make sure you check out the other article on “How to Save a PowerPoint Presentation in Multiple Formats” for all the details!
However, in a nutshell, to save a copy of your presentation in other formats, click on the “Save A Copy” option in the “File” menu. In the “Save A Copy” screen, click on the “Save As Type” box which is the second box in the right column.
Now all you have to do is click on your preferred file format from the dropdown menu. For complete details, make sure you check out the article.
Credit to drobotdean (on Freepik) for the featured image of this article (further edited)
How Do You Copy a Microsoft PowerPoint Presentation? (Step-By-Step Guide)
Are you looking to make a copy of a Microsoft PowerPoint presentation? Whether you need to replicate a presentation for a new audience or you want to use the same elements in multiple presentations, copying a PowerPoint presentation can be a great way to save time.
In this step-by-step guide, we’ll explain what Microsoft PowerPoint is, why you may need to copy a presentation, and how to do it.
We’ll also provide helpful tips for saving and managing files, different ways to share the copied presentation, and troubleshooting common issues.
Let’s get started!
Table of Contents
Short Answer
To copy a Microsoft PowerPoint presentation, open the presentation you want to copy and select File > Save As.
Choose a location and name for the new presentation, then click Save.
You can also select the Save a Copy option from the File menu and save a copy of the presentation in your chosen location.
This method will create an exact copy of the original presentation so you can make any changes or edits you need to the copy without affecting the original.
What is Microsoft PowerPoint?
Microsoft PowerPoint is a powerful presentation software used by professionals and students alike to create dynamic presentations.
It is part of the Microsoft Office suite of applications, so it is compatible with other Microsoft Office programs, such as Word and Excel.
PowerPoint allows users to create slideshows, add images, video, audio, and text to create a visually appealing presentation.
It also has a range of features including the ability to add transitions, animations, and shape and color effects to enhance the presentation.
PowerPoint is a great tool for creating engaging and informative presentations that can be used in the classroom, in the workplace, or for personal use.
With its wide range of features, PowerPoint is an essential tool for anyone who wants to create a professional-looking presentation.
Why Copy a PowerPoint Presentation?
There are many situations in which copying a Microsoft PowerPoint presentation can be a useful tool.
For example, if youre preparing a presentation for a large group, you may want to make a copy of the presentation for each attendee.
Alternatively, if youre working with multiple versions of a presentation, you may want to keep a copy of the original presentation in case any mistakes are made in later versions.
Additionally, if youre collaborating on a project with other people, you may want to keep a copy of the presentation on your own computer to ensure that everyone has access to the same version.
Finally, if youre creating a presentation that will be shared with people outside of your organization, copying the presentation allows you to easily share the file with others without having to worry about them accessing the original version.
Overview of the Copying Process
Copying a Microsoft PowerPoint presentation is a straightforward process that only requires a few clicks.
Whether you are copying a presentation to share with others, or simply making a backup copy for safekeeping, the process is the same.
First, open the presentation that you would like to copy.
Then, click the “File” tab at the top of the window.
From this menu, select the “Save As” option.
In the window that appears, select the folder where you would like to save the file, enter a name for the file, and click “Save”.
This will create a duplicate copy of the presentation, which is now saved in the specified folder.
The copied presentation can now be used or shared with others.
It is important to note that the original version of the presentation will remain in its original location, and any edits made to the new copy will not affect the original.
Step-By-Step Guide to Copying a PowerPoint Presentation
Copying a PowerPoint presentation is an essential task for anyone who wants to share or reuse their presentation.
Whether you are preparing the same presentation for multiple audiences or simply want to have a backup copy of your work, the process for copying a PowerPoint presentation is easy to follow.
The first step in the process is to open the PowerPoint presentation you would like to copy.
Once the presentation is open, click the File tab at the top of the window.
This will bring up a list of options.
From here, select the Save As option.
A new window will appear, which will allow you to select the folder where you would like to save the file.
Once you have selected the folder, enter a name for the file and click Save.
After this, the PowerPoint presentation is officially copied and can be used or shared with others.
Its important to note that the name you enter for the file should be unique so that it can be easily identified.
Additionally, you may want to consider saving the file in a folder dedicated to your presentation.
This will help to keep all of your files organized and easily accessible.
Copying a PowerPoint presentation is a simple task that can be completed in a few easy steps.
So the next time you need to share or reuse your presentation, you can quickly and easily copy it.
Tips for Saving and Managing Files
When it comes to saving and managing Microsoft PowerPoint presentations, there are a few key tips to keep in mind.
For starters, be sure to give the file a descriptive name.
This will make it easier to locate when you need it later.
It’s also a good idea to save the presentation in a familiar location, such as a folder on your computer or a cloud storage platform like Dropbox.
This will help you keep track of all your presentations in one place.
Additionally, you may want to back up your files regularly to protect them from accidental deletion or corruption.
You can do this by saving the presentation to a USB drive or an external hard drive.
Finally, if you’re sharing the presentation with others, consider converting it to a PDF file so that it is easier to access and view on any device.
Different Ways to Share the Copied Presentation
Once you have successfully copied your Microsoft PowerPoint presentation, you can share it with others in a variety of ways.
You can save the file to a storage device, such as a USB drive or external hard drive, and distribute it to others that way.
You can also upload the file to a cloud storage service, such as Dropbox, Google Drive, or OneDrive, and share the link with others.
If youd like to share the presentation with people who dont have access to the same cloud storage service, you can compress the file and email it.
Additionally, some cloud storage services, including Dropbox, allow you to generate a link to share the file.
This is a great way to quickly share the presentation with someone without having to worry about emails bouncing or the file being too large to send.
If you think the presentation would be more effective if the viewers could interact with it, you can upload the file to an online presentation service, such as SlideShare or Prezi.
These services allow you to upload your PowerPoint presentation and then share it with others who can view it online.
They also allow you to create a unique link that can be shared with anyone, even if they dont have an account with the service.
Finally, if you want to share the presentation with a large group of people, you can use a video streaming service like YouTube or Vimeo to upload the presentation and then share it with your viewers.
By following the steps outlined above, you can easily copy a Microsoft PowerPoint presentation and share it with others in a variety of ways.
Whether youre sending it to a few people or sharing it with a large group, being able to quickly and easily copy and share your presentation is a great way to make sure your message is heard.
Troubleshooting Common Issues
When attempting to copy a Microsoft PowerPoint presentation, there are a few common issues that can arise that can prevent you from doing so successfully.
One of the most common is that the presentation may not save properly.
This can be caused by a variety of things, including not having enough hard drive space available, not having the correct permissions to save the file, or if the file is corrupt.
Another issue is that the presentation may not open properly.
This can be caused by a variety of things, including not having the right version of PowerPoint installed, not having the correct codecs installed, or if the file is corrupted.
Finally, you may have difficulty when attempting to share the copied presentation.
This can be caused by a variety of things, including not having the correct permissions to share the file, or if the file is corrupted.
Fortunately, most of these issues can be easily resolved by following the steps outlined in the blog post.
However, if the issue still persists after following the steps, you may need to contact Microsoft customer service for further assistance.
Final Thoughts
Copying a Microsoft PowerPoint presentation is a simple, straightforward process.
Now that youre familiar with the steps and the various options available for saving and managing your files, as well as different ways to share the presentation, youre ready to put your newfound knowledge into action.
So, go ahead and start copying and sharing your presentations with ease!
James Wilson
James Wilson has extensive knowledge in the information technology industry.His second love, besides dealing with computers, is smart home technology. He is continually updating information to better comprehend this problem and has a deep understanding of the apartment’s support system.
Recent Posts
Can You Create a Poll in Microsoft Outlook Email? Here's How!
Do you want to get feedback from your contacts quickly and efficiently? If so, then creating a poll in Microsoft Outlook email is the perfect solution! Polls are a great way to quickly collect data...
How To Fix Microsoft Outlook Cannot Connect To Server? (Here's The Solution)
Have you ever experienced the frustration of not being able to connect to your Microsoft Outlook server? It can be a major inconvenience when you need access to your emails, and it can be hard to...
How to Copy a PowerPoint to a New PowerPoint: A Step-by-Step Guide
Copying a PowerPoint to a new PowerPoint is a straightforward task. You simply need to open the original presentation, save it with a new name, and then make the desired changes to the new copy. By doing this, you’ll have two separate PowerPoint files: the original and the copy.
After completing this action, you will have two PowerPoint presentations. The original will remain unchanged, while the copied version can be edited and customized without affecting the original file.
Introduction
Have you ever found yourself needing to duplicate a PowerPoint presentation, perhaps to create a similar one for a different audience or to make significant changes without losing the original? Whatever the reason, it’s a common need in the world of presentations. Copying a PowerPoint to a new PowerPoint can save you time and effort, especially if the new presentation will have similar content or structure. It’s also a valuable skill for anyone who often uses PowerPoint for work, school, or personal projects.
By understanding how to copy a PowerPoint presentation, you can more efficiently create multiple versions of a presentation, experiment with design changes, or prepare multiple presentations for different purposes. This guide will walk you through the simple steps to duplicate your PowerPoint presentation, as well as highlight the advantages and considerations of doing so.
Step by Step Tutorial on How to Copy a PowerPoint to a New PowerPoint
This section will guide you through the process of copying an existing PowerPoint presentation to create a new one.
Step 1: Open the Original PowerPoint Presentation
Open the PowerPoint application and the presentation you want to copy.
By opening the original presentation, you can ensure that all the content you want to duplicate is readily accessible before creating a copy.
Step 2: Save the Presentation with a New Name
Go to ‘File’ > ‘Save As’ and choose a new name and location for your copied presentation.
Saving the original presentation with a new name creates a separate file, allowing you to maintain the original while working on the new copy.
Step 3: Make the Desired Changes to the New Copy
Edit the newly copied presentation to suit your needs, whether it’s changing the content, design, or layout.
Once you’ve created the copy, you can freely make changes without worrying about altering the original presentation. This is the step where you can personalize the new PowerPoint for its intended purpose.
Additional Information
When you’re working on copying a PowerPoint to a new PowerPoint, there are some additional tips and tricks that can further streamline the process. For instance, if you’re looking to copy only specific slides rather than the entire presentation, you can use the ‘Duplicate Slide’ feature. This is particularly useful if the new presentation will only share certain parts with the original.
Another helpful tip is to use the ‘Slide Master’ to ensure that any changes you make to design elements like fonts, colors, and backgrounds are applied consistently across all slides in the new presentation. And remember, always double-check which file you’re working on to avoid accidentally overwriting your original presentation.
- Open the original PowerPoint presentation.
- Save the presentation with a new name.
- Make the desired changes to the new copy.
Frequently Asked Questions
Can i copy only selected slides from a powerpoint presentation.
Yes, you can select specific slides and use the ‘Duplicate Slide’ option to copy them into a new presentation.
Will copying a PowerPoint presentation also copy the animations and transitions?
Yes, copying a presentation preserves all elements, including animations, transitions, and media.
How do I ensure that I don’t overwrite the original presentation?
Always double-check the file name and save the copy with a distinct name in a different location.
Can I copy a PowerPoint presentation to a different version of PowerPoint?
Generally, yes, but some features may not be compatible if you’re moving between significantly different versions.
Is it possible to automate the copying process for multiple presentations?
While there’s no built-in feature for this, you could use macros or third-party tools to automate the copying process.
Copying a PowerPoint to a new PowerPoint is a useful skill that can greatly enhance your productivity and presentation management. Whether it’s for backing up your work, creating variations of a presentation, or simply experimenting with new ideas, understanding how to effectively duplicate your PowerPoint files is an asset.
With the simple steps outlined in this guide, you can confidently tackle this task and keep your presentations organized and efficient. Always remember to manage your files carefully to prevent confusion and to ensure that your original work remains intact. Now that you’ve learned how to copy a PowerPoint, you’re ready to tackle your next presentation project with ease.

Matthew Burleigh has been writing tech tutorials since 2008. His writing has appeared on dozens of different websites and been read over 50 million times.
After receiving his Bachelor’s and Master’s degrees in Computer Science he spent several years working in IT management for small businesses. However, he now works full time writing content online and creating websites.
His main writing topics include iPhones, Microsoft Office, Google Apps, Android, and Photoshop, but he has also written about many other tech topics as well.
Read his full bio here.
Share this:
Join our free newsletter.
Featured guides and deals
You may opt out at any time. Read our Privacy Policy
Related posts:
- How to Save Powerpoint as PDF with Notes
- How to Duplicate a Picture on an iPhone
- Can I Convert My Powerpoint to Google Slides?
- How to Make a Powerpoint Slide Vertical in Powerpoint 2013
- How to Duplicate a Slide in Powerpoint 2010
- How to Change Hyperlink Color in Powerpoint 2010 (An Easy 5 Step Guide)
- How to Loop a Slideshow on Powerpoint 2013
- Can You Save a Powerpoint as a Video in Powerpoint 2013?
- How to Insert Slides from Another Presentation in Powerpoint 2010
- How to Convert a PowerPoint to Word and Edit with Ease
- How to Find and Delete Duplicate Files on a MacBook Air
- How to Start PowerPoint: A Step-by-Step Guide for Beginners
- How to Set Time for Slides in Powerpoint
- How to End Powerpoint on Last Slide in Powerpoint 2010
- How to Change Line Spacing in Powerpoint for Every Slide at Once
- How to Put Embedded Youtube Video in Powerpoint 2010
- How to Make a Powerpoint Into a Video
- Can I Create a Timeline in Powerpoint?
- How to Check Word Count on Powerpoint 2010
- How to Add Page Numbers in Powerpoint 2010
- Insider Reviews
- Tech Buying Guides
- Personal Finance
- Insider Explainers
- Sustainability
- United States
- International
- Deutschland & Österreich
- South Africa

- Home ›
- tech ›
- how-to »
How to copy or duplicate a PowerPoint slide and put it anywhere in your slideshow

- You can copy a slide in the PowerPoint app or online version, and then paste it somewhere else in the slideshow.
- To copy a PowerPoint slide, you just need to right-click it, or open the "Home" menu.
- You can also use PowerPoint's "Duplicate" function, which will create a copy of a slide automatically, without having to paste anything.
Copying a slide in PowerPoint takes only a few clicks, whether you choose to do so in a web browser or in the app.
Additionally, you can also choose to directly duplicate a slide, which eliminates the need to click again to paste. The "Duplicate" option will create a copy of the slide, right behind its original.

Here's how to do copy or duplicate in either version of PowerPoint on your Mac or PC .
Check out the products mentioned in this article:
Apple macbook pro (from $1,299.00 at apple), acer chromebook 15 (from $179.99 at walmart), how to copy a slide in powerpoint 's online app.
1. Open Office365 in any internet browser, and log into your account.
2. Open a PowerPoint presentation by selecting one from the "Recent" list or other tabs. You can also click "Start new" below the plus sign icon, followed by "Presentation." Additonally, you can click "PowerPoint" from the options at the top.
3. Once your presentation is open, you can right-click on any slide in the left sidebar, and then select "Copy." You can select multiple slides at once by holding Copy or Command on your keyboard as you click.

5. You can also select "Duplicate Slide" instead of "Copy." This eliminates the need to right-click again to paste, as it automatically creates a copy of the slide or slides selected. Slides will immediately appear in order, directly behind their originals.
You can also select slides, and then find the Copy, Paste, and Duplicate options by clicking the clipboard icon at the top of the screen. If you don't see it, make sure you're in the "Home" tab.
How to copy a slide in the PowerPoint desktop app
1. Open a PowerPoint presentation on your Mac or PC.
2. Right-click on a slide in the left sidebar to copy it. You can also press Command + C or Ctrl + C on your keyboard. If you hold down Command or Ctrl, you can click multiple slides to select them all at once.
3. Right-click in the space between slides or the blank area at the end of a presentation to paste. You can also use Command + V or Ctrl + V.
4. When you right-click on the original slide to be copied, you can also choose the "Duplicate Slide" option instead. The keyboard shortcut for this is Shift + Command + D, or Shift + Ctrl + D. This eliminates the need to right-click again to paste, and instead immediately creates a copy directly behind the selected slide.
5. You can also access any of these options on the far left side of the "Home" tab. Click the page icon to copy the selected slide, or click the small arrow next to it to choose between "Copy" or "Duplicate." The "Paste" clipboard icon appears next to these options.
Related coverage from Tech Reference :
How to download and access microsoft powerpoint on your mac computer, how to embed a youtube video into your microsoft powerpoint presentations using a mac or pc, how to convert google slides to a powerpoint presentation in 4 easy steps, how to convert a powerpoint to google slides in 2 different ways, how to change the background on your google slides presentation.

- Current Location in Google
- Hide Whatsapp Messages
- Phone is hacked or not
- Whatsapp Deleted Messages
- Download photos from Whatsapp
- Instagram Messages
- How to lock facebook profile
- Unfollowed on Instagram
- Best printers for Home
- Best Mixer Grinder
- Best wired Earphones
- Best 43 Inch TV in India
- Best Wi Fi Routers
- Best Vacuum Cleaner
- Best Home Theatre in India
- Smart Watch under 5000
- Best Laptops for Education
- Best Laptop for Students

- Advertising
- Write for Us
- Privacy Policy
- Policy News
- Personal Finance News
- Mobile News
- Business News
- Ecommerce News
- Startups News
- Stock Market News
- Finance News
- Entertainment News
- Economy News
- Careers News
- International News
- Politics News
- Education News
- Advertising News
- Health News
- Science News
- Retail News
- Sports News
- Personalities News
- Corporates News
- Environment News
- Top 10 Richest people
- Cibil Score vs Cibil Report
- Top 10 Largest Economies
- Lucky Color for 2023
- How to check pan and Aadhaar
- Deleted Whatsapp Messages
- How to restore deleted messages
- 10 types of Drinks
- Instagram Sad Face Filter
- Unlimited Wifi Plans
- Recover Whatsapp Messages
- Google Meet
- Check Balance in SBI
- How to check Vodafone Balance
- Transfer Whatsapp Message
- NSE Bank Holidays
- Dual Whatsapp on Single phone
- Phone is hacked or Not
- How to Port Airtel to Jio
- Window 10 Screenshot
Copyright © 2024 . Times Internet Limited. All rights reserved.For reprint rights. Times Syndication Service.
How to Copy a PowerPoint to a New PowerPoint
- Small Business
- Setting Up a New Business
- Setting Up a New Business Basics
- ')" data-event="social share" data-info="Pinterest" aria-label="Share on Pinterest">
- ')" data-event="social share" data-info="Reddit" aria-label="Share on Reddit">
- ')" data-event="social share" data-info="Flipboard" aria-label="Share on Flipboard">
How to Pin Posts on Facebook Groups
How to set up usb printer on a hp thin client, how to change language in startup on windows 7.
- How to Switch the Keyboard Back to English & Arabic
- How to Terminate Google Chrome
Presentation expert Garr Reynolds says that great presentations have a "consistent visual theme throughout," but he cautions against using the stock themes and templates in PowerPoint because your audience has seen them before. You can, however, reuse themes from your own PowerPoint presentations. The simplest way to copy from an old slides show to a new one is to select the slides you want to, press "Ctrl-C" to copy, open a new PowerPoint file and press "Ctrl-V" to paste the slides in. You can also fine tune how slides are pasted in PowerPoint.
Launch the old PowerPoint presentation. Click the "View" tab and choose "Slide Sorter."
Click the first slide you want to copy, press "Shift" and click on the last slide. All the slides in between will be selected. Press "Ctrl-C" to copy the slides.
Click "File" and choose "New." Double-click "Blank Presentation."
Switch to the Slide Sorter view and press "Ctrl-V" to paste in the slides. To the bottom right of the last slide you pasted will be the Paste Options button. You can click on it to see the options or tap "Ctrl" on the keyboard.
Select "Use Destination Theme" if you want to merge the old PowerPoint slides into the new theme -- "Ctrl-H" on the keyboard. Choose "Keep Source Formatting" if you want the original PowerPoint theme brought into the new presentation -- "Ctrl-K" on the keyboard.
- Microsoft Office Support: Copy and Paste Your Slides
- Microsoft Office Support: File Formats that are Supported in PowerPoint 2010
- Microsoft Office Support: Features are Lost When You Open a Presentation Created in an Earlier Version of PowerPoint
- Garr Reynolds: Top Ten Slide Tips
- Microsoft Office Support: Compatibility Checker
- Create a template from your PowerPoint file so you can reuse the same theme. Click "File" and choose "Save As." Select "PowerPoint Template (.potx)" from the options, type a name for your template and click "Save."
- You can open older PowerPoint files in newer version of the software, but not all the features will be supported. PowerPoint 2010 will run PowerPoint 2003 and older files in compatibility mode.
- You can save the files in the new PPTX format to enable the newer features, but you may lose older data if you abandon the PPT file type. Use the Microsoft Office Compatibility Checker to find out the effects of changing a file (see link in Resources).
James T Wood is a teacher, blogger and author. Since 2009 he has published two books and numerous articles, both online and in print. His work experience has spanned the computer world, from sales and support to training and repair. He is also an accomplished public speaker and PowerPoint presenter.
Related Articles
How to move pictures in openoffice, how to rename subfolders in zip files, how to go back to the regular tumblr themes, how to change the monitor resolution on a pc, how to modify photo sizes in blogger, how to change where my browser downloads go, how to replace text in pdf files, how to switch blogs on tumblr, exporting a cell to another cell in excel, most popular.
- 1 How to Move Pictures in OpenOffice
- 2 How to Rename Subfolders in Zip Files
- 3 How to Go Back to the Regular Tumblr Themes
- 4 How to Change the Monitor Resolution on a PC
How to make a copy of a power point
Duplicate your PowerPoint presentation effortlessly with these simple steps to ensure your content's safety and versatility.
Sanskar Tiwari

Related Blogs
How to summarize blog posts text into visual slideshows, how to create concise presentations from lengthy articles: a step-by-step guide, how to quickly summarize meeting agendas for ppt presentations, how to group different objects together in google slides, how to convert selected text to capitals in google slides, how to convert pdf report to powerpoint presentation, how to convert pdf lecture notes to powerpoint, how to extract webinar highlights from youtube to powerpoint for quick references, how to create language learning materials by converting youtube videos to powerpoint slides, stunning presentations in seconds with ai.
Install MagicSlides app now and start creating beautiful presentations. It's free!

~1M Installs, rated 4.5/5 ⭐️ by 424 reviews
Free All-in-One Office Suite with PDF Editor
Edit Word, Excel, and PPT for FREE.
Read, edit, and convert PDFs with the powerful PDF toolkit.
Microsoft-like interface, easy to use.
Windows • MacOS • Linux • iOS • Android

- Articles of PPT
3 Ultimate Ways to Copy Slides in PowerPoint (Step-by-Step)
As a PowerPoint User, you want to make your work as easy as possible. Users often want to reuse specific slides or sections of content from one presentation to another, saving time and effort in creating new material. How do we go about copying a slide in PowerPoint? This guide will inform you all you need to know about copying PowerPoint slides to another ppt template.
Why Is It Useful to Copy Slides in PowerPoint?
You need to know how to Copy a slide in PowerPoint without losing formatting
slides because;
One, it saves time by swiftly duplicating content, avoiding the need to recreate slides from scratch.
Secondly, it ensures consistency by maintaining the same theme across presentations, preserving a cohesive visual identity.
It also allows users to leverage the design work they've invested in a previous presentation, promoting efficiency and reducing the effort required to create new slides.
In essence, copying slides in PowerPoint streamlines the presentation creation process, saves time, and upholds a uniform theme, making it a valuable tool for presenters.
3 Methods to Copy Slides in PowerPoint
There are 3 main methods to copy PowerPoint slides to another PowerPoint template.
Method 1: Click, Drag, and Drop (Easy)
Step 1: Open both presentations on the same screen in the original presentation. In the "Slides pane," select the slide's thumbnail you want to copy.
Step 2: Drag the selected thumbnail to the destination PowerPoint slides pane, positioning it where you want in the presentation—whether as the first slide, in the middle, or at the end. The dragged thumbnail will adopt the format of the destination presentation.
Comment: This method offers slide placement flexibility and maintains the copied slide's visual consistency within the new presentation.
Method 2: Copy- Paste
Step 1: Open the original and destination PowerPoint presentations on your computer.
Step 2: In the original presentation, click the "View" option on the PowerPoint ribbon and select "Arrange All" under the "Window" group.

Step 3: Navigate to the desired slide in the slides pane. Right-click the slide thumbnail, then select "Copy" from the menu.
Step 4: Open the destination PowerPoint presentation and choose where to insert the slide. This can be between existing slides or at the end. Right-click on the chosen area and select one of the paste options: "Use Destination Theme," "Use Source Formatting," or "As a Picture."
Comment: This method allows precise slide placement and formatting control when copying slides between presentations.
Method 3: Reuse Slides tool
To use the Reuse Slides tool in PowerPoint 365, follow these steps:
Step 1: Go to the Home or Insert tab in the Slides group, click the New Slide arrow, and select the Reuse Slides.

Step 2: In the Reuse Slides box (usually on the right side), you can do either of the following:
a. Click the Browse button or Open a PowerPoint File link and select the presentation file containing the slides you want to use.
b. If you've recently opened the presentation, expand the list in the Insert slide from the field and choose the presentation from the list, or click the presentation file name in the Open section of the Reuse Slides pane.
Step 3: The Reuse Slides pane displays thumbnails of available slides from the selected presentation. Click on the thumbnail of each slide you want to insert into your current presentation.
Comment: This process simplifies importing slides from another presentation, offering the flexibility to apply the new theme automatically or retain the source formatting, depending on your needs.
Each of these three methods for copying slides in PowerPoint offers varying user experiences:
The click, Drag, and Drop method is straightforward and user-friendly, ideal for those who prefer a visual and intuitive approach. It provides flexibility in slide placement and preserves the visual consistency of the copied slide. It's quick and efficient for simple tasks.
The Copy-Paste method requires more technical knowledge but offers precise control over slide placement and formatting.
Reuse Slides Tool simplifies the process by offering a user-friendly interface and the option to apply a new theme or retain source formatting. It's convenient for users who want a guided, streamlined experience.
Copying Slides in PowerPoint: Desktop and Online Methods for Mac and Windows
Method 1: powerpoint desktop app.
To copy a slide in the PowerPoint desktop app:
Step 1 : Open your PowerPoint presentation.
Step 2: Right-click on the slide you want to copy in the left sidebar. You can also use Command + C (Mac) or Ctrl + C (Windows) to copy and select multiple slides by holding down Command or Ctrl.
Step 3: Right-click between slides or in a blank area at the end of your presentation to paste, or use Command + V (Mac) or Ctrl + V (Windows).
Step 4: Alternatively, right-click on the original slide to be copied, and choose "Duplicate Slide" or use Shift + Command + D (Mac) or Shift + Ctrl + D (Windows) to create a copy behind the selected slide immediately.
Method 2: PowerPoint's Online App
To copy a slide in PowerPoint's online app:
Step 1: Log into your Office365 account in a web browser.
Step 2: Open a PowerPoint presentation from your recent files or create a new one.
Step 3: Right-click on the slide you want to copy in the left sidebar and select "Copy." While clicking, you can select multiple slides by holding down the Ctrl key (Windows) or Command key (Mac).
Step 4: Right-click in the sidebar again and choose "Paste." Pasting in the gray space at the bottom adds the copied slide to the end of your presentation while pasting between two slides inserts it there.
How to Copy Slides in Powerpoint with WPS Office?
What Is WPS Office and Why Choose it?
WPS Office offers essential office tools for free, including Writer, Spreadsheet, Presentation, and PDF editing. It provides a powerful PDF toolkit, often premium in other software.
The platform offers a rich template store for Word, PPT, and Excel, and it's compatible across Windows, MAC, Linux, Android, and iOS, ensuring seamless synchronization.
It's a cost-effective choice with numerous free features, offering more value than Microsoft Office.
How to Copy Slides in WPS Presentation?
Here are the steps to copy a slide in the WPS Presentation:
https://res-academy.cache.wpscdn.com/images/c33e62a62ed5a6869211952860b6fe15.gif
Step 1: Open your presentation in WPS Presentation.
Step 2: Choose the specific slide you want to copy.
Step 3: Right-click and select "Copy" or use Ctrl+C as a keyboard shortcut.
Step 4: Click on the location where you want to paste the slide.
Step 5: Right-click again and choose "Paste" or use Ctrl+V as a shortcut. Your slide is now copied!
Use Word, Excel, and PPT for FREE, No Ads.
Edit PDF files with the powerful PDF toolkit.
Microsoft-like interface. Easy to learn. 100% Compatibility.
Boost your productivity with WPS's abundant free Word, Excel, PPT, and CV templates.
Why can't I copy and paste slides in PowerPoint?
If you encounter copy-and-paste errors in PowerPoint for the web due to clipboard access issues, follow these steps:
Allow Global Access as in the steps below.
Step 1: In the Chrome browser, open Settings.
Step 2: Select Security & Privacy > Site Settings > Permissions > Clipboard.
Step 3: Choose "Allow."
Allow Domain-Specific
This step is unnecessary if you've enabled global clipboard access. To do it;
Step 1: Access the browser settings for the clipboard (chrome://settings/content/clipboard).
Step 2: Ensure the Office.com domain is listed in the "Allowed to see your clipboard."
What is the difference between copying and duplicating slides?
Duplicating a Slide creates a copy of a slide within the same location or presentation, resulting in two identical slides in the same file.
Below are the steps required;
Step 1: Right-click on the slide you want to duplicate.
Step 2: Select "Duplicate Slide"
Step 3: The duplicate slide is created within the same presentation.
Copying a Slide creates a copy of it and allows you to place it in a different location or presentation you specify.
The steps involved include;
Step 1 : Right-click on the slide you want to copy.
Step 2: Select "Copy."
Step 3: Navigate to the desired location or presentation.
Step 4: Right-click in that location and select "Paste" to create a copy of the slide.
This article provides a comprehensive guide on three methods to copy slides in PowerPoint, highlighting their advantages. It explains the difference between duplicating and copying slides and offers troubleshooting tips for PowerPoint errors. Notably, it emphasizes the benefits of using WPS Office, a free alternative with powerful features and cross-platform compatibility, making it a cost-effective choice for users.
- 1. How to Print Powerpoint Slides with Notes Multiple Per Page: A Step-by-Step Guide
- 2. How to Insert Slides from Another PowerPoint A Step-by-Step Guide
- 3. Google Slides Login Ultimate Guide in 2024
- 4. How to download slides without microsoft powerpoint - step by step guide
- 5. How to Export PowerPoint to Google Slides [Step-by-Step Tutorial]
- 6. How to Select Multiple Slides in Google Slides (Easy & Fast)

15 years of office industry experience, tech lover and copywriter. Follow me for product reviews, comparisons, and recommendations for new apps and software.

How To Make A Copy Of A Powerpoint
To make a copy of a Powerpoint presentation, you can simply use the “Save As” option and choose a new file name or location.

- Last Updated: February 11, 2024
Creating a copy of a PowerPoint presentation is a handy technique that allows you to make edits or modifications while preserving the integrity of the original file. Whether you want to experiment with different designs or customize content for a specific audience, having a duplicated version of your presentation can save you time and effort. In this blog post, we will guide you through the step-by-step process of making a copy of a PowerPoint presentation, ensuring you have the flexibility to tailor your presentations to suit your needs without compromising the original content. So, if you’re ready to enhance your PowerPoint workflow and make the most out of your presentations, let’s dive in!
How To Make A Copy Of A Powerpoint: Step-by-Step
Step 1: open existing powerpoint, step 2: access ‘file’ menu, step 3: select ‘save as’, step 4: choose destination, step 5: name the copy, step 6: save the copy, step 7: verification.
To copy a PowerPoint presentation, open the PowerPoint application on your computer, select ‘Open’, and navigate to the desired presentation.
Once you have the PowerPoint application open, locate the ‘File’ option in the upper left-hand corner of the screen and click on it to access various functions and settings for your presentation.
In the drop-down menu under ‘File’, select ‘Save As’, which will prompt a new window to appear for saving purposes.
In the new window, navigate to the location on your computer where you want to save the copy by choosing the desired folder or directory.
In the ‘File name’ box, simply enter the desired name for your copied PowerPoint presentation. This will help you easily identify and locate the file, ensuring a seamless organization and accessibility for your work.
Once you have assigned a name to your copied PowerPoint presentation, simply click the ‘Save’ button to store the duplicate file in the desired location determined in Step 4.
After saving the new file, double-check its accuracy by opening it from the saved location. Ensure that all the content, formatting, and elements in the new PowerPoint match those of the original file.
In conclusion, making a copy of a PowerPoint presentation is a simple and essential skill that every tech-savvy individual should possess. Whether you want to create a backup file, share the presentation with someone else, or make edits without affecting the original version, having the ability to duplicate your PowerPoint slides is invaluable.
With the methods outlined in this blog post, you can effortlessly create copies using built-in PowerPoint features, such as the “Save As” option or by duplicating slides within the presentation itself. Additionally, you learned about the advantages of using cloud storage services like Google Drive and Dropbox to store and share your presentations. These platforms not only provide an excellent backup solution but also enable collaboration and easy access across multiple devices.
Remember, making a copy of your PowerPoint presentation ensures that you can always revert to a previous version if anything goes wrong, and it allows you to experiment and make changes without fear of losing important content. So, take advantage of these techniques and make duplicating your PowerPoint presentations a regular part of your workflow.
Now that you know how to make copies of your PowerPoint presentations, go ahead and explore the possibilities that come with having multiple versions. Seamlessly share and collaborate on projects, maintain backups of your work, and make edits without any worries. Happy duplicating!
Table of Contents
How we make money.
We are an independent marketing platform and monetize our content exclusively through integrated advertising. We do not cooperate with any providers and do not include any affiliate links.
Our Categories
Apple Devices and Services
Office and Productivity Tools
Social Media Platforms
Mobile and PC Operating Systems
Editorial Process

Contribute to the Microsoft 365 and Office forum! Click HERE to learn more 💡
March 14, 2024
Contribute to the Microsoft 365 and Office forum!
Click HERE to learn more 💡
Top Contributors in PowerPoint: Steve Rindsberg - Jim_ Gordon - John Korchok ✅
March 11, 2024
Top Contributors in PowerPoint:
Steve Rindsberg - Jim_ Gordon - John Korchok ✅
- Search the community and support articles
- Microsoft 365 and Office
- Search Community member
Ask a new question
Importing Slides from Desktop to PowerPoint Online
Report abuse.
- Microsoft Agent |
Hi Nkee1229,
You may try the following steps:
1.In desktop version of PowerPoint, create a new file which contains the slides you want to reuse.
2.Go to OneDrive for Business in the cloud, click Upload>File in the top menu to upload the PowerPoint file to OneDrive for Business.
3.Open PowerPoint online>click Open from OneDrive for Business button as below, choose and open the file you have uploaded in OneDrive for Business.

4.Click Open in PowerPoint Online , then you can edit the file which contains the slides you need in PowerPoint online.

15 people found this reply helpful
Was this reply helpful? Yes No
Sorry this didn't help.
Great! Thanks for your feedback.
How satisfied are you with this reply?
Thanks for your feedback, it helps us improve the site.
Thanks for your feedback.
Replies (1)
Question info.
- Norsk Bokmål
- Ελληνικά
- Русский
- עברית
- العربية
- ไทย
- 한국어
- 中文(简体)
- 中文(繁體)
- 日本語
How to share your Microsoft PowerPoint presentation on a Mac, PC, or web browser
- It's easy to share a PowerPoint presentation on your Mac or PC app.
- You can also share a presentation if you use the online version of PowerPoint.
- Sharing a presentation can help you collaborate with friends or coworkers.
- Visit Business Insider's Tech Reference library for more stories .
When creating Microsoft PowerPoint presentations for work or school, it's often necessary to collaborate with others on your projects.
Thankfully, it's easy to share a PowerPoint presentation no matter what version you use. The process looks fairly similar on both Mac and PC programs, as well as on the online version that can be accessed from any web browser. The online option is helpful if you don't have the Microsoft Office program downloaded to your desktop.
For all of these options, you can add a collaborator (which operates similarly to sharing Google Slides ) or opt to send your file as a presentation or PDF via email. There are also alternative methods, such as sending via social media.
Here's how to share a presentation.
Check out the products mentioned in this article:
Apple macbook pro (from $1,299.00 at apple), acer chromebook 15 (from $179.99 at walmart), microsoft office (from $149.99 at best buy), samsung chromebook (from $269.00 at amazon), how to share a powerpoint presentation on a pc.
Sharing a presentation on the PC version of PowerPoint should look similar on most computer types. The following steps and accompanying photos detail the process on a Samsung Chromebook.
1. Open the PowerPoint presentation you wish to share on your PC.
2. Click the "Share" symbol in the upper right hand corner of the screen. This should give you the option to share either the full document or just the current slide.
- If you prefer to add a collaborator instead (similar to Google Slides functions), you will need to click the orange button to save a copy of the file to your OneDrive.
3. Choose how you'd like to share the document or slide as an attachment. You can choose to send an email via Outlook or as a message via Zoom, for example.
Additionally, when you first launch the program, you can also find a "Share" tab on the left hand side. This will provide you with the same options for sharing a file.
How to share a PowerPoint Presentation on a Mac
1. Open the PowerPoint presentation on your Mac desktop or laptop.
2. Click the "File" tab in the top left corner.
3. Select "Share" from the dropdown menu. This will grant you the option to either send or copy a link to share, send the file as a presentation or PDF, or manage access to a shared file. Select whichever option you'd like and follow the directions to add contact information.
- If you wish to manage access and add collaborators, you will have to make sure the file has been uploaded to your OneDrive before proceeding. (If it hasn't, PowerPoint should prompt you to do so at this time.)
4. Sending the file as an email is the most common choice. Selecting this option will automatically open a new draft with the file attached. (Be sure to select "Send PDF" if you'd prefer it to send as a PDF file instead of as a presentation.) Add an address, subject, and body text before sending.
You can also share a presentation by clicking the "Share" button in the upper right hand corner. (This is similar to how it appears on a PC.)
This option is extremely helpful as it provides all of your possible options in a single pop-up. Enter a name or email address (along with an optional message) to send the document.
You can change the permissions settings at the top before clicking "Send," "Copy Link," or "Mail" to share your work. Click "More Apps" to browse additional options, such as sending via social media or text message. Lastly, you can select "Send a Copy" to send as a traditional attachment.
How to share a PowerPoint presentation on a web browser
You can access PowerPoint online on either a Mac or PC, as long as you have your login information for Microsoft Office. Regardless of what browser you prefer to use, the steps to share a presentation are exactly the same.
1. Log in to your Microsoft Office account on your preferred web browser and open the presentation you wish to share.
2. Click the "Share" button in the upper right hand corner of the screen.
3. This will open a pop-up in the center of the page. Enter a name or email address (along with an optional message) to send the document. You can change the permissions settings at the top before sending the link by clicking the "Send" or "Copy Link" option. (Those who have followed these steps on a Mac will recognize that it looks similar.)
Additionally, when you open the main menu, you can click the "Share" tab on the left hand side. This will allow you to invite others to edit the presentation or embed the presentation for a blog or website.
If you are looking to embed online, this will open a different pop-up that will generate a code for you. Select the dimensions desired and then paste the text as needed. Click the "Close" or "X" buttons to minimize the window.
Related coverage from Tech Reference :
How to embed a youtube video into your microsoft powerpoint presentations using a mac or pc, how to convert a powerpoint to google slides in two different ways, how to convert google slides to a powerpoint presentation in 4 easy steps , how to copy or duplicate a powerpoint slide and put it anywhere in your slideshow, how to download and access microsoft powerpoint on your mac computer.
Insider Inc. receives a commission when you buy through our links.
Watch: A diehard Mac user switches to PC
- Main content
- Tech Deals at Target Right Now!
- The Electric Grill You Need This Year
How to Copy a PowerPoint Design Template to Another Presentation
It's quick and easy to copy over a design template
- Brock University
What to Know
- In the source presentation, select View > Slide Master . In the Slide pane, right-click the Slide Master and select Copy .
- Go to View > Switch Windows and choose the second presentation. Go to View > Slide Master . Right-click the Slide pane and select Paste .
- Choose Use Destination Theme (keeps colors, fonts, and effects) or Keep Source Formatting (copies the source's colors, fonts, effects).
This article explains how to copy a PowerPoint design template over to another presentation. Instructions apply to PowerPoint 2019, PowerPoint 2016, PowerPoint 2013, and PowerPoint for Microsoft 365.
How to Copy a Presentation's Design Template
It's often quicker to copy a design template from a presentation than to find it in the list of PowerPoint templates.
Go to View in the presentation that contains the design template you want to copy and select Slide Master .
Right-click the Slide Master in the Slide pane on the left side of the screen and select Copy .
The Slide Master is the large thumbnail image at the top of the Slide pane. Some presentations contain more than one slide master.
Go to View , select Switch Windows , and choose the presentation you want to paste the Slide Master into.
If you don't see the other PowerPoint presentation on this list, it means that the other file isn't open. Open it now and return to this step to select it from the list.
In the second presentation, go to View and select Slide Master to open the Slide Master .
To insert the Slide Master from the other presentation, right-click on the Slide pane to the left, select Paste , and do one of the following:
- Choose Use Destination Theme to keep the theme colors, fonts, and effects of the presentation you are pasting to.
- Choose Keep Source Formatting to copy the theme colors, fonts, and effects of the template you are copying from.
Select Close Master View .
Changes made to individual slides in the original presentation, such as font styles, do not change the design template of that presentation. Therefore, graphic objects or font changes added to individual slides do not copy over to a new presentation.
To copy PowerPoint slides to another presentation , right-click the thumbnail of the slide you want to copy and choose Copy . Right-click a blank area of the Slides pane where you want to place it and choose one of the pasting options.
To save a copy of a PowerPoint presentation on your computer, go to the File tab and select Download As > Download a Copy . Select Download to continue.
To embed YouTube videos in PowerPoint , select Share > Embed . Select the HTML code and choose Copy . In your PowerPoint slide, select Insert > Video > Insert Video From Website . In the dialog box, right-click the blank area and choose Paste > Insert .
Get the Latest Tech News Delivered Every Day
- Copy Slides to Another PowerPoint Presentation
- Use This PowerPoint Template for a Multiple Choice Quiz
- How to Use PowerPoint Slide Master Layouts
- How to Add an Excel Chart to a PowerPoint Presentation
- How to Merge PowerPoints
- 10 Free PowerPoint Game Templates
- Change the Default Font in PowerPoint Text Boxes
- Replacing All the Fonts in a Presentation at One Time
- Definition and Uses for a PowerPoint Design Template
- PowerPoint Master Slide
- Create a Default Presentation Template in PowerPoint
- What Is a PowerPoint Placeholder?
- How to Increase PowerPoint Slide Number Size
- Add, Delete or Change the Order of PowerPoint Slides
- How to Use Canva Templates
- The 10 Most Common PowerPoint Terms
Critical PowerPoint Shortcuts – Claim Your FREE Training Module and Get Your Time Back!
How to Make a PowerPoint Presentation (Step-by-Step)
- PowerPoint Tutorials
- Presentation Design
- January 22, 2024
In this beginner’s guide, you will learn step-by-step how to make a PowerPoint presentation from scratch.
While PowerPoint is designed to be intuitive and accessible, it can be overwhelming if you’ve never gotten any training on it before. As you progress through this guide, you’ll will learn how to move from blank slides to PowerPoint slides that look like these.

Table of Contents
Additionally, as you create your presentation, you’ll also learn tricks for working more efficiently in PowerPoint, including how to:
- Change the slide order
- Reset your layout
- Change the slide dimensions
- Use PowerPoint Designer
- Format text
- Format objects
- Play a presentation (slide show)
With this knowledge under your belt, you’ll be ready to start creating PowerPoint presentations. Moreover, you’ll have taken your skills from beginner to proficient in no time at all. I will also include links to more advanced PowerPoint topics.
Ready to start learning how to make a PowerPoint presentation?
Take your PPT skills to the next level
Start with a blank presentation.
Note: Before you open PowerPoint and start creating your presentation, make sure you’ve collected your thoughts. If you’re going to make your slides compelling, you need to spend some time brainstorming.
For help with this, see our article with tips for nailing your business presentation here .
The first thing you’ll need to do is to open PowerPoint. When you do, you are shown the Start Menu , with the Home tab open.
This is where you can choose either a blank theme (1) or a pre-built theme (2). You can also choose to open an existing presentation (3).
For now, go ahead and click on the Blank Presentation (1) thumbnail.

Doing so launches a brand new and blank presentation for you to work with. Before you start adding content to your presentation, let’s first familiarize ourselves with the PowerPoint interface.
The PowerPoint interface

Here is how the program is laid out:
- The Application Header
- The Ribbon (including the Ribbon tabs)
- The Quick Access Toolbar (either above or below the Ribbon)
- The Slides Pane (slide thumbnails)
The Slide Area
The notes pane.
- The Status Bar (including the View Buttons)
Each one of these areas has options for viewing certain parts of the PowerPoint environment and formatting your presentation.
Below are the important things to know about certain elements of the PowerPoint interface.
The PowerPoint Ribbon

The Ribbon is contextual. That means that it will adapt to what you’re doing in the program.
For example, the Font, Paragraph and Drawing options are greyed out until you select something that has text in it, as in the example below (A).

Furthermore, if you start manipulating certain objects, the Ribbon will display additional tabs, as seen above (B), with more commands and features to help you work with those objects. The following objects have their own additional tabs in the Ribbon which are hidden until you select them:
- Online Pictures
- Screenshots
- Screen Recording
The Slides Pane

This is where you can preview and rearrange all the slides in your presentation.
Right-clicking on a slide in the pane gives you additional options on the slide level that you won’t find on the Ribbon, such as Duplicate Slide , Delete Slide , and Hide Slide .

In addition, you can add sections to your presentation by right-clicking anywhere in this Pane and selecting Add Section . Sections are extremely helpful in large presentations, as they allow you to organize your slides into chunks that you can then rearrange, print or display differently from other slides.

The Slide Area (A) is where you will build out your slides. Anything within the bounds of this area will be visible when you present or print your presentation.
Anything outside of this area (B) will be hidden from view. This means that you can place things here, such as instructions for each slide, without worrying about them being shown to your audience.

The Notes Pane is the space beneath the Slide Area where you can type in the speaker notes for each slide. It’s designed as a fast way to add and edit your slides’ talking points.
To expand your knowledge and learn more about adding, printing, and exporting your PowerPoint speaker notes, read our guide here .
Your speaker notes are visible when you print your slides using the Notes Pages option and when you use the Presenter View . To expand your knowledge and learn the ins and outs of using the Presenter View , read our guide here .

You can resize the Notes Pane by clicking on its edge and dragging it up or down (A). You can also minimize or reopen it by clicking on the Notes button in the Status Bar (B).
Note: Not all text formatting displays in the Notes Pane, even though it will show up when printing your speaker notes. To learn more about printing PowerPoint with notes, read our guide here .
Now that you have a basic grasp of the PowerPoint interface at your disposal, it’s time to make your presentation.
Adding Content to Your PowerPoint Presentation
Notice that in the Slide Area , there are two rectangles with dotted outlines. These are called Placeholders and they’re set on the template in the Slide Master View .
To expand your knowledge and learn how to create a PowerPoint template of your own (which is no small task), read our guide here .

As the prompt text suggests, you can click into each placeholder and start typing text. These types of placeholder prompts are customizable too. That means that if you are using a company template, it might say something different, but the functionality is the same.

Note: For the purposes of this example, I will create a presentation based on the content in the Starbucks 2018 Global Social Impact Report, which is available to the public on their website.
If you type in more text than there is room for, PowerPoint will automatically reduce its font size. You can stop this behavior by clicking on the Autofit Options icon to the left of the placeholder and selecting Stop Fitting Text to this Placeholder .
Next, you can make formatting adjustments to your text by selecting the commands in the Font area and the Paragraph area of the Home tab of the Ribbon.

The Reset Command: If you make any changes to your title and decide you want to go back to how it was originally, you can use the Reset button up in the Home tab .

Insert More Slides into Your Presentation
Now that you have your title slide filled in, it’s time to add more slides. To do that, simply go up to the Home tab and click on New Slide . This inserts a new slide in your presentation right after the one you were on.

You can alternatively hit Ctrl+M on your keyboard to insert a new blank slide in PowerPoint. To learn more about this shortcut, see my guide on using Ctrl+M in PowerPoint .
Instead of clicking the New Slide command, you can also open the New Slide dropdown to see all the slide layouts in your PowerPoint template. Depending on who created your template, your layouts in this dropdown can be radically different.

If you insert a layout and later want to change it to a different layout, you can use the Layout dropdown instead of the New Slide dropdown.
After inserting a few different slide layouts, your presentation might look like the following picture. Don’t worry that it looks blank, next we will start adding content to your presentation.

If you want to follow along exactly with me, your five slides should be as follows:
- Title Slide
- Title and Content
- Section Header
- Two Content
- Picture with Caption
Adding Content to Your Slides
Now let’s go into each slide and start adding our content. You’ll notice some new types of placeholders.

On slide 2 we have a Content Placeholder , which allows you to add any kind of content. That includes:
- A SmartArt graphic,
- A 3D object,
- A picture from the web,
- Or an icon.
To insert text, simply type it in or hit Ctrl+C to Copy and Ctrl+V to Paste from elsewhere. To insert any of the other objects, click on the appropriate icon and follow the steps to insert it.
For my example, I’ll simply type in some text as you can see in the picture below.

Slides 3 and 4 only have text placeholders, so I’ll go ahead and add in my text into each one.

On slide 5 we have a Picture Placeholder . That means that the only elements that can go into it are:
- A picture from the web

To insert a picture into the picture placeholder, simply:
- Click on the Picture icon
- Find a picture on your computer and select it
- Click on Insert
Alternatively, if you already have a picture open somewhere else, you can select the placeholder and paste in (shortcut: Ctrl+V ) the picture. You can also drag the picture in from a file explorer window.

If you do not like the background of the picture you inserted onto your slide, you can remove the background here in PowerPoint. To see how to do this, read my guide here .
Placeholders aren’t the only way to add content to your slides. At any point, you can use the Insert tab to add elements to your slides.
You can use either the Title Only or the Blank slide layout to create slides for content that’s different. For example, a three-layout content slide, or a single picture divider slide, as shown below.

In the first example above, I’ve inserted 6 text boxes, 3 icons, and 3 circles to create this layout. In the second example, I’ve inserted a full-sized picture and then 2 shapes and 2 text boxes.
The Reset Command: Because these slides are built with shapes and text boxes (and not placeholders), hitting the Reset button up in the Home tab won’t do anything.
That is a good thing if you don’t want your layouts to adjust. However, it does mean that it falls on you to make sure everything is aligned and positioned correctly.
For more on how to add and manipulate the different objects in PowerPoint, check out our step-by-step articles here:
- Using graphics in PowerPoint
- Inserting icons onto slides
- Adding pictures to your PowerPoint
- How to embed a video in PowerPoint
- How to add music to your presentation
Using Designer to generate more layouts ideas
If you have Office 365, your version of PowerPoint comes with a new feature called Designer (or Design Ideas). This is a feature that generates slide layout ideas for you. The coolest thing about this feature is that it uses the content you already have.
To use Designer , simply navigate to the Design tab in your Ribbon, and click on Design Ideas .

NOTE: If the PowerPoint Designer is not working for you (it is grey out), see my troubleshooting guide for Designer .
Change the Overall Design (optional)
When you make a PowerPoint presentation, you’ll want to think about the overall design. Now that you have some content in your presentation, you can use the Design tab to change the look and feel of your slides.
For additional help thinking through the design of your presentation, read my guide here .
A. Picking your PowerPoint slide size
If you have PowerPoint 2013 or later, when you create a blank document in PowerPoint, you automatically start with a widescreen layout with a 16:9 ratio. These dimensions are suitable for most presentations as they match the screens of most computers and projectors.
However, you do have the option to change the dimensions.
For example, your presentation might not be presented, but instead converted into a PDF or printed and distributed. In that case, you can easily switch to the standard dimensions with a 4:3 ratio by selecting from the dropdown (A).
You can also choose a custom slide size or change the slide orientation from landscape to portrait in the Custom Slide Size dialog box (B).

To learn all about the different PowerPoint slide sizes, and some of the issues you will face when changing the slide size of a non-blank presentation, read my guide here .
B. Selecting a PowerPoint theme
The next thing you can do is change the theme of your presentation to a pre-built one. For a detailed explanation of what a PowerPoint theme is, and how to best use it, read my article here .
In the beginning of this tutorial, we started with a blank presentation, which uses the default Office theme as you can see in the picture below.

That gives you the most flexibility because it has a blank background and quite simple layouts that work for most presentations. However, it also means that it’s your responsibility to enhance the design.
If you’re comfortable with this, you can stay with the default theme or create your own custom theme ( read my guide here ). But if you would rather not have to think about design, then you can choose a pre-designed theme.
Microsoft provides 46 other pre-built themes, which include slide layouts, color variants and palettes, and fonts. Each one varies quite significantly, so make sure you look through them carefully.
To select a different theme, go to the Design tab in the Ribbon, and click on the dropdown arrow in the Themes section .

For this tutorial, let’s select the Frame theme and then choose the third Variant in the theme. Doing so changes the layout, colors, and fonts of your presentation.

Note: The theme dropdown area is also where you can import or save custom themes. To see my favorite places to find professional PowerPoint templates and themes (and recommendations for why I like them), read my guide here .
C. How to change a slide background in PowerPoint
The next thing to decide is how you want your background to look for the entire presentation. In the Variants area, you can see four background options.

For this example, we want our presentation to have a dark background, so let’s select Style 3. When you do so, you’ll notice that:
- The background color automatically changes across all slides
- The color of the text on most of the slides automatically changes to white so that it’s visible on the dark background
- The colors of the objects on slides #6 and #7 also adjust, in a way we may not want (we’ll likely have to make some manual adjustments to these slides)

Note: If you want to change the slide background for just that one slide, don’t left-click the style. Instead, right-click it and select Apply to Selected Slides .
After you change the background for your entire presentation, you can easily adjust the background for an individual slide.

Inside the Format Background pane, you can see you have the following options:
- Gradient fill
- Picture or texture fill
- Pattern fill
- Hide background
You can explore these options to find the PowerPoint background that best fits your presentation.
D. How to change your color palette in PowerPoint
Another thing you may want to adjust in your presentation, is the color scheme. In the picture below you can see the Theme Colors we are currently using for this presentation.

Each PowerPoint theme comes with its own color palette. By default, the Office theme includes the Office color palette. This affects the colors you are presented with when you format any element within your presentation (text, shapes, SmartArt, etc.).

The good news is that the colors here are easy to change. To switch color palettes, simply:
- Go to the Design tab in the Ribbon
- In the Variants area, click on the dropdown arrow and select Colors
- Select the color palette (or theme colors) you want
You can choose among the pre-built color palettes from Office, or you can customize them to create your own.
As you build your presentation, make sure you use the colors from your theme to format objects. That way, changing the color palette adjusts all the colors in your presentation automatically.
E. How to change your fonts in PowerPoint
Just as we changed the color palette, you can do the same for the fonts.

Each PowerPoint theme comes with its own font combination. By default, the Office theme includes the Office font pairing. This affects the fonts that are automatically assigned to all text in your presentation.

The good news is that the font pairings are easy to change. To switch your Theme Fonts, simply:
- Go to the Design tab in the Ribbon
- Click on the dropdown arrow in the Variants area
- Select Fonts
- Select the font pairing you want
You can choose among the pre-built fonts from Office, or you can customize them to create your own.
If you are working with PowerPoint presentations on both Mac and PC computers, make sure you choose a safe PowerPoint font. To see a list of the safest PowerPoint fonts, read our guide here .
If you receive a PowerPoint presentation and the wrong fonts were used, you can use the Replace Fonts dialog box to change the fonts across your entire presentation. For details, read our guide here .
Adding Animations & Transitions (optional)
The final step to make a PowerPoint presentation compelling, is to consider using animations and transitions. These are by no means necessary to a good presentation, but they may be helpful in your situation.
A. Adding PowerPoint animations
PowerPoint has an incredibly robust animations engine designed to power your creativity. That being said, it’s also easy to get started with basic animations.
Animations are movements that you can apply to individual objects on your slide.

To add a PowerPoint animation to an element of your slide, simply:
- Select the element
- Go to the Animations tab in the Ribbon
- Click on the dropdown arrow to view your options
- Select the animation you want
You can add animations to multiple objects at one time by selecting them all first and then applying the animation.
B. How to preview a PowerPoint animation

There are three ways to preview a PowerPoint animation:
- Click on the Preview button in the Animations tab
- Click on the little star next to the slide
- Play the slide in Slide Show Mode
To learn other ways to run your slide show, see our guide on presenting a PowerPoint slide show with shortcuts .
To adjust the settings of your animations, explore the options in the Effect Options , Advanced Animation and the Timing areas of the Animation tab .

Note: To see how to make objects appear and disappear in your slides by clicking a button, read our guide here .
C. How to manage your animations in PowerPoint

The best way to manage lots of animations on your slide is with the Animation Pane . To open it, simply:
- Navigate to the Animations tab
- Select the Animation Pane
Inside the Animation Pane, you’ll see all of the different animations that have been applied to objects on your slide, with their numbers marked as pictured above.
Note: To see examples of PowerPoint animations that can use in PowerPoint, see our list of PowerPoint animation tutorials here .
D. How to add transitions to your PowerPoint presentation
PowerPoint has an incredibly robust transition engine so that you can dictate how your slides change from one to the other. It is also extremely easy to add transitions to your slides.
In PowerPoint, transitions are the movements (or effects) you see as you move between two slides.

To add a transition to a PowerPoint slide, simply:
- Select the slide
- Go to the Transitions tab in the Ribbon
- In the Transitions to This Slide area, click on the dropdown arrow to view your options
- Select the transition you want
To adjust the settings of the transition, explore the options in the Timing area of the Transitions tab.
You can also add the same transition to multiple slides. To do that, select them in the Slides Pane and apply the transition.
E. How to preview a transition in PowerPoint

There are three ways to preview your PowerPoint transitions (just like your animations):
- Click on the Preview button in the Transitions tab
- Click on the little star beneath the slide number in the thumbnail view
Note: In 2016, PowerPoint added a cool new transition, called Morph. It operates a bit differently from other transitions. For a detailed tutorial on how to use the cool Morph transition, see our step-by-step article here .
Save Your PowerPoint Presentation
After you’ve built your presentation and made all the adjustments to your slides, you’ll want to save your presentation. YOu can do this several different ways.

To save a PowerPoint presentation using your Ribbon, simply:
- Navigate to the File tab
- Select Save As on the left
- Choose where you want to save your presentation
- Name your presentation and/or adjust your file type settings
- Click Save
You can alternatively use the Ctrl+S keyboard shortcut to save your presentation. I recommend using this shortcut frequently as you build your presentation to make sure you don’t lose any of your work.

This is the standard way to save a presentation. However, there may be a situation where you want to save your presentation as a different file type.
To learn how to save your presentation as a PDF, see our guide on converting PowerPoint to a PDF .
How to save your PowerPoint presentation as a template
Once you’ve created a presentation that you like, you may want to turn it into a template. The easiest – but not technically correct – way, is to simply create a copy of your current presentation and then change the content.
But be careful! A PowerPoint template is a special type of document and it has its own parameters and behaviors.
If you’re interested in learning about how to create your own PowerPoint template from scratch, see our guide on how to create a PowerPoint template .
Printing Your PowerPoint Presentation
After finishing your PowerPoint presentation, you may want to print it out on paper. Printing your slides is relatively easy.

To open the Print dialog box, you can either:
- Hit Ctrl+P on your keyboard
- Or go to the Ribbon and click on File and then Print

Inside the Print dialog box, you can choose from the various printing settings:
- Printer: Select a printer to use (or print to PDF or OneNote)
- Slides: Choose which slides you want to print
- Layout: Determine how many slides you want per page (this is where you can print the notes, outline, and handouts)
- Collated or uncollated (learn what collated printing means here )
- Color: Choose to print in color, grayscale or black & white
There are many more options for printing your PowerPoint presentations. Here are links to more in-depth articles:
- How to print multiple slides per page
- How to print your speaker notes in PowerPoint
- How to save PowerPoint as a picture presentation
So that’s how to create a PowerPoint presentation if you are brand new to it. We’ve also included a ton of links to helpful resources to boost your PowerPoint skills further.
When you are creating your presentation, it is critical to first focus on the content (what you are trying to say) before getting lost inserting and playing with elements. The clearer you are on what you want to present, the easier it will be to build it out in PowerPoint.
If you enjoyed this article, you can learn more about our PowerPoint training courses and other presentation resources by visiting us here .
🔒 Unlock the PowerPoint Shortcuts Trusted by Industry Leaders KKR, American Express, HSBC, and More!
Join over 114,880 professionals from diverse fields including consulting, investment banking, advertising, marketing, sales, and business development who have supercharged their PowerPoint game with our proven methods.
✅ Customize compelling presentations effortlessly.
✅ Master time-saving techniques for faster deck creation.
✅ Boost your career prospects with top-notch PowerPoint skills.
Get FREE access to the Critical PowerPoint Shortcuts module of our premium training course by entering your name and email below.
DISCLAIMER: PC Users Only!
We respect your privacy and will keep your info safe and confidential.
About The Author

Popular Tutorials
- How to Strikethrough Text (l̶i̶k̶e̶ ̶t̶h̶i̶s̶) in Word, Excel & PowerPoint
- How to Make Animated Fireworks in PowerPoint (Step-by-Step)
- Strikethrough Shortcut (l̶i̶k̶e̶ ̶t̶h̶i̶s̶) for Word, Excel & PowerPoint
- How to Create a Flash Card Memory Game in PowerPoint (Like Jeopardy)
- Keyboard Shortcuts Not Working: Solved
PowerPoint Tutorial Categories
- Strategies & Opinions
- Shortcuts & Hacks
- Pictures, Icons, Videos, Etc.
- New Features
- Miscellaneous
- Charts & Data Viz
We help busy professionals save hours and gain peace of mind, with corporate workshops, self-paced courses and tutorials for PowerPoint and Word.
Work With Us
- Corporate Training
- Presentation & Template Design
- Courses & Downloads
- PowerPoint Articles
- Word Articles
- Productivity Resources
Find a Tutorial
- Free Training
- For Businesses
We help busy office workers save hours and gain peace of mind, with tips, training and tutorials for Microsoft PowerPoint and Word.
Master Critical PowerPoint Shortcuts – Secure Your FREE Training Module and Save Valuable Time!
⌛ Master time-saving expert techniques.
🔥 Create powerful presentations.
🚀 Propel your career to new heights.
We value your privacy – we keep your info safe.
Discover PowerPoint Hacks Loved by Industry Giants - KKR, AmEx, HSBC!
Over 114,880 professionals in finance, marketing and sales have revolutionized their PPT skills with our proven methods.
Gain FREE access to a full module of our premium PowerPoint training program – Get started today!
We hate spam too and promise to keep your information safe.
You are currently viewing a placeholder content from Facebook . To access the actual content, click the button below. Please note that doing so will share data with third-party providers.
Reinvent productivity with Copilot for Microsoft 365.
Microsoft PowerPoint

Copilot in PowerPoint
Turn your inspiration into stunning presentations. Get it now when you add Copilot Pro or Copilot for Microsoft 365 to your Microsoft 365 subscription.
Turn your inspiration into stunning presentations
Turn a spark of inspiration into personalized presentations with Copilot in PowerPoint. Copilot will turn existing Word documents into presentations, create new presentations from simple prompts or outlines, or find the best places for impactful imagery—and will help you leave audiences dazzled with skillful storytelling.

Designing slides has never been easier
Create well-designed, impactful slides with the help of Designer and Ideas in PowerPoint.
3D isn't just for the movies
Now you can easily insert 3D objects and embedded animations directly into PowerPoint decks from your own files or a library of content.

Interact naturally using voice, touch, and ink
Easily ink onto a slide, then convert handwritten notes into text and make hand-drawn shapes perfect in seconds.
Nail your next presentation
With Presenter Coach, practice your speech and get recommendations on pacing, word choice, and more through the power of AI.

Be on the same page
Always know where you are in the editing process. With the while you were away feature, track recent changes made by others in your decks.
Task management with PowerPoint and Microsoft 365
Tell your story with captivating presentations.
Originally starting from Free now starting from Free
Sharing and real-time collaboration
PowerPoint for the web
Basic templates, fonts, icons, and stickers
Dictation and voice commands
Works on web, iOS, and Android™
5 GB of cloud storage
Microsoft 365 Personal
Originally starting from $6.99 now starting from $6.99
$6.99 $6.99
(Annual subscription–auto renews) 1
PowerPoint for the web and PowerPoint desktop app for offline use
Premium templates, fonts, icons, and stickers with thousands of options to choose from
Dictation, voice commands, and transcription
Advanced spelling and grammar, in-app learning tips, use in 20+ languages, and more
1 TB (1000 GB) of cloud storage
Premium desktop, web, and mobile apps
Advanced security
Ad-free experience
Works on Windows, macOS, iOS, and Android™
Copilot Pro available as an add-on. *
Microsoft 365 Family
Originally starting from $9.99 now starting from $9.99
$9.99 $9.99
One to six people
Up to 6 TB of cloud storage, 1 TB (1000 GB) per person
Premium desktop, web, and mobile apps
Advanced security
Microsoft Powerpoint
One person
Microsoft 365 Apps for business
Originally starting from $8.25 now starting from $8.25
$8.25 $8.25
Available for up to 300 employes
Desktop versions of Word, Excel, PowerPoint, and Outlook
1 TB of cloud storage per user
Anytime phone and web support
Microsoft 365 Business Standard
Originally starting from $12.50 now starting from $12.50
$12.50 $12.50
Everything in Microsoft 365 Apps for business, plus:
Web, and mobile versions of Word, Excel, PowerPoint, and Outlook
Custom business email ([email protected])
Chat, call, and video conference with Microsoft Teams
10+ additional apps for your business needs (Bookings, Planner, Microsoft Forms, and others)
Automatic spam and malware filtering
Webinars with attendee registration and reporting
New: Collaborative workspaces to co-create using Microsoft Loop
New: Video editing and design tools with Clipchamp
Copilot for Microsoft 365 available as an add-on. **
Add Copilot to your Microsoft plan
Achieve more than ever using AI integrated with Word, Excel, PowerPoint, Outlook, and other Microsoft 365 apps.

Get the PowerPoint mobile app
Ready to create great presentations with Microsoft 365?
See more from microsoft powerpoint.
Collaborate on shared projects
Get commonly used Office features and real-time co-authoring capabilities through your browser.
Jumpstart your design
Show your style and professionalism with templates, plus save time. Browse PowerPoint templates in over 40 categories.
Connect with experts
See what’s new and get classic tips and editors' tricks to help you create, edit, and polish presentations like a pro.
Read about slide presentations
6 slide presentation software tips to impress, host large-scale virtual presentations, how to make a slide show, what’s new in powerpoint.
- [1] Once your paid subscription begins, cancelation policies vary based on your status as a new customer, product, and domain selections on Microsoft. Learn more. Cancel your Microsoft 365 subscription any time by going to the Microsoft 365 admin center. When a subscription is canceled, all associated data will be deleted. Learn more about data retention, deletion, and destruction in Microsoft 365 . Microsoft PowerPoint with a Microsoft 365 subscription is the latest version of PowerPoint. Previous versions include PowerPoint 2016, PowerPoint 2013 , PowerPoint 2010 , PowerPoint 2007 , and PowerPoint 2003. iTunes, iPhone, and iPad are registered trademarks of Apple Inc., registered in the U.S. and other countries. Android is a trademark of Google Inc.
- [*] Copilot Pro benefits are currently available on web, Windows, and macOS and iPadOS. A Microsoft 365 Personal or Family subscription is required to access Copilot in select apps, including Word, Excel, PowerPoint, OneNote, and Outlook. Excel features are currently in preview in English only. Microsoft 365 Personal or Family and Copilot Pro are not available in the same transaction and must be purchased in two separate transactions.
- [**] Copilot for Microsoft 365 may not be available for all markets and languages. To purchase, enterprise customers must have a license for Microsoft 365 E3 or E5 or Office 365 E3 or E5, and business customers must have a license for Microsoft 365 Business Standard or Business Premium.
Follow Microsoft 365

How To Get Free Access To Microsoft PowerPoint
E very time you need to present an overview of a plan or a report to a whole room of people, chances are you turn to Microsoft PowerPoint. And who doesn't? It's popular for its wide array of features that make creating effective presentations a walk in the park. PowerPoint comes with a host of keyboard shortcuts for easy navigation, subtitles and video recordings for your audience's benefit, and a variety of transitions, animations, and designs for better engagement.
But with these nifty features comes a hefty price tag. At the moment, the personal plan — which includes other Office apps — is at $69.99 a year. This might be the most budget-friendly option, especially if you plan to use the other Microsoft Office apps, too. Unfortunately, you can't buy PowerPoint alone, but there are a few workarounds you can use to get access to PowerPoint at no cost to you at all.
Read more: The 20 Best Mac Apps That Will Improve Your Apple Experience
Method #1: Sign Up For A Free Microsoft Account On The Office Website
Microsoft offers a web-based version of PowerPoint completely free of charge to all users. Here's how you can access it:
- Visit the Microsoft 365 page .
- If you already have a free account with Microsoft, click Sign in. Otherwise, press "Sign up for the free version of Microsoft 365" to create a new account at no cost.
- On the Office home page, select PowerPoint from the side panel on the left.
- Click on "Blank presentation" to create your presentation from scratch, or pick your preferred free PowerPoint template from the options at the top (there's also a host of editable templates you can find on the Microsoft 365 Create site ).
- Create your presentation as normal. Your edits will be saved automatically to your Microsoft OneDrive as long as you're connected to the internet.
It's important to keep in mind, though, that while you're free to use this web version of PowerPoint to create your slides and edit templates, there are certain features it doesn't have that you can find on the paid version. For instance, you can access only a handful of font styles and stock elements like images, videos, icons, and stickers. Designer is also available for use on up to three presentations per month only (it's unlimited for premium subscribers). When presenting, you won't find the Present Live and Always Use Subtitles options present in the paid plans. The biggest caveat of the free version is that it won't get any newly released features, unlike its premium counterparts.
Method #2: Install Microsoft 365 (Office) To Your Windows
Don't fancy working on your presentation in a browser? If you have a Windows computer with the Office 365 apps pre-installed or downloaded from a previous Office 365 trial, you can use the Microsoft 365 (Office) app instead. Unlike the individual Microsoft apps that you need to buy from the Microsoft Store, this one is free to download and use. Here's how to get free PowerPoint on the Microsoft 365 (Office) app:
- Search for Microsoft 365 (Office) on the Microsoft Store app.
- Install and open it.
- Sign in with your Microsoft account. Alternatively, press "Create free account" if you don't have one yet.
- Click on Create on the left side panel.
- Select Presentation.
- In the PowerPoint window that opens, log in using your account.
- Press Accept on the "Free 5-day pass" section. This lets you use PowerPoint (and Word and Excel) for five days — free of charge and without having to input any payment information.
- Create your presentation as usual. As you're using the desktop version, you can access the full features of PowerPoint, including the ability to present in Teams, export the presentation as a video file, translate the slides' content to a different language, and even work offline.
The only downside of this method is the time limit. Once the five days are up, you can no longer open the PowerPoint desktop app. However, all your files will still be accessible to you. If you saved them to OneDrive, you can continue editing them on the web app. If you saved them to your computer, you can upload them to OneDrive and edit them from there.
Method #3: Download The Microsoft PowerPoint App On Your Android Or iOS Device
If you're always on the move and need the flexibility of creating and editing presentations on your Android or iOS device, you'll be glad to know that PowerPoint is free and available for offline use on your mobile phones. But — of course, there's a but — you can only access the free version if your device is under 10.1 inches. Anything bigger than that requires a premium subscription. If your phone fits the bill, then follow these steps to get free PowerPoint on your device:
- Install Microsoft PowerPoint from the App Store or Google Play Store .
- Log in using your existing Microsoft email or enter a new email address to create one if you don't already have an account.
- On the "Get Microsoft 365 Personal Plan" screen, press Skip For Now.
- If you're offered a free trial, select Try later (or enjoy the free 30-day trial if you're interested).
- To make a new presentation, tap the plus sign in the upper right corner.
- Change the "Create in" option from OneDrive - Personal to a folder on your device. This allows you to save the presentation to your local storage and make offline edits.
- Press "Set as default" to set your local folder as the default file storage location.
- Choose your template from the selection or use a blank presentation.
- Edit your presentation as needed.
Do note that PowerPoint mobile comes with some restrictions. There's no option to insert stock elements, change the slide size to a custom size, use the Designer feature, or display the presentation in Immersive Reader mode. However, you can use font styles considered premium on the web app.
Method #4: Use Your School Email Address
Office 365 Education is free for students and teachers, provided they have an email address from an eligible school. To check for your eligibility, here's what you need to do:
- Go to the Office 365 Education page .
- Type in your school email address in the empty text field.
- Press "Get Started."
- On the next screen, verify your eligibility. If you're eligible, you'll be asked to select whether you're a student or a teacher. If your school isn't recognized, however, you'll get a message telling you so.
- For those who are eligible, proceed with creating your Office 365 Education account. Make sure your school email can receive external mail, as Microsoft will send you a verification code for your account.
- Once you're done filling out the form, press "Start." This will open your Office 365 account page.
You can then start making your PowerPoint presentation using the web app. If your school's plan supports it, you can also install the Office 365 apps to your computer by clicking the "Install Office" button on your Office 365 account page and running the downloaded installation file. What sets the Office 365 Education account apart from the regular free account is that you have unlimited personal cloud storage and access to other Office apps like Word, Excel, and Outlook.
Read the original article on SlashGear .

- Create a presentation Article
- Add and format Article
- Design a presentation Article
- Share and collaborate Article
- Give a presentation Article
- Set up your mobile apps Article
- Learn more Article
Create a presentation
Create a presentation in powerpoint for the web.

With PowerPoint for the web running in your web browser, you can:
Create presentations that include images, videos, transitions, and animations.
Get to your presentations from your computer, tablet, or phone.
Share and work with others, wherever they are.
If you're using the desktop version of PowerPoint on a Windows PC, see the PowerPoint Quick Start .
If you're using the desktop version of PowerPoint on a Mac, see Office for Mac Quick Start Guides and PowerPoint for Mac Help .
Create, open, and name a presentation
Go to powerpoint.office.com .

Select New blank presentation , open a Recent file, select one of the themes , or start with a presentation template .
To name the presentation, select the title at the top and type a name.
If you need to rename the presentation, select the title and retype the name.

Add a slide
Select the slide you want your new slide to follow.
Select Home > New Slide .
Select Layout and the you type want from the drop-down.

When working in PowerPoint for the web, your work is saved every few seconds. You can select File > Save a Copy to create a duplicate copy in another location.
Or choose File > Download As to save a copy to your device.

When you're online, AutoSave is always on and saves your changes as you work. If at any time you lose your Internet connection or turn it off, any pending changes will sync as soon as you’re back online.

Need more help?
Want more options.
Explore subscription benefits, browse training courses, learn how to secure your device, and more.

Microsoft 365 subscription benefits

Microsoft 365 training

Microsoft security

Accessibility center
Communities help you ask and answer questions, give feedback, and hear from experts with rich knowledge.

Ask the Microsoft Community

Microsoft Tech Community

Windows Insiders
Microsoft 365 Insiders
Was this information helpful?
Thank you for your feedback.
IMAGES
VIDEO
COMMENTS
To save a copy of a PowerPoint presentation on your desktop, follow the 3 simple steps. Step-1: Click on the "File" tab. The first step is to click on the "File" tab. It is located on the left corner of the menu ribbon at the top of the screen. This will open the "File" menu. Step-2: Click on the "Save A Copy" option.
To get started, open the presentation you want to copy. Once youve opened the file, go to the File tab on the ribbon. When you select the File tab, a menu will appear with a variety of options. From this menu, select Save As. Once youve clicked Save As, youll be prompted to select a location to save the copy.
First, open the presentation that you would like to copy. Then, click the "File" tab at the top of the window. From this menu, select the "Save As" option. In the window that appears, select the folder where you would like to save the file, enter a name for the file, and click "Save". This will create a duplicate copy of the ...
Click View, and then in the Presentation Views group, click Normal. In the slide thumbnails on the left side, click the slide that you want to copy: To select multiple sequential slides, click the first slide, press Shift, and then click the last slide that you want. Alternatively, you can click on the first slide, press Shift and then press ...
Step 2: Save the Presentation with a New Name. Go to 'File' > 'Save As' and choose a new name and location for your copied presentation. Saving the original presentation with a new name creates a separate file, allowing you to maintain the original while working on the new copy.
PowerPoint for the web. PowerPoint for the web automatically saves your work to OneDrive, in the cloud. (This kind of operation in Microsoft 365 is often called Save As, but in Microsoft 365 for the web apps it is Save a Copy or Download As .) To save to another location (such as your computer or a USB thumb drive), or to save a copy, click a ...
To copy a PowerPoint slide, you just need to right-click it, or open the "Home" menu. You can also use PowerPoint's "Duplicate" function, which will create a copy of a slide automatically, without ...
2. Click the first slide you want to copy, press "Shift" and click on the last slide. All the slides in between will be selected. Press "Ctrl-C" to copy the slides.
2. Right-click on a slide in the left sidebar to copy it. You can also press Command + C or Ctrl + C on your keyboard. If you hold down Command or Ctrl, you can click multiple slides to select ...
On the File tab, select Save. Do of the following: To save to your local drive, such as your laptop, a flash drive, CD or DVD drive, select Computer. To save to a SharePoint Library, select SharePoint. Under Save As > Recent Folders, select Browse, pick a path and file folder, and then name the file. Select Save.
Step-by-Step Guide to Making a Copy of a PowerPoint Presentation: Open the Presentation: If your presentation is not already open, open it by going to "File" > "Open" and browsing for the presentation on your computer. Save As a Copy: Click on "File" in the top menu bar. Select "Save As": From the dropdown menu, choose "Save As."
Copy Slides to Another PowerPoint Presentation. Right-click the thumbnail of the slide to be copied, select Copy, then right-click a blank area of the Slides pane where you want to place it. Alternate method: Click-and-drag the thumbnail of the slide you want to copy to the Slides pane of the destination presentation.
Step 1: Open your presentation in WPS Presentation. Step 2: Choose the specific slide you want to copy. Step 3: Right-click and select "Copy" or use Ctrl+C as a keyboard shortcut. Step 4: Click on the location where you want to paste the slide. Step 5: Right-click again and choose "Paste" or use Ctrl+V as a shortcut.
In conclusion, making a copy of a PowerPoint presentation is a simple and essential skill that every tech-savvy individual should possess. Whether you want to create a backup file, share the presentation with someone else, or make edits without affecting the original version, having the ability to duplicate your PowerPoint slides is invaluable.
Copy and Paste in File Explorer/ Finder. Tag: can be used to copy multiple PPT files. Step 1. Open your File Explorer (Windows) or Finder (Mac), and locate the PowerPoint file you want to copy. Step 2. Choose the file and right-click on it, then choose Copy. (You can also choose multiple files by pressing the Ctrl key.)
1.In desktop version of PowerPoint, create a new file which contains the slides you want to reuse. 2.Go to OneDrive for Business in the cloud, click Upload>File in the top menu to upload the PowerPoint file to OneDrive for Business. 3.Open PowerPoint online>click Open from OneDrive for Business button as below, choose and open the file you have ...
10. Use Microsoft's Office Presentation Service. For Mac users, you're going to have to skip this part. Unfortunately, the Office Presentation Service is only available on Windows computers at this particular point in time. This free service makes it easy for PowerPoint Windows users to share their presentations online.
1. Open the PowerPoint presentation on your Mac desktop or laptop. 2. Click the "File" tab in the top left corner. 3. Select "Share" from the dropdown menu. This will grant you the option to ...
To send your presentation as a copy or a PDF, select Share. Select Attach a Copy Instead in the Share dialog box. Select either PowerPoint Presentation or PDF. PowerPoint will open the email application and attach the file to a new message. Enter the recipients details and a short message, and click Send.
What to Know. In the source presentation, select View > Slide Master. In the Slide pane, right-click the Slide Master and select Copy. Go to View > Switch Windows and choose the second presentation. Go to View > Slide Master. Right-click the Slide pane and select Paste. Choose Use Destination Theme (keeps colors, fonts, and effects) or Keep ...
To do that, simply go up to the Home tab and click on New Slide. This inserts a new slide in your presentation right after the one you were on. You can alternatively hit Ctrl+M on your keyboard to insert a new blank slide in PowerPoint. To learn more about this shortcut, see my guide on using Ctrl+M in PowerPoint.
One person. Sharing and real-time collaboration. PowerPoint for the web and PowerPoint desktop app for offline use. Premium templates, fonts, icons, and stickers with thousands of options to choose from. Dictation, voice commands, and transcription. Advanced spelling and grammar, in-app learning tips, use in 20+ languages, and more.
Open PowerPoint. In the left pane, select New. Select an option: To create a presentation from scratch, select Blank Presentation. To use a prepared design, select one of the templates. To see tips for using PowerPoint, select Take a Tour, and then select Create, . Add a slide.
Install and open it. Sign in with your Microsoft account. Alternatively, press "Create free account" if you don't have one yet. Click on Create on the left side panel. Select Presentation. In the ...
Notes: If you're using the desktop version of PowerPoint on a Windows PC, see the PowerPoint Quick Start.. If you're using the desktop version of PowerPoint on a Mac, see Office for Mac Quick Start Guides and PowerPoint for Mac Help.