Critical PowerPoint Shortcuts – Claim Your FREE Training Module and Get Your Time Back!

How to Convert PowerPoint to Google Slides (Step-by-Step)
- PowerPoint Tutorials
- Shortcuts & Hacks
- October 11, 2019
In this article, you’ll learn two ways to convert PowerPoint to Google slides to take full advantage of the online Google Slides platform.

And while it’s easy to convert back and forth between PowerPoint and Google Slides, it’s important to keep in mind that not all your presentation content will properly convert (as discussed below).
That’s why I recommend using (and sticking with) whichever software program your team and/or clients are most comfortable using.
Note: You can use your Google Drive platform to store and distribute your PowerPoint presentations without having to convert to the Google Slides file format.
To do that, simply upload your PowerPoint presentations to your Google Drive (as discussed below) and use it as a file folder.
To learn how to do the reverse and convert Google Slides to PowerPoint, read our article here .
Note: Because Google Slides is an online platform, you will need access to the internet before you can upload and import PowerPoint files into its format.
[Watch] Converting PowerPoint to Google Slides
You are currently viewing a placeholder content from Youtube . To access the actual content, click the button below. Please note that doing so will share data with third-party providers.
Google Slides Pros and Cons
Google Slides is the second most popular program for creating and delivering presentations behind Microsoft PowerPoint.
And while some people prefer one program to the other, if you are trying to decide which program to use, I recommend choosing whichever program your client or project team is using.,
That will just make everyone’s lives easier.
Google Slides pros:
- Free to use
- Cloud-based – no software installation required
- Offline mode to use when you’re not connected to the internet
- Automatic saving
- History review to check previous changes made
- Easy to share for seamless collaboration
- Works 100% the same on Mac and PC
Google Slides cons:
- Basic animations and fewer transitions
- Fewer and much less robust templates (there are some in a gallery of pre-made basic templates)
- Has slightly fewer export formats than PowerPoint
- Not accepted by many corporations and organizations with strict privacy rules
Upload PowerPoint to Google Slides
The first way to convert a PowerPoint presentation into the Google Slides format is to upload it to a Google Drive folder and then convert its file format.
To do that, simply follow these steps:
1. Open a Google Drive folder

To open a Google Drive folder to start the conversion process, simply:
- Navigate to your Google slides login here
- Find a folder and click on it to open it
Although you can later move your presentation to another folder in your Google Drive, it’s best to convert your PowerPoint presentation into a Google Slides document exactly where you want it to be.
This saves you from losing your presentation after you convert it.
2. Upload PowerPoint to Google Drive
There are two different ways you can get your PowerPoint presentation into Google Drive:

To upload a file directly from within a Google Drive folder, simply:
- Right-click inside your Google Drive folder
- Select Upload Files
- Navigate to your PowerPoint file
- Select your file
- Click Open
Another way to upload PowerPoint to Google Drive, is to just click and drag it into your Google Drive folder, as pictured below. This can be faster if you already have the file folder open on your computer, instead of navigating to it from your Google Drive.

To learn how to snap your File Explorer windows side-by-side using your Windows 10 shortcuts, see our guide here .
Note: Uploading your PowerPoint presentations to Google Drive does not automatically convert them. Notice in the picture below that the presentation is still in the PowerPoint .pptx file format. So, simply uploading a PowerPoint file to Google Drive does not automatically convert it to Google Slides.

3. Open PowerPoint in the Google Slides format
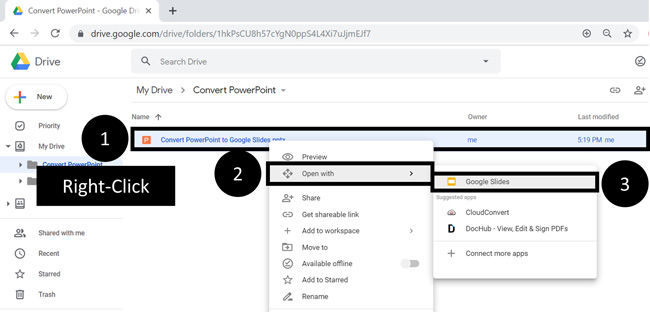
To open your PowerPoint presentation in the Google Slides file format, simply:
- Right-click your PowerPoint file
- Select Open With in the action menu
- Choose Google Slides
Choosing Google Slides, you will see a conversion icon. When it’s complete, you will see your PowerPoint presentation as a Google Slides document, but it will still be in the .pptx file format as you see below, so we are not done yet.

To finish the PowerPoint to Google Slides conversion process, continue on to the next step below.
Note: Not all PowerPoint features are available in the Google Slides format. If your presentation has PowerPoint features that cannot be converted to Google Slides, you will see the warning at the top of your screen.

Some PowerPoint features can’t be displayed in Google Slides and will be dropped if you make changes.
This is a good time to double check your presentation to make sure all your PowerPoint slides have been properly converted. Things to look at are logos, pictures, animations, ink, etc.
4. Save your PowerPoint presentation in the Google Slides format
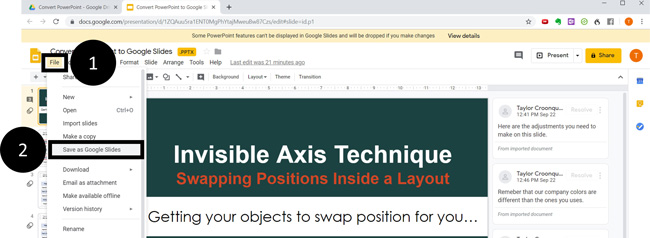
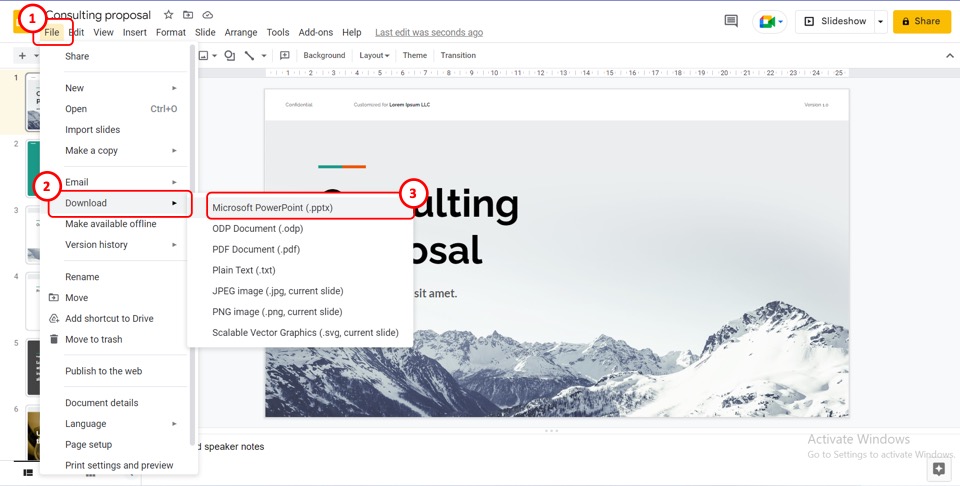
To finish your PowerPoint to Google Slides conversion process, simply:
- Open the Google Slides File menu
- Select Save as Google Slides
Doing so, you will now see your presentation as a TRUE Google Slides presentation, as pictured below. The .pptx file extension is no longer be there.

On top of that, if you navigate back to your folder, you will see your presentation in both the Google Slides and PowerPoint file format.
After double-checking your Google Slides presentation, I recommend deleting your old PowerPoint file so you don’t get confused (unless you want to keep it as a reference).
5. Delete your PowerPoint presentation
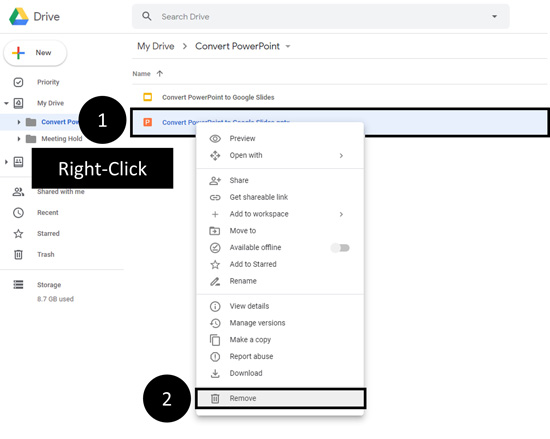
To delete your PowerPoint presentation from your Google Drive, simply:
- Navigate to your Google Drive folder and Right-click your file (the .pptx one)
- In the right-click menu, select Remove
This leaves you with just the Google Slides presentation in your folder.
#2. Import PowerPoint to Google Slides
Instead of uploading your PowerPoint presentations to Google Drive and then converting them, you can import them directly inside of a Google Slides document.
You can do this in a blank presentation, or with an existing Google Slides presentation.
1. Open a blank Google Slides file

To create a new Google Slides presentation to start the conversion process, simply:
- Choose a Folder for where you’ll want your presentation to be
- Right-click and select Google Slides
You can alternatively click the New icon beneath the Google Drive logo to start a new presentation, instead of right-clicking.
Doing so opens a blank Google Slides document in a new tab in your web browser. This blank presentation is what you will use in the next few steps to convert your PowerPoint presentation.

Note: Instead of starting from a blank Google Slides presentation, you can also start from within an existing Google Slides presentation and import your PowerPoint slides directly into it.
2. Open the Import slides dialog box

To open the Import slides dialog box, from within Google Slides simply:
- Open the Google Slides File menu
- Select Import Slides
3. Upload PowerPoint to Google Slides
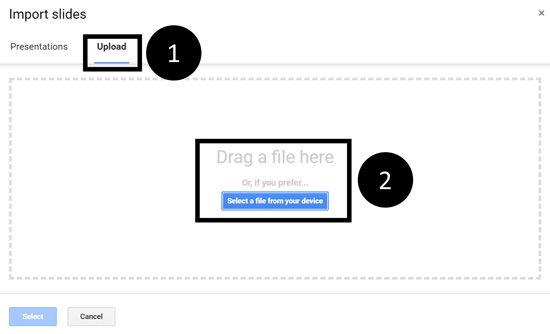
To import slides from a PowerPoint presentation into your Google Slides document, simply:
- Click the Upload option
- Navigate to your PowerPoint presentation and click on Open (or click and drag it into the dialog box)
Selecting your presentation, your PowerPoint is uploaded to Google Slides as pictured below. Depending on the size of your PowerPoint presentation, this could take a few seconds or a few minutes.

Note: If you have already uploaded your PowerPoint presentation to your Google Drive, you can also use the Presentations tab to find the presentation you want to convert instead of uploading it from your computer.

4. Select the PowerPoint slides you want to convert to Google Slides
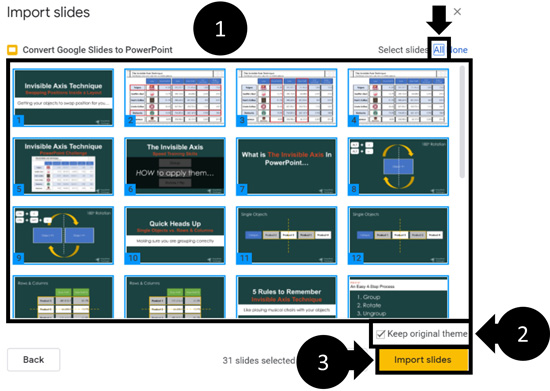
To import your PowerPoint slides into your Google Slides presentation, simply:
- Select the PowerPoint slides you want to import (or select All in the upper right-hand corner)
- Check or uncheck Keep Original Theme (see note below)
- Click Import slides
- Delete the first blank slide

Selecting Import Slides , your selected slides are imported into the Google Slides format, and you are done. You can now edit or present your presentation in Google Slides.
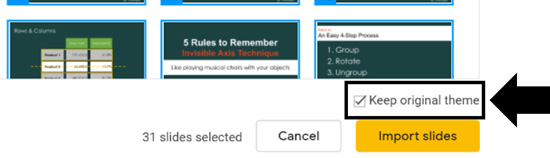
Keep Original Theme
Selecting Keep original theme means that Google Slides converts your PowerPoint template (as best as it can) to the Google Slides format.
Un-selecting Keep original theme means that just your content will be imported into whatever Google Slides theme you are using (as best as it can). To learn more about PowerPoint themes and how they work, read our article here .
So that’s how to convert PowerPoint to Google Slides and the different options you have.
Although you can quickly and easily convert between the two different formats, not all PowerPoint features will properly convert to the Google Slides format. So, to the extent that you can avoid converting back and forth, the better off you will be.
You can always keep your files in the PowerPoint format and still use your Google Drive to store and share your presentations with your team.
If you enjoyed this article, you can learn more about our PowerPoint training courses and other presentation resources, visit us here .
What’s Next?
Related articles, about the author.

Popular Tutorials
- How to Strikethrough Text (l̶i̶k̶e̶ ̶t̶h̶i̶s̶) in Word, Excel & PowerPoint
- How to Make Animated Fireworks in PowerPoint (Step-by-Step)
- Strikethrough Shortcut (l̶i̶k̶e̶ ̶t̶h̶i̶s̶) for Word, Excel & PowerPoint
- How to Create a Flash Card Memory Game in PowerPoint (Like Jeopardy)
- Keyboard Shortcuts Not Working: Solved
PowerPoint Tutorial Categories
- Strategies & Opinions
- Presentation Design
- Pictures, Icons, Videos, Etc.
- New Features
- Miscellaneous
- Charts & Data Viz
We help busy professionals save hours and gain peace of mind, with corporate workshops, self-paced courses and tutorials for PowerPoint and Word.
Work With Us
- Corporate Training
- Presentation & Template Design
- Courses & Downloads
- PowerPoint Articles
- Word Articles
- Productivity Resources
Find a Tutorial
- Free Training
- For Businesses
We help busy office workers save hours and gain peace of mind, with tips, training and tutorials for Microsoft PowerPoint and Word.
Master Critical PowerPoint Shortcuts – Secure Your FREE Training Module and Save Valuable Time!
⌛ Master time-saving expert techniques.
🔥 Create powerful presentations.
🚀 Propel your career to new heights.
We value your privacy – we keep your info safe.
Discover PowerPoint Hacks Loved by Industry Giants - KKR, AmEx, HSBC!
Over 114,880 professionals in finance, marketing and sales have revolutionized their PPT skills with our proven methods.
Gain FREE access to a full module of our premium PowerPoint training program – Get started today!
We hate spam too and promise to keep your information safe.
You are currently viewing a placeholder content from Facebook . To access the actual content, click the button below. Please note that doing so will share data with third-party providers.
Unsupported browser
This site was designed for modern browsers and tested with Internet Explorer version 10 and later.
It may not look or work correctly on your browser.
- Presentations
How to Convert PowerPoint (PPT) to Google Slides Presentations on Import (+Video)
- Bahasa Indonesia
When you work with presentations, you don't always have a choice in file type. But when you convert PowerPoint to Google Slides, you've got flexibility for many situations.

It's common to need to convert while working with presentations That's why it helps to learn how to convert PowerPoint to Google Slides . Been asked to change or update a Microsoft PowerPoint presentation? You can do it using Google Slides.
The PPTX to Google Slides process isn't hard - in fact, it only takes a few clicks! In this tutorial, you'll learn how to convert PPT to Google Slides. I 'll show you how to convert PPTX to Google Slides, step by step. Let's get started!
How to Convert PowerPoint to Google Slides (Quick Video)
Ready to learn how to transfer PowerPoint to Google Slides designs? Here's a screencast to quickly show you the first method of converting a PowerPoint presentation to Google Slides:

Can you convert from PPT to Google Slides? Absolutely. As it turns out, there are many methods that help you upload PPT to Google Slides formats. Read on to see the top PPTX to Google Slides techniques in action.
Jump to the following content:
How to Convert a PowerPoint Presentation to Google Slides Format
Convert other types of files to google slides format.
7 Best Practices for Importing Files to Google Slides
- Learn More About Presentations
Another Great Presentation Resource for 2024
- More Great Presentation Templates for PowerPoint
Best Presentation Templates on Envato Elements (With Unlimited Use)
Now, let’s learn how to convert PowerPoint to Google Slides. There are three main ways to do this, and we’ll explore each one. Each one is easy, and it pays to know all three. You’ll find that you use these simple steps every day!

I’ll explain how to convert PPT to Google Slides using the Enjoy PowerPoint Template from Envato Elements. We'll use built-in tools as a PPT to Slides converter! Download it today to follow along.
Method 1: Open a PPT Presentation in Google Drive
The first method to import a PowerPoint presentation into Google Slides is through your Google Drive. Drive is used to store files that you work with in Google Slides, Sheets, Docs, and more. It's the first step as you learn how to transfer PowerPoint to Google Slides.
Can you convert PPT to Google Slides? You'll see that below. Here are step-by-step instructions on how to use the built-in PPT to Slides converter.
Step 1: Drag Your PowerPoint File Into Google Drive
To get started here, open your Google Drive folder in Chrome. Navigate to the folder where you’d like to store your imported presentation. Click on it to open it up.

In the center of your screen, you’ll see text reading Drop Files Here. With Google Drive still open in your browser, find the PPTX file that you want to upload into Google Slides to edit.

Click on the PowerPoint file you’ve chosen, and drag it over your Google Drive screen. Drop it into place, and Drive will upload the file. This may take a few moments, depending on the file size and your connection speed.

Step 2: Open and Convert the PowerPoint File
Just like that, you’ve uploaded a PowerPoint file to Google Drive. The next step is to convert it to Google Slides format so that you can get to work making edits. To use the PPT to Slides converter, double-click on the file in Google Drive.

By default, Google Drive launches the presentation in Google Slides. The conversion process is performed automatically. You don’t have to do any manual work to kick it off. It’s a streamlined convert PPT to Google Slides process that saves you a ton of time.
Step 3: Edit File in Google Slides
With the presentation file converted, you can get started editing! You just learned how to convert PowerPoint to Google Slides. It now works just like any other presentation in Google Slides.

You can add text, images, and more. And you can take advantage of Google Slides’ robust collaboration features to interact with your global team.
Method 2: Import From Within a Google Slides Deck
Need another option for how to convert PowerPoint to Google Slides? The second method of importing a PowerPoint presentation is to start by opening a blank Google Slides presentation. Here's the process:
Step 1: Open a Blank Google Slides Presentation
Back in Google Drive, click New in the upper left corner of the screen. From the drop-down options, click Google Slides .

A blank Google Slides presentation opens. You can now import a PPT presentation from here.
Step 2: Upload a PowerPoint Presentation
To import a PPTX file, go to the File menu and choose Open .

The Open a File dialog box launches. From the tabbed options, click Upload . Then, click Browse . Browse for a stored PPTX file on your computer and click to insert it. Google Slides uploads the slide deck. This is the start of the convert PPT to Google Slides process.
You’ll see the slides appear in a new window. You just learned another method for how to convert PowerPoint to Google Slides. You’re ready to convert and edit your slides! This is another great way to convert from PPT to Google Slides with ease.
Method 3: Import Some Slides into Google Slides
Our final method for how to convert PowerPoint to Google Slides lets you import select slides. You can do this in an existing or new presentation. It’s useful if you don’t need to work with every slide in a PowerPoint that you already have built out.
Step 1: Open a Google Slides Presentation
Creating a new presentation? Follow the first step of Method 2 for how to convert PowerPoint to Google Slides above to open a blank presentation.
If you're importing slides into an existing presentation, open it in Google Slides.
Step 2: Import PowerPoint Slides
Once your Google Slides presentation is open, click File > Import Slides from within the presentation.

You’ll see the Import Slides menu appear. Again, click Upload to select a presentation from your computer. Once you find the file from which you want to import slides, click on it and click the Select button in the lower left corner.
The Import Slides dialog box displays with thumbnails of the slides in the presentation. It gives you a sneak peek as you navigate your upload PPT to Google Slides process.
To select individual slides to import, click on each slide to select it. Click the Import Slides button in the lower right corner of the dialog box when you've finished selecting slides.

To import all the slides, click the All link in the upper right of the dialog box and click the Import Slides button.
The slides you've chosen to import appear below the current slide in your Google Slides presentation.
Step 3: Edit the Imported Slides
Once you've imported the PowerPoint slides of your choice into your Google Slides presentation, you can edit them as you choose. They're now part of your new Google Slides presentation.
The conversion process is automatic. It's essentially a built-in PowerPoint to Google Slides converter. But you may notice font and formatting differences after importing PPTX to Google Slides.
PowerPoint is one of the most popular presentation packages. For that reason, I've covered how to convert PowerPoint presentations to Google Slides format in detail in this tutorial. But it’s far from being your only option for a robust presentation app.
How to Convert OpenOffice Presentations to Google Slides
OpenOffice is a popular free presentation app. It saves its files using the .odp file format. Above, you learned how to convert PowerPoint to Google Slides. But can you use .odp files? Absolutely!

To use an OpenOffice .odp in Google Slides, scroll up to Method 1 above. Repeat those steps, choosing the .odp to upload. Google Slides handles the conversion steps.
How to Convert Keynote to Google Slides
You saw how to convert OpenOffice and PPTX to Google Slides. But what about Keynote files? If you aren’t familiar, Keynote is Apple’s own presentation app. It’s growing more popular. But you can’t upload Keynote directly to Google Slides.

Luckily, there’s a workaround. When you’ve built slides in Keynote, go to File > Export To > PowerPoint. This saves your Keynote presentation in PowerPoint format. Now, you can use Method 1 above to upload and edit it in Google Slides!
How to Use Canva Presentations in Google Slides
Canva is an online app that you can use to create presentations. But, some of its features do require a premium tier. What if you want to use Canva to collaborate with others in Google Slides?
Again, your best option is to save your online Canva slides in PowerPoint format. Then, you can upload them into Google Slides! It’s a good way to share slides with your team.

You've learned how to convert from PPT to Google Slides. It's really easy, but there are tips to make your PPTX to Google Slides even more successful.
It's easy to import files from PowerPoint into Google Slides. Here are some best practices to use as you upload PPT to Google Slides:
- Control Quality. Start with a clean, original presentation. If you start with a low-quality presentation, converting PPTX to Google Slides won't improve it. Make sure that slides are designed well and your images are clean. Also, be sure that your fonts are readable and the links work.
- Manage File Size. Delete unused slides before uploading. This reduces the file size and the amount of work you've got to do after the conversion.
- Pay Attention to File Type. If the presentation file type you're trying to import into Google Slides isn't supported, go back to the original app. Then, export it to a supported format (such as PowerPoint) and retry. (Depending on the original file type, you may lose some features after import.)
- Be Aware of Font Changes. Google Slides may not match the fonts you originally used. Instead, it converts your fonts to the closest available font. The fonts may not be an exact match.
- Expect Format Changes. Likewise, your formatting after the import into Google Slides will be like your original formatting, but it may not be the same. You may need to tweak it to match your intent.
- Reinsert Links. Currently, links embedded into a PowerPoint presentation don't work after you convert PPT to Google Slides. Make a checklist and adjust hyperlinks after upload.
- Don't Import PDFs. At this time, a PDF file can't be imported as a Google Slides presentation or converrted into one. But you can take a screenshot of a PDF and insert the image into your Google Slides presentation.
The import process for importing PowerPoint files into Google Slides is like the import process for all Google Drive tools.
You can convert from PPT to Google Slides, but Google Drive also supports conversions for other apps. To read a complete tutorial on Google Drive file conversions, review:
Learn More About PowerPoint Presentations
Can you convert PPT to Google Slides? You just learned that it's a "yes!" Now, you can keep learning more about PowerPoint and Google Slides with our tutorials. Master more of PowerPoint in How to Use PowerPoint (Ultimate Tutorial Guide.)
We've got top tutorials that help you work effectively in PowerPoint. Check out our favorite resources below:
Learn the best presentation strategies in our eBook: The Complete Guide to Making Great Presentations ( grab it now for FREE ) . Get your ideas formed into a powerful presentation that'll move your audience!

Find More Great Presentation Templates
So far, you've learned how to convert PPT to Google Slides designs. Think about it: when you can upload PPT to Google Slides and change format, you unlock limitless templates.
You know how to convert a PowerPoint to a Google Slides template. But if you want original Google Slides designs, we've got you covered. Here are more great presentation templates:

You learned how to convert PPTX to Google Slides. You can use your favorite Google Slides or PowerPoint template to do just that! Let me tell you about the best place to find amazing templates.
Explore Presentation Templates

Turn to Envato Elements for the ultimate premium presentation templates. For a flat monthly rate, you can download and use as many premium PPTX to Google Slides themes as you want! Each one is fully customizable in your favorite presentation app.
From PowerPoint or Google Slides templates to stock photos, fonts, and more, Envato Elements has it all. There are loads of quality creative designs and templates with on-trends available.

With Envato Elements, finding the perfect assets is now faster with our AI-powered search assistant . Just type in what you're looking for, and let the technology do the hard work.
It quickly sorts through millions of items to find the assets that best fit your project. No PowerPoint to Google Slides converter is needed. Just upload your favorite Google Slides template, and you’re ready to get to work!
From PowerPoint to Google Slides, here are top templates from Elements:

Karmel is a minimalist style presentation. It takes on the less is more mindset for clean and clear presentations. This presentation template can be used for many different purposes.
2. Cleanical

This fully editable presentation template is great for any purpose. There are five premade color schemes, which makes it easy to customize the presentation. Remember: after you learn how to upload PowerPoint to Google Slides, templates like this will work great for you.

This PowerPoint template is a multi-purpose presentation template. With its simple design, you can easily edit the template to fit your needs.
As you can see, Envato Elements has thousands of options for your next presentation . It’s your best bet in 2024 and beyond! Now that you know how to convert PPTX to Google Slides, you’re all set. Choose your favorite template and get started.
With unlimited downloads, you've got unlimited possibilities. Jump over to Envato Elements today. Knowing how to convert from PPT to Google Slides means that your options are limitless.
You're Ready to Convert PowerPoint to Google Slides
Can you convert PPT to Google Slides?
Yes! You can work with presentations originally created in PowerPoint. Or you can work with files from other presentation apps.
Now that you know how to upload PowerPoint to Google Slides, you won't need to recreate templates from scratch. The key is to convert from PowerPoint (or another presentation format) to Google Slides format.
Converting a PowerPoint presentation to Google Slides isn't hard once you know what to do. You've just learned how to convert PowerPoint to Google Slides. Now, put your new convert PowerPoint to Google Slides skills to work!
You've also seen some great presentation templates from Envato Elements to help you create a visually appealing slideshow. If you're creating a new presentation, why not choose one of these templates?
Editorial Note : This post was originally published in 2017. It's been comprehensively revised to make it current, accurate, and up to date by our staff—with special help from Andrew Childress and Sarah Joy.

- Meta Quest 4
- Google Pixel 9
- Google Pixel 8a
- Apple Vision Pro 2
- Nintendo Switch 2
- Samsung Galaxy Ring
- Yellowstone Season 6
- Recall an Email in Outlook
- Stranger Things Season 5
How to convert a PowerPoint to Google Slides
While PowerPoint is widely used to develop presentations, Google Slides has become a popular alternative. Part of what makes it so popular is that it's free to use, as is other Google software such as Google Docs and Google Sheets – which is a stark contrast to the premium price you'll pay for Microsoft Office and PowerPoint.
Converting a PowerPoint file using Google Slides
Using google drive, importing specific slides.
If you're looking to jump ship from PowerPoint to Slides, Google makes it easy to do so. In fact, it takes little more than a few clicks to convert a PowerPoint to Google Slides. Whether you need to change the format for a coworker or want to permanently switch to the free platform, here's a look at how to convert your PowerPoint deck into a Google Slides presentation.
What You Need
Microsoft PowerPoint
A computer, laptop, tablet, or phone with access to Google Slides
Step 1: Open Google Slides and click Blank under Start a New Presentation .
Step 2: At the top, under the title settings, click File > Open .
Step 3: Click the Upload tab and choose the Select a File From Your Device button. Locate your PowerPoint file and open it (the extension will be .pptx).
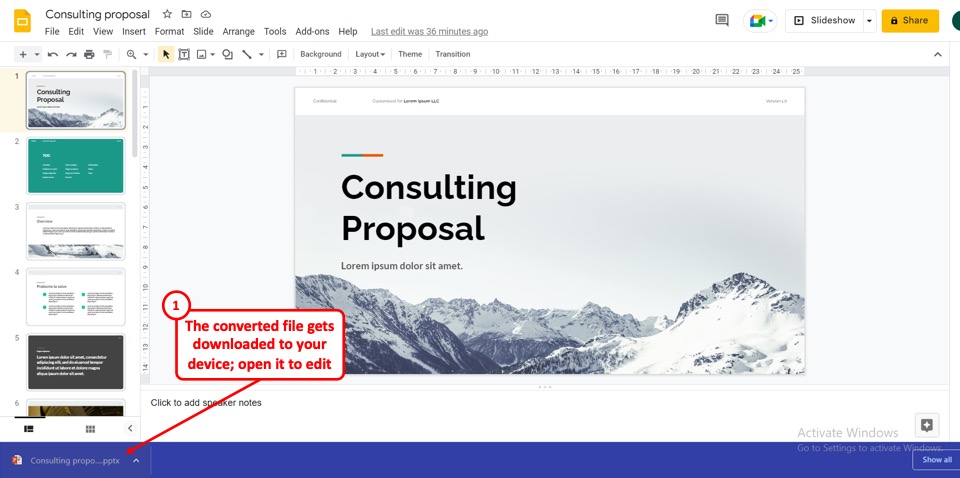
Google will now convert that PowerPoint file into a Google Slides format. Once the process is completed, it will automatically be saved into your Google Slides account via Google Drive.
Conveniently, you can now edit that presentation online and, when the need arises, convert it back to a Microsoft PowerPoint file ( File > Download > Microsoft PowerPoint ).
Another way to convert a PowerPoint file to Google Slides is by using Google Drive.
Step 1: Go to your Google Drive account's home page. Click the New button and then File Upload . Select your PowerPoint file.
Step 2: Select the file on Google Drive, right-click it, and click the Open With tab. Finally, click the Google Slides tab.
Step 3: The PowerPoint will be displayed within Google Slides. Unlike uploading directly via Google Slides, you will have to save the file for this method. Select the File tab and click the Save As Google Slides option from the drop-down menu.
Google Slides’ ability goes beyond just converting an entire PowerPoint file. You can also choose specific slides you want to import as opposed to the entire presentation itself.
Step 1: Open a new Google Slides presentation. Within the File tab, select the Import Slides option and then choose the Upload tab. Select the PowerPoint file from your PC.
Step 2: Google will now populate a thumbnail-based view of all the slides contained within that PowerPoint file and allow you to select which specific ones you wish to import and convert. Click the Import Slides button when you’re done.
Editors’ Recommendations
- Best Microsoft Office deals: Get Word, PowerPoint, and Excel for free
- How to delete Google Chrome on Windows and Mac
- How to convert Google Slides to PDF
- How to print a PowerPoint presentation with notes
- How to sync your Outlook Calendar with your Google Calendar
- How-To Guides

Apple’s Vision Pro is just a couple of days from landing on people’s heads, with many speculating how much of a success -- or not -- the tech giant can make of its most important product launch in years.
A key factor is expected to be the level of interest developers show in creating custom-made apps for the mixed-reality headset, with some major platforms such as Netflix, Spotify, and YouTube deciding to hold back from offering bespoke apps.
Choosing the right font for your presentation is important. While Google Slides has a good selection of fonts, you may want something different. Even though you cannot upload or use a font from your computer in Google Slides, there are ways to get more font choices.
Here's how to get and add fonts in Google Slides:
With various cybersecurity threats on a constant rise, it certainly feels like dangerous malware is around every corner. This time, it found its way into PowerPoint presentations disguised as helpful guides on how to protect yourself against phishing. The irony of it all is strong, but the worst part is that this malware could help attackers empty your bank account.
- Shop Early Amazon Prime Day Deals
- I Tried Both: Ring vs Nest Doorbell
How to Convert Powerpoint to Google Slides
Change the presentation format to work with your preferred application
:max_bytes(150000):strip_icc():format(webp)/KarenMarcus-b36dca4c46e7441c8a50744f9a5c0260.jpg "how to save a powerpoint presentation to google drive")
- University of Colorado at Denver
- Colorado State University
What To Know
- To drop into Google Slides: Open Slides . Go to File picker (folder icon) > Open a file > Upload > Drag the file to Drag a file here .
- To upload to Google Drive: Open Drive . Go to New > File Upload > pick your file > Open with Google Slides .
- To open with Google Slides: Open Slides . Press the Owned by... drop-down to pick the class. Select the file, and Edit as Google Slides .
This article explains how to open and edit a PowerPoint file in Google Slides, either by opening it directly through Slides or by importing it through Drive and editing it in Slides.
Drag and Drop a Powerpoint File Into Google Slides
Use this method if your Powerpoint file is located on a local drive.
Open Google Docs.
If Slides is not already selected, in the upper-left corner of the application, select the menu (three bar) icon.
From the menu, choose Slides .
In the upper-right corner of the Recent presentations section, select the file picker (file folder) icon.
In the Open a file screen, choose Upload .
Open the folder where your Powerpoint file is stored. Drag the Powerpoint file into the Drag a file here section.
Alternatively, use the blue file-picker button to find your local document through the operating system's file manager.
The file uploads and then becomes available for opening or editing like any other Slides document.
Formatting may change when you convert a PowerPoint file to Google Slides.
Upload a Powerpoint File Into Google Drive
This method will also work for files located on a local drive.
Open Google Drive.
In the upper-left corner, select New > File Upload .
Navigate to the file you want to upload and select it.
You’ll see an uploading message, then the file will show up in your Google Drive file list. Select the file.
At the top of the screen, from the menu choose Open with Google Slides .
The converted presentation will appear in the Google Slides editing environment and you can work with it as you normally would.
Open a Powerpoint File From Google Slides
Use this method if your Powerpoint file is already located on your Google Drive.
Toward the top of the screen, select the down-arrow and choose a class of document to view.
Select your Powerpoint file. You’ll see a dialog box asking if you want to open the file in View Only mode, or Edit as Google Slides . Choose Edit as Google Slides .
You can now work with the file as you normally would.
Get the Latest Tech News Delivered Every Day
- How to Create a Google Docs Form
- How to Create a Free Google Slides Template
- 4 Ways of Transferring Files From Android to Mac
- How to Add Music to Google Slides
- How to Create a Microsoft Sway Presentation
- How to Embed Video in Google Slides
- How to Edit Word Documents in Google Docs
- What Is a PPTX File?
- How to Convert a Google Doc to PDF
- How to Convert a PDF to Google Doc Format
- How to Use Google Duet in Slides
- The 8 Best Google Drive Add-ons for 2024
- How to Use Google Slides to Make a Presentation
- How to Insert a GIF Into Google Slides
- How to Do a Hanging Indent in Google Slides
- How to Upload Word Documents to Google Docs

How to Convert PowerPoint to Google Slides (5 Ways)

Easily Convert a PowerPoint Presentation to Google Slides
by Avantix Learning Team | Updated August 8, 2023
Applies to: Microsoft ® PowerPoint ® 2013, 2016, 2019, 2021 and 365 (Windows) and Google Slides
You can convert a PowerPoint presentation to Google Slides in several ways. You will first need to import or upload the PowerPoint deck into Google Slides and then make any changes you need. Google Slides will try to convert the presentation into compatible objects, tools and fonts but these programs do have differences so some elements may not convert well.
Google Slides is a cloud-based program and is updated regularly so menus, buttons and features may change. Notably, Google rolled out a new feature in 2019 to edit PowerPoint files directly in Google Slides without conversion. Prior to the upgrade, depending on the way you imported a PowerPoint file, Google may have made a copy of the PowerPoint file and created a new Google Slides file automatically. This is no longer the default setting.
If you have not already done so, you will need to set up a Google Drive account at drive.google.com . Note that if you have a Gmail account, you already have a Google Drive account with the same login details.
In this article, we'll review converting a PowerPoint presentation to Google Slides in 5 ways:
- Open a PowerPoint presentation in Google Slides
- Drag a PowerPoint file into Google Drive
- Upload a PowerPoint file into Google Drive
- Import all slides from a PowerPoint file into a Google Slides file
- Import specific slides from a PowerPoint file into a Google Slides file
Recommended article: PowerPoint vs Googles Slides (Full Feature Comparison + Benefits)
Do you want to learn more about PowerPoint? Check out our virtual classroom or in-person PowerPoint courses >
For the following examples, we are using PowerPoint 2013 or later with Windows 10. The process is the same for other versions of PowerPoint and Windows. You can use Chrome or another browser.
Presentations will convert best if you have designed the PowerPoint deck as follows:
- Titles are in title placeholders
- Body text is in body placeholders (if possible)
- Themes have been applied
- Slide master(s) and layouts have been used
- Images are good quality
- Fonts are readable by Google Slides (standard or safe fonts should convert without a problem)
- Links or hyperlinks work
The following are five ways to convert a PowerPoint presentation to Google Slides. It's up to you which method you prefer.
1. Convert PowerPoint to Google Slides by opening a PowerPoint presentation in Google Slides
The easiest way to convert a PowerPoint presentation to Google Slides is by opening the PowerPoint deck in Google Slides.
To convert a PowerPoint presentation to Google Slides by opening the file in Google Slides:
- Navigate to drive.google.com in your browser and enter your login details if necessary.
- At the top of the screen, click New, select Google Slides from the drop-down menu and then select Blank presentation. A blank presentation appears.
- In the menu at the top of the screen, click File and then select Open. A dialog box appears.
- Click Upload at the top of the dialog box.
- Click Browse. A dialog box appears.
- Navigate to the location of the file on your computer, click the file and then click Open. You can also double-click the file. The file will be named the same name as the PowerPoint file but will be in Google Slides format.
- Edit the Google Slides presentation as required.
- Double-click in the title and enter a name for the presentation.
- On the top left, click the Slides icon (Slides Home) to return to the Google Slides area of Google Drive. Editing changes will be saved automatically.
When you select Open from the File menu, you will have the option of choosing from Google Drive as well as other locations including Upload:

2. Convert PowerPoint to Google Slides by dragging a PowerPoint file into Google Drive
To import a PowerPoint presentation into Google Slides by dragging the file into a Google Drive folder from your computer:
- Double-click the folder where you want to store your imported PowerPoint presentation. In the folder, an icon may appear with Drop files here.
- Drag the title bar of the Google Drive window down and resize the window so you can view both the Google Drive folder and your computer with the PowerPoint file.
- Drag the PowerPoint file into the Google Drive folder. The file is still a PowerPoint or PPTX file at this point.
- Double-click the file in the Google Drive folder to open it. A dialog box appears.
- At the top, select Open with Google Slides. The PowerPoint file opens in Google Slides.
- In the menu at the top of the screen, click File and then select Save As Google Slides to save the presentation in the Google Slides format. There will now be two copies of the presentation – the original PowerPoint presentation and the converted Google Slides file. These files are not linked.
In the following example, a PowerPoint presentation has been dragged into a Presentations folder in Google Drive:

3. Convert PowerPoint to Google Slides by uploading a PowerPoint file into Google Drive
To import a PowerPoint presentation into Google Slides by uploading the file into a Google Drive folder:
- Right-click in a blank area in the folder click Upload files from the drop-down menu. A dialog box appears.
- Navigate to the location of the file on your computer, click it and then click Open. You can also double-click the file.
- In the menu, click File and then select Save As Google Slides to save the presentation in the Google Slides format. There will now be two copies of the presentation – the original PowerPoint presentation and the converted Google Slides file. These files are not linked.
Upload files appears in the context menu when you right-click in a folder in Google Drive as follows:

4. Convert PowerPoint to Google Slides by importing all slides from a PowerPoint file into a Google Slides file
To import a PowerPoint presentation into Google Slides from within a new Google Slides file:
- In the menu at the top, click File and then select Import Slides. A dialog box appears.
- Navigate to the location of the file on your computer, click the file and then click Open. You can also double-click the file.
- On the top right, click All.
- Check or uncheck the option to Keep original theme as required.
- Click Import slides.
The Upload option appears when you select Import Slides from the File menu:

5. Convert PowerPoint to Google Slides by importing specific slides from a PowerPoint file into a Google Slides file
To import specific PowerPoint slides into a new Google Slides presentation:
- Click each slide you want to import.
In the following example, specific slides have been selected for import:

Why does a converted PowerPoint file lose or change formatting in Google Slides?
Google Slides will often change the formatting of your PowerPoint presentation when you convert it.
If Google Slides does not recognize the font that has been used in the PowerPoint presentation, it will convert the font to the closest available Google font. Google Slides uses web fonts by default and PowerPoint uses standard installed fonts on your computer by default.
After you convert a PowerPoint presentation to Google Slides, the formatting should be similar to the original formatting. However, you may need to fix formatting or objects in Google Slides.
Certain features are not supported during PowerPoint conversion to Google Slides:
- Most PowerPoint animations and transitions
- Links or hyperlinks (you will need to reinsert the links)
- Embedded charts and videos (these will be converted to images but you can reinsert videos or recreate charts)
- Linked Excel spreadsheets
- SmartArt graphics (these will be converted to drawing objects)
- Password protected files (they can be previewed in Google Drive but not converted to Google Slides)
- VBA (Visual Basic for Applications) macros
If you have a lot of Excel charts and videos in your PowerPoint deck, you will have issues with conversion.
Subscribe to get more articles like this one
Did you find this article helpful? If you would like to receive new articles, JOIN our email list.
More Resources
How to Add Audio in Google Slides
How to Remove the Background of an Image in PowerPoint
How to Group or Ungroup Objects in PowerPoint (with Shortcuts)
How to Insert a Check Mark or Tick Mark in Google Slides (3 Ways)
How to Make an Object Appear and Disappear in Google Slides Using Animations
Related courses
Microsoft PowerPoint: Introduction
Microsoft PowerPoint: Intermediate / Advanced
Microsoft PowerPoint: Design for Non-Designers
Microsoft PowerPoint: Animations Bootcamp
VIEW MORE COURSES >
Our instructor-led courses are delivered in virtual classroom format or at our downtown Toronto location at 18 King Street East, Suite 1400, Toronto, Ontario, Canada (some in-person classroom courses may also be delivered at an alternate downtown Toronto location). Contact us at [email protected] if you'd like to arrange custom instructor-led virtual classroom or onsite training on a date that's convenient for you.
Copyright 2024 Avantix ® Learning
You may also like

How to Insert or Type A with an Accent Mark in Google Docs (À, Á, Â, Ä, à, á, â, or ä) – 6 Ways
You can insert or type a with an accent mark in Google Docs in several ways. You can use built-in tools, online tools, add-ons or keyboard shortcuts (including Alt code shortcuts). The letter a can be inserted with an accent in both upper or lower case. The following are common accents in upper or lower case – À, Á, Â, Ä, à, á, â, or ä.

How to Insert or Type U with an Accent Mark in Google Docs (Ù, Ú, Û, Ü, ù, ú, û, or ü) – 6 Ways
You can insert or type u with an accent mark in Google Docs in several ways. You can use built-in tools, online tools, add-ons or keyboard shortcuts (including Alt code shortcuts). The letter u can be inserted with an accent in both upper or lower case. The following are common accents in upper or lower case – Ù, Ú, Û, Ü, ù, ú, û, or ü

How to Insert or Type O with an Accent Mark in Google Docs (Ò, Ó, Ô, Õ, Ö, ò, ó, ô, õ or ö) – 6 Ways
You can insert or type o with an accent mark in Google Docs in several ways. You can use built-in tools, online tools, add-ons or keyboard shortcuts (including Alt code shortcuts). The letter o can be inserted with an accent in both upper or lower case. The following are common accents in upper or lower case – Ò, Ó, Ô, Õ, Ö, ò, ó, ô, õ or ö.
MORE POWERPOINT ARTICLES >
Google, the Google logo and related Google Drive applications and logos are registered trademarks of Google LLC in Canada, US and other countries.
Microsoft, the Microsoft logo, Microsoft Office and related Microsoft applications and logos are registered trademarks of Microsoft Corporation in Canada, US and other countries. All other trademarks are the property of the registered owners.
Avantix Learning |18 King Street East, Suite 1400, Toronto, Ontario, Canada M5C 1C4 | Contact us at [email protected]
Our Courses
Avantix Learning courses are offered online in virtual classroom format or as in-person classroom training. Our hands-on, instructor-led courses are available both as public scheduled courses or on demand as a custom training solution.
All Avantix Learning courses include a comprehensive course manual including tips, tricks and shortcuts as well as sample and exercise files.
VIEW COURSES >
Contact us at [email protected] for more information about any of our courses or to arrange custom training.
Privacy Overview
Pin it on pinterest.
- Print Friendly

[Solved] How to Upload PowerPoint to Google Drive

3 Reasons to Upload Your PowerPoint to Google Drive
How to upload powerpoint to google drive, drag & drop a powerpoint into google drive, upload a powerpoint presentation from within google drive, how to convert your powerpoint to google slides, upload your powerpoint with google drive or onedrive, final words: how to upload powerpoint to google drive, related posts, how to add music to powerpoint slideshow and find free music, how to record audio in powerpoint for narration or voice-over | step-by-step, 10s method: how to add bullet points in powerpoint.
- Best Video Converters
- The Best Video Downloaders for Windows

“Downloading Do Not Turn OFF The Target!” Error In Samsung
- The Best Network Monitoring Tools
- The Best TVs for Xbox Series X

‘IP address conflict’ – How To Manage & Fix
- Best Laptops Under $300
- Best Laptops Under $500

10 Alternatives to Trapcall
- Social Media
- Cut the Cord
TechJunkie is a BOX20 Media Company
Home Mobile How to Convert PowerPoint to Google Slides Without Losing Formatting
How to Convert PowerPoint to Google Slides Without Losing Formatting
What happens when you convert powerpoint files to google slides.
Ideally, you should be able to open and use PowerPoint files in Google Slides without any issues. But in some cases, the fonts, animation, text transparency, and other elements used in the slide can change during file conversion. So, it is important to note the following things when converting your PowerPoint file for use in Google Slides:
- Not all PowerPoint themes are compatible with Google Slides.
- PowerPoint and Google Slides can use GIFs so these should transfer without issues.
- Certain animations and fonts aren’t compatible with Google Slides.
- Audio from PowerPoint slides can carry over but only if they’re in .mp3 or .wav format.
- Video from PowerPoint slides will work fine in Google Slides but they should be in .webm, .mp4, .3gp, .mov, or .avi format.
- Use a custom slide size in Google Slides after converting the PowerPoint file.
How to Convert PowerPoint Files to Google Slides Without Losing Formatting
Google offers a built-in tool in Google Drive to convert PowerPoint files to Google Slides. This is your best option to keep formatting issues at bay, though there’s no guarantee you won’t run into them.
- Open Google Drive on your PC.
- Click New .

- Upload the PowerPoint file you want to convert.
- Proceed to open it.
- Click File .

By following the above steps, you can retain themes and certain animations during the conversion process. However, expect issues to pop up in Google Slides if the presentation uses custom or incompatible fonts, complex animations, and large audio files. In cases like these, you have to manually add or modify these elements.
It is recommended to add large video files to Google Slides after converting the file from PowerPoint format.
You can upload PowerPoint files using the same method from the Google Slides app on your Android or iPhone. But to convert it into a native Google Slides format, you must access Google Drive on the web using your PC
How to Check Formatting Issues with PowerPoint Files in Google Slides
It can be confusing to see what formatting changes were made when uploading your file to Google Slides, especially when you’re working on a large presentation. You can avoid this problem and make editing easier by checking for elements that did not transfer properly during the conversion.
- Open Google Drive.
- Select File Upload .
- Open your file.

From here, you can note the list of the changes you need to make and do it once the file has been converted from PowerPoint to Google Slides format.
Convert With Less Hassle
Since PowerPoint is a more powerful presentation creator than Google Slides, there could be a lot of problems when converting files from one program to the other. As much as possible, we highly recommend sticking to one program for making presentations as it will be easier to edit on your end.
If you want another helpful trick, here’s how you can add speaker notes to Google Slides to make delivering your presentation easier.
A: Yes, you can download Google Slides files to PowerPoint by picking the .PPTX format when downloading a file. You can then open this file on PowerPoint.
A: The file formats compatible with PowerPoint are .asf, .avi .mp4, .m4v, .mov .mpg or .mpeg, and .wmv.
A: No, there’s no natural way to add more fonts to Google Slides or any Google Drive tools. You can access new fonts by using extensions like Extensis Fonts.
How to Hide or Delete Your Amazon Order History
Leave a Reply Cancel reply
Your email address will not be published. Required fields are marked *

Jonas Sunico
Nov 27, 2023
Jonas is a writer with over 6 years of experience in the tech and gaming industry. He holds a bachelor's degree in Journalism from University of the East Philippines and is one of the proud leaders of the academe's Journalism Society. At heart, he's a hardcore tech junkie that loves video games, the latest gadgets, and the wonderful science behind social media and AI.
314 Articles Published
You May Like

How to Get Rid of Generative AI Results in Google

Ashish Mohta
May 21, 2024

How to Take Screenshots of Microsoft Edge Copilot Chat on Android and iOS
May 9, 2024

How to Search on Google in WhatsApp
May 7, 2024

How to Disable Remix on Your YouTube Shorts
May 2, 2024

How To Text Someone from a Different Phone Number (Not Your Own)

Ronil Thakkar
Mar 13, 2024

How to Hide From Someone Without Blocking Them on Messenger
Jun 4, 2024

How to Change Emoji Set in Telegram
May 29, 2024

How to Share Collaborative Collection on Instagram With Multiple People
May 27, 2024

How to Change Your Name in Zoom

May 31, 2021

How To Filter By Color in Google Sheets

Robert Hayes
Jan 15, 2020
Copyright @2024 TechJunkie
2-Step Verification for your LAPU Google account is now mandatory as of Feb. 1, 2024. Sign up now or check if you have 2-Step Verification enabled.

Upload PowerPoint Presentation to Google Drive
Google Docs allows you to upload a Microsoft PowerPoint Presentation which then can be converted to a Google Docs Presentation, thus allowing for collaboration.
Supported file types: .ppt, .pps, .pptx
Note: If you are using Apple's Keynote then you will need to first save the Keynote presentation as a PPT: File > Export > PPT
Follow these steps to share your video with your instructor and fellow students:
Navigate to https://drive.google.com/ and sign in to your LAPU email account.
Once you are in Google Drive select the New button > File Upload .
Locate your PowerPoint presentation and select Open to upload to Google Drive.
Once your upload is complete, select the file name in the upload status window to navigate to open uploaded file.
Note: The file will remain as a PowerPoint file in Google Drive. If you would like to convert the file for Google Slides, select File > Save as Google Slides.
Click here for more information on uploading files to Google Drive.
Share Your Presentation from Google Drive via a Link
A. Set visibility option to anyone with the link can view
Go to drive.google.com
Right-click the file or folder you'd like to share
Select Share
Choose the visibility option: "Anyone with the link"
Choose Access: Anyone "Can View”
Select Save
B. Send the link to a shared file
Go to drive.google.com .
Copy the link at the top of the sharing settings.
Paste the link into your assignment text submission in box.
Click here for more information on sharing files with Google Drive.
Collaborate on a file in Google Drive
To collaborate on a presentation once it has been uploaded you will need to convert the file in Google Drive first. Then share the presentations with your collaborators by clicking "Share" and entering their email addresses. When you share the presentation make sure to select "Can edit." By doing so you have given them access to edit the presentation itself.
Real Time Collaboration
If other people are editing a presentation simultaneously with you, you'll see their names at the top of the page. You'll also be able to chat with other viewers and collaborators in View presentation mode (available in the upper-right corner of the edit page).
Click here for more information on collaborating on a document in Google Drive.
- Help Center
- Google Docs Editors
- Privacy Policy
- Terms of Service
- Submit feedback
Switching to Slides from Microsoft PowerPoint
| PowerPoint outside of work. Now that you have Google Slides, here are some tips to begin using it as your new presentation software.
|
Note: Comparisons are based on Microsoft Office versions 2010, 2013 and 2016.
Comparison at a glance
Show all instructions | Hide all instructions
| In PowerPoint… | In Slides… |
|---|---|
| Share your presentation using SharePoint or OneDrive | , , or . . . . |
| Collaborate in real time from SharePoint or OneDrive | . |
| Access version history in SharePoint or OneDrive | , open your file. . . . |
| Open a PowerPoint presentation | , double-click a PowerPoint file. A preview of your file will open. .Any changes that you make are saved to the original Microsoft Office file. . |
| Access a presentation offline in OneDrive | . , click Settings . box. . . To learn how to access files offline from your desktop or mobile, see . |
| Save a presentation automatically in SharePoint or OneDrive or turn on AutoRecover | . |
| Add images to your presentation | and choose an image from Google Drive, Google Photos, the web and more. For more details, see . |
| Add an Excel chart to your presentation | or . . . . |
Google, Google Workspace and related marks and logos are trademarks of Google LLC. All other company and product names are trademarks of the companies with which they are associated.
Need more help?
Try these next steps:.
Using Google products, like Google Docs, at work or school? Try powerful tips, tutorials, and templates. Learn to work on Office files without installing Office, create dynamic project plans and team calendars, auto-organize your inbox, and more.
3 Ways to Share a PowerPoint on Google Drive
Google Drive is a popular cloud storage platform that makes it easy to store, access, and collaborate on files. One of the most common files people may want to share on Google Drive is PowerPoint presentations. There are a few simple ways to upload and share PowerPoint files on Google Drive.
1. Upload the PowerPoint File to Google Drive
2. share the uploaded powerpoint file, 3. convert the powerpoint to google slides, benefits of sharing presentations on google drive.
There are many benefits of storing your PowerPoint presentations on Google Drive and sharing them from there:
Adjust Share Settings and Permissions
When sharing a presentation file on Google Drive, you can adjust the permissions to control what recipients can do with the file.
Share PowerPoints Securely with Specific People
Collaborate on powerpoints in real-time.
A key benefit of using Google Drive for presentations is the ability for multiple people to collaborate easily:
Generate Shareable Links for Presentations
When people click on the link, they will be able to view the presentation without needing to log in or have access to your Google Drive.
This makes it easy to share presentations with clients, partners, or anyone outside of your organization.
Google Drive takes the friction out of collaborating on and presenting PowerPoints. So next time you need to share a presentation, look no further than your Google Drive account.
About The Author
Vegaslide staff, related posts, how to create a powerpoint in libreoffice impress, how to make text appear transparent in powerpoint, how to save powerpoint as pdf with notes, 3 ultimate ways to copy slides in powerpoint.
How-To Geek
How to convert google slides to powerpoint.

Your changes have been saved
Email Is sent
Please verify your email address.
You’ve reached your account maximum for followed topics.
4 AI Search Engines I Use Every Day
The internet is not forever, so it's time to preserve what you can, cut your presentation time down with the pechakucha method.
If someone sent you a presentation on Google Slides, but you'd rather work on it in Microsoft PowerPoint, you can easily convert it to a .pptx file in just a few simple steps. Here's how it's done.
First, you'll need to access your Google Slides presentation in Google Drive. To do this, head on over to the Drive website in your browser of choice.

Next, open the Google Slides file that you'd like to convert to PowerPoint.

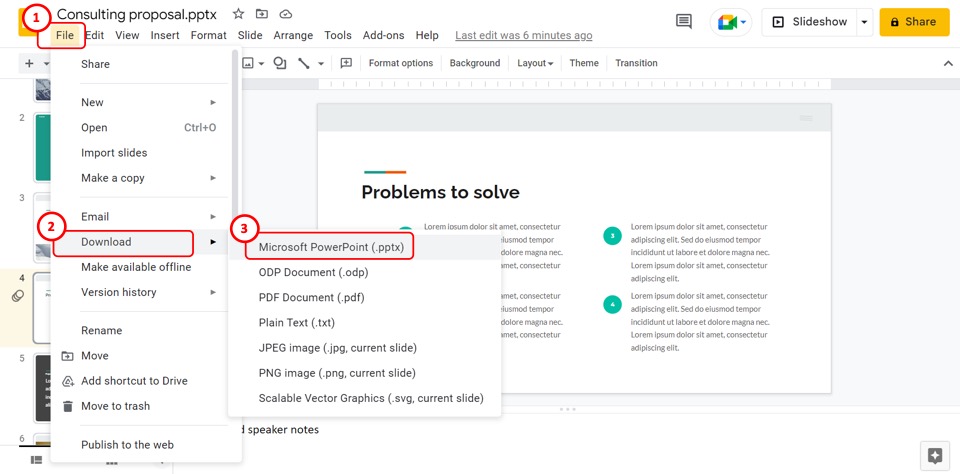
Once you've opened the Google Slides document, select the "File" tab in the top-left corner of the window.

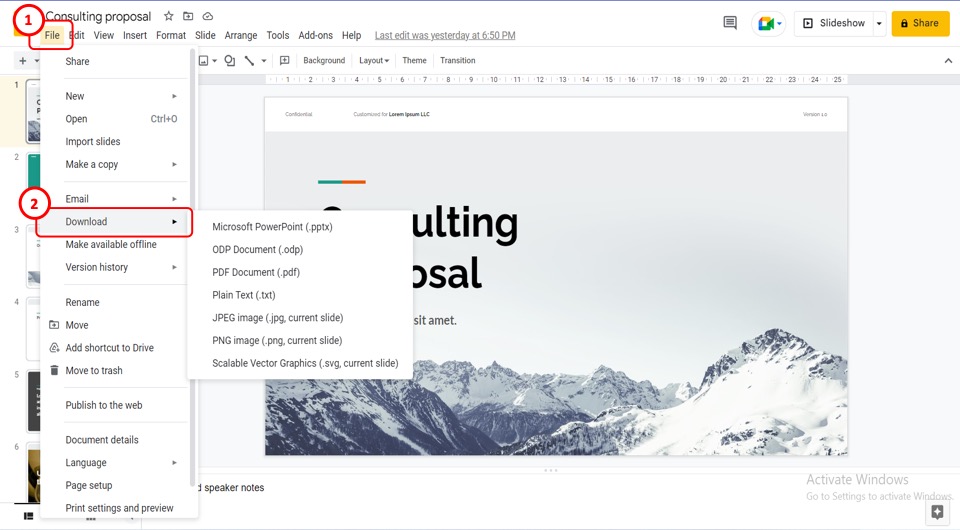
In the drop-down menu, select the "Download" button.

In the submenu that appears, you'll see a list of download options, ranging from .pptx to .pdf to different image formats . To convert this presentation to a PowerPoint file, select the "Microsoft PowerPoint .pptx" option from the menu.

Once selected, the file will begin converting to .pptx and download to your computer. Once finished, you can open the file and begin editing.
Converting a PowerPoint to Google Slides is just as simple. If this is what you're looking to do, open Google Drive , select "New," and then click the "File Upload" option. In File Explorer (or Finder on Mac), select the file to upload it. Once in Drive, right-click the document, select "Open With," and then choose "Google Slides."
- Google Slides
- Microsoft PowerPoint
How to convert Google Slides to a PowerPoint presentation in 4 easy steps
- It's easy to convert Google Slides to a PowerPoint presentation on your computer.
- To save a Google Slides presentation as a PowerPoint deck, use the File menu to download the Google Slides file as a PowerPoint (.pptx) file.
- Your browser will then give you the option to open or save the PowerPoint file on your computer.
- Visit Business Insider's homepage for more stories .
Whether you regularly use Google Slides or Microsoft PowerPoint , it's just a matter of time before you need to convert one of those files into the other.
If you have a PowerPoint presentation that you need to convert into a Google Slides deck, read our article, " How to convert a PowerPoint presentation to Google Slides in 2 different ways ."
If you need to go the other way and save a Google Slides presentation as a PowerPoint deck, it's even simpler. Here's how to do it.
How to convert Google Slides to PowerPoint
1. Open Google Drive in a web browser.
2. Locate and open the Slides deck that you want to convert to PowerPoint. You can zero in on your slides by clicking the three horizontal lines at the top left of the page and choosing "Slides" from the menu.
3. In the open presentation, click "File."
4. Click "Download" and then click "Microsoft PowerPoint (.pptx)."
A PowerPoint version of the document will be saved to your computer. Find the file depending upon what browser you're using:
- In Firefox, you'll see a dialog box that lets you open the file in PowerPoint or save it to your hard drive.
- In Google Chrome, the file will be automatically downloaded. You can find it in the download bar at the very bottom of the browser window.
- In Microsoft Edge, you should see a dialog box at the bottom of the browser asking if you want to open or save the file.
Related coverage from How To Do Everything: Tech :
How to add music or other audio to a google slides presentation, how to embed a youtube video into a powerpoint presentation, depending on the version of your powerpoint, how to edit google docs files offline, for when you're without internet or trying to eliminate online distractions, how to embed a youtube video in google slides in 4 simple steps to make your slideshow presentations more engaging.
Watch: I cut Google out of my life for 2 weeks, but the alternatives prove why Google is so much better
- Main content
- Slidesgo School
- Google Slides Tutorials
How to Convert Presentations from Google Slides to PowerPoint

PowerPoint and Google Slides are currently the most popular presentation software. Some people will prefer one to the other, and PowerPoint has been around for a longer time, but both programs have found a way to be compatible with each other’s files. In this new Slidesgo School tutorial, you’ll learn how to convert your Google Slides presentation into a PowerPoint presentation.
How to Export a Google Slides Presentation to PowerPoint — From Google Slides
How to export a google slides presentation to powerpoint — from google drive, how to adjust your google slides presentation in powerpoint.
- Open your presentation in Google Slides.
- Click File → Download → Microsoft PowerPoint (.pptx).
- A copy of your Google Slides presentation will be saved as a .pptx file (PowerPoint file format).
- Access your Google Drive.
- Select the presentation you want to download.
- Right-click → Download.
- Most likely, the font used in your Google Slides presentation won’t be installed in your PC. All Google Slides presentations use fonts from Google Fonts. As for our templates, you’ll find URLs to each font that we’ve used. For more information, please refer to the “ How to Change, Embed or Add Fonts in PowerPoint ” tutorial.
- The color of the hyperlinks present in your Google Slides presentation could revert to PowerPoint’s default blue if that color wasn’t set in the master slides. For more information, please refer to the “ How to Add or Change Themes in Google Slides ” tutorial.
- If any picture or image was rotated in your Google Slides presentation, it will go back to its original position in PowerPoint, so you’ll need to re-adjust it.
Do you find this article useful?
Related tutorials.

How to Download Google Slides Templates
When preparing a presentation, many people start panicking because they realize how much time it will take to edit each and every slide. Creating them from scratch, filling them in, looking for pictures, moving the elements...How stressful! But there is a solution that saves you a lot of time. We're sure that you've browsed the internet for templates, or basically, pre-established designs and elements, that can be downloaded for free and can be edited to your liking. Are we right? Then, we have some good news for you!

Discover our collection of printable templates
With the advance of technology, printing has become something that is no longer a necessity. Smartphones have made the paper format less and less frequent, but there are still certain cases in which having physical resources is much more convenient. Whether it's for taking notes, handing out assignments, making worksheets or handing out business cards or invitations, it's necessary to print your customized designs.From now on, in every Slidesgo printable presentation that you download, you will find the instructions for printing on the third slide. Depending on the style, colors or format of each presentation, we will tell you if you can...

How to Add Superscript and Subscript in Google Slides
Let’s take the most famous formula: E=mc^2, Einstein’s relativity equation. It wouldn’t be the same if it was E=mc2, right? Okay, yes, some people write it like that because it’s very famous and it won’t be misunderstood. But technically… It can! This is where the sophistication of superscript or subscript enters the room! Do you know how to write them in equations, copyright brands or even footnotes in your presentations? Let’s figure out how.

How to Add Superscript and Subscript in PPT
It can be a registered brand, a footnote or a math formula that you need to properly write. “2^2+2” is not the same as “22+2”, is it? Using superscript or subscript in a proper way makes a whole difference in texts. If it’s for your mathematical or physics complex formulas or just an anecdotic footnote, let’s figure out how to write them in a powerpoint presentation!
Convert Google Slides to PowerPoint [Without Losing Formatting]
By: Author Shrot Katewa
![Convert Google Slides to PowerPoint [Without Losing Formatting]](https://artofpresentations.com/wp-content/uploads/2022/11/Featured-Image-COnvert-Google-Slides-to-Powerpoint.webp "how to save a powerpoint presentation to google drive")
Any presentation made in Google Slides can be converted to different format files using simple steps. In this article we will demonstrate how to convert a Google Slides presentation to PowerPoint.
To convert Google Slides to PowerPoint, first select the “File” menu. Then, click on “Download” and finally choose the “Microsoft PowerPoint” option in the pop-up menu. Your file will now be downloaded onto your device as a PowerPoint.
To learn more on this conversion method and to see what else can be done using the same simple steps please read further on.
1. Can You Open Google Slides in PowerPoint?
You can open a Google Slides presentation in Microsoft PowerPoint. Google Slides allows you to easily convert a presentation file into a PowerPoint file. You can find the “Microsoft PowerPoint (.pptx)” option in the “File” menu in Google Slides.
2. How to Convert Google Slides to PowerPoint?
It is easy to convert a Google Slides file into a PowerPoint format using the “File” menu. All you have to do is to follow the 3 quick steps.
Step-1: Click on the “File” format

In the menu bar at the top of the screen, click on the “File” menu. In the dropdown menu under the “File” tab, click on the “Download” option.
Step-2: Click on the “Microsoft PowerPoint (.pptx)” option
Another drop-down menu will appear by the “Download” option in the “File” menu. To convert Google Slides to PowerPoint, you have to click on the “Microsoft PowerPoint (.pptx)” option.
Step-3: Click on the converted PowerPoint file
When you click on the “Microsoft PowerPoint (.pptx)” option in the “File” menu, the Google Slides presentation will download on your device as a Microsoft PowerPoint file. Once the file downloads, click on the downloaded PowerPoint file to open and edit it.
3. How to Convert Google Slides To PowerPoint Without Losing Formatting?
When converting a Google Slides file to a PowerPoint presentation, some of the formattings may change. This can happen if the Google Slides presentation includes any object like fonts, animations, audio, etc. that is not supported by Microsoft PowerPoint.
To convert Google Slides to PowerPoint without losing formatting, you can download the slides as images. All you have to do is to follow the 7 easy steps.
The first step is to open the Google Slides presentation that you want to convert to Microsoft PowerPoint. In the menu bar located at the top of the screen, click on the “File” tab.
Step-2: Click on the “Download” option
In the dropdown menu under the “File” tab in the menu bar, click on the “Download” option. This will open a pop-up menu by the “Download” option (as shown above).
Step-3: Click on the “PNG image” option
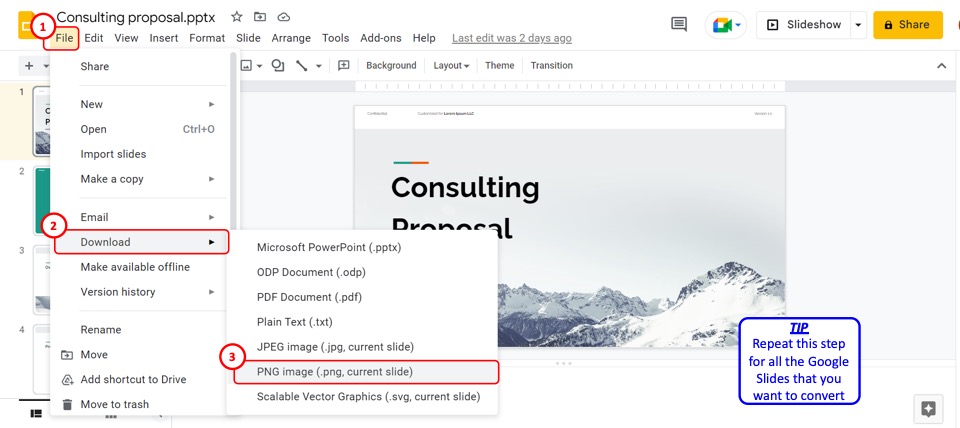
In the pop-up menu by the “Download” option in the dropdown “File” menu, click on the “PNG image (.png, current slide)” option to download the open slide. Then repeat the step for each slide that you want to convert to Microsoft PowerPoint.
Step-4: Click on the “Format Background” option
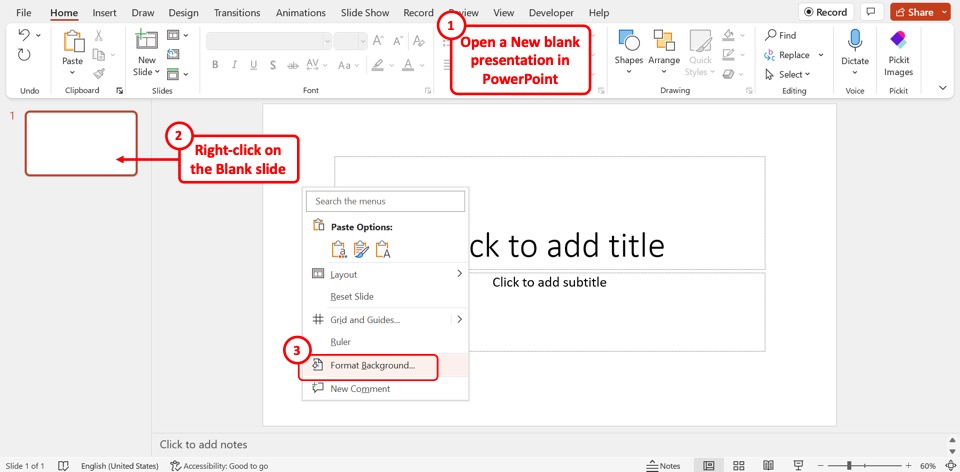
The next step is to open a new presentation file in Microsoft PowerPoint. Then “Right Click” on the blank slide. Click on the “Format Background” option in the right-click menu.
Step-5: Click on the “Picture or texture fill” option
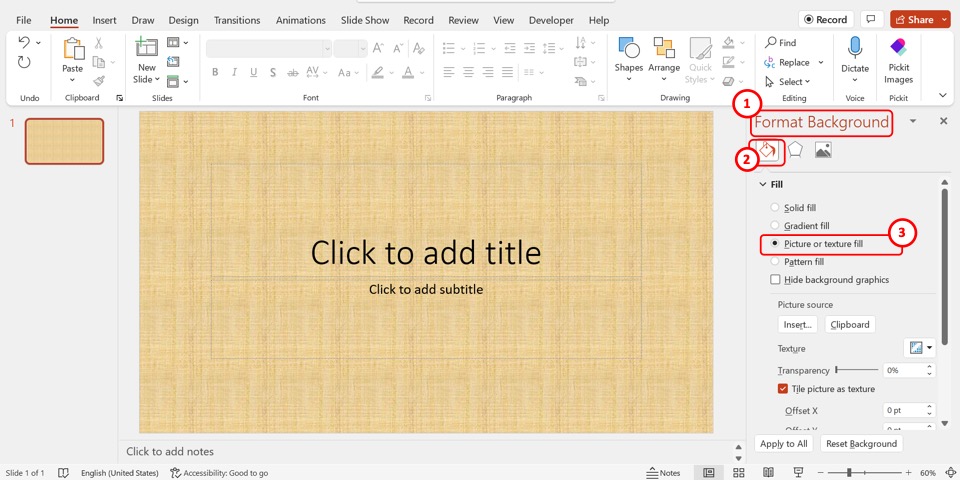
At the top of the “Format Background” sidebar on the right side of the screen, click on the “Fill” icon. In the “Fill” section of the sidebar, click on the “Picture of texture fill” option.
Step-6: Click on the “From a File” option
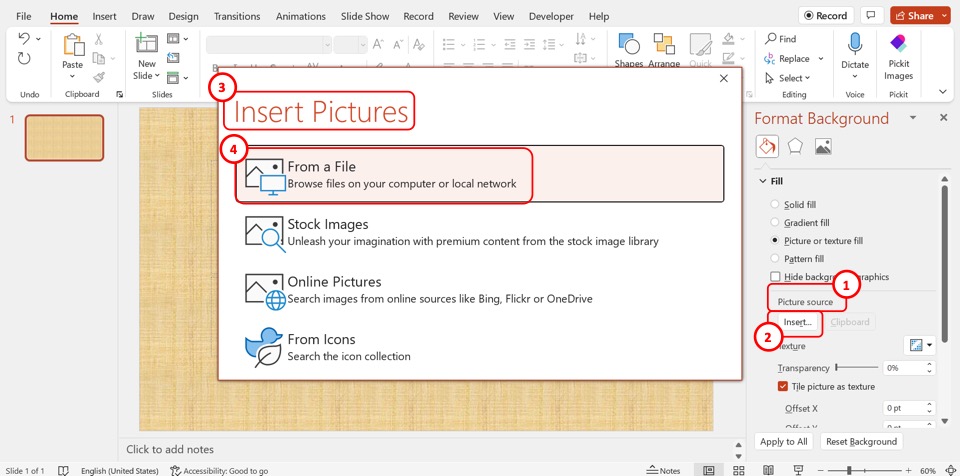
In the “Picture source” section of the “Format Background” sidebar, click on the “Insert” button. This will open the “Insert Pictures” dialog box. In the dialog box, click on the “From a File” option.
Step-7: Click on the “Insert” button
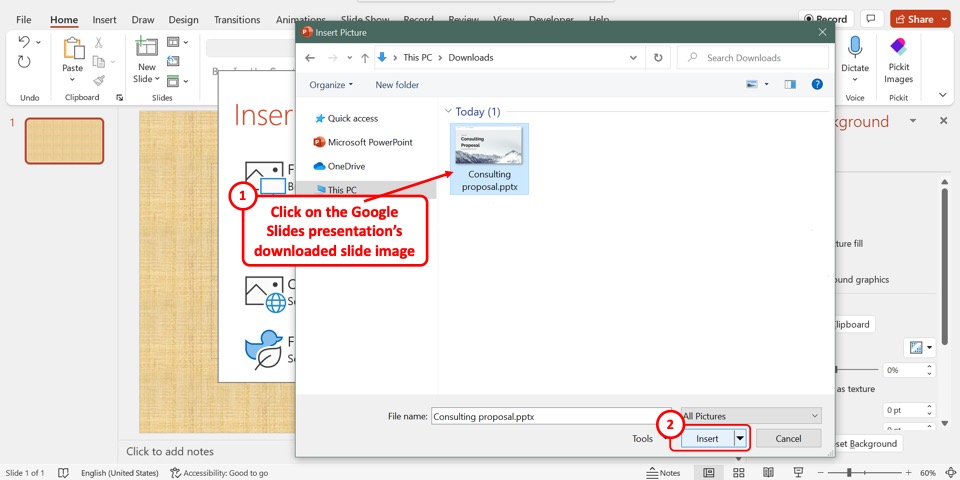
In the “Insert Pictures” pop-up window, select the Google Slides presentation slide downloaded as an image. Then all you have to do is click on the “Insert” button at the bottom of the pop-up window to convert the slide to PowerPoint without losing formatting.
4. How to Export Google Slides with Audio to PowerPoint?
To export a Google Slides presentation with audio to PowerPoint, all you have to do is follow the steps detailed in section 2 . However, if you find the audio missing in the converted PowerPoint presentation, you can download the audio from Google Slides and insert it into PowerPoint.
To do so, follow the 5 quick steps.
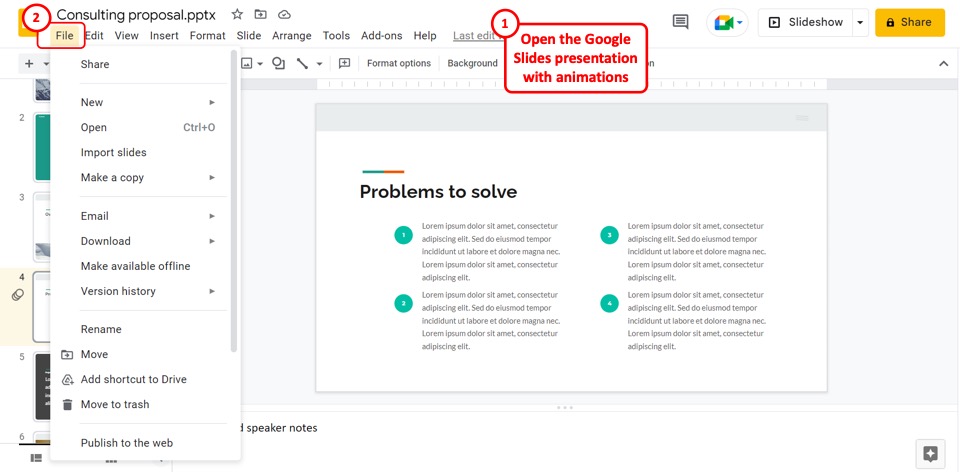
Step-1: “Right Click” on the Audio
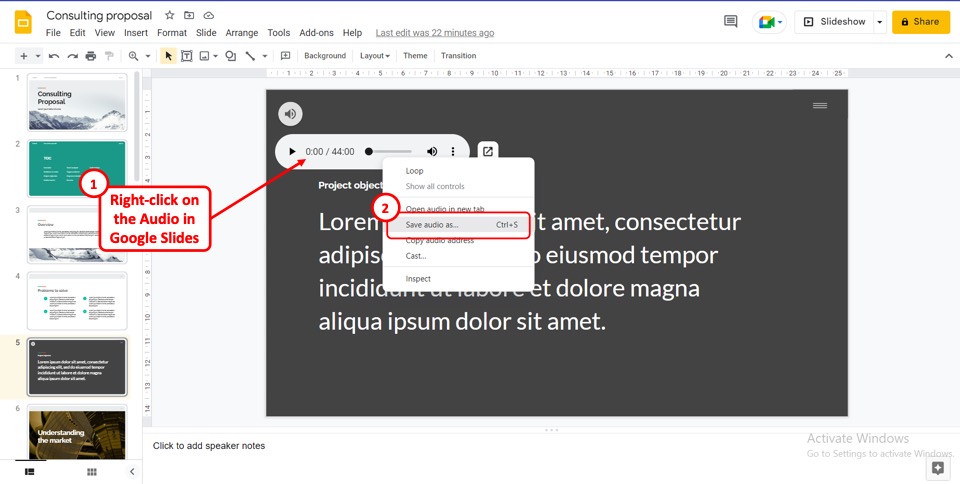
In Google Slides, “Right Click” on the audio. In the right-click menu, click on the “Save audio as..” option. Alternatively, you can select the audio and press the “Ctrl+S” keys on your keyboard. This will open the “Save as” pop-up window.
Step-2: Click on the “Save” option
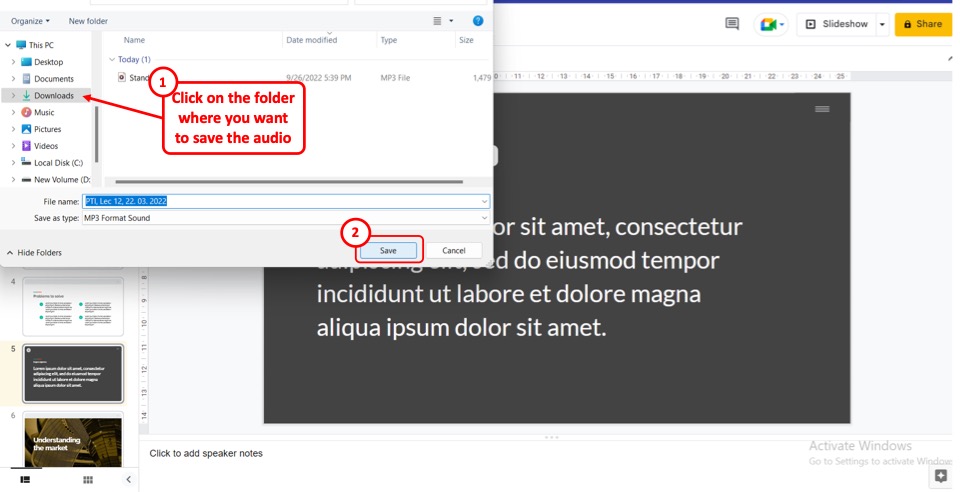
In the “Save As” pop-up window, select the folder on your desktop where you want to download the audio. Then you have to click on the “Save” option at the bottom of the pop-up window to download the audio from Google Slides.
Step-3: Click on the “Insert” option
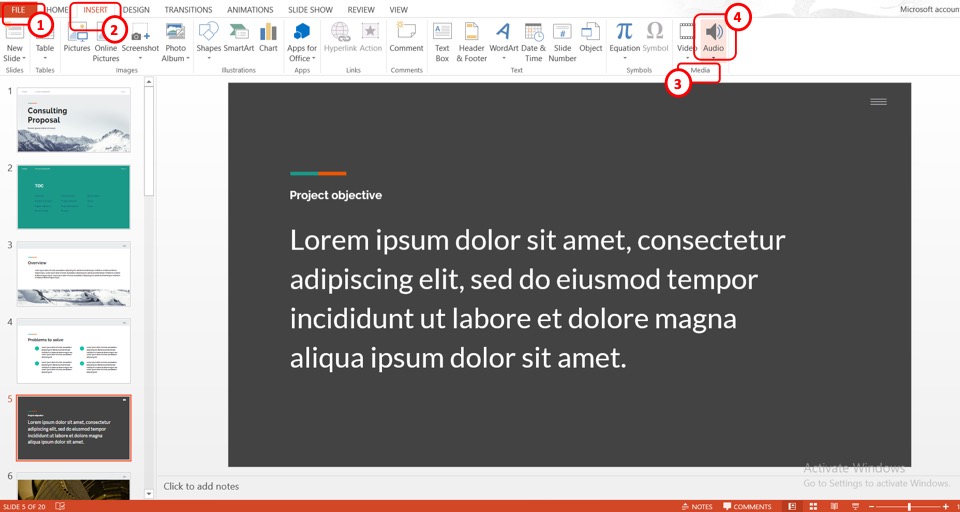
The next step is to open the PowerPoint presentation converted from Google Slides. In the menu ribbon located at the top of the screen, click on the “Insert” tab. In the “Media” group of the “Insert” menu, click on the “Audio” option.
Step-4: Click on the “Audio on My PC..”
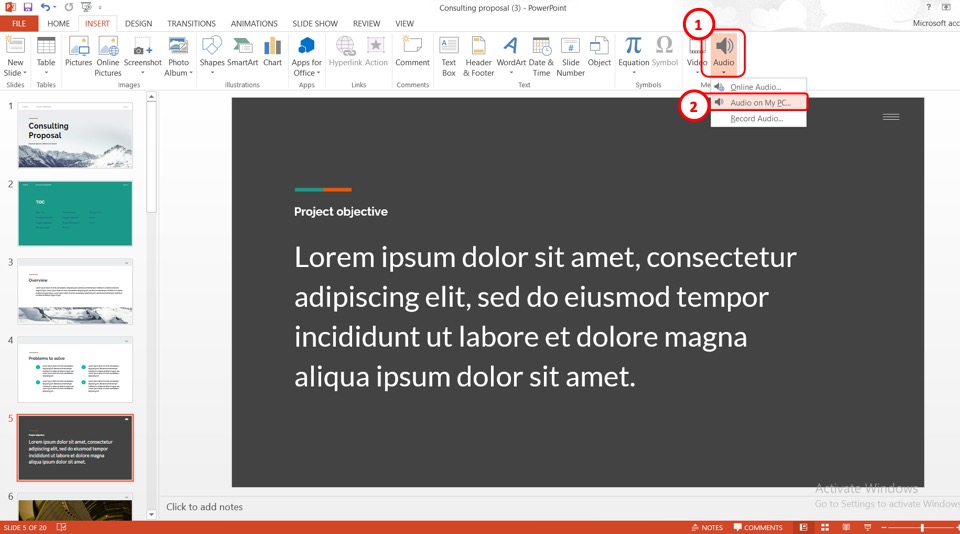
In the dropdown menu under the “Audio” option, click on the “Audio on My PC..” option. This will open the “Insert Audio” dialog box.
Step-5: Click on the “Insert” option
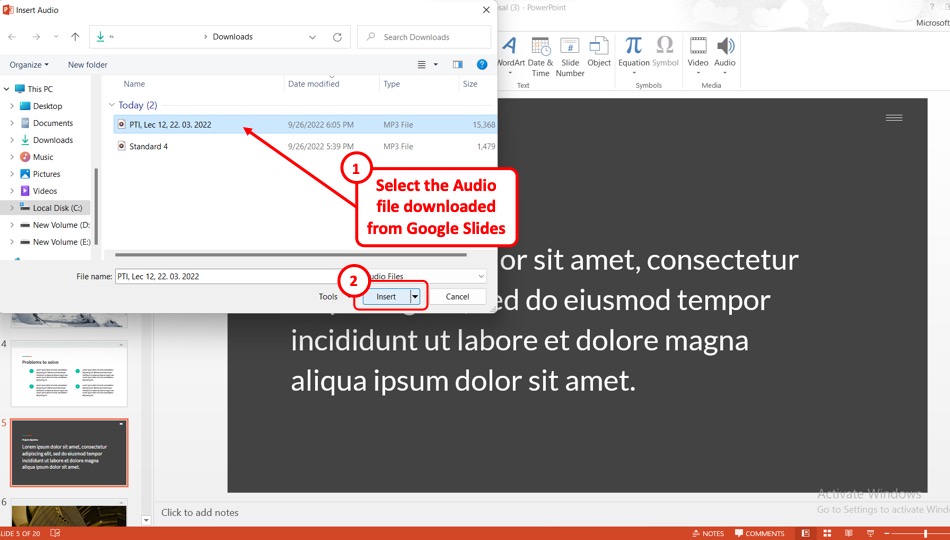
In the “Insert Audio” dialog box, select the audio downloaded from Google Slides. Then all you have to do is click on the “Insert” option at the bottom of the dialog box to insert the audio into the converted Microsoft PowerPoint presentation.
5. How to Export Google Slides with Animations to PowerPoint?
In Microsoft PowerPoint, all animations available in Google Slides are available. To export a Google Slides presentation with animation to PowerPoint, all you have to do is download the presentation as a Microsoft PowerPoint file.
All the animations will be automatically retained. To convert a Google Slides presentation with audio, follow the 4 simple steps.
Step-1: Click on the “File” menu
The first step is to open the Google Slides presentation with animations that you want to convert to PowerPoint. In the menu bar located at the top of the screen, click on the “File” menu.
In the dropdown “File” menu, click on the “Download” option. Then click on the “Microsoft PowerPoint (.pptx)” option in the pop-up menu by the “Download” option to save the Google Slides presentation as a PowerPoint file.
Step-3: Click on the “Slide Show” tab
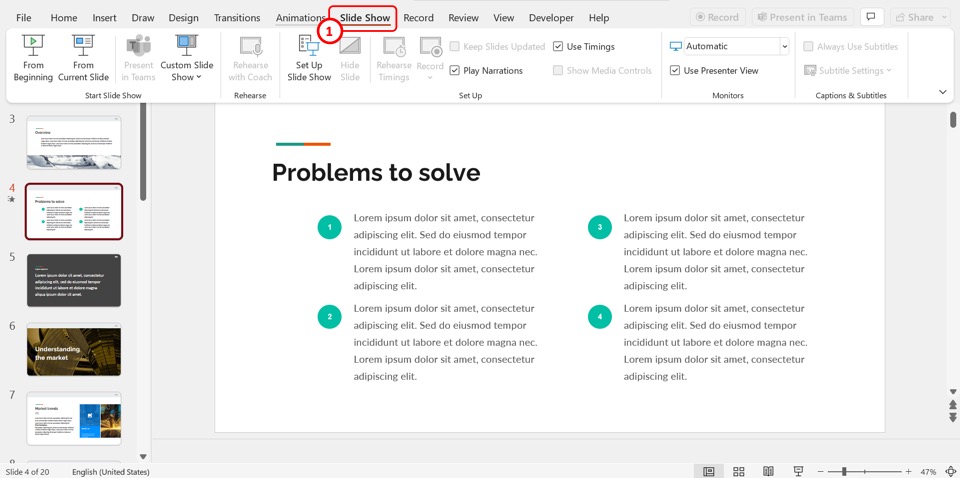
Now you can open the PowerPoint presentation to preview the animations. In the menu bar in PowerPoint, click on the “Slide Show” tab.
Step-4: Click on the “From Beginning” option
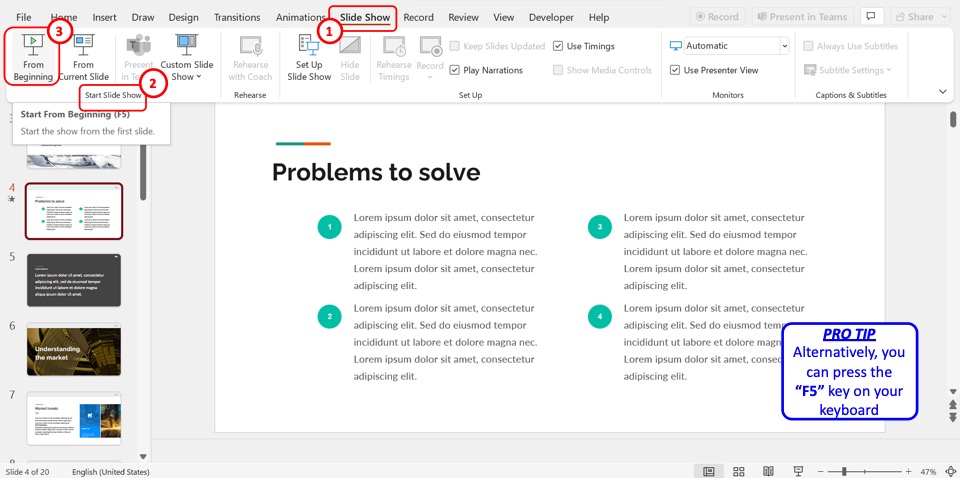
In the “Start Slide Show” group of the “Slide Show” menu, click on the “From Beginning” option. You can alternatively press the “F5” key on your keyboard to start the presentation to preview the animations downloaded from Google Slides.
6. How to Stop PowerPoint from Changing Formatting?
Once you convert the Google Slides presentation to Microsoft PowerPoint, the formatting is likely to change when editing the PowerPoint slides. To stop PowerPoint from changing the formatting, follow the 7 quick steps.
Step-1: Click on the “File” tab
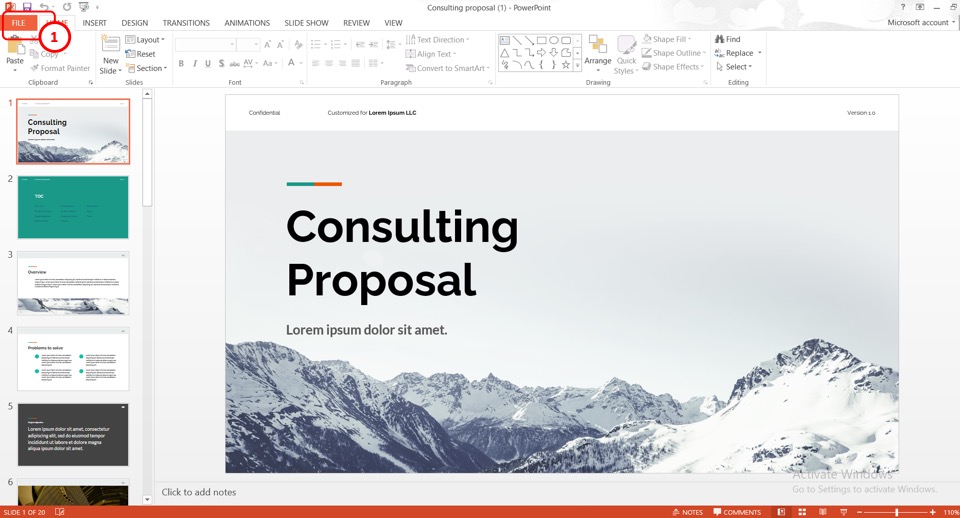
The first step is to open the downloaded Microsoft PowerPoint file. In the menu ribbon located at the top of the screen, click on the “File” tab.
Step-2: Click on the “Options” option

The next step is to open the “PowerPoint Options” dialogue box. To do so, click on the “Options” option in the sidebar on the left side of the “File” screen.
Step-3: Click on the “Proofing” option
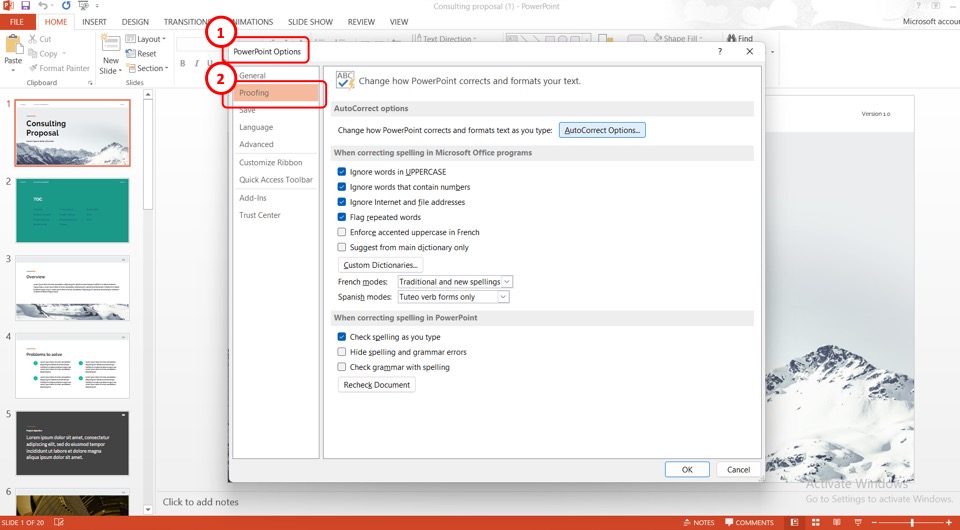
When you click on the “Options” option, the “PowerPoint Options” dialog box will appear in the middle of the screen. In the left column of the dialog box, click on the “Proofing” option.
Step-4: Click on the “AutoCorrect Options” button

The next step is to click on the “AutoCorrect Options..” button in the right column of the “PowerPoint Options” dialog box. This will open the “AutoCorrect” dialog box.
Step-5: Click on the “AutoFormat As You Type” tab
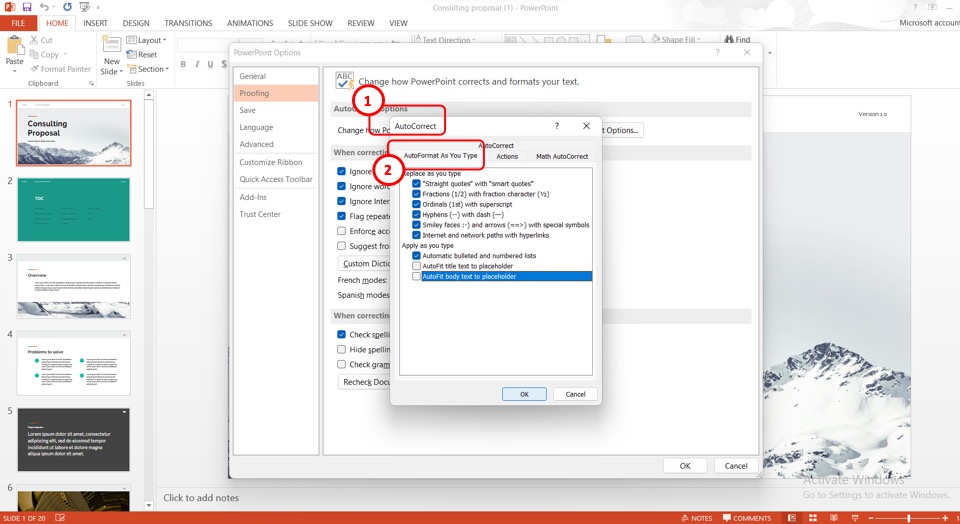
In the “AutoCorrect” dialog box, click on the “AutoFormat As You Type” tab located at the top.
Step-6: Click on the “AutoFit body text to placeholder” option
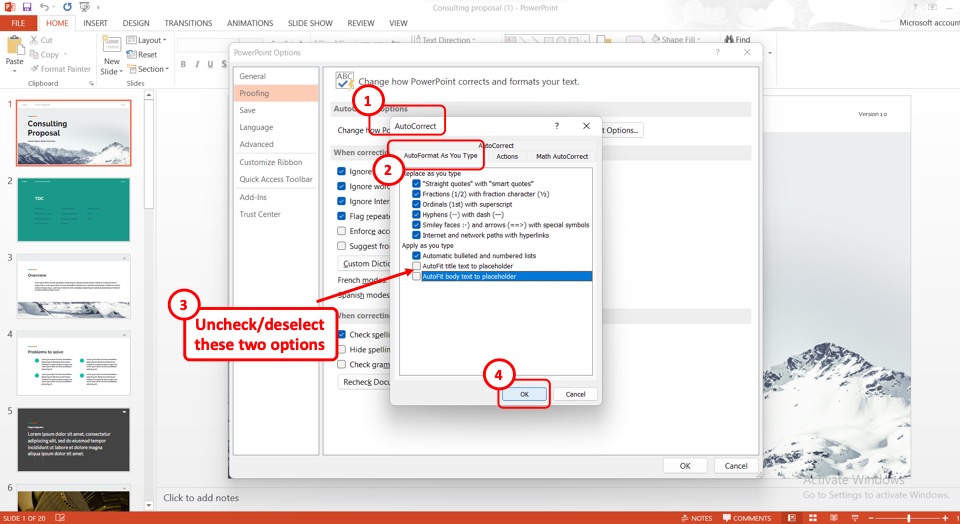
In the “Apply as you type” section of the “AutoCorrect” dialog box, you have to deselect or uncheck the “AutoFit title text to placeholder” option and the “AutoFit body text to placeholder” options. To do so, click on the options. The checkmarks by the options will disappear.
Step-7: Click on the “OK” button
Finally, all you have to do is click on the “OK” button at the bottom of the “AutoCorrect” dialog box to stop auto-formatting. Then click on the “OK” button at the bottom of the “PowerPoint Options” dialog box to return to editing the presentation (as shown above).
7. How to Edit Google Slides Presentation in PowerPoint?
Google Slides allows you to export a presentation to Microsoft PowerPoint without any changes in formatting. You can also edit the exported Google Slides presentation in PowerPoint. All you have to do is follow the 3 simple steps.

The first step is to convert the Google Slides presentation into a PowerPoint file. To do so, click on the “File” menu which is the first option in the menu bar at the top of the screen.
In the dropdown menu under the “File” tab, click on the “Download” option. Now all you have to do is click on the “Microsoft PowerPoint (.pptx)” option in the pop-up menu by the “Download” option to save the file as a PowerPoint presentation (as shown above).
Step-3: Click on the “Enable Editing” option
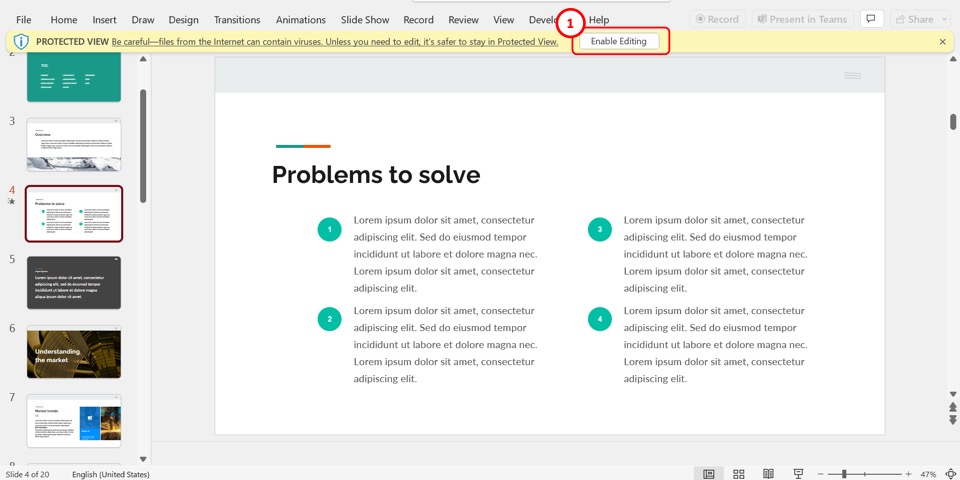
The final step is to open the converted PowerPoint file. The Microsoft PowerPoint presentation will open in “Protected View” format which is not editable.
To edit the presentation, click on the “Enable Editing” option in the yellow message bar under the menu ribbon located at the top of the screen. You can now edit the Google Slides presentation using the editing features available in PowerPoint.
8. How to Convert Google Slides to PDF?
Google Slides allows you to convert a presentation file into PDF using the “File” tab. Converting a presentation into a PDF file allows you to easily print the slides without losing formatting. To convert a presentation file into a PDF, follow the 2 quick steps.
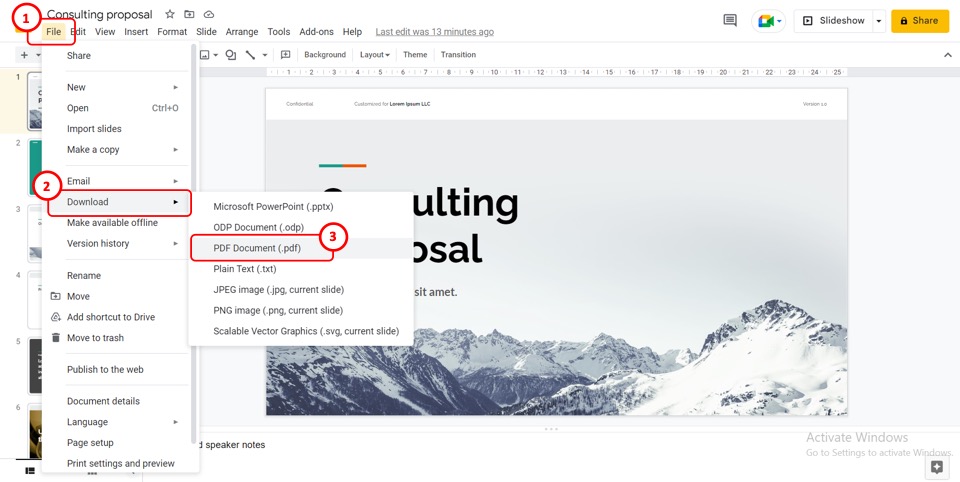
First, you have to open the Google Slides presentation that you want to convert to PDF. Then click on the “File” tab in the menu bar at the top of the screen. In the dropdown “File” menu, click on the “Download” option.
Step-2: Click on the “PDF Document (.pdf)” option
In the pop-up menu by the “Download” option in the “File” menu, click on the “PDF Document (.pdf)” option to convert the Google Slides presentation to a PDF document (as shown above).
9. How to Convert Google Slides to Keynote?
Since Keynote is a part of Apple’s iWork productivity suite, you cannot directly convert a Google Slides presentation to Keynote.
To convert a Google Slides presentation to Apple Keynote, you have to download the presentation as a Microsoft PowerPoint file first. Unfortunately, Keynote will show that some fonts and other formatting are missing from the converted file since it does not support all the formatting available in Google Slide.
9.1 How to Convert Google Slides to Keynote on Mac?
You can easily convert a Google Slides file to Keynote on Mac. All you have to do is follow the 4 quick steps.
The first step is to open the Google Slides presentation. Then click on the “File” tab in the menu bar at the top of the screen.
In the “File” dropdown menu, click on the “Download” option. Then click on the “Microsoft PowerPoint (.pptx)” option from the pop-up menu by the “Download” option.
Step-3: Click on the “File” tab
Now you have to open the Keynote application on your Mac device. Click on the “File” option on the top left corner of the screen. It will open a dialog box.
Step-4: Select the PowerPoint file
In the dialogue box, select the downloaded PowerPoint file. Then all you have to do is click on the “Open” option to convert the PowerPoint file to a Keynote application.
9.2 How to Convert Google Sides to Keynote on iPad
To convert a Google Slides presentation to Keynote on an iPad, you have to follow the 4 easy steps.
Step-1: Select the “More” option
The first step is to open the Google Slides presentation on your iPad. Then tap on the “More” option which is the “…” icon on the top right corner of the screen.
Step-2: Select the “Send a Copy” option
When you tap on the “…” icon, a menu bar will appear on the screen. Tap on the “Send a Copy” option from the menu bar. It will open another pop-up menu.
Step-3: Tap on the “PowerPoint” option
Tap on the “PowerPoint” option from the pop-up menu by the “Send a Copy” option to download the Google Slides presentation as a Microsoft PowerPoint file.
Step-4: Click on the “Copy to Keynote” option
Once the Google Slides file is converted into a PowerPoint file, a dialog box will appear on the screen. Now all you have to do is swipe left in the dialog box and tap on the “Copy to Keynote” option. This will open the PowerPoint presentation file in the Keynote application.
Credit to kroshka__nastya (on Freepik) for the featured image of this article (further edited).
How to Convert Google Slides to PowerPoint: 3 Easy Methods
- Last updated July 3, 2023
Google Slides transformed how we create presentations by enabling seamless collaboration and incorporating other impressive features. Despite this, some people still prefer editing with Microsoft PowerPoint or sending files as attachments instead of a link.
Be it for compatibility, convenience, or simply for preference. You may find yourself searching for how to convert Google Slides to PowerPoint format. Fortunately, the conversion process is simple and straightforward.
In this guide, we will walk you through how to convert Google Slides to PowerPoint so you can take advantage of the unique features and familiarity that Microsoft PowerPoint offers. Let’s take a look at the different converting methods.
Table of Contents
Method 1: Export Your Presentation from Google Slides
The easiest way to convert Google Slides to PowerPoint is to save your presentation from Google Slides. To do so, simply follow the steps below:
- To get started, go to your Google Slides presentation.

- Next, on the Google Slides main menu, click “File” > “Download” > “Microsoft PowerPoint (.pptx).”

- Wait for your Google Slides presentation to be exported as a PowerPoint presentation. Then, review the contents of the downloaded file.

Once you have finished exporting Google Slides to PowerPoint, you can view, edit, and save it in Microsoft PowerPoint. Note, however, that there might be some formatting issues after the conversion, so be sure to check for any formatting mistakes.
Method 2: Converting a Presentation in PDF Format to a Powerpoint File
PDF-formatted presentations are easier to share, especially when the purpose of the presentation is to view the slideshow without animations. When your Google Slides presentation is saved in PDF format, you can convert the slideshow to PowerPoint using the following steps:
- Open your PDF file in Adobe Acrobat. Then, click “File” > “Save As…”

- On the pop-up menu, enable the “ Convert to Word, Excel, or PowerPoint ” option and select .pptx as your file format.

- Here you have two file location options for saving your presentation: the “ Recent Folder ” or the “ Choose a Different Folder ” section. A pop-up menu will appear if you click “ Choose a different Folder .” Here, you can browse for the location of where you want to save your file.

- Once you’re done choosing the file destination, click “ Save .”
Note that Adobe Acrobat’s conversion tool is only available in the paid version of the app. You can also use Adobe Acrobat’s online services for their PDF to PowerPoint tool . Here, you can simply upload your PDF file and then download the converted PowerPoint file.
Method 3: Download Your Slides from Google Drive
Google Drive chooses the most common file formats when downloading a file created from one of the Google Editors suite apps (Docs, Sheets, Slides, etc.). Google Slides automatically downloads as a PowerPoint presentation.
Follow the steps below to download Google Slides as PowerPoint:
- Open your Google Drive and find your Google Slides file.

- Next, right-click on your file and select “Download.” Once the presentation has been downloaded, you can view and edit the presentation.

Benefits of Converting Google Slides to PowerPoint
Aside from the benefits we have mentioned above, there are several additional benefits of converting Google Slides to PowerPoint:
- File import compatibility – You can import different file formats, from various image formats such as .png, .gif, and .tif, to .mp4 videos, and many more.
- Feature versatility – PowerPoint has more advanced features and tools than Google Slides, such as animations, transitions, shape-drawing, and other editing tools.
- More control over your presentation design – PowerPoint offers far more control over your presentation design, including transitions, animations, and slide layouts, giving you more flexibility.
- Extensive range of templates – PowerPoint has a larger library of templates and themes, giving you more options to create different presentations for all purposes.
- Access to legacy features – PowerPoint has been used for over two decades and has a large user base. Many legacy features, such as word processing, drawing, outlining, presentation management tools, and PowerPoint add-ons, have been added, making it particularly useful to specific users.
Extra Tips for Converting Google Slides to PowerPoint
While saving your Google Slides as PowerPoint is relatively easy, the feature sometimes gives you different formatting than your initial file. The best practices highlighted below are helpful to new users converting their Google Slides for the first time and for experienced users who have used the feature before.
When converting Google Slides to PowerPoint presentations, here are a few factors to keep in mind:
1. Use the Built-In Export Option
For most presentations, Google Slides’ built-in export option is the simplest way to open Google Slides in PowerPoint.
As we showed earlier, you can simply go to “File” > “Download” > “Microsoft PowerPoint” to convert your file into .pptx format.
2. Look for Formatting Problems That Need Correcting
Since the conversion process might involve some lost formatting, it’s good practice to double-check your file after converting it.
First, make sure all of your slides are formatted correctly. Then, check the images, animations, logos, and transitions, among other settings, to confirm that they still work. Also, check the embedded links and the inserted Google Sheets into Google Slides to ensure there are no formatting problems.
3. Converting to PDF Instead
It is common to encounter formatting issues when converting Google Slides to PowerPoint. Therefore, you can instead convert your presentation into a PDF file. This works best when you just need your presentation to be viewed without the animations.
The conversion freezes all the formatting and layout of your presentation. This way, everyone you share your file with can view your presentation with the same formatting you have. However, they won’t be able to make any changes to it.
4. Checking Defaulted Fonts
Some fonts from your Google Slides presentation may not be available in PowerPoint. In this case, the unavailable fonts may be replaced by default fonts, so it’s best to review your slides to ensure all the fonts are still appropriate.
Frequently Asked Questions
How to convert other file formats to powerpoint.
You can use the built-in features of the software you initially used to create your presentation. Alternatively, you can use an online third-party conversion tool to convert other presentation file types such as .odp, .key, .prezi, etc.
Is PowerPoint compatible with Google Slides?
Yes, Microsoft PowerPoint is compatible with Google Slides to some extent. You can import Google Slides presentations into PowerPoint, but some features and formatting may need to be recovered in the process. Conversely, you can export PowerPoint presentations to Google Slides, but some features and formatting may be lost.
How to convert Google Slides to PowerPoint without losing formatting?
Depending on the complexity of your presentation, you may not be able to convert animation-filled or more detailed Google Slides presentations to PowerPoint without losing some formatting. You can also use third-party tools to convert your file, but you may have the same formatting problems.
Wrapping it Up
Converting Google Slides to PowerPoint is a convenient way to reach a wider audience and utilize advanced features. In addition, the process is simple and can be done in just a few clicks.
By converting your Google Slides presentation to PowerPoint, you can expand your presentation capabilities, ensure compatibility with more software, and have more control over the design.
Whether you want to make minor adjustments, share your file with a specific audience, or just love editing presentations with PowerPoint, converting Google Slides to PowerPoint can help you get the versatility and control you need to create effective and dynamic presentations.
If you want to create expert-looking presentations or learn more about PowerPoint and G Suite apps, check out these online courses on PowerPoint and G Suite to start your creative process today.
- How to Convert PowerPoint to Google Slides [Step-by-Step]
- How To Do Hanging Indent on Google Slides
- How to Add a GIF to Google Slides (Easy 2 Minute Guide)
- Insert Google Sheets Into Google Slides [Easy Guide]
- How to Make a Flyer on Google Docs (Free Templates)
- Top 12 Best Google Sheets Add-Ons
- How to Convert Google Docs to Word [Easy Steps]
- Google Slides vs PowerPoint: Which Program Is Better?
- How To Insert a PDF into Google Slides [3 Easy Ways]
Most Popular Posts

How To Highlight Duplicates in Google Sheets

How to Make Multiple Selection in Drop-down Lists in Google Sheets

Google Sheets Currency Conversion: The Easy Method
A 2024 guide to google sheets date picker, related posts.
- Sumit Bansal
- May 16, 2024
- May 2, 2024
How to Insert a Google Sheets Hyperlink in 5 Seconds
- Chris Daniel
- April 15, 2024
How to Import Stock Prices into Google Sheets
- April 2, 2024
Thanks for visiting! We’re happy to answer your spreadsheet questions. We specialize in formulas for Google Sheets, our own spreadsheet templates, and time-saving Excel tips.
Note that we’re supported by our audience. When you purchase through links on our site, we may earn commission at no extra cost to you.
Like what we do? Share this article!
How to Open Google Slides in PowerPoint Quickly
Learn to convert Google Slides to PowerPoint effortlessly. This guide covers direct export methods, maintaining animations, and... read more

#ez_toc_widget_sticky--1 .ez-toc-widget-sticky-container ul.ez-toc-widget-sticky-list li.active{ background-color: #ededed; } Steps To Follow
Get Trainings
Advance your Microsoft Excel & Office Skills with the MyExcelOnline Academy!

Google Slides is a cloud-based tool that enables you to create, edit, and share presentations from any internet-enabled device. It’s great for collaboration and has a clean, simple interface. Microsoft PowerPoint , in contrast, is a powerful desktop application known for its comprehensive features including advanced animations, extensive templates, and the ability to work offline. Combining the best of both worlds by opening Google Slides in PowerPoint often requires moving from one platform to the other.
Download our 141 Free Excel Templates and Spreadsheets !
Key Takeaways
- Google Slides offers real-time collaboration and is accessible from any device, whereas PowerPoint is known for its advanced features that can be enhanced with the PPT Productivity Add-in.
- To open a PowerPoint presentation in Google Slides, you can either upload the file to Google Drive, import the entire presentation directly into Google Slides, or import specific slides.
- Created PowerPoint files are compatible with Google Slides, allowing for a seamless transition between the two platforms for presenting and editing.
When You Should Convert From Google Slides to PowerPoint?
You may want to shift gears to PowerPoint if you’re heading into a situation where internet reliability is questionable; PowerPoint’s offline capabilities mean you won’t miss a beat without Wi-Fi. Teamwork also gets a boost if everyone is wielding Microsoft Office—converting ensures flawless compatibility. And, for those intricate presentations demanding next-level animations or unique slide transitions, PowerPoint’s advanced toolkit steps up to the plate. Privacy is another draw; if you’re keen on keeping tight reins on who sees your slides and where they live, PowerPoint gives you that granular control unlike the cloud-dependent Google Slides.
Table of Contents
Step-by-Step Conversion Methods
Method 1: direct export from google slides to powerpoint.

Method 2: Using Google Drive for Conversion

Opening a Powerpoint Presentation in Google Slides
If you want to convert the file to a Google Slides format:

Tips for Smoother Transition
Preserving formatting during conversion.
Keeping your slides looking just as snappy post-conversion is key, and sticking with common fonts like Arial, Times New Roman, or Calibri is a golden rule—they’re recognized widely across both platforms. Before you bid farewell to Google Slides, inspect each slide closely for any quirky alignment or offbeat spacing that might rattle PowerPoint. Tinkering with the animations looms as a notorious hurdle, they don’t always make the leap smoothly, so consider simplifying them or prepare to reapply in PowerPoint. Embrace these tips, and your converted presentation will land in PowerPoint looking sharp and primed for action.
Additional Considerations for Complex Presentations
For complex presentations brimming with bells and whistles, keep an eagle eye on multimedia elements—they’re notorious for throwing tantrums during a switch. Videos, audio files, and GIFs call for a compatibility check; make sure they play nice with PowerPoint. Consider the less-is-more approach; if something isn’t crucial, chop it. This is not only aesthetic advice but a practical one, as it could reduce file size and ease the transition. And remember, some unique Google Slides features might not have a twin in PowerPoint land, so prepare to be creative in reimagining these bits if they’re must-haves.
Troubleshooting Common Conversion Issues
Handling incompatible features and formats.
Now and then, you’ll stumble across a feature that just doesn’t jive with PowerPoint. Those snazzy Google Slides fonts that aren’t part of the standard Office suite? They’ll default to something more pedestrian once they cross the border. Special effects and animations might lose their mojo or disappear altogether. Don’t let this catch you off-guard—review and replace them with PowerPoint-friendly options. In terms of formats, things get even trickier with embedded forms or scripts—PowerPoint will throw up its hands here. Sometimes, a little rework or finding alternative approaches in PowerPoint is all you need to keep the show on the road.
Solutions for Large File Conversion Challenges
When wrestling with a hefty presentation, the file size can flex its muscles and hinder the conversion process. Keep your presentation fighting fit by compressing images directly in Google Slides before exporting. Clean house and discard any unnecessary slides or content which can bog down the file size. If the presentation still tips the scales, split it into smaller, more manageable chunks. And don’t forget, converting fewer slides at a time can be a tactical move, allowing for a smoother transition before you reassemble the whole ensemble in PowerPoint.
Enhancing Your Presentation Post-Conversion
Adding advanced features in powerpoint.
Once your Google Slides arrive in PowerPoint , it’s time to flex those advanced features muscles. Get creative with PowerPoint’s vast array of animations and transitions to give your slides that extra flair. Dive into custom multimedia options, adding in video or audio that truly resonates with your audience. Explore the depth of custom slide layouts and design elements to ensure your presentation stands out. With PowerPoint’s robust toolkit at your disposal, the sky’s the limit for crafting a show-stopping slide deck that’ll keep all eyes glued to the screen.
Recommendations for Final Touches Before Your Presentation
To make sure your presentation is hitting all the right notes , give it a final polish in PowerPoint. Run through your slides like a dress rehearsal, checking the pacing and transitions. Use the ‘Rehearse Timings’ feature to nail the timing down to a T. Linking back to essential data? Verify that all your hyperlinks are in working order. And maybe the most overlooked—but oh-so-critical—step: proofread your slides for those pesky typos that have a habit of sneaking in. A little attention to detail here can make all the difference in delivering a clear, professional presentation.
Frequently Asked Questions
Can powerpoint open google slides directly.
Yes, PowerPoint can open Google Slides directly, but it’s not always a straightforward affair. You’ll likely need to first download your Google Slides as a PowerPoint file and then open it with Microsoft PowerPoint. Keep in wisdom that the formatting could change when switching platforms, so take a moment to check that everything looks as it should after opening.
How to maintain animation effects when converting from Google Slides to PowerPoint?
For animations that seem to have a mind of their own post-conversion, make a note of the effects used in Google Slides. After converting to PowerPoint, you might have to reapply similar animations manually. PowerPoint has a broader suite of animations, so you may even find an upgrade or two. Keep animations simple to avoid compatibility hiccups and a smoother transition from one platform to the other.
Can you convert Google Slides into PowerPoint?
Absolutely, you can convert Google Slides into PowerPoint! It’s as simple as opening your Google Slides presentation, selecting ‘File’, and then ‘Download’ followed by ‘ Microsoft PowerPoint (.pptx). Your Google Slides will then transform into a PowerPoint file, ready for any final tweaks or to be presented as-is.
How do I link a Google slide to a PowerPoint?

John Michaloudis
John Michaloudis is a former accountant and finance analyst at General Electric, a Microsoft MVP since 2020, an Amazon #1 bestselling author of 4 Microsoft Excel books and teacher of Microsoft Excel & Office over at his flagship Academy Online Course .
Related Articles
How to Remove Picture Backgrounds Fast in PowerPoint
How to Cite Web Sources in Slides with APA Powerpoint Citations
How to Create Flyers in PowerPoint – Step-by-Step Guide
Get Video Training
Dramatically Reduce Repetition, Stress, and Overtime! Exponentially Increase Your Chances of a Promotion, Pay Raise or New Job! Learn in as little as 5 minutes a day or on your schedule.
IMAGES
VIDEO
COMMENTS
Locate and select your PowerPoint file, then click "Open." After the file uploads to Google Drive, right-click it and choose Open With > Google Slides. The presentation will open in Google Slides but remain a PowerPoint file as you can see next to the name on the top left. Click File > Save as Google Slides from the menu to convert it.
To get started, open your PowerPoint file. Go to File > Export. Choose "Create PDF/XPS Document.". Follow the prompts to save the file to your computer. 4. Log in to your Google Drive account and click the "New" button. 5. Select "File upload.". Choose the PDF file you've just saved and upload it to your Google Drive.
Select the PowerPoint file and import it into your Google Drive account. To do so, click New → File upload. Then locate the file in your computer and click Open. As an alternative, you can drag the file directly to your browser. Once the file has been uploaded, double-click it. Click Open with and choose Google Slides.
On your computer, open a document or presentation in Google Docs or Google Slides. Click Insert Chart From Sheets. Click the spreadsheet with the chart you want to add, then click Select. Click the chart you want to add. If you don't want the chart linked to the spreadsheet, uncheck "Link to spreadsheet."
4. Select the PowerPoint slides you want to convert to Google Slides. To import your PowerPoint slides into your Google Slides presentation, simply: Select the PowerPoint slides you want to import (or select All in the upper right-hand corner) Check or uncheck Keep Original Theme (see note below) Click Import slides.
Navigate to your file (s) and then click "Open.". Alternatively, you can drag and drop a file from your computer directly into the web browser for an easy upload. Once your file uploads, right-click it, point to "Open With" on the context menu, and then select "Google Slides.". Google then converts your presentation into a Google ...
Step 1: Drag Your PowerPoint File Into Google Drive. To get started here, open your Google Drive folder in Chrome. Navigate to the folder where you'd like to store your imported presentation. Click on it to open it up. Get started by opening your Google Drive account. In the center of your screen, you'll see text reading Drop Files Here.
Converting a PowerPoint file using Google Slides. Step 1: Open Google Slides and click Blank under Start a New Presentation. Step 2: At the top, under the title settings, click File > Open. Step 3 ...
From the menu, choose Slides . In the upper-right corner of the Recent presentations section, select the file picker (file folder) icon. In the Open a file screen, choose Upload . Open the folder where your Powerpoint file is stored. Drag the Powerpoint file into the Drag a file here section. Alternatively, use the blue file-picker button to ...
Click Upload at the top of the dialog box. Click Browse. A dialog box appears. Navigate to the location of the file on your computer, click the file and then click Open. You can also double-click the file. The file will be named the same name as the PowerPoint file but will be in Google Slides format.
How to convert a PowerPoint to Google Slides. 1. Open Google Drive. 2. Select "New" in the upper left-hand corner of the screen. 3. Select "Upload File." Choose to upload a new file. Peter Aitken ...
Open Google Drive and sign in to your Google Drive account. Navigate to the folder where you want to store your PowerPoint presentation. Locate your PowerPoint file on your computer and drag and drop the file to the surface of Google Drive, where it says, "Drop files here". You will now see a message in the lower right where it says ...
Open Google Drive on your PC. Click New. Select File Upload. Upload the PowerPoint file you want to convert. Proceed to open it. Click File. Select Save as Google Slides. By following the above steps, you can retain themes and certain animations during the conversion process. However, expect issues to pop up in Google Slides if the presentation ...
Locate your PowerPoint presentation and select Open to upload to Google Drive. Once your upload is complete, select the file name in the upload status window to navigate to open uploaded file. Note: The file will remain as a PowerPoint file in Google Drive. If you would like to convert the file for Google Slides, select File > Save as Google ...
Do consider subscribing, it's totally free: https://www.youtube.com/channel/UCDgVxla6knbtIkYbL_eCGEA?sub_confirmation=1In this video, I'm teaching you how to...
Learn how to convert your powerpoint file into a google slides file in this easy tutorial. Watch the video and follow the simple steps.
Open a PowerPoint presentation. In Drive, double-click a PowerPoint file. A preview of your file will open. At the top, click Open with Google Slides . Any changes that you make are saved to the original Microsoft Office file. For more details, see Work with Microsoft Office files. Access a presentation offline in OneDrive.
The people you shared with will receive an email with the presentation attached or with a link to view or edit it on Google Drive. 3. Convert the PowerPoint to Google Slides. Another option is to convert your PowerPoint presentation to a Google Slides presentation within Google Drive: Right-click on the PowerPoint file in Google Drive.
To do this, head on over to the Drive website in your browser of choice. Next, open the Google Slides file that you'd like to convert to PowerPoint. Once you've opened the Google Slides document, select the "File" tab in the top-left corner of the window. In the drop-down menu, select the "Download" button. In the submenu that appears, you'll ...
Google Slides PowerPoint. 1. Open Google Drive in a web browser. 2. Locate and open the Slides deck that you want to convert to PowerPoint. You can zero in on your slides by clicking the three ...
Open your presentation in Google Slides. Click File → Download → Microsoft PowerPoint (.pptx). A copy of your Google Slides presentation will be saved as a .pptx file (PowerPoint file format). Access your Google Drive. Select the presentation you want to download. Right-click → Download.
All you have to do is to follow the 7 easy steps. Step-1: Click on the "File" format. The first step is to open the Google Slides presentation that you want to convert to Microsoft PowerPoint. In the menu bar located at the top of the screen, click on the "File" tab. Step-2: Click on the "Download" option.
Method 1: Export Your Presentation from Google Slides. The easiest way to convert Google Slides to PowerPoint is to save your presentation from Google Slides. To do so, simply follow the steps below: To get started, go to your Google Slides presentation.
Method 2: Using Google Drive for Conversion. Alternatively, Google Drive doubles as your conversion assistant, helping you switch between Google Slides and PowerPoint.To kick things off, open your Drive, find the desired slides file, and right-click it for the drop-down menu.