Learning and Teaching
- Assessment & Feedback

How to mark an Assignment online in Moodle
Published on: 31/07/2023 · Last updated on: 31/07/2024
Preparing to grade an Assignment
Before beginning marking it’s important to understand how your assignment has been setup, so that you can ensure that you are not showing marks and feedback to students before you are ready for them to see them .
By default, Moodle assignments hide grades and feedback from students through the ‘Marking Workflow’ option.
When you create an Assignment, the ‘Marking Workflow’ setting will be enabled. This automatically hides any marks and feedback that you upload for students until you take specific steps to release the marks and feedback. This is a ‘safer’ option for the requirements of most Teachers .
Guidance on releasing Marks and Feedback, and sending a notification to students with a few clicks, using marking workflow can be found below.
If you prefer instead to turn off the marking workflow option you can do so within the Assignment’s settings, under the ‘Grade’ settings. Note that doing this will mean that any marks and feedback added to Moodle will be immediately visible to students!
If you have turned off Marking Workflow, but you also don’t want students to see marks and feedback as soon as they are uploaded, you will need to hide the Assignment link and Gradebook item until you are ready to reveal the marks and feedback.
The guidance below shows how to turn off Marking Workflow (if you wish) and how to hide the Assignment link and Gradebook item:
- Find your Assignment and select Settings
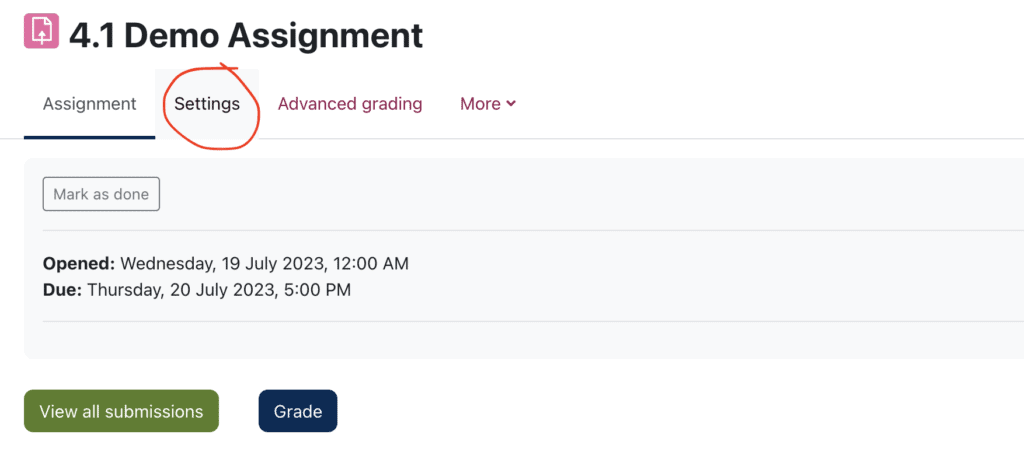
- Scroll down to ‘ Grade ’ settings and expand them
- Set use marking workflow to no
- Save changes
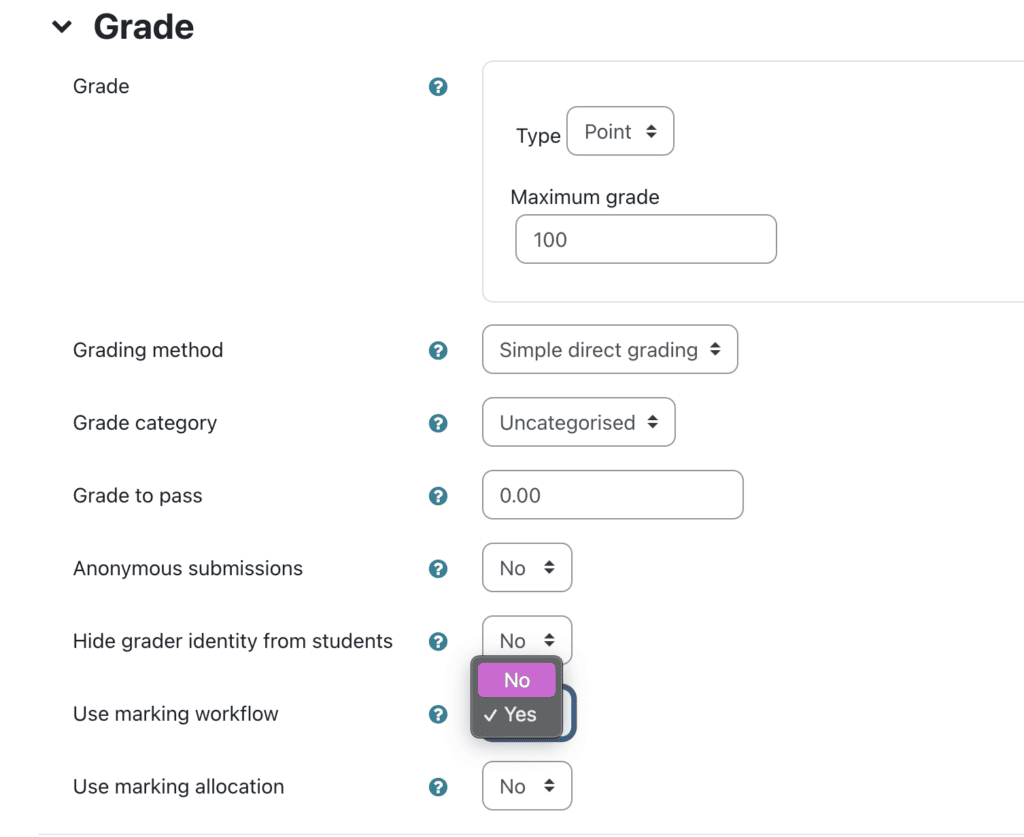
Note: Any marks and feedback you add will now be immediately visible to students!
To manually hide marks and feedback from students you will need to hide the Assignment’s Gradebook item and the Assignment link (which is often not practical where there are late submissions)
To hide the Gradebook item:

- Go to the Course Homepage and choose the Grades tab
- From the Grader Report drop-down menu, choose Gradebook Setup .
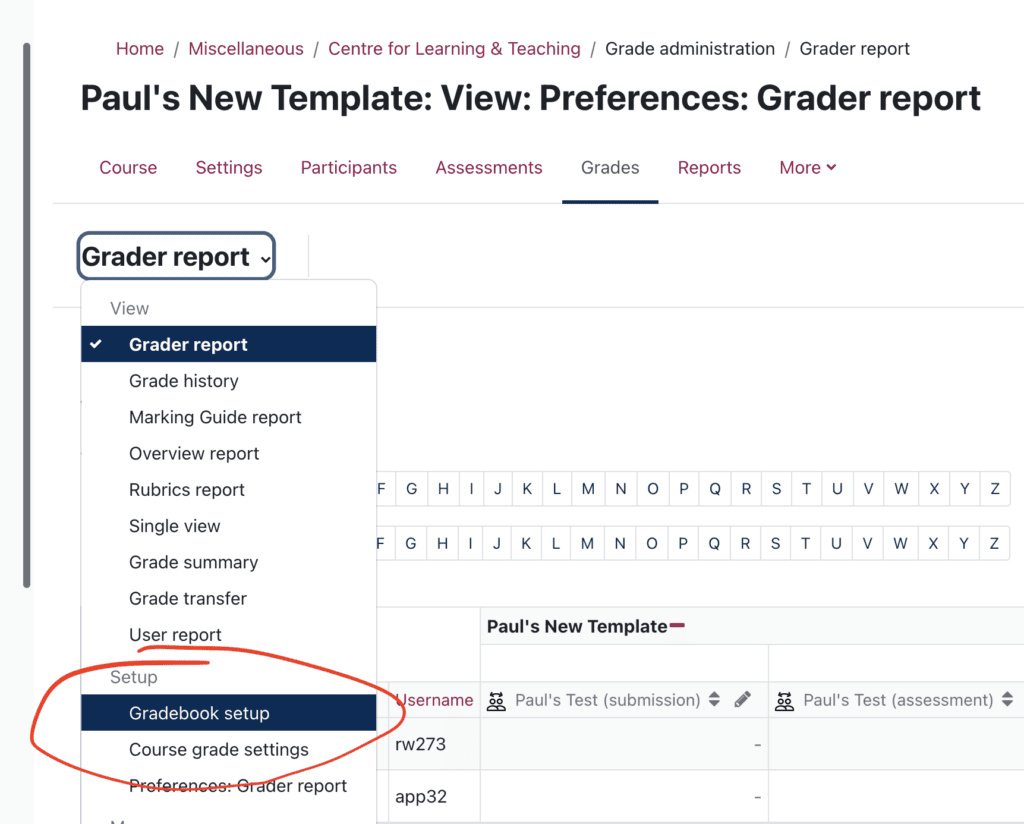
- In the row for the Assignment that you wish to hide, in the Actions column, choose Edit then Hide .

- Save Changes .
- The Gradebook item will now appear to be greyed out to show that it is not visible to students.

To hide the Assignment link from students:
- Navigate to the Assignment and, from its Edit drop-down menu, choose Hide .

- You can now begin marking.
Note : When are ready to release marks and feedback to students, don’t forget that you’ll need to make the Gradebook item and Assignment link visible again.
Lock submissions to prevent changes
Before you begin marking it’s a good idea to lock submissions. This will prevent students from making any changes to their submissions once marking is underway. To do so, navigate to your Assignment and View all submissions .
- Tick the box at the top of the ‘select’ column to select all user submissions.
- From the ‘ With selected…’ drop-down menu choose Lock Submissions .
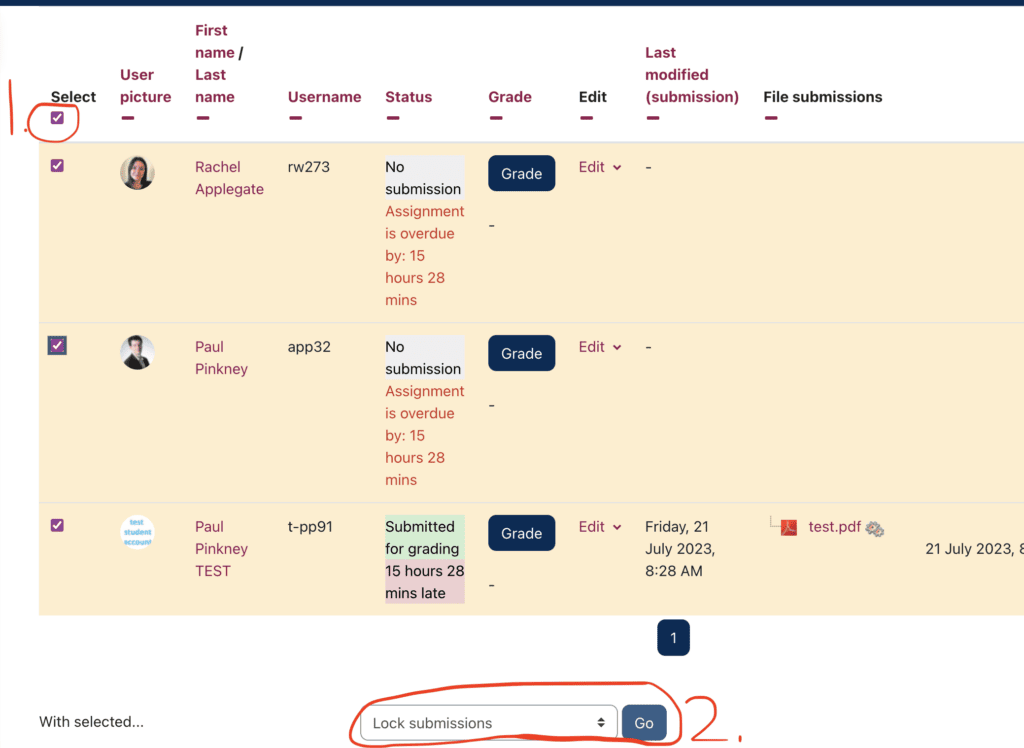
Note: If you have a large number of students you will need to select the option under the table to ‘show all students on one page’.
Moodle grading interface overview
Moodle has a built-in grading interface that allows you to annotate student assignments, add summary comments and award marks. Student submissions are displayed in PDF form and include a link to the Ouriginal similarity report (where activated).
The image below gives an overview of the built-in grading interface:
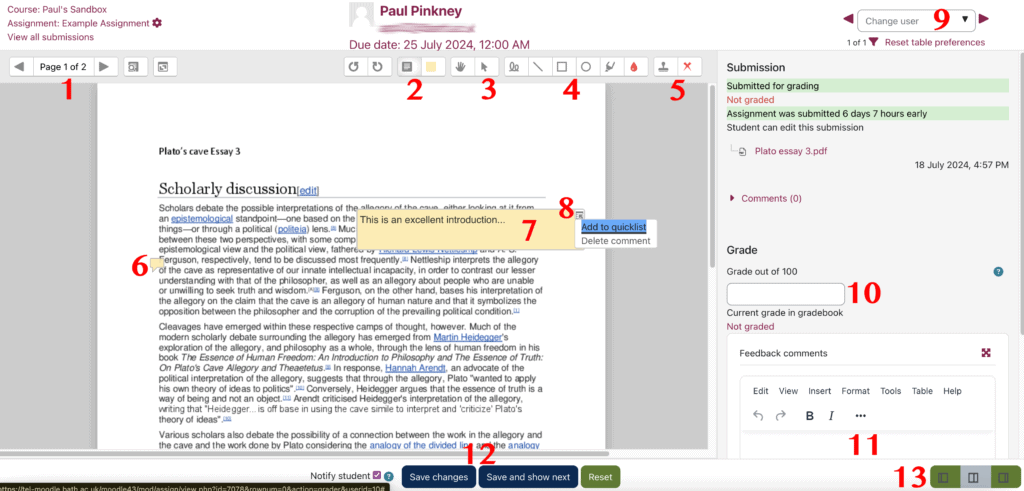
- Use the next and previous arrows to move to the next page of the student’s document or choose a page from the drop-down menu.
- Add an annotation to comment (with option to choose background colour).
- Use the arrow tool to select, move or delete existing annotations.
- Other tools such as the pen (squiggly line) for free form drawing or writing, shape tools, line, highlighter)
- Stamp tool/x tool.
- Anchor for an annotation (if you hover over it, it expands to reveal the annotation)
- An annotation
- Click the sub-menu icon in annotation (top right corner) to delete or add annotation to a ‘quicklist’ for the assignment).
- Use navigation to see Previous/Next student’s assignment or filter.
- Add grade here in the right-hand pane.
- Summary feedback can be entered here
- Don’t forget to save any changes made!
- Click to cycle through the options for screen layout
The video below provides an introduction to the grading interface, shows how to annotate student scripts, view Ouriginal reports and award marks. It also details how you can lift anonymity (where anonymous marking is being used) at the end of the marking process.
Marking Assignments Online
Marking a Group Assignment
Where one student has uploaded a file on behalf of her Group, the file will appear against all Group members, and any of these can be marked. On the individual student grading page, an option to ‘ Apply grade and feedback to all members of group ’ will appear. If ticked the grades and feedback will be applied to all group members.

Allocate Assignments to another Marker
You can use the Marking Allocation feature to assign student submissions to a specific marker in your Moodle space.
- Marking allocation – this allows allocation of markers to work after the deadline. Marking allocation depends on Marking workflow being enabled.
Marking Workflow and Marking Allocation must be enabled in your assignment settings.
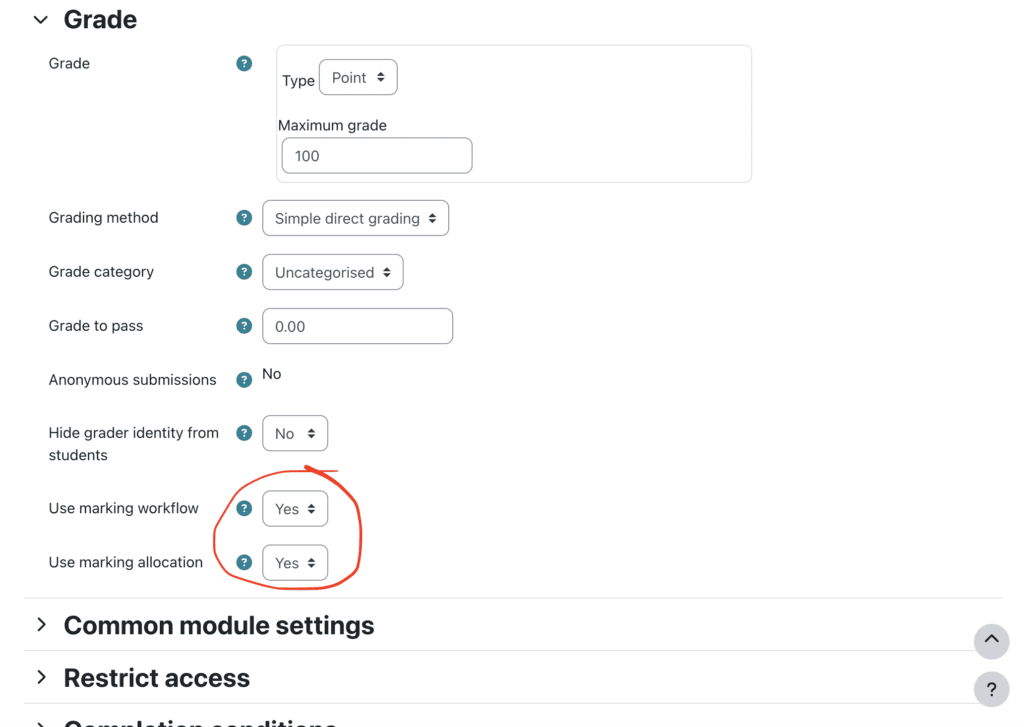
Once these have been enabled, you can allocate assignments to a marker.
- Click on your Assignment link
- Click on View all submissions

- Tick the box to the left of the student whose assignment you want to allocate, then choose Set allocated marker and click Go .
- At the prompt click Ok , then on the next page select your allocated marker from the drop-down menu and click Save Changes .
How to lift anonymity in an Assignment
If you are using Anonymous Marking (blind marking) in Moodle, once you have completed marking, it is necessary to lift anonymity in order to release grades to the Gradebook. Please note that lifting anonymity can only be done once, (you cannot return the assignment to an anonymous state once it has been lifted), so ensure that you have completed all marking before going ahead.
To lift anonymity.
- Click on the assignment link, then click on View all submissions
- From the grading actions menu choose Reveal student identities:
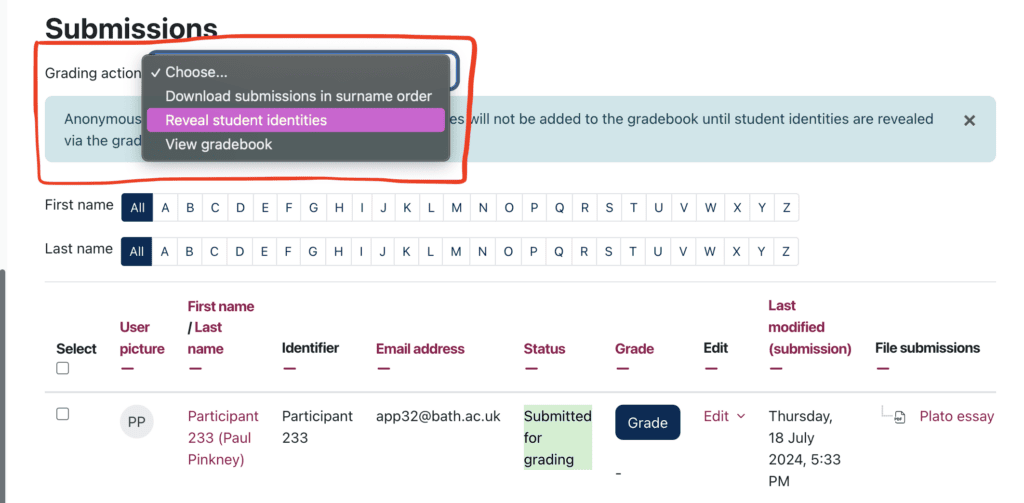
This video also shows the process for lifting anonymity: https://uniofbath.cloud.panopto.eu/Panopto/Pages/Viewer.aspx?id=dbdb18a7-e4f2-40af-a7fe-acd800a3803c&start=0
Lifting Anonymity
Related Articles
- Anonymous marking in Moodle
- Advanced Grading in Moodle
- Group Peer Review for Teachers
- How to mark an Assignment offline and upload feedback
- Using Ouriginal
- How to create an Assignment
Article Contents

Swarthmore College – ITS Blog

Grading Assignments in Moodle with the Built-in Annotation Tool
Using the built-in assignment grader tool.
Did you know new improvements have been made to Moodle’s built-in Assignment Activity grading interface? The new interface will convert student submissions to PDF so that you can view and annotate assignments on your desktop in addition to entering grades and feedback.
The built-in grading function in Assignments allows the grader to:
- Make annotated comments directly into the file, which Moodle automatically converts to a pdf
- Give short, general comments in the Feedback Comments text box
- Upload feedback files into the proper feedback box
- Grade the submission
Using the Built-in Annotation Tool
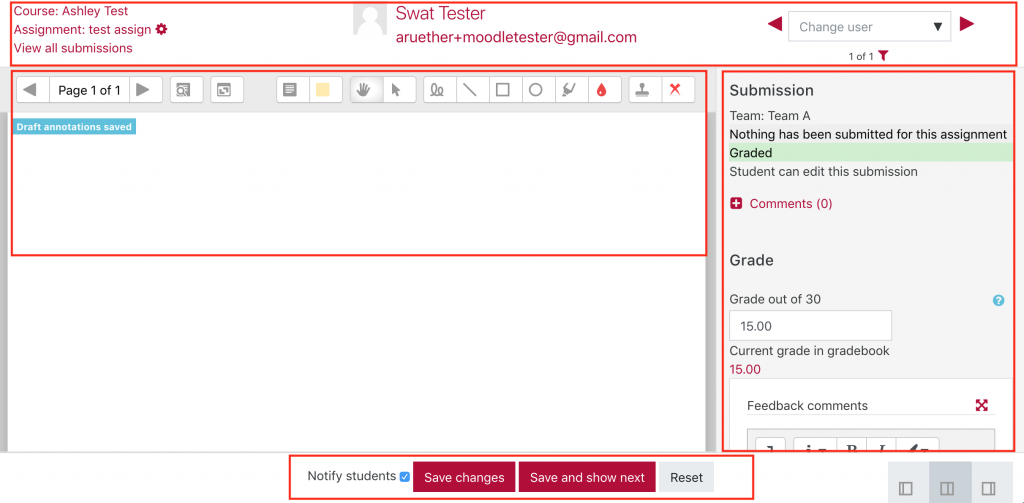
The top left of the banner allows you to navigate back to the course site page or assignment description page. The top center displays the current student’s name and email information. The top right of the banner allows you to navigate to other student submissions.
Right Column
The right column of the annotation tool displays a link to the assignment submission file in its original file format. It also contains a feedback comments text box, and the feedback files upload box.
Center Area
The center area displays the PDF document to be annotated. Use the annotation toolbar to mark up the submitted PDF document. You can use the highlighter, comment box, and pen tool from the top menu bar.
Footer Area
At the bottom of the screen there are three options: Notify Students, Save, and Reset.
- Notify students will send the current student an email notifying them that their assignment has been graded. Uncheck this box if you do not want the student to receive a notification
- Save changes is required to complete grading the assignment of the current student selected
- Reset will clear all feedback comments
If you’d like to learn more about the different ways to grade Assignments in Moodle take a look at the video below. Or feel free to reach out to the Academic Technologist team at [email protected] . We’d be happy to go over this tool or any other Moodle question with you at anytime.
Share this:
Moodle 101: How Does Moodle Grading Work?
Confused about Moodle Grading? In the teaching and learning process grading is an essential component since it informs both students and teachers of their progress in terms of level and provides feedback on the efficiency of the teaching strategies and study aids employed.
Grading activities is an important part of your job as a teacher, but it may be a time-consuming activity. Making grading easier will help you finish other items on your to-do list and save time so you can focus more on planning for future classroom events.
A variety of Moodle activities can be graded (an activity must first be configured as graded). Once a student submits an assignment, the teacher can immediately enter the marks, assessment, or grade to the student from the same activity, and the result is automatically added to the grade book. A column in the gradebook is automatically created for each activity that has been graded. New columns can be manually created and filled with grades and marks.
If there is one feature that distinguishes Moodle, it is the numerous options for creating tests and assessments. Instead of using a grading method just because it is available, it is important to know why you should choose one over the other. The idea here is to create a plan and implement it in Moodle. The platform serves as a tool to help you meet your learning objectives in this way.
Similarly, Moodle provides an essential set of tools for assessing, grading, and evaluating. This means that there are very few platforms capable of competing with Moodle. So, keep this in mind to ensure that you can apply the strategy that best satisfies your objectives.
The Moodle Gradebook: How to Get Started
Your Moodle course assignments, tasks, and/or manual grades are automatically compiled into a single score and piece of feedback in the Moodle Gradebook. Students can check their grades in personalized reports that safeguard student privacy. The gradebook may be displayed to students at certain times and in certain ways, or the instructor may completely hide it.
It is possible for teachers and teaching assistants to manually input and amend grades in the gradebook, and import grades from external sources such as OWL, iClicker, and Opscan. Or export the gradebook to another software program like Excel.
Moodle keeps track of all gradebook modifications so that instructors can verify who made what changes and when. Based on the instructor’s assigned grading scale, the gradebook keeps track of each student’s overall course grade.
Setting Up the Moodle Gradebook
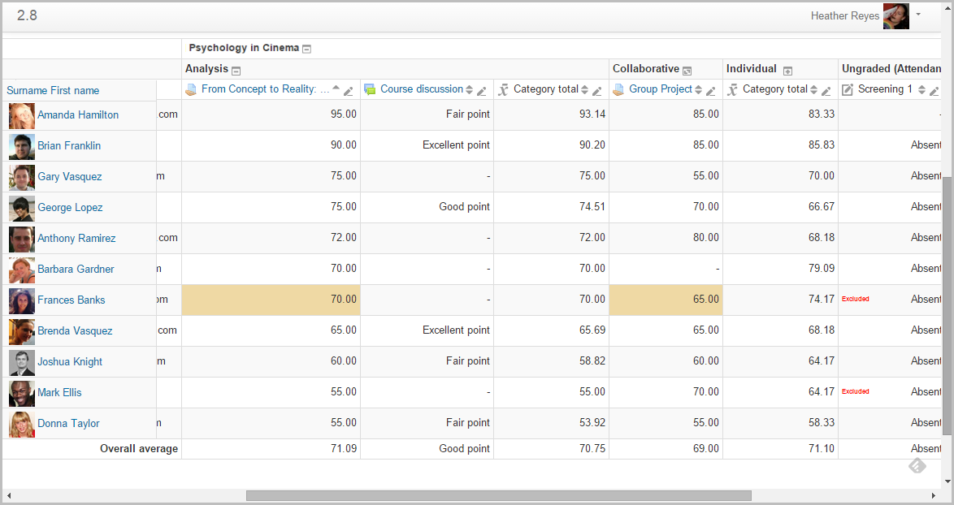
The Moodle gradebook offers a number of features and functionalities that will assist you in navigating to the locations where you need to be in order to do the activities you desire. The gradebook offers a variety of choices for calculating and displaying grades. Your gradebook can be set up in advance of the semester or created as you go.
Setup and Organize Grade Items and Categories
The course gradebook in a Moodle course automatically adds matching grade items (columns) when activities like Assignments or Quizzes are uploaded. In order to record more grade components, Moodle also allows you to manually add columns to your gradebook. It is acceptable to create your gradebook as you go in both of these scenarios, but when it comes to determining final grades, the organization of these factors is necessary to guarantee accuracy.
Calculating Grades
Allowing Moodle to handle calculations is the simplest approach to determining grades. If you need subtotals, Moodle includes built-in computations (aggregations) to figure out the grade for the entire course.
When accrediting grades, Moodle offers three options:
- Natural – the total of all grade values.
- Mean of grades – the total of all grades divided by the total number of grades.
- Custom weights – where weights are assigned as a proportion of the overall grade to certain items or categories.
If you need more operations, you could also make a special formula.
Rubrics and Non-numerical Scales for Grading
Some Moodle activities offer to grade using rubrics and non-numeric scales if you prefer alternate techniques for reviewing student work.
Rubrics are helpful when you want to evaluate student work based on a variety of criteria. When evaluating Assignment activities, you can set a rubric and criteria using advanced grading options, and the rubric will produce an overall grade.
Custom Scales are useful when you want students to view Excellent, Good, Fair, and so on as a grade on an item rather than a numerical number. While non-numeric assessments can be displayed using bespoke scales, the gradebook will still be able to do computations with these items if necessary.
Display Grades in Percentages And Letters
You can choose to display grades to students as a letter, a percentage, or a numeric number by modifying the settings in your gradebook. The Grade type of Points is used by default in Moodle activities, with a maximum grade of 100.
You can alter grade limits on the gradebook Letters tab by matching score ranges to letter grades (e.g., 93.00-100.00 for A). Following that, when grading, input the number that corresponds to the letter grade you want to give (for example, 90 for a B+). Students will see the right letter grade when Moodle generates letter grades since it compares numerical scores to the ranges in the Letters settings.
Although, only numerical scores may be recorded for grade elements connected to Moodle activities. For Moodle in the Cloud, it is no longer possible to manually grade items in Moodle by entering letter grades. Letter grades can be shown to students as a percentage, but instructors must record or import grades as points.
Edit The Activity Name of Every Column In The Gradebook
A new column will be automatically created in the gradebook for a Moodle activity after it has been configured to be graded. The column will have the same name as the activity. If the name is lengthy, only the first 12 characters are shown as the column name. Therefore, it is advised that you give the activities short, distinct titles.
New columns can be manually created and filled with grades and marks. Instead of establishing a new column and entering the results, if at all possible, think about using an assignment.
As you add the graded activities to the course, columns are created in the gradebook to reflect this. For this reason, it is frequently required to afterward arrange the columns in the proper sequence. It is fair to establish categories (from chosen columns) and sort columns into categories if there are several graded activities in the course.
Setting Up An Automated System To Verify For Passing Grades
The learner’s performance can be automatically checked to see if it complies with standards using the gradebook configuration options.
For instance, if all of the assignments have been passed (marked on a pass/fail scale) and the average of all quizzes is at least 80%, the course is considered passed if graded using the 10-point scale. Or the course grade is a letter grade determined by the points earned, but it is only considered successful if the learner has passed all non-differentiated examinations.
A formula can be used to determine the passing grade. The formula is dependent on the display type and the configuration of the course’s total grade
Prepare The Final Grades
You can easily shift grades from the Moodle gradebook to your SPIRE grade roster at the end of the semester. Using a scale of your choice, Moodle will convert numerical grades to letter grades. You can still change grades after importing them into SPIRE before the Registrar approves and receives them.
How Does Grading Work With Moodle?

The gradebook automatically compiles the results of graded Moodle activities. Entries in the gradebook are always numeric so Moodle can simply aggregate grades automatically.
Although this can be changed in the Assignment options for each activity, the default rating for each activity is 100. The weights of individual assignments or groups of assignments can then be adjusted in the gradebook to get the overall grade for the class.
You can create a grading system and use it to display letter grades to students based on percentage. Grading can be fairly simple if you use Moodle techniques. It is possible to grade using your own procedures, although it can necessitate additional processes and workarounds.
Some tasks, like the Turnitin and Moodle assignments, let you apply a rubric or grading form to determine your grade.
Manually added grade items (with the exception of Moodle activities like quizzes or assignments) can be adjusted to allow you to type or import actual letters if you choose to grade exclusively using letters and do not want to enter numerical values. It should be noted that using this method excludes the use of numerical scores and prevents Moodle from calculating an overall course grade.
You can give feedback on the majority of Moodle activities using a (verbal) Scale that includes terms like “outstanding,” “unsatisfactory,” and “satisfactory.” It should be noted that each custom scale value has a number associated with it, so you should consider how those numbers will combine to determine a course’s overall grade.
Students can view written feedback next to their grade if you add it. When grading from within the activity, some activities (including Assignments, Turnitin assignments, Quizzes, and Workshops) have a place for writing written feedback. The gradebook also allows you to add comments for graded objects.
How to Grade your Moodle Assignments: 3 Methods
There are three options for grading systems in the Moodle assignment activity in addition to the standard options like points and scales. “Simple direct grading,” “marking guidelines,” and “rubric” are the three options.
Simple Direct Grading
Simple Direct Grading is by far the simplest to implement. When you create an assignment, this is the default setting. You have the choice of giving an overall score and overall feedback when grading a submission. Even though the simple direct way of grading is straightforward, it depends on the feedback remark box as the main tool for informing students of their areas of strength and weakness in the assignment.
The rubric is precisely what it says it is. In your course, you can create a rubric that you can use to grade tasks in Moodle. You will be taken to a screen where you can either start generating a rubric from the beginning or modify the one you have already established as a template once you choose the rubric technique and save your assignment.
When using a rubric to grade work, you can enter feedback at the appropriate criterion level by clicking on the level the student has achieved. If you want to have an area for feedback on the entire assignment or remarks not covered by the rubric, there is also a spot for an overall feedback comment.
Marking Guide
The Marking Guide functions as a halfway point between the rubric and simple direct grading. The marking guide approach enables the mark to be broken up into criteria while still providing direct grading boxes for each criterion, as opposed to having the criteria and levels of the rubric method.
There is a feedback box for each requirement in your marking guide, as well as a direct grading box that allows you to enter the student’s level and your chosen point total.
Final Thoughts On Moodle Grading
Moodle is an extremely adaptable learning platform that lets you select or combine several grading techniques. Grading can be quite simple if you follow the Moodle guidelines. It is feasible to grade using your own procedures, although it can necessitate extra steps and hacks. As you grade on Moodle, we hope that some of these thoughts will be helpful.
Looking to take your Moodle course to the next level? Whether you need some help selecting and configuring new plugins, designing your site or something more complicated, our team of Moodle experts is here to help.
Don't forget to share this post!
Elena Gutierrez

Everything You Need To Know About Membership Pricing Strategy

The secret to better course content: Integrating H5P with your WordPress LMS

Here’s How You Can Prevent Cheating In Your Online Courses
Cancel reply, download e-book.

Instructional Design & Technology Services, IITS
Haverford College
The Moodle Assignment: Collect and grade submitted work
The Moodle Assignment module lets you collect student assignments—including research papers, spreadsheets, presentations, photographs, and short audio or video recordings—online. The video below is a great resource for seeing how to add an assignment and to understand many of the most useful options. A text version of the information, along with some specific recommendations for Haverford faculty follows the video.
Add the assignment
Configure the assignment.
Now you need to configure assignment settings. By selecting the correct options, you will be able to grade student and give feedback the way you want. You can generally accept the defaults, but we recommend changing a few of the options to make submission easy for students and grading easy for you.
General settings
You must fill in the general setting to give your assignment a name. You need to enter an Assignment name –the name that students see on the main course page.
You can also give an assignment Description to explain the assignment to your student. What are your expectations for the assignment? What file format, if any, should they use? If you are allowing drafts, what do you expect in the drafts and what do you expect in the final project?
You can also upload instructions, templates, or other relevant files in the Additional files area.
Availability
OPTIONAL: Next, you will see an Availability section. Use this to give your students due dates. Date information from your assignments will flow to the Moodle calendar. Students can see upcoming assignments on their Moodle dashboard.
You can also set a “remind me to grade by” date; this will appear on your dashboard.
Submission types
OPTIONAL: In the Submission types area, determine what your students will be submitting. If you leave the defaults, students will submit one file, up to 5 MB in size. This works for many types of assignments. However , if you have any of the scenarios below, you will want to change the defaults.
Do you want students to submit a short reading response, or other short entry, directly into the assignment text area? Check the “ online text ” box.
Do you want to set a word limit for online submissions? In addition to checking the “ online text ” box, enable and set a “ Word limit .”
Do you want student to submit draft copies of their submission? Increase the “ maximum number of uploaded files .”
Will students submit documents over 20MB in size? 20MB is a pretty large file. Hopefully, students will be uploading files much smaller, to avoid taxing our system resources. If 20MB is not large enough, contact [email protected] and see if there is a better tool for your needs.
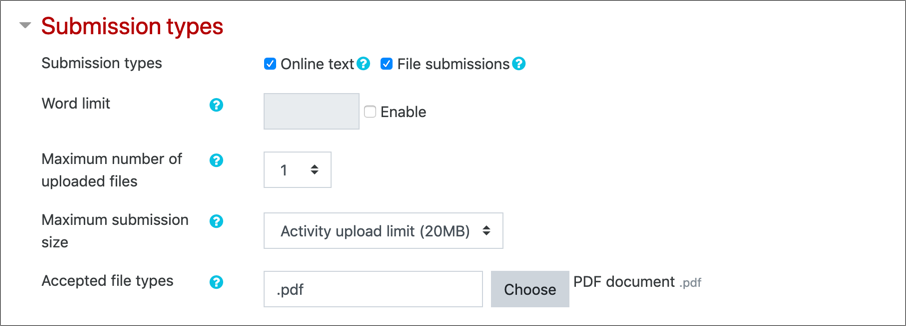
Do you want students to submit assignments in a particular format, such as a PDF, Microsoft Word format, Microsoft Excel, MP3 audio file, etc.? Click the “ Choose ” button and select your desired file type for student submissions or type the file extension name into the box. Require PDFs (“.pdf”) if you want to mark up assignments directly in the Moodle gradebook.
Feedback types
OPTIONAL: In the Feedback types area, state what type of feedback you will give students–and how you will give that feedback. All options should be checked by default. However, if any options are unchecked that may prevent you from delivering feedback in your preferred way.
Check the “ Feedback comments ” box to give comments on each submission.
Check the “ Offline grading worksheet ” box, if you want to enter grades in Excel and upload them to Moodle.
Check the “ Feedback files ” box, if you want to return student submissions with your markups, or submit other types of feedback files such as voice comments.
Set “ Comment inline ” to yes , for an easy way to comment on text students submit directly into the assignment tool. This is only useful if you enable the “Online Text” submission type.
More options
In addition to the settings above, many other options are available. A few options:
- group assignments
- blind marking , to hide student identities when you grade
- activity completion tracking, so you can make other activities in your course dependent upon this assignment, or just help students see where they are in the course
Once you have the desired settings, click the button to save and return to course .
Grade submissions and provide feedback
Once you have created your assignment activity and students have submitted work, you will want to collect and grade student submissions. You can either download all the assignments, grade them offline, and then upload feedback files with comments or mark papers directly in Moodle.
Download all submissions and mark papers outside of Moodle
The Moodle Assignment module lets you bulk downloaded student submissions for organization and offline grading. This can be helpful in a number of situations:
- Organize and locally store submitted assignments
- Provide assignments feedback using by marking-up student submissions using tools available in desktop or tablet apps such MS Word, Adobe Acrobat Pro, Explain Everything, etc.
- Efficiently enter grades and general feedback comments using Excel, which can be faster the Moodle online grading interface
- Grade assignments anywhere; internet access is not needed
It’s not hard to use the offline grading option, but it has a number of steps both within Moodle and your local computer operating system. Watch this video on off-line marking for more information.
Mark directly within Moodle
- Enter the student’s grade.
- Type or record feedback comments.
- Download the submission to look at it or annotate it outside of Moodle.
- Mark up a PDF submission.
- Return a file with your annotations or comments.
- Save the grade and continue to the next student.
- Depending upon what the student submitted, you may want to change the layout of your marking window.
- You can also select a different student from the upper right drop-down menu.
- By default, students are notified when you grade, but you can uncheck that option before saving.
- Account creation and closure
- Account management
- Two-factor authentication
- College computers
- College phones
- Using your devices
- Email and Calendar
- File Storage
- Internet Connections
- Other Tools
- Printing, Copying, & Scanning
- Accessibility
- Devices: College-provided
- Devices: Personal
- Installation
- Microsoft 365
- Off-Campus Access
- Domain of One's Own
- College password: Set up and update
- Getting started at Bryn Mawr
- Leaving Bryn Mawr
- Visitor accounts and access
- Group Manager: Grant and revoke access
- LITS Service Catalog: View project requests
- BIONIC: Data standards for names and more
- BIONIC: User interface guide
- BIONIC: View budget reports
- Encryption: College-Owned Computer (macOS)
- Encryption: Emails in Microsoft 365
- Encryption: External Storage Drives
- CrowdStrike Falcon Antivirus: Overview
- International travel: technology and security
- Malware and spam: Phishing emails
- Malware and spam: Ransomware
- Password managers
- Password safety: Best practices
- Two-Factor: Get started with Duo
- Two-Factor: Methods of Authentication
- College computers: Accessibility Settings
- New College computer? Start here!
- Standard computers and accessories
- College Deskphone: Setup & Use
- College Softphone: Setup & Use
- Help Desk tickets
- LITS's Device Replacement Cycle
- LITS's Device Support Cycle
- Office move requests
- Shipping devices to LITS
- Common hardware issues
- Remote Learning, Teaching, and Work: Suggested Computer Accessories
- Students: Laptop Purchasing Guide
- Students: What tech to bring to College
- Alumnae/i: Email Forwarding
- Calendly: Schedule appointments
- Mailing Lists: Management
- Mailing Lists: Overview
- Microsoft 365: Overview
- Microsoft 365: Shared Email, Calendars, and Folders
- Microsoft 365: Export email archive
- Outlook: Schedule Zoom meetings through Outlook
- CrashPlan: disaster recovery
- Data backup: Why, where, and how
- Data Clean-Up: Email Inbox
- Data Clean-Up: Storage Drives (C:, H:, S:, Q:, and more!)
- Network Drives: Connect from Windows or macOS
- OneDrive: Share files and folders
- Save a file as a pdf
- Eduroam: Connect to College Wifi
- Gaming Wi-Fi: Connect your devices
- Ivanti Secure VPN: Off-Campus Access
- Network Registration
- Moodle: Log in
- Moodle: Courses Not Showing Up
- Moodle: Browse courses during registration
- Moodle: Use the text editor
- Moodle: Add files and folders to a course
- Moodle: External tool connections
- Moodle: Add course blocks
- Moodle: Manage Class Recordings with the Panopto Block
- Moodle: Schedule class Zoom meetings
- Moodle: Enable students to schedule appointments
- Moodle: Add JoVE content to a course
- Moodle: Restore recently deleted items from the recycle bin
- Moodle: Link to McGraw-Hill
- Moodle: Link to a Cengage Platform
- Moodle: Customize and organize your course
- Zoom: Schedule course meetings with the Moodle Zoom activity
- Moodle: Hide and unhide courses and course sections
- Moodle: Copy content from another course
- Moodle: Get a merged Moodle site for a multi-section course
- Moodle: Save or export course data and content
- Moodle: Set up a course gradebook
- Moodle: Hide grades from students
- Moodle: Extensions, overrides, and accommodations
- Moodle: Download assignment to grade offline
Moodle: Grade assignments with Annotate PDF
- Moodle: Use grading workflow to manage assignment feedback
- Moodle: Extra credit
- Integrations
- Moodle: Create and manage assignments
- Moodle: Convert documents using Sensus Access
- Moodle: Create and grade Quizzes
- Moodle: Use Question Bank
- Moodle: Forums
- Moodle: Create a questionnaire
- Moodle: Student Journals
- Moodle: Workshop
- Moodle: View Course Evaluation Results
- Moodle: View and create course Calendar events
- Moodle: Add or change your photo
- Moodle: View and submit assignments
- Moodle: Keep organized with Timeline and Calendar
- Moodle: Take online quizzes and exams
- Moodle: Participate in a workshop activity
- Moodle: Export coursework and materials
- Moodle: Complete course evaluations
- Moodle: Instant Messaging
- Moodle: Enroll or unenroll participants
- Moodle: Using Groups
- Moodle: Message course participants
- Moodle: Take attendance
- Moodle: Guest access to courses
- Moodle: View course as a student
- Moodle: Create checklists for students
- Constellate: Log In and Authenticate
- LinkedIn Learning: Overview
- LinkedIn Learning: Add content to a Moodle course New
- LinkedIn Learning: Create and share playlists
- Macmillan (Achieve, LaunchPad): Link to a Moodle course
- NameCoach: Overview
- NameCoach: Add name recording to email and social media
- NameCoach: Add to a Moodle course
- NameCoach: Record and listen to names in Moodle
- NameCoach: Name Pages for events
- Perusall: Add social annotation assignments to Moodle
- Piazza: Alternative Discussion Tool for Moodle
- Posit Cloud: Teaching with Posit Cloud
- Overleaf: Create LaTeX documents New
- Overleaf: Get a premium account New
- Oxford Learning Link: Link to Moodle New
- Panopto: Get and log into your account
- Panopto: Record in your browser (Panopto Capture)
- Panopto: Record lecture using desktop app
- Panopto: Add a presentation or web content to a recording
- Panopto: Upload audio or video files
- Panopto: Change sharing permissions
- Panopto: Where are my recordings?
- Panopto: Edit videos
- Panopto: Captions
- Panopto: Create Accessible Captions
- Panopto: Add the Panopto block to a Moodle course
- Panopto: Manage Class Recordings in Moodle
- Panopto: Copy recordings to a new course
- Panopto: Collect audiovisual assignments
- Panopto: Student guide to uploading and recording videos
- Panopto: Quizzes
- Panopto: Enable video downloads
- Panopto: Get emailed when videos are posted
- Panopto: Record with multiple video sources
- Panopto: Department folders
- Panopto: Training and learning resources
- WeVideo: Create an account on Bryn Mawr's license
- WeVideo: Create and add people to projects
- WeVideo: Video and podcast editing basics
- WeVideo: Finish and share videos
- WeVideo: Add subtitles to a video
- WeVideo: Access after you leave BMC
- Remote learning, teaching, and work: Suggested computer accessories
- Remote teaching: Create digitally friendly documents
- Students: Remote learning tools
- Canon supplies: Order, install, and recycle
- HP supplies: Order, install, and disposal
- Making accessible scans
- Office Lens: Scan papers or documents with your smartphone
- Print from a public printer
- Print with a departmental printer
- Scan and copy with printers
- ABBYY Fine Reader: complex OCR
- Adobe Acrobat Pro: Make PDFs accessible
- Adobe Creative Cloud: College Computers
- College Computers: Request software changes
- College-provided software Updated
- Adobe Creative Cloud: Personal Devices
- Antivirus: Personal devices New
- Microsoft Edge: Automatic Sign-in
- Software for Personal Devices
- ChemDraw: Access and installation Updated
- Hyland OnBase
- KaleidaGraph: Installation
- Mathematica and Wolfram|Alpha Pro
- MATLAB: Access and installation New
- Software Center: Install Programs
- Microsoft Office: Personal Devices
- Microsoft Office: Public lab computers
- Office365: Immersive reader accessibility features
- PowerPoint: Turning on subtitles
- Apporto: Remotely Connect to a Virtual Lab Computer
- Financial Edge: Off-Campus Access
- LabStats: Remotely Connect to a Lab Computer
- Microsoft Platforms: Accessibility Features
- Microphone not working
- Microsoft Teams: Overview
- Microsoft Teams: Accessibility Features
- Zoom: Activate and log into a BMC account
- Zoom: Am I using A Bryn Mawr Zoom account?
- Zoom: Create meetings
- Zoom: Create meetings through Outlook
- Zoom: Create meetings for courses through Moodle
- Zoom: Host a meeting
- Zoom: Participate in a meeting
- Zooming in less-than-ideal circumstances
- Zoom: Security
- Zoom: Use registration to secure meetings
- Zoom: Where are my recordings?
- Zoom: Breakout rooms
- Zoom: Captions
- Zoom: Chat, reactions, and polls
- Zoom: Increase caption and chat font size
- Zoom: Mirror an ipad in a classroom
- Zoom: Multiple cameras
- Zoom: Use Scheduler for appointment booking
- Hosting Large Online or Hybrid Events New
- Domain of One's Own: Get started
- Domain of One's Own: Install applications
- Domain of One's Own: WordPress
- Domain of One's Own: Grav
- Domain of One's Own: Omeka
- Domain of One's Own: Scalar
- Domain of One's Own: Log into and manage applications
- Domain of One's Own: Upload and manage files
- Domain of One's Own: Migrate content when you leave Bryn Mawr
- Domain of One's Own: TRU Collector/Writer Sites
- Drupal - Basic: Drupal Training Videos
- Drupal - Basic: Log in and find content in Drupal
- Drupal - Basic: Announcements in Drupal
- Drupal - Basic: Events in Drupal
- Drupal - Basic: Biography Listings in Drupal
- Drupal - Basic: Edit Biographies in Drupal
- Drupal - Basic: Embed forms and other content in Drupal
- Drupal - Basic: Flexible Content in Drupal
- Drupal - Basic: Flex Basic WYSIWYG
- Drupal - Basic: Flex Basic 2 - Accordion, Carousel and more
- Drupal - Basic: Images in Drupal
- Drupal - Basic: News Articles in Drupal
- Drupal - Basic: Pages in Drupal
- Drupal - Basic: Preparing Images for the Web in Adobe Photoshop
- Drupal - Basic: Preparing Images for the Web in MS Word
- Drupal - Basic: Tables in Drupal
- Drupal - Basic: Upload and Link to Documents in Drupal
- Drupal - Basic: Website Image Size and Format Guide
- Drupal - Basic: What is a Web Steward? Roles and Permissions Explained
- Drupal Basic - Introduction to Drupal Drafts
- Drupal - Intermediate: Flex Intermediate A - Columns, Gallery and more
- Drupal - Intermediate: Flex Intermediate B - People List, Features and more
- Drupal - Intermediate: Videos in Drupal
- Drupal - Advanced: Bulletin in Drupal
- Drupal - Advanced: Flex Advanced - Syndication and Flex Items
- Drupal - Advanced: Flex content for special roles
- Drupal - Advanced: Themes and Theme Switcher
- Drupal Short Sessions - Syndication
- Drupal Short Sessions - Event 3up
- Drupal Short Sessions - Announcement 4up
- Drupal Short Sessions - News 3up and News+Contact
- Drupal Short Sessions - Story 1-up and Story 3-up
- Drupal Short Session: Image-based Features in Flex Content
- Drupal Short Session: Image List
- Drupal - Special Role: Admissions Officers in Drupal
- Drupal - Special Role: Course listings in Drupal
- Drupal - Special Role: CV Upload via Provost in Drupal
- Drupal - Special Role: Homepage content in Drupal
- Drupal - Special Role: Navigation Menus in Drupal
- Drupal - Special Role: Program Descriptions in Drupal
- Drupal - Special Role: EMS
- Drupal - Special Role - Story Editor (Group)
- File Names for Web Pages and Blogs: Best Practices
- Make sure your documents show up correctly in search results
- Web Forms (Wufoo)
- WordPress: Adding Users to Your Blog
- WordPress: Basics
- WordPress: Changing the author name displayed on your WordPress posts
- WordPress: Close Comments on Old Posts to Reduce Comment Spam
- WordPress: Embedding videos and other media content in blogs
- WordPress: FontAwesome for WordPress
- WordPress: Logging in & Creating a New Blog
- WordPress: Moderating Comments (and spam) in WordPress
- WordPress: Privacy settings for your blog
- WordPress: Updating Your Alumnae Club Blog
- WordPress: User Roles for Blogs
- WordPress: Working with WordPress themes
Instructors can mark and leave digital comments on Assignment submissions within Moodle by using the Annotate PDF feedback option. Annotate PDF allows you to highlight, write or type comments, add stamps, and post notes in PDF documents submitted by students using any device with a web browser.
Before you start , you will need access to the following:
- An Instructor of record , Other editing teacher , or Non-editing teacher role in a Bryn Mawr Moodle course
Set Up the Assignment
WARNING: Your Assignment must be set up to require PDF file submissions and use the Annotate PDF feedback type before students start submitting work. (You won't be able to make changes after that point.)
- Create your Assignment if you haven't already (c lick +Add an activity or resource ; then s elect Assignment ).
- Open the Assignment Settings page (click the Assignment to open it, then click S ettings in the top menu).
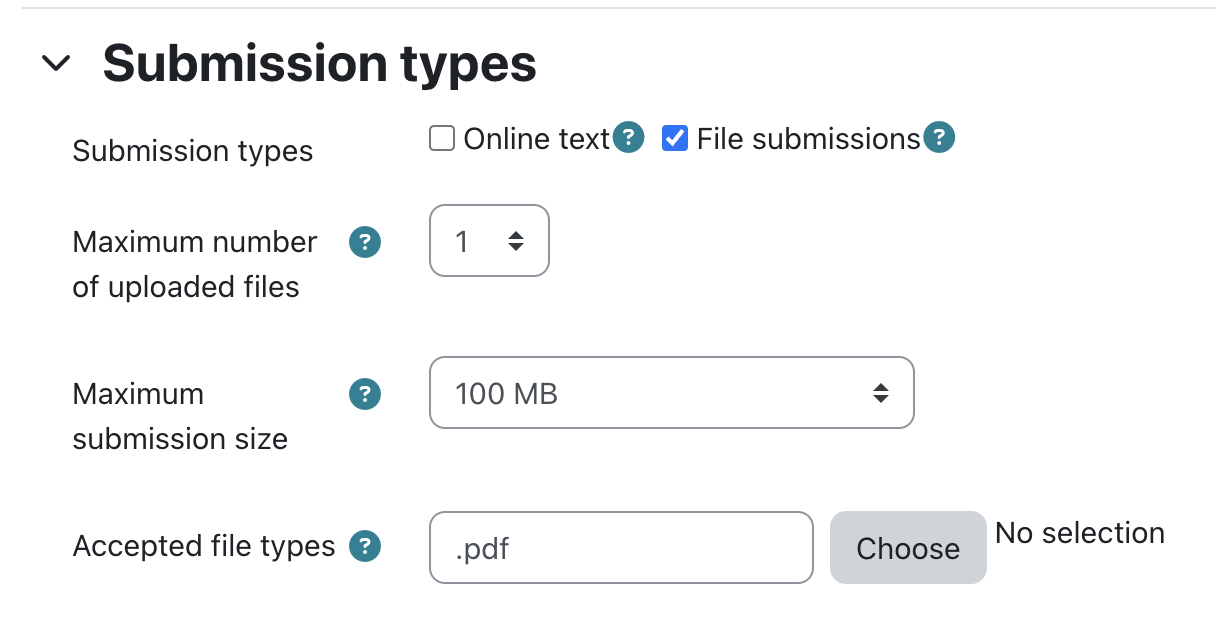
- Check the File Submissions box (required).
- Set Maximum number of uploaded files to 1 (recommended).
- Type .pdf in the Accepted file types box (required).
- Under Feedback Types , check Feedback Comments and Annotate PDF.

- Adjust the remaining settings if desired, then click Save and Display or Save and return to course.
Help students submit PDFs
It is increasingly common for students to submit coursework for K-12 courses through Google drive or docs, and some college students may not know how to save, export, or print files as PDFs. However, it is easy to do using software that is widely available to students and a good skill to learn before entering the workforce!
These Ask Athena articles may help:
- Save a file as a pdf explains how to save documents as PDF files using commonly used software.
- Scan and copy with printers explains how to use the multifunction copier/printers in libraries and public spaces on campus . (For Bryn Mawr users, scans are saved as PDFs to their H:// drive by default.)
- Office Lens: Scan papers or documents with your smartphone explains how to use this free smartphone app to create multi-page PDF documents using the phone’s camera.
Mark using annotate PDF
- Click the Assignment to open it.
- Click Grade .
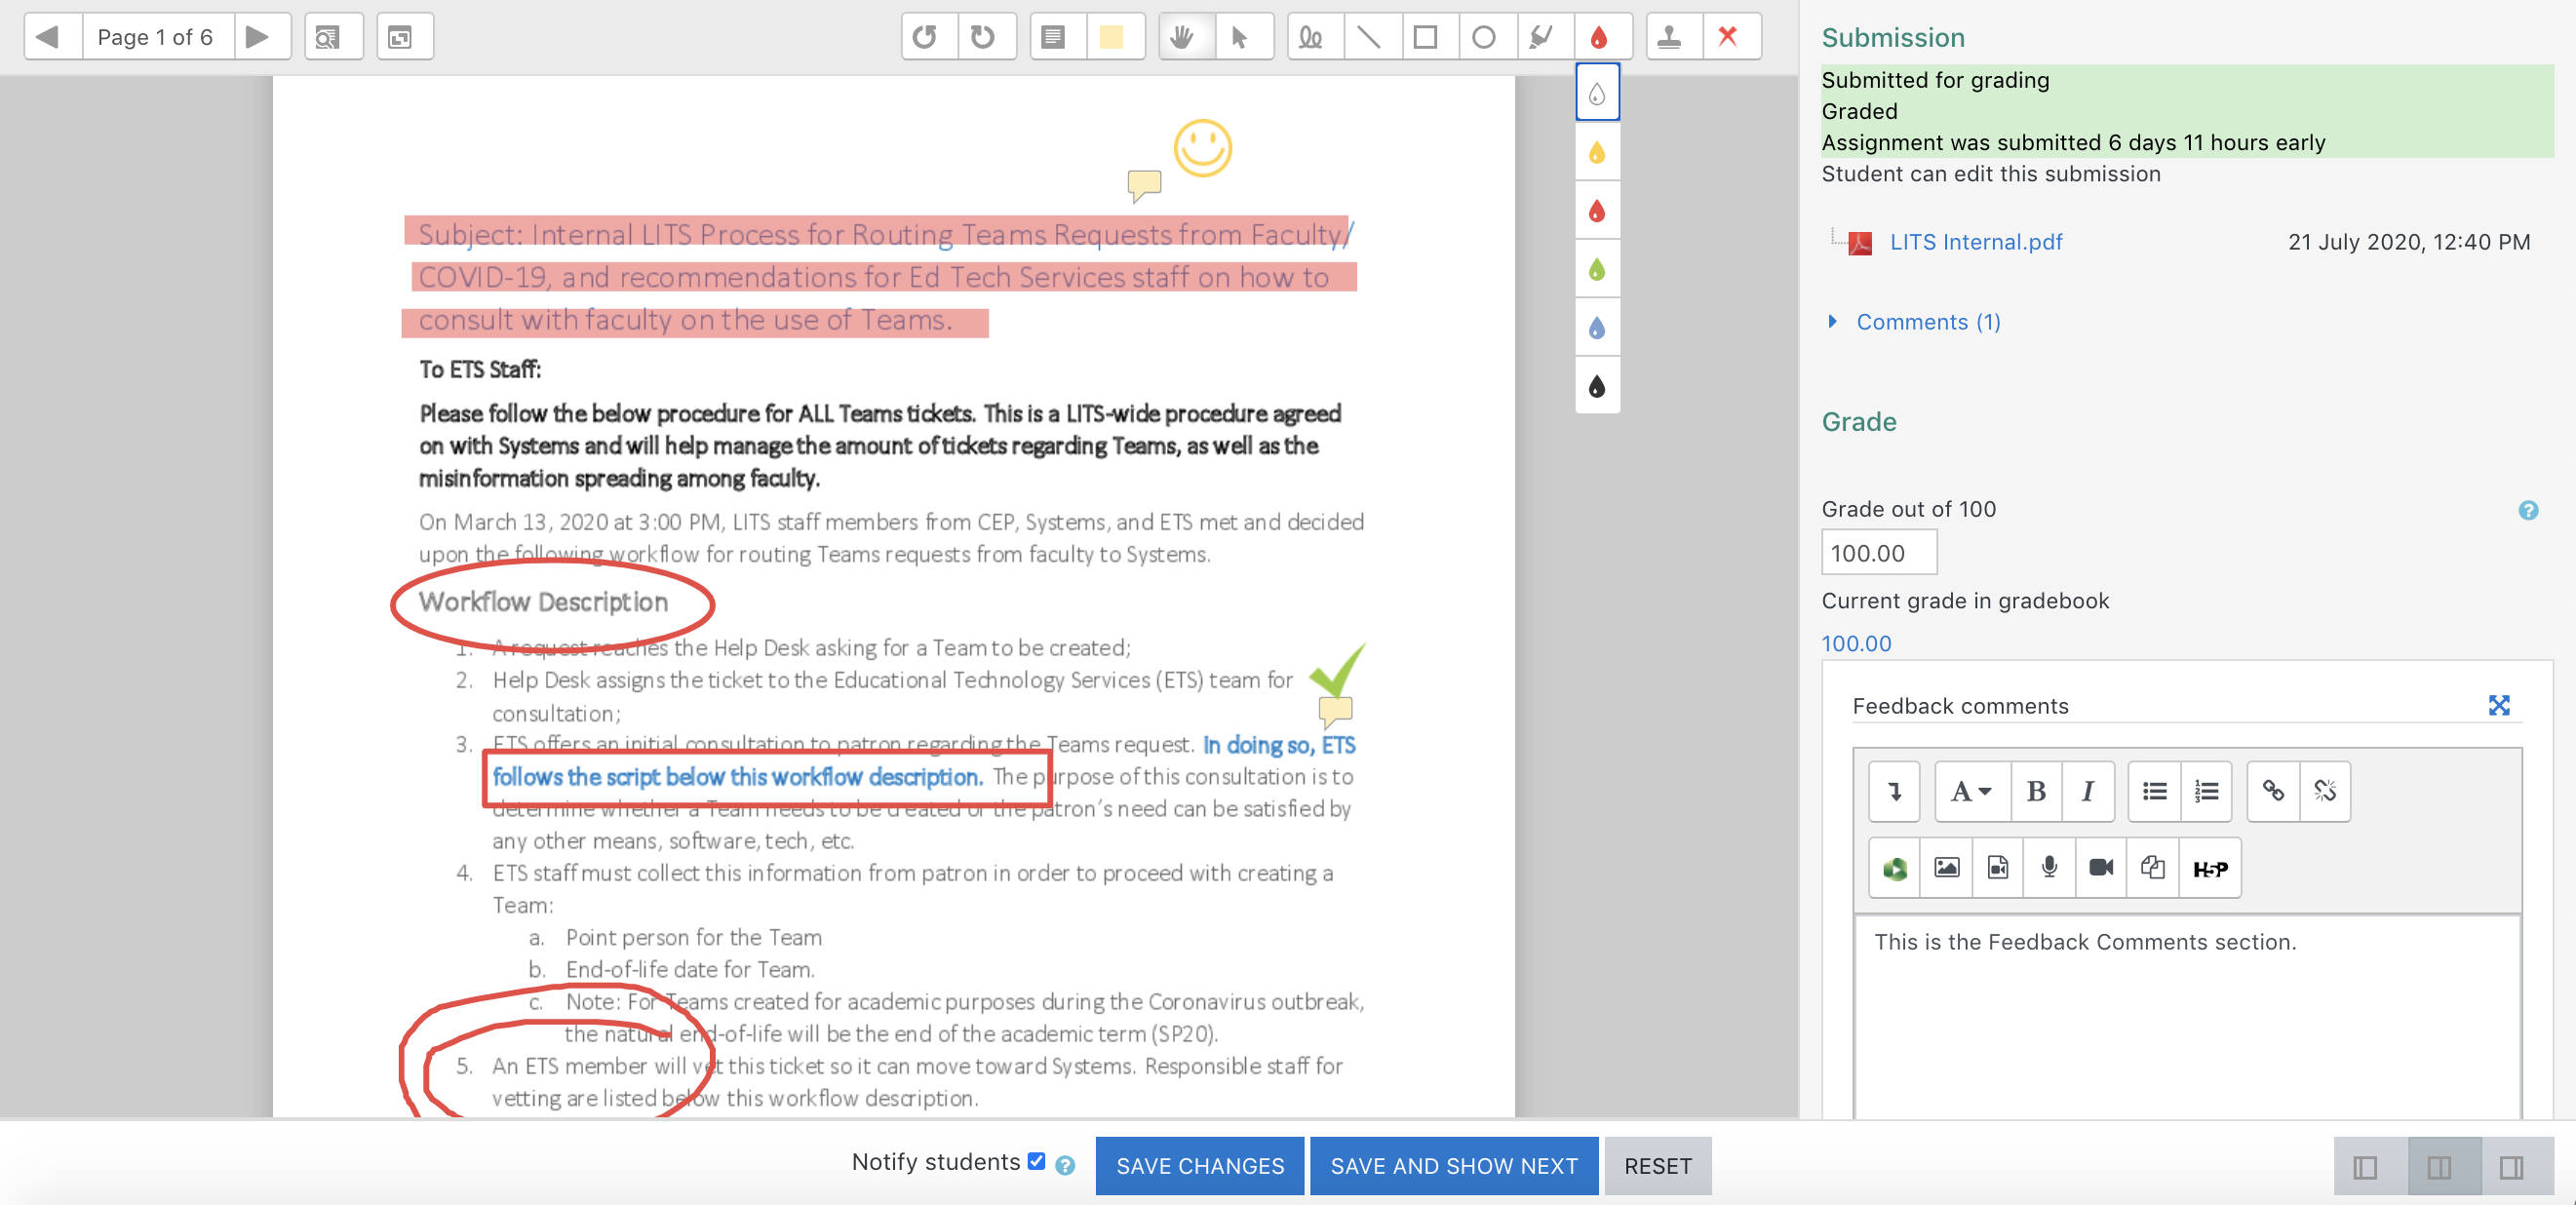
- Enter the Grade and any overall Feedback comments in the fields provided . (You can include images, files and media clips in you comments, see Moodle: Use the text editor for details.)
- If you enabled the Feedback files type in your assignment settings, use the Feedback files menu to upload them.
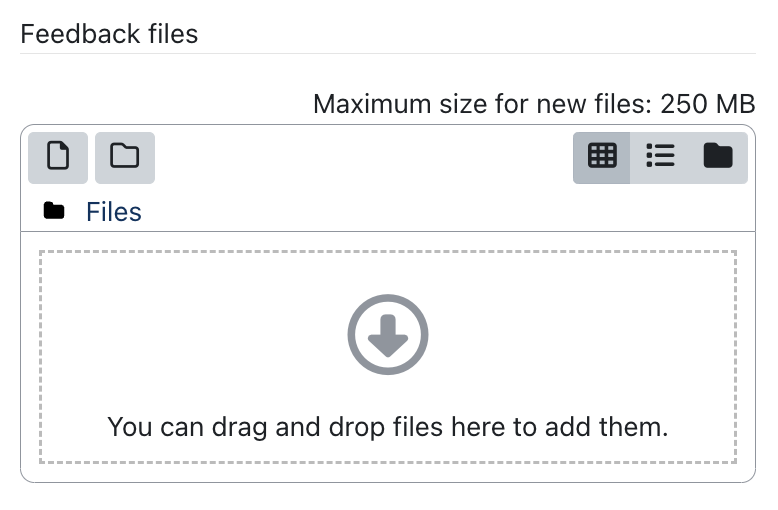
- Click Save Changes as you go and Save and Show Next to finish marking a submission and move on to the next one.
Exporting copies of marked submissions
If you want to keep copies of annotated submission for your records:
- Click the Assignment to open it.
- Click the titles of PDFs you want to download in the Annotate PDF column.
- They will download to your browser's default Downloads folder; from there you can move them to a more permanent storage location.
If you have any additional questions or problems, don't hesitate to reach out to the Help Desk !
Phone: 610-526-7440 | Library and Help Desk hours Email: [email protected] | Service catalog Location: Canaday Library 1st floor
Related Articles

Thank you! Your feedback has been submitted.
- Library and Help Desk Hours
- Web Accessibility
- Credits and Attributions
- Have feedback?
- © 2021 – Bryn Mawr College. All rights reserved.
Moodle Marking Types
In Moodle, there are 3 primary methods in which teaching staff can mark graded student submissions, these include:
- Simple direct grading
- Using rubric
- Using marking guide
Different grading methods
Simple direct grading is the most straightforward and simple method to understand and set up. As teaching staff begin to mark submissions, they can manually provide a numerical mark, no other steps are required. When the grader provides only a final grade and feedback to students, is the most commonly used grading method for a Moodle Assignment.
Rubrics or marking guides are recommended for high-stakes tasks, but simple direct grading is great for smaller assignments. It takes very little time to set up and enables grading assignments quickly using the quick grading function.
Marking with a rubric allows teaching staff to address several aspects of a student's assignment and assess them separately. Moodle will calculate the total aggregated grade from all the addressed aspects/criteria. Rubric marking makes the rationale behind the scores clear to students and to other markers of the same assignment. Rubrics can be time-consuming to set up as all criterion scores and descriptions must be created alongside the rubric.
A marking guide is very similar to a rubric, but it's simpler. For each marking criterion, a comment explains what is being sought, and provides a maximum mark that can be awarded.
Marking using a marking guide is more detailed and less subjective than awarding a single grade, but it's less time-consuming to set up. Students can be allowed to view the marking guide before they submit, so that they know what their learning priorities are in relation to this assignment.
Marking guides and rubrics are forms of standards-based assessment. Click the following link to find out more about standards-based assessment .
Set activity with simple direct grading
By default, all activities are set with simple direct grading. These settings can be found in the "Grades" tab of the Settings page of any gradable activity.
Click ' Get Started' to view the step-by-step guide
Set activity with a rubric
A rubric is a set of marking criteria, for each of which several descriptive levels are defined and assigned points. It is presented as a table, with the criteria defined in rows and the levels and associated points defined in columns.
Mark a rubric graded activity
Activities that are set up with Rubric grading method are marked slightly different that direct grading method ones.

Set activity with a marking guide
A marking guide is a simpler form of rubric, which can also be created within Moodle.
Mark a marking guide graded activity
Grading activity that is set up with a marking guide is very similar to an activity with rubric, however, there are some differences. Marking guide allows to leave additional feedback for each criterion student is being graded with. Also, it allows to specify the grade out of the maximum allocated grade points.
How to edit rubric?
Rubrics can generally be edited up until they are used.
Issues can occur in Turnitin as old rubrics cannot be edited after they are used unless they are duplicated.
Create a duplicate of the rubric
Make changes to the duplicate in the Rubric Manager
Attach the new rubric to the activity.
If the activity has a previously attached rubric, attaching a new rubric may result in a loss of content
How to duplicate rubric?
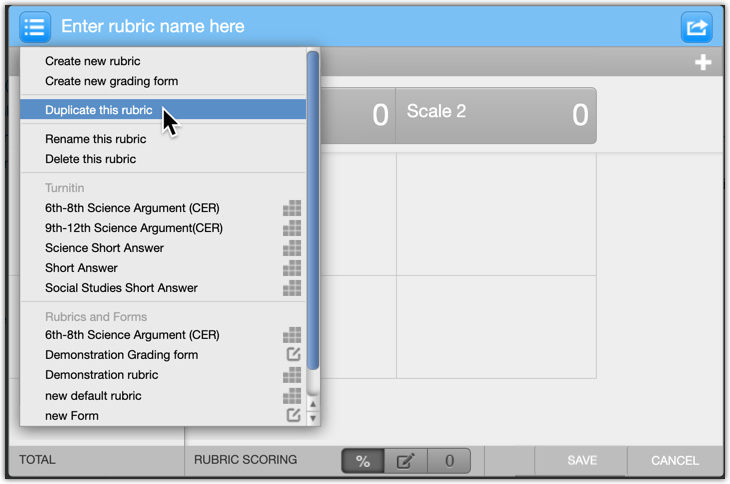
Instructors can duplicate rubrics from the rubric manager in the activity’s settings.
Click ‘Launch Rubric manager’ in the activity’s settings
Select your rubric in the top left menu
Click ‘Duplicate this rubric’ in the top left menu
On this page
Annotating Moodle Assignment Files
Annotating assignment files using built-in moodle tools.
Instructors can use the built-in annotation tools in Moodle Assignments to markup files submitted by students.
- Log in to moodle.lafayette.edu and select the appropriate course.
- Go to the Moodle Assignment you want to add annotations and click [View all submissions].
- Click the [Grade] button beside the name of the student’s files you want to annotate.

- Click the [Save changes] or [Save and show next] button after adding annotations.
Annotating Assignment Files Using Notability
To use something beyond the built-in annotation tools, many have found Notability on an iPad to be an intuitive way to annotate assignment submissions.
Downloading the files from Moodle
- On your iPad, log in to Moodle in Safari.
- Scroll to the bottom of the page and be sure “ Download submission in folders ” is unchecked.
- Scroll back to the top and select the [Download all submissions] button in the upper right.
Importing files into Notability
Unzipping the downloaded file.
- Open the Files app on your iPad.
- You should see a “ Downloads ” folder, likely under the “ Favorites ” section on the left.
- Click the zip file that was just downloaded. This will unzip it.
Importing the files into Notability
- A subject is like a category and you don’t have to have one. However, if you’re going to do this a lot, creating at least one subject for each of your courses will help keep things better organized.
- Click the import button (it looks like a box with a down-facing arrow inside it) from the upper-right corner of Notability.
- Select “ Files ” from the drop-down menu and click “ Browse ” from the bottom.
- Click the “ Downloads ” folder and click the folder that was just created.
- Click “ Select ” from the upper-right and then click “ Select All ” in the upper-left. Click “ Open ” from the upper-right.
- Choose “ Create Separate Notes ” and click “ Next ” until you can select “ Import .”
- Annotate the files in Notability as you see fit.
Exporting, preparing, and uploading files to Moodle
DO NOT CHANGE THE FILE NAMES. Doing so will prevent the assignments from merging correctly back into the assignment.
Exporting Notability files
- In Notability , click the Export button, which looks like a box with an upward-facing arrow inside it.
- Select the files you want to export.
- Click the Export button again.
- Select “ Google Drive ” and choose where to save these files. Click “ Send to Google Drive .” Unfortunately, Notability doesn’t allow you to export to the Files app).
Creating a zip file of the exported PDFs
- Select “ Google Drive ” from the left and navigate to the folder where you exported the files. If you don’t see Google Drive listed as a Location, you may need to edit the sidebar in your Files app to toggle on Google Drive.
- Click the “ Select ” button in the upper-right and select the files you wish to upload back into Moodle.
- Click the “ More ” button in the bottom-right and choose “ Compress .” This will zip the files into one file.
Uploading the zipped file to the Moodle Assignment
- Return to Moodle in Safari, navigate to the Assignment, and click “ View all submissions .”
- From the “ Grading action ” drop-down menu, select “ Upload multiple feedback files in a zip .”
- Click the “ Choose a file ” button, click “ Choose File ,” click “ Browse ,” and click “ Locations ” so you can select “ Google Drive .” From there, navigate to the folder where you created the zip file and select it (the default name will be Archive.zip).
- Click the “ Upload this file ” button and then click “ Import feedback file(s) .” Click “ Confirm ” and then “ Continue .”
Documentation
| If you want to create a new page for developers, you should create it on the site. |
Assignment Advanced Marking
This is a proposal for additional marking features in the Assignment module.
References: https://docs.moodle.org/dev/Lightwork#User_Interface_-_Marker_allocation_and_management
Tracker Issue: http://tracker.moodle.org/browse/MDL-34902
This issue has ballooned and this spec is not longer useful. It will be broken down into smaller features with individual specs for each.
- 1.1 Control the distribution
- 1.2 Support the marking process
- 1.3 Control the release of marking to students
- 1.4 How do these functionalities combine for the user and in implementation?
- 2.1 Settings added to the mod_assign settings page
- 2.2.1 Marking release
- 2.2.2 Marker allocations
- 2.3.1 Teacher is creating an assignment with a small number of students and they do not wish to use advanced marking
- 2.3.2 Teacher is creating an assignment with a small number of students and they wish to mark all submissions, then re-mark several submissions to check for "grading drift" before release
- 2.3.3 Multiple Teachers are marking submissions for the same assignment and they want to know who is marking which assignment
- 2.3.4 A teacher has assistants helping them mark and wants to review all marks before they are released 1
- 2.3.5 A teacher has assistants helping them mark and wants to review all marks before they are released 2
- 2.3.6 Multiple markers which to separately mark the same set of students and then a moderator either takes an average or chooses one of the marks to be released
- 2.3.7 Multiple markers mark one student in sequence
- 2.3.8 Separate release of grades and feedback
- 2.4.1 Assignment settings screen
- 2.4.2 Submission menu in grading table
- 2.4.3 Batch operations menu
- 2.4.4 Marker allocation
- 2.5 Database Changes
Goals, rationale and fundamentals
The main goals of this change are to:
Control the distribution
Support the marking process, control the release of marking to students.
This is relevant in the context of large courses where groups/groupings are used to divide the students into groups and to associate dedicated staff with these groups. In terms of assignment marking the idea is that staff associated with groups are responsible for the marking of students in their groups and fulfil such marking independently from the marking of other groups.
An example would be: A course with 300 students is divided into 3 groups of students (based on different delivery locations, modes, tutorial groups, or other criteria). Two or more staff are associated with each group (one teacher and several teaching assistants). The same assignment is setup for the whole course. The staff associated with each group of students are responsible for marking their groups.
When looking at the assignment marking (mod/assign/view.php?id=3&action=grading) staff associated with a group should only see the students belonging to this group. It is not recorded which staff member is marking which students. The staff member in charge of the overall course might have a setting, which allows to see assignment marking for all students (of all groups).
This functionality is primarily of interest to the EAM project.
SW(USQ) I consider it important from an administration point of view that it is important to record which staff member is marking which student. Certainly the staff member in charge should be able to see who is marking which assignment, however I think that a setting (switch oon) to allow other persons (possibly admin staff/non teachers) t osee who is marking which student/s assignments.
The focus here is on assisting with the marking process, typically in situations where multiple teachers and/or teaching assistants form a marking team. The idea is to allow each individual marker to have an overview of marking assigned to them and of the status this marking is in. The teacher in charge of the assignment wants to be able to see how marking is progressing and what quality the marking is (per marker and across markers).
To achieve this focus two aspects need to be introduced:
- Marker allocations;
- Marking statuses.
With marker allocations, it is recorded which marker (teacher or teaching assistant) is marking which student. Only the marker allocated can mark a student. The teacher in charge of the assignment decides the marker allocation (the teacher selects all staff involved in marking and then distributes marking manually, randomly, or even based on groups). As the marking progresses, allocations can be changed (e.g., when a marker becomes unavailable).
GW - my concern with the paragraph above is that it implies that the processes of allocating manually, randomly or by groups will all operate identically. It is my understanding that the spec below is suggesting that manual allocation happens within the assignment grading table, whereas random allocation will effectively occur via the use of groups and will take advantage of the random allocation mechanisms already built into the group manager in Moodle. Likewise allocating by groups will take advantage of the same existing Moodle functionality. It was my impression that changing allocations during the marking process if groups (including random groups) are used, will require changes to the group membership. This may be a minor point, but I think it is worth highlighting.
EH - Grette, putting implementation issues aside, do you agree with the functionality proposed and importantly, with the fundamental difference to what I have called 'distribution of marking'? If we can agree on the fundamentals first we can then see how the implementation will work. What is currently described below (e.g., with the screenshots) suffers, in my opinion, from confusion about what we want to achieve.
GW - I guess I am finding it difficult to see what the difference between allocation and distribution is in reference to identifying which marker will mark which students work. I am unsure what the implications of highlighting the difference will be.
The following marking statuses are suggested:
- Allocated (the marker has not yet started)
- In marking (the marker has started but not yet finished)
- Marking completed (the marker has finished but might need to go back for checking/corrections)
- In review (the marking is now with the teacher in charge for quality checking)
- Ready for release (the teacher in charge is satisfied with the marking but wait before giving students access to the marking)
- Released (students have access to the marking.
The marking statuses are for use by staff. The marking statuses are not visible to students. The default setting will be that students can see who has marked them (but this can be changed). Marking can be taken from one status to the next on individual student basis, yet there are also bulk transitions (e.g., to release of ‘ready’ marking). Marking can be taken back into a previous status (e.g., from in review back to in marking if more work is required).
When looking at the assignment marking (mod/assign/view.php?id=3&action=grading) it is displayed who is marking which student (and only the staff assigned can edit the marking).
The functionality related to the marking process has its origins in Lightwork and is primarily of interest to the Lightwork online project.
GW - EAM are also interested in manual allocation of marking as an addition to using groups.
EH: Are you talking about manual distribution of subsets of students to individual markers/several markers (with processes like I have described in the first point about 'Distribution', or, are you talking about supporting the marking process? GW - see my comment above about not being clear on the reason for the distinction between allocation and distribution.
PC: I believe a simplified set of statuses would be good when there is only a single marker:
Multiple markers - "Allocated"->"In Marking"->"Marking Completed"->"In Review"->"Ready for Release"->"Released"
Single marker - "In Marking"->"In Review"->"Released"
SW(USQ) from our perspective, I tend to agree with PC, we need a different status set for multiple and single markers, otherwise it just causes confusion
A problem with the current Moodle assignment module (2.3) is that students can immediately see their marking results (if the teacher does not take extra steps for hiding the assignment from student view and hiding the grade book entry). This is not good, as it does not allow the teacher to make changes (e.g., as required to deal with marker drift or for checking across multiple markers).
The suggestion is to add a release control to the assignment module. This will have three possibilities, visible in the assignment marking overview screen (mod/assign/view.php?id=3&action=grading):
- Nothing shown (no-one has yet saved any marking for a student)
- Not released (someone has saved marking, but this marking is not yet visible to the student)
- Released (marking is visible to the student)
The sole focus here is on if the student can see the marking or not. This is not about trying to manage the marking process.
This functionality is already included in supporting the marking process as proposed by the Lightwork Online project. The EAM project is interested in this functionality as well.
PC: A concern that I have with adding a release control to the assignment module is that teachers already have a form of release control (hiding the grade book entry). It might be simpler if we could use this existing mechanism instead of adding a second release control that may confuse teachers.
GW - my sense is that using the hide/show controls for the gradebook entry requires teachers to move to a different part of Moodle in order to ensure that students do not receive their grades/feedback immediately. A function that sits within the assignment module itself will be more visible and hopefully therefore more usable. We should definitely not build something however that prevents teachers from using the 'hide/show gradebook entry' method.
EH: I think that the additional functionality would be well placed. Hiding marking from students needs to occur in two places: in the gradebook and in the assignment activity. Hiding the gragebook entry is fairly easy for the teacher (but, as Grette points out, it is in a different place in Moodle). Hiding the assignment activity has unwelcome side effects. As I understand it, the teacher needs to hide the assignment from student view so students cannot see marks and feedback. But, for example, this means that students cannot make late submissions (as they cannot see the assignment ...).
PC: Just to be clear, what I was talking about was using the proposed release control in the assignment settings to hide the grade book entries (not expecting teachers to move to a different part of Moodle). In other words, when an assignment is created with release control, it would be automatically set to 'hidden' in the grade book.
How do these functionalities combine for the user and in implementation?
The functionalities would result in three settings to the Assignment update page (course/modedit.php?update=3&return=1).
- Control release of marking to students (Yes/No)
- Set distribution of marking (Yes/No; with Yes offering selection of groups/groupings)
- Manage marking process (Yes/No; with Yes offering allocation algorithms/manual allocation)
Controlling the release of marking to students is not in conflict with setting the distribution of marking, and is already included in managing the marking process.
Fundamentally there is no conflict between setting the distribution of marking and managing the marking process (in fact, it would be welcome as a ‘group’ will likely contain a large number of students and possibly several markers, making it very useful to be able to manage their marking). Yet, an initial implementation might keep things more simple and make these setting mutually exclusive.
The distribution of marking will build on already existing groups and groupings. No further database tables should be necessary to capture this information. Any changes to groups would be reflected during the marking process.
Capturing the marking allocations will require new database tables. If one allows building the allocation on groups, this will mean that the initial setting for the allocations is taken from the groups, but that any changes to groups will not be automatically reflected in marker allocations (but can be done manually, like any changes to allocations). GW - this would be highly problematic for groups that get their membership from Student Information Systems.
(The following sections currently do not match what is proposed under Goals above.)
Settings added to the mod_assign settings page
Release grades immediately (Checkbox, default to on - this is the current behaviour)
[Help text] When enabled, grades will be visible to students as soon as they have been entered by a grader (If the grade column is visible in the gradebook). When disabled, any grades that are entered will be only visible to graders until they are approved for release.
Allocate markers to students (Select list of options, "None - all markers can mark all students", "Manually allocated - markers are manually allocated students to mark", "Groups - Markers can mark students in their own group")
When the grouping method is chosen above, an additional setting should be enabled to allow a grouping to be specified for the marker allocations.
Grouping for marker allocations (Select from the available groupings - or None for all groups)
GW - we currently create marking groups using the groups interface and then set assignment up using "Separate groups" so that markers can filter the list of assignments. One of the issues we have come up against is unenrolled (suspended) students still appearing in the groups interface. We have a proposal for better management of suspended users. We have identified 23 (possibly 25) areas where suspended users are currently an issue. Where possible, we’d like an option to toggle between hiding and showing suspended users, with the default option being hidden. We are looking to resource a change that will be all encompassing and a complete fix that can be contributed back to the Moodle community. Initially we will build for 2.1.6, but will then review for 2.3 towards the end of the year.
PC - I believe the assignment settings should be simplified or teachers will find it confusing. I would like to see the "Release grades immediately" and "Allocate markers to students" replaced with a single drop down of standard options:
- Simple marking" (the default settings - grades are released immediately)
- Advanced marking - single marker" (Grades are released when status changed to 'Released')
- Advanced marking - multiple markers" (Grades are released when status changed to 'Released')
Note that when choosing "Advanced marking - multiple markers" the teacher would be able choose whether or not to use a Grouping for allocating markers. If we are going to allow other combinations of "Release grades immediately" and "Allocate markers to students" then we could have an additional menu item to allow teachers to choose their own combination.
EH: Paul, with "Advanced marking - single marker", do you see that an automated marking allocation is made to one person (who has to have the capability to release grades), therefore enforcing that only this person can mark? I think this is a quite different approach to what Damyon is proposing, which basically says 'use marking statuses but do not record/control who is marking'. If I understand correctly what Paul is proposing, this means that one can use marking statuses only if one controls marker allocation. This might be a better solution, as it cuts out variety, simplifying things for the development and the user. We could add a fourth option for using marking statuses without marker allocation, this might give the following options:
- Simple marking" (the default settings - grades are released immediately, marker allocations are not recorded)
- Advanced marking - no marker allocations" ((Grades are released when status changed to 'Released'. No control who is marking)
- Advanced marking - single marker" (Grades are released when status changed to 'Released'. Only single marker specified can mark and release)
- Advanced marking - multiple markers" (Grades are released when status changed to 'Released'. Multiple markers work together)
GW - I think my preference is for three settings: Release grades immediately Allocate markers to students
and the third Grouping for marker allocations (to appear only if group allocation is selected)
I think it may end up being clearer, rather than trying to explain in help text what Simple marking and the Advanced marking options are.
PC - My concern is that being able to choose a combination of settings in this way does not make it clear to the teacher what they will end up with at the end. For instance, a teacher who wants to take advantage of the advanced marking process should not have to work out that they have to select "Release grades immediately - No" in order to do this. Also, see my comment earlier about the use of the "hiding" facility in the grade book to control the release.
Changes to grading/grading interface
Marking release.
If "Release grades immediately" is not enabled, an additional status should be added to the grading status column "Draft/Ready for release/Released". Use background colors as well to visually distinguish the statuses (Blue - draft, Fushia - Ready for Review, Yellow - Ready for Release, Green - Released).
Anyone with mod/assign:grade capability would be able to move the status from "Draft" to "Ready for Review" via the drop down menu on each submission, or via the batch operations form.
Anyone with mod/assign:releasegrade (new) capability would be able to move the grade from either "Draft" or "Ready for Review" to "Ready for Release".
Anyone with mod/assign:releasegrade (new) capability would be able to move the grade from either "Draft" or "Ready for Review" or "Ready for Release" to "Released". At this point the grade is pushed to the gradebook and made visible to the student.
Marker allocations
If "Allocate markers to students" is set to "Manually allocated", and the current user has "mod/assign:allocatemarkers" capability, the list of markers allocated to each student needs to be shown in a new column in the grading interface.
Multiple markers should be able to be allocated to a single student. (GW - future dev? Implies the need for markers to be able to lock assignments while they are marking them). If the current user has mod/assign:allocategraders permission, a red X next to each markers will allow immediately removing this marker (Ajax if possible - don't refresh the full page) An option should be added to the menu for each submission and the batch operations menu which takes you to a separate page where you can choose from the users with mod/assign:grade permission to allocate to a student (or multiple students).
Any student with no markers allocated should have "No markers" in this column and the column background should be shown in a different colour (Red?) to indicate that no-one has been assigned to mark this submission. If the current user has "mod/assign:allocatemarkers" and "mod/assign:grade" capability, there should be an entry in the menu for this submissions for "Assign to me" (preferably AJAX - do not refresh entire page).
If the a submissions has not been allocated to the current user, the option to grade that submission is removed.
If the current user does not have "mod/assign:allocatemarkers" capability, the list of submissions will be limited to only show the submissions where the current user has been allocated as a marker.
PC - How will you be handling marker allocation in the database when "Grouping for allocating markers" isn't selected? Answer from our last meeting : marker allocation tables will be used
Teacher is creating an assignment with a small number of students and they do not wish to use advanced marking
- Release grades immediately: "checked"
- Allocate markers to students: "None"
Teacher is creating an assignment with a small number of students and they wish to mark all submissions, then re-mark several submissions to check for "grading drift" before release
(I am defining this as the perception of quality changing over time as the marker marks each assignment in turn - can't find a good reference right now) EH: This is called 'marker drift'. you'll find a brief description in http://etools.massey.ac.nz/documents/LitReview101006.pdf (p. 19 bottom), as well as references to further literature.
- Teacher has "mod/assign:create", "mod/assign:grade" and "mod/assign:releasegrades" capabilities
- Release grades immediately: "not checked"
- Teacher marks each submission individually. Grades are "Draft" and not released to gradebook or students
GW - I think I know why this status is "Draft", but I think it might get confused with the submission status in the interface. I think we can come up with a better term..not that I have thought of one yet.
PC - How about "Provisional"?
- Teacher re-marks a random sample of submissions
- Teacher releases all the grades via the batch operations form
EH: The seems to be our 'In marking'
GW - what about "Ready to mark" - this might be more consistent with the other statuses "Ready for review" and "Ready for release". Is there any relationship between this status and the submission status...ie. if the submission status is "Draft" should the marking status be "Not ready to mark", which changes to "Ready to mark" when the submission status is "submitted"?
'Not marked' 'In Marking' (?) 'Ready for review' 'Ready for release' ' Released'
I think we should point out as the main reason for the stepped release of grades via the transition from 'Ready for release' to 'Released' as
- The teacher wants to release marking to all students at the same time.
Marker drift or any other checking done by one person on their own marking is important. Yes, in this use case the teacher can use the statuses proposed for that, yet the need for this type of checking applies to all markers (teachers and teaching assistants). This is why we have proposed the statuses of 'In marking' and 'Marking finished', before the marking is being passed on the the teacher for further quality review (e.g., to check across markers).
PC: I believe the following statuses would be good:
PS: The descriptions here focus on the release of grades - this portraits a very summative viewpoint; it does not acknowledge the importance of feedback (as in the comments hopefully written to guide the students). This is why I tend to talk about marking and marking results.
Multiple Teachers are marking submissions for the same assignment and they want to know who is marking which assignment
- Assignment has been created and there are multiple markers with "mod:assign/grade and mod:assign/allocatemarker" capabilities
- Each marker selects "Assign to me" for the submissions they wish to mark.
- Each marker then provides grades and feedback which is released immediately to students
- The markers can see which students have been allocated a marker and will not end up marking the same student
A teacher has assistants helping them mark and wants to review all marks before they are released 1
- Assignment has been created and there are is a teacher with "mod/assign:grade", "mod/assign:allocatemarker" and "mod/assign:releasegrades" capabilities
- There are multiple teaching assistants who have "mod/assign:grade" capability but not "mod/assign:releasegrades" or "mod/assign:allocatemarker" capabilities
- Release grades immediately : not checked
- Allocate markers to students : Manually
- The teacher allocates a set of students to each of the Teaching Assistants
- The teaching assistants login and can only grade their own students. The grades and feedback are "Draft" and not released to gradebook or students
EH: It would be nice to have an option on the settings page where the teacher can set if the Teaching Assistants can see the marking done by other markers (not just the grade). Is the current proposal that a Teaching Assistant would see the entries for students not allocated to them (that means that can see the grade given by another Teaching Assistant)? There would have to be a 'read-only' grading option, allowing the Teaching Assistant to view marking done by others but not change it. DW: No the current proposal is that they would not see any students not allocated to them.
- When finished, for each submission the teaching assistant changes the status of the grades to "Ready for review"
EH: Here it would be nice if the Teaching Assistant could pass on a message to the Teacher together with the status change.
- The teacher can see which grades/feedback are ready for them to review by the grading status.
- The teacher reviews all grades and feedback that are "Ready for review", making changes if necessary
EH: How will the screenshot look? Will the Teacher have access to the grading interface even if the Teacher is not allocated to mark (the Teacher will have to look at the marking details, not just at the grade)? DW: yes they would see the grading interface If the Teacher changes feedback or grade, will this mean an automated re-allocation to the Teacher as marker? DW: The teacher would not be able to provide grades or feedback unless they were the allocated marker Will the student see who has marked them (there probably should be a setting allowing the Teacher to decide)? DW: This is a big change - it would currently show them the last person to mark them. We also need to options here to return the marking to the Teaching Assistant (ideally with comments, explaining why) and to allocate another marker (who then will continue with the marking already started - maybe this is already covered). DW: This is quite an advanced workflow - we need to make sure we are not adding too much complexity (it is not prevented by this interface - it just does not include any statuses for it - ie "Needs allocation to another marker for a second round of marking")
EH: This description skips the step of the Teacher taking assignments into 'Ready for release' after successful quality checking.
- The teacher changes the status of the grades to 'Released' when they are satisfied with the grading quality.
EH: I think this should read: The Teacher changes the status from 'Ready for review' to 'Ready for Release' when they are satisfied with the grading quality.
Then the next step is: The Teacher changes the status from 'Ready for Release' to 'Released' when they want to release marking to students.
DW: I have added the "ready for release" status - but this will require good help explaining the difference between the statuses to teachers. A visual flow chart of the statuses would help.
GW - I think that the Teacher should have the option to skip the "Ready for Release" status and take the assignment from "Ready for review" straight to "Released". If statuses can be skipped..ie. as long as we don't force users through every status, then i don't think it will be a problem to have the five statuses as proposed above: 'Not marked' 'In marking/Being marked' 'Ready for review' 'Ready for release' 'Released'
PC - I don't agree with skipping the "Ready for Release" status since it is an important part of the review process. However, it is possible to make the switching between statuses fast and efficient by having bulk options such as "Release all" that automatically selects marking with one status and moves it to the next.
Where it would be appropriate to reduce the number of statuses (but possibly not in our first Moodle 2.4 release) is when there is only a single marker. So, I think we need the following:
A teacher has assistants helping them mark and wants to review all marks before they are released 2
- There are groups containing teaching assistants and sets of students contained in a grouping.
- Allocate markers to students : Groups
- Grouping for marker allocation : "Name of Grouping"
- The teacher changes the status of the grades to "Released" when they are satisfied with the grading quality.
If there are multiple markers added to a group then all markers will be able to mark assignments in that group.
GW - If there are no markers in a group, then there is the potential that student assignments would get missed....there is no visual queue that students are unallocated. In addition - our SIS-created groups systematically check for the addition of members who are not in the group in the SIS. Any staff therefore who are added to the groups in Moodle will be removed from the group on the next update...unless we changed our integration script to retain users in SIS-created groups as long as they were not students??
Multiple markers which to separately mark the same set of students and then a moderator either takes an average or chooses one of the marks to be released
Not supported by this proposal
Multiple markers mark one student in sequence
EH: This is about two or more markers marking student work, e.g., marker 1 marks parts 1 and 2, marker 2 marks parts 3 and 4 of an assignment. This could be done with a different form of allocation: marker1 picks a student and then marks their part; the interface shows that marker 1 has done their part, marker2 can now allocate themselves and continue the marking. Once all markers involved (as setup initially, here markers 1 and 2 need to mark) have done their parts the status changes to 'ready for review'.
This is not part of the current proposal.
Separate release of grades and feedback
EH: It would be nice to be able to release feedback (for formative purposes) first and marks/grades later (with a time delay or triggered by the Teacher, or, more sophisticated, dependent on the student doing something).
DW: I think it should be - but I don't what to make it complicated. I think that either the feedback is visible to the student during the entire marking process and they get the grade at the end - or they see nothing and they get the grades + feedback at the end (we could add those 2 options to the settings page). Note: The submission comments are visible to staff and students for the entire duration and provide 2 way comments between students and staff.
GW: The potential issue with this is that feedback might change during the marking process. Is a student-triggered process (ie. viewing the feedback) to release grades "complicated"?
EH: I am with Grette there - feedback should only be visible to students when marking is considered as finished (otherwise we would be back to the current deficiencies in Moodle)
User Interface
Assignment settings screen.
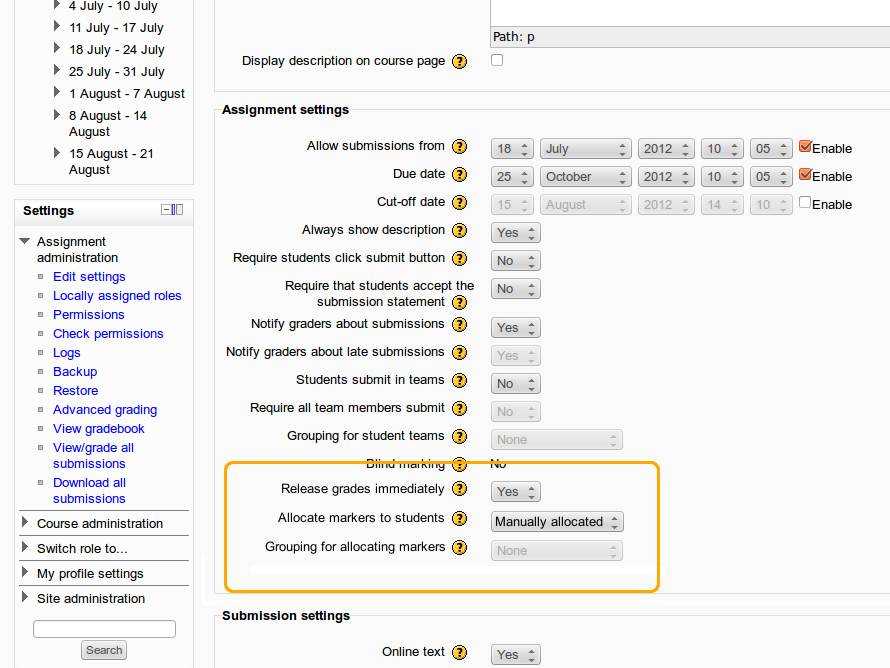
Submission menu in grading table
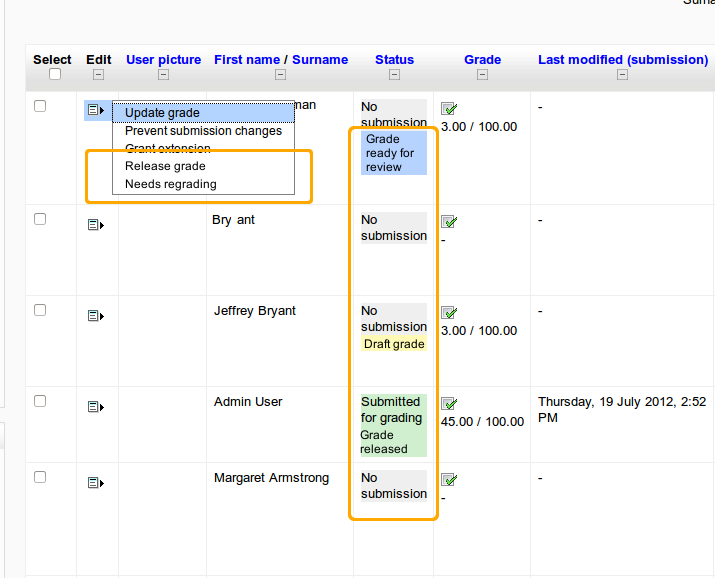
Batch operations menu
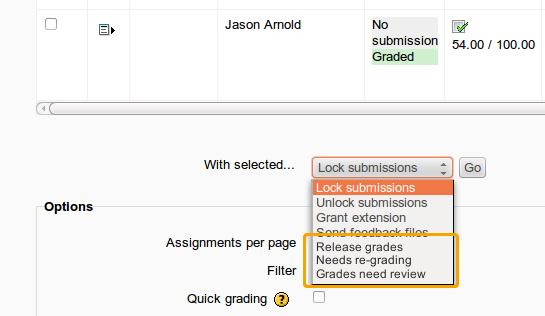
GW: Will there be an option for the Teacher with "mod/assign:releasegrades" capability to take all assignments that are in "Ready for Review" to either "Ready for Release" or "Release" without having to individually select them?
GW - will there be a batch operation for "Assign to me?"
Marker allocation
Notes: The current user is "Grader Gary" so the grade option has disappeared for all submissions that this user is not assigned to mark. The current user also has permission to assign graders so they see additional options in the submission menu.
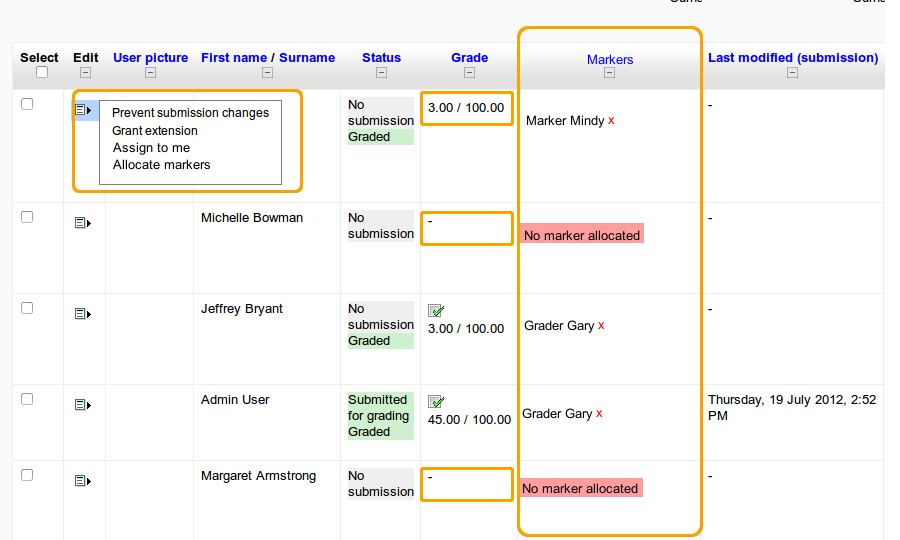
Database Changes

Grade Assignments Using Annotate PDF
This tutorial shows how to create an assignment that uses the annotate pdf tool which allows instructors to grade assignments without downloading them..
Note: It is not recommended using this tool to provide feedback for an assignment that students will need to revise, work on further, etc. This is because students will receive the feedback in the form of a PDF, which they won't be able to edit.
To create an Assignment with Annotate PDF:
- Follow the instructions to Create an Assignment
- When you get to the settings choose Submission Types, Feedback types, Grade settings, as described below:
Submission types
- Make sure the File Submissions box is selected.
- In the Accepted file types area, add Documents which includes .pdf files. (Note Annotated PDF grader will also allow you to annotate Word docs).

Feedback Types

- After you've finished setting up the Assignment, click to view it.
Marking with Annotate PDF
Graders can highlight, write, type, and add stamps and post notes in a PDF document submitted by a student when Annotate PDF is enabled. They can use a mouse, trackpad, or WACOM tablet to make handwritten markings when using a computer or an iPencil, stylus, or finger when grading on an iPad or other tablet.
- Click the assignment you would like to grade from within your course
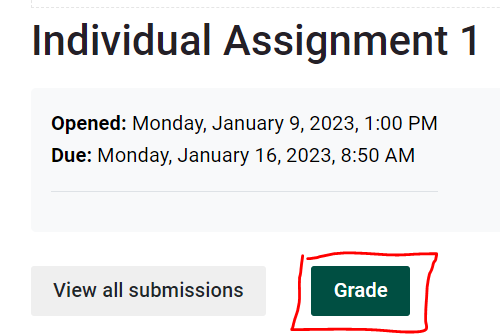
The submission(s) will open one at a time in an annotation window as shown below. Navigate through the student submissions using the grading tools to annotate directly on the assignment submitted.

Select a tool from the annotation toolbar at the top of the window to mark the submission.
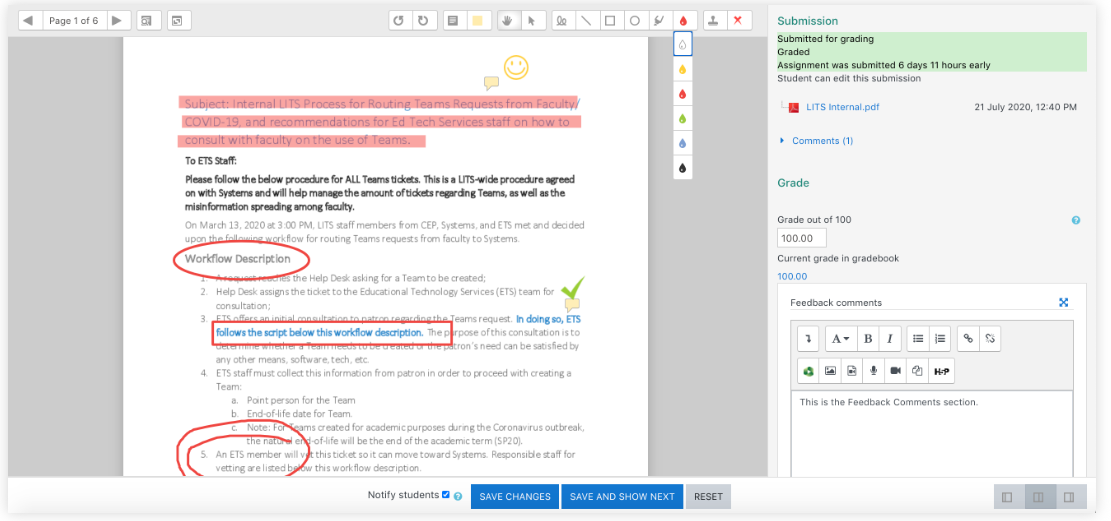
- If the document in annotation window is blank, the conversion to PDF failed (for a file submitted in a different format) or Annotate PDF could not read the PDF file. You will need to download the file using the link in the pane to the right of the annotation window and add annotations outside of Moodle.
- To save a copy of your annotations and feedback outside of Moodle, click the Download Feedback PDF link beneath the Feedback Comments box.
- The Annotate PDF feature works with PDF and Word doc files . If students submit files in other formats, Moodle will try to convert them to PDF so that you can mark them, but this conversion process does not work reliably. For best results when using Annotate PDF, have your students save their assignments as a single PDF file for upload.
Tip Deleting a Stamp
- Click on the stamp you want to delete. The stamp will highlight a little trash can icon appears.
- Click the trash can icon to delete the stamp.
Another perspective - Moodle: Grade assignments with Annotate PDF
Make assignment annotating and feedback easier to read and access with Moodle 3.3
Teachers, we are pleased to announce that annotating assignments is now enhanced in Moodle 3.3 with the possibility of collapsing and expanding comments!
In previous versions of Moodle, comments teachers provide while annotating assignments would sometimes cover the original text. Of course this makes it hard to read and perhaps also limits how much feedback teachers can provide.
Now, this new (and very useful feature) in Moodle gives teachers the option of writing comprehensive feedback on assignments that can be collapsed so it won’t block over the original text.
This then makes reading feedback easier for students.
Using this new feature is also super simple.
When teachers are grading assignments and are adding comments as feedback for the student, comments are automatically collapsed as they move to a different area.
If they need to see the comments again, the teachers simply need to click on them and the comments enlarge to become readable.
In addition, teachers can also collapse and expand all comments at once through a click of a button.
Thank you to Moodle community member, Tony Butler, for working on this new improvement with us.
Enjoy adding comprehensive comments when annotating assignment submissions and being able to collapse them for greater readability.
Watch our step by step guide to see how the assignment collapsible comments in Moodle 3.3 works.
Assignment collapsible comments
- Download Moodle 3.3 or contact a Moodle Partner for upgrading assistance
- Download the Moodle 3.3 assignment collapsible comments explainer poster
- Read the Moodle 3.3 release notes
Subscribe to Moodle news
First Name*:
Last Name*:
Afghanistan Albania Algeria American Samoa Andorra Angola Anguilla Antarctica Antigua and Barbuda Argentina Armenia Aruba Australia Austria Azerbaijan Bahamas Bahrain Bangladesh Barbados Belarus Belgium Belize Benin Bermuda Bhutan Bolivia Bonaire, Sint Eustatius, and Saba Bosnia and Herzegovina Botswana Bouvet Island Brazil British Indian Ocean Territory British Virgin Islands Brunei Bulgaria Burkina Faso Burundi Cabo Verde Cambodia Cameroon Canada Cayman Islands Central African Republic Chad Chile China Christmas Island Cocos (Keeling) Islands Colombia Comoros Congo Republic Cook Islands Costa Rica Croatia Cuba Curaçao Cyprus Czechia DR Congo Denmark Djibouti Dominica Dominican Republic Ecuador Egypt El Salvador Equatorial Guinea Eritrea Estonia Eswatini Ethiopia Falkland Islands Faroe Islands Fiji Finland France French Guiana French Polynesia French Southern Territories Gabon Gambia Georgia Germany Ghana Gibraltar Greece Greenland Grenada Guadeloupe Guam Guatemala Guernsey Guinea Guinea-Bissau Guyana Haiti Heard Island and McDonald Islands Honduras Hong Kong Hungary Iceland India Indonesia Iran Iraq Ireland Isle of Man Israel Italy Ivory Coast Jamaica Japan Jersey Jordan Kazakhstan Kenya Kiribati Kosovo Kuwait Kyrgyzstan Laos Latvia Lebanon Lesotho Liberia Libya Liechtenstein Lithuania Luxembourg Macao Madagascar Malawi Malaysia Maldives Mali Malta Marshall Islands Martinique Mauritania Mauritius Mayotte Mexico Micronesia Moldova Monaco Mongolia Montenegro Montserrat Morocco Mozambique Myanmar Namibia Nauru Nepal Netherlands New Caledonia New Zealand Nicaragua Niger Nigeria Niue Norfolk Island North Korea North Macedonia Northern Mariana Islands Norway Oman Pakistan Palau Palestine Panama Papua New Guinea Paraguay Peru Philippines Pitcairn Islands Poland Portugal Puerto Rico Qatar Romania Russia Rwanda Réunion Saint Barthélemy Saint Helena Saint Lucia Saint Martin Saint Pierre and Miquelon Samoa San Marino Saudi Arabia Senegal Serbia Seychelles Sierra Leone Singapore Sint Maarten Slovakia Slovenia Solomon Islands Somalia South Africa South Georgia and South Sandwich Islands South Korea South Sudan Spain Sri Lanka St Kitts and Nevis St Vincent and Grenadines Sudan Suriname Svalbard and Jan Mayen Sweden Switzerland Syria São Tomé and Príncipe Taiwan Tajikistan Tanzania Thailand Timor-Leste Togo Tokelau Tonga Trinidad and Tobago Tunisia Turkey Turkmenistan Turks and Caicos Islands Tuvalu U.S. Minor Outlying Islands U.S. Virgin Islands Uganda Ukraine United Arab Emirates United Kingdom United States Uruguay Uzbekistan Vanuatu Vatican City Venezuela Vietnam Wallis and Futuna Western Sahara Yemen Zambia Zimbabwe Åland
If you want more information about Moodle, its software products and services, recommendations and promotions subscribe to Moodle's monthly newsletter. You can always unsubscribe if you change your mind.

Register for Moodle Moot 2024

How to improve your learners’ distance learning experience

Top 5 reasons why MoodleMoot Global is one of the most sought-after EdTech conferences

10 compelling reasons to attend MoodleMoot Global 2024
- LEaD events
- IT Self Service Portal

Moodle Assignment feedback guide
- Get started - Moodle Assignment feedback
- Hide grades and feedback
- Late submissions
- Use Marking workflow
- Grade Using the Grading page
- Grade with Moodle Marking Record
Moodle Marking record
Hide grades and feedback for an assignment, access submissions page, access student submission, grade with marking record, upload feedback file and add general comments, navigate between student submissions, release grades and feedback for assignment, release grades and feedback (anonymous submissions), student view of marking record feedback, related guidance.
- Grade with Moodle Rubric
- Quick grading
- Track changes on Word document and / or adding feedback to a coversheet
- Upload feedback and grades via Excel spreadsheet
- Upload offline feedback files individually
- Group Assignment feedback and grading
- Release grades and feedback
A Marking record is used to assess a student's work against a set of marking criterion. The criterion explain what is required of the student and a maximum mark that can be awarded for each criterion is provided.
Personalised feedback and grades are added for each criterion and 'frequently added comments' can also be added. Marking using a marking record is more detailed and less subjective than awarding a single grade.
Students can view the Marking record before they submit their assignment, so that they know what their learning priorities are in relation to the assignment.

- Select Grades in the contextual navigation menu above the module name. The Grader report page opens
- Open the drop-down menu on the left of the page and choose Gradebook setup .
- Select the Edit link on the same row as the name of the grade item you are marking.
- Select Hide .

- Open the assignment from the module page. This opens the Grading summary page.

- Select the View all submissions button to view the Submissions page.
- If you cannot see all the submissions you expect, check to see whether a filter has been applied. Filters can follow you from one module to another, and if another user has added a filter, it may still be in place. Remove the filters to see all submissions.
- Alphabetic filter . Select All for both the First Name and Surname to clear

- Options . Open the Filter drop-down menu, select No filter to clear any existing filter.

- After the assignment deadline, select the Grade button for the student you want to grade.
- The grading page for the student will open.
- The grading page should display a message: This grade and feedback (if present) is hidden in the Grader Report and is not available to the student.
- It this message does not display, go to Gradebook setup (by selecting Grades on the contextual navigation menu, open the Grader Report drop-down menu, select Gradebook setup ) and select Edit opposite the assignment name. Hide the assignment grade item.

For assignments where the Anonymous submissions has been enabled, a unique Participant ID will be generated by Moodle to replace the student name.

In the Grade section, each of the criterion for the marking record will be displayed.
- If both marker and student criterion were added when the assignment was set up, choose whether to show or hide each set of criterion while grading by selecting the appropriate radio button next to Show/Hide for each set.
- For each criterion, add feedback into the feedback input field.
- Each criterion is graded out of the score displayed alongside the score input field. Add a score for each criterion into the score input field. The Marking record calculates the overall grade based on grades input.
- If frequently used comments were added when the marking record was set up, they will be displayed under the criterion. To add a frequently used comment to the feedback, select the relevant feedback input field and then select the required comment in the frequently used comments list. The comment will be added to the feedback input field.
- Do not uncheck the Notify students box. Your feedback and grade is hidden as you selected to hide the Grade item at the start of this process.
- Select Save changes or Save changes and show next to move to the next student.

You can use the Feedback comments input field to provide general feedback and upload an external feedback file.
- Type any overall feedback for the student's submission into the Feedback comments input field.
- To upload an external feedback file select the file icon under Feedback files and select your file to upload, or drag and drop your feedback into the feedback area.
- Select Save and show next to move onto the next student to upload feedback and add grade in Moodle.
- Do not uncheck the Notify students box. Your feedback and grade is hidden as you selected to hide the Grade item at the start of this process.

Audio and video feedback
You can also provide up to 2 minutes of multimedia feedback by selecting the microphone icon or the camera icon from the text editor toolbar on the Feedback comments field. These files do not produce captions so you will need to provide written feedback for students to ensure that the feedback is accessible to all students. Students are not able to download multimedia feedback provided via the text editor in the Feedback comments input field.
Tips to prepare audio feedback
- Focus on the quality of the feedback as opposed to the quality of the recording . Don’t feel like you have to correct small speaking errors by re-recording. You can correct these as you would do in conversation. Do avoid poor quality audio as this can deter from the quality of your feedback.
- Structure your feedback . Prepare a draft of the key points you would live to cover before you record.
- Try to stay positive . Even when providing developmental feedback try to end on a positive note.
- Speak clearly .
- Make explicit how the feedback can contribute to the student's development .
There are two ways to navigate between student assignments submissions within the grading page of the assignment.
- You can use the Save and show next to move button at the end of the grading screen to save your feedback and move onto to the next student submission.

- Select Grades in the contextual navigation menu above the.
- Select the Grader Report drop-down menu and choose Gradebook setup .
- Select the Edit link on the same row as the name of the grade item you are marking.
- Select Show.

This makes the grades and feedback visible and generates an email to students to alert them to their released grade and feedback.
When an assignment is set up with anonymous marking, you must unhide the grade item and reveal student identities in order to release grades and feedback.
- Select Grades in the contextual navigation menu above the module name.
- Select the link to the assignment to open it.
- Select View all submissions .

When you release feedback and grades to students for an assignment marked with a Marking record, each student will be able to access their feedback and grades via the link to Grader Report in the Module Dashboard. Each student will be able to view.
- Their total grade for the assignment.
- Any general feedback entered.
- Any feedback files added.
- Feedback against the fields in the marking record. If the student selects the assignment they can view the scores for each of the Marking record criterion.

- Create Marking Guide
- << Previous: Grade Using the Grading page
- Next: Grade with Moodle Rubric >>
- Last Updated: Jul 17, 2024 9:42 AM
- URL: https://city-uk-ett.libguides.com/staff/moodle/assignment-feedback


- Training and Support
Canvas and Moodle Comparisons
- How to Publish a Course
- User Roles in Canvas
- Special Features in Canvas
- Other Ways to Get Help
When transferring to Canvas from Moodle, there are certain terms and features that are the same and some that are different. This will help you lidentify the Canvas terminology and features that are included in your course. The Canvas terms are arranged in alphabetical order. Their order will vary in your Canvas course based on your course navigation settings . If you don't see a feature or tool that you previously used or have more questions about this, then please email [email protected]
| Announcements | Announcements | Equivalent to Moodle. Your course must be published and active for students to receive announcments via email | (Video) (Instructor Guide) |
| Assignments | Assignments | Equivalent to Moodle. | (Video) (Instructor Guide) |
| Attendance (Roll Call) | Attendance | Can be used as graded activity or ungraded. Self-marking by students is not available. | (Tutorial) |
| BigBlueButton | Not in Oxy's Moodle | Conferencing tool for hosting virtual lectures, office hours, and student groups. |
|
| Chat | Chat activity | Real time conversation with course participants. Chat can be disabled for a course in the Course Settings. | (Tutorial) |
| Collaboration | No equivalent | Create collaborative (multiple user) documents that are saved in real time. Google docs are the default collaboration tool. | (Tutorial) |
| Discussions | Forum | Equivalent to Moodle. | (Video) (Instructor Guide) |
| Files | File | Equivalent to Moodle | (Instructor Guide) |
| Grades | Gradebook | Items in the Canvas Gradebook are created when assignments, discussions (graded), or quizzes are created. | (Video) (Instructor Guide) |
| Item Banks | Question Bank | Similar to Moodle | (Tutorial) |
| Leganto Reading List | Reading List | Equivalent to Moodle | guide |
| Modules | Topics | Similar to Moodle |
(Instructor Guide) |
| New Analytics | Reports and Analytic Graphs | Similar but not equivalent to Moodle | (Video) (Instructor Guide) |
| Outcomes | No equivalent | Allows tracking of the students' progress as measured by pedagogical goals or desired outcomes. | (Instructor Guide) |
| Pages | Page | Similar to Moodle. Canvas has a built-in accessibility checker | (Video) (Instructor Guide) |
| People | Participants | Similar but not equivalent to Moodle. To add participants to a course in Canvas, you must know the exact email or username (no search function like Moodle). | (Instructor Guide) |
| Quizzes | Quiz | Similar but not equivalent to Moodle. Canvas recently launched New Quizzes which is enabled at Oxy. | (Video) (Instructor Guide) |
| Rubrics | Rubrics | Equivalent to Moodle. | (Video) (Instructor Guide) |
| Settings | Course Settings | Canvas course settings include Course Details, Sections, Navigation, Apps, Feature Options, Integrations | (Tutorial) |
| Studio | No equivalent | Canvas Studio allows instructors and students to collaborate through video and audio. | |
| Syllabus | Course Summary | Similar to Moodle. In addition to posting the syllabus, the summary of course activities and due dates is autopopulated at the bottom of the page. It can be set as the course homepage. | (Tutorial) |
| Zoom | Not in Oxy's Moodle | Allows scheduling of a meeting from within the course |
- << Previous: Training and Support
- Next: How to Publish a Course >>
- Last Updated: Aug 16, 2024 10:45 AM
- URL: https://libguides.oxy.edu/canvas
Assignment marking guide 'Show/Hide marker/student criterion descriptions' checkbox options not holding selection when changes are saved
- Resolution: Unresolved
- Fix Version/s: None
- Affects Version/s: 4.0.5
- Component/s: Assignment , Grading methods
- external_confirmed
- Affected Branches: MOODLE_400_STABLE
Description
Assignments set to use marking guides — when grading them — have options to Show/Hide marker/student criterion descriptions in the PDF annotator grading form:
By default both the marker and student descriptions are set to show and when you toggle them, the descriptions appear/disappear on demand as one might expect. If however you toggle them to hide and then save the grading page, it appears to not hold that choice in place visually and reverts them back to show.
Replicated on 4.0.5, 3.11.6 and 3.10.3 Moodle environments
STEPS TO REPLICATE:
- Ensure there is at least one Student user enrolled in a test course
- Add an Assignment activity to the course page. Set required fields and ensure under Grade >> Grading method it is set to 'Marking guide'. Save and display.
- In the advanced grading section of the assignment where you define a new marking guide, click to 'define a new marking guide from scratch'. Name the guide, add as many criterion levels as you wish, provide meaningful marker/student criterions to properly observe changes noted in last two steps below then click 'Save marking guide and make it ready' when done
- Go to 'View all submissions' page within the Assignment activity and submit something on behalf of a student.
- Grade this student such to bring up the PDF annotation interface. Add some data to the marking guide fields, and toggle the Show/Hide marker/student criterion descriptions without saving. Observe that they show/hide these criterion descriptions as advertised.
- With the marker/student criterion descriptions set to show, set them to hide and then click 'Save' at the bottom of the page. Observe that the radio buttons revert back to show
OBSERVED BEHAVIOUR:
Show/Hide marker/student criterion descriptions options in Assignment activities set for marking guide grading revert to show when the submission is saved
EXPECTED BEHAVIOUR:
Show/Hide marker/student criterion descriptions options should ideally save and the display toggle opted for should visually hold
Attachments
- Sort By Name
- Sort By Date
- Download All
Error rendering 'clockify-timesheets-time-tracking-reports:timer-sidebar'. Please contact your Jira administrators.
Pardon Our Interruption
As you were browsing something about your browser made us think you were a bot. There are a few reasons this might happen:
- You've disabled JavaScript in your web browser.
- You're a power user moving through this website with super-human speed.
- You've disabled cookies in your web browser.
- A third-party browser plugin, such as Ghostery or NoScript, is preventing JavaScript from running. Additional information is available in this support article .
To regain access, please make sure that cookies and JavaScript are enabled before reloading the page.

COMMENTS
Click on the assignment name on the Moodle course homepage to access the summary page and click View/grade all submissions. From the Grading action drop-down menu choose Upload grading worksheet. Click Choose a file... and upload the grading worksheet to Moodle, or drag the csv file to the arrow and wait for the file name to appear in the box.
By default, Moodle assignments hide grades and feedback from students through the 'Marking Workflow' option. When you create an Assignment, the 'Marking Workflow' setting will be enabled. This automatically hides any marks and feedback that you upload for students until you take specific steps to release the marks and feedback.
In this video we demonstrate how to grade an assignment in Moodle.
The first step to using the marking workflow is to enable it on your assignment activity. This setting can be found in the Grade Section. The default for "Use marking workflow" is No, change ...
The new interface will convert student submissions to PDF so that you can view and annotate assignments on your desktop in addition to entering grades and feedback. The built-in grading function in Assignments allows the grader to: Make annotated comments directly into the file, which Moodle automatically converts to a pdf. Give short, general ...
About Press Copyright Contact us Creators Advertise Developers Terms Privacy Policy & Safety How YouTube works Test new features NFL Sunday Ticket Press Copyright ...
Moodle Assignment: assessment with marking guides In this type of grading, the teacher defines a series of criteria and assigns a maximum amount of marking points to each. When assessing learners' assignments, the teachers provide both a numerical mark and a comment for each of the criteria. For this type of grading, you can make the criteria ...
Selecting Marking guide. Create an assignment, and in the Grades section, choose from the Grading method drop down menu the Marking guide option:; Creating a new Marking guide. When the assignment has been created, and the Marking guide is selected as above, click Save and display and choose Define new grading form from scratch. (See section 5 for information on how to use a template.)
The gradebook automatically compiles the results of graded Moodle activities. Entries in the gradebook are always numeric so Moodle can simply aggregate grades automatically. Although this can be changed in the Assignment options for each activity, the default rating for each activity is 100.
The Moodle Assignment module lets you collect student assignments—including research papers, spreadsheets, presentations, photographs, and short audio or video recordings—online. ... Provide assignments feedback using by marking-up student submissions using tools available in desktop or tablet apps such MS Word, Adobe Acrobat Pro, Explain ...
To beginning marking an assignment, you need to click on the assignment while in the role of a teacher. After clicking on the assignment you will see a. summary page that indicates the number of students. how many assignments have been submitted. the number of assignments that need to be graded. the due date.
Open the Assignment Settings page (click the Assignment to open it, then click Settings in the top menu). Check the File Submissions box (required). Set Maximum number of uploaded files to 1 (recommended). Type .pdf in the Accepted file types box (required). Under Feedback Types, check Feedback Comments and Annotate PDF.
When the grader provides only a final grade and feedback to students, is the most commonly used grading method for a Moodle Assignment. Rubrics or marking guides are recommended for high-stakes tasks, but simple direct grading is great for smaller assignments. It takes very little time to set up and enables grading assignments quickly using the ...
On your device (e.g., iPad, laptop), log into Moodle in Safari. Go to the Moodle Assignment you want to add annotations and click [View all submissions]. Click the [Grade] button beside the name of the student's files you want to annotate. To reveal the annotation tools, click the [Collapse grade panel] button, which is the far-right blue ...
Moodle Assignment can handle independent ('blind') marking because it allows inboxes of submissions to be downloaded (preserving anonymity if needed) along with a marksheet. Similarly Moodle Assignment can handle offline marking by allowing submissions and marksheet to be downloaded, preserving anonymity if needed.
2.3.1 Teacher is creating an assignment with a small number of students and they do not wish to use advanced marking. 2.3.2 Teacher is creating an assignment with a small number of students and they wish to mark all submissions, then re-mark several submissions to check for "grading drift" before release.
After you've finished setting up the Assignment, click to view it. Marking with Annotate PDF. Graders can highlight, write, type, and add stamps and post notes in a PDF document submitted by a student when Annotate PDF is enabled. ... Moodle: Grade assignments with Annotate PDF. Previous. Assignment Feedback (Student View) Next. Alternative to ...
The View/grade all submissions page for a Moodle assignment activity allows you to do several important grading functions. Grades entered on this page will appear in the corresponding grade column of the gradebook. We recommend grading Assignments from this page, rather than manually entering grades in the Grader report, especially if you want to provide feedback as online
When teachers are grading assignments and are adding comments as feedback for the student, comments are automatically collapsed as they move to a different area. ... Download the Moodle 3.3 assignment collapsible comments explainer poster; Read the Moodle 3.3 release notes . Moodle LMS. Share: Share: You May Also Like: Register for Moodle Moot ...
1) Open the pdf of the students assignment and view on tablet pc. 2) Use the tablet pen to correct/comment etc all over the assignment like a lecturer normally would. 3) then I would like to save a pdf of that assignment with my electronic markings all over it and, 4) send it back to the student as feedback (pdf?), 5) record their grade in MOODLE.
In the Grade section, each of the criterion for the marking record will be displayed.. If both marker and student criterion were added when the assignment was set up, choose whether to show or hide each set of criterion while grading by selecting the appropriate radio button next to Show/Hide for each set.; For each criterion, add feedback into the feedback input field.
Assignments: Assignments: Equivalent to Moodle. Assignments Overview (Video) Assignments (Instructor Guide) Attendance (Roll Call) Attendance: Can be used as graded activity or ungraded. Self-marking by students is not available. Attendance (Tutorial) BigBlueButton: Not in Oxy's Moodle: Conferencing tool for hosting virtual lectures, office ...
Assignments set to use marking guides — when grading them — have options to Show/Hide marker/student criterion descriptions in the PDF annotator grading form: By default both the marker and student descriptions are set to show and when you toggle them, the descriptions appear/disappear on demand as one might expect.
Learn about Moodle's products, like Moodle LMS or Moodle Worplace, or find a Moodle Certified Service Provider. Moodle.com . ... They are marking assignments and then if the student needs to do more work in order for them to pass, the tutor will reopen the assignment for them.
Each Turnitin assignment in Moodle Direct V2 can have multiple parts associated with it. The student must submit a file to each part to complete the assignment. By default, Moodle will create a one-part assignment. ... Choose whether to Enable Anonymous Marking. Student names may be revealed for an assignment by clicking on the anonymous ...
Lab Manual: https:// Software Use: AUTOCAD, SOLIDWORKS Grading Scheme Assessment Tool Weight 8 Assignments (2 % each) 16 % 4 Lab Assignments (3 % each) 12 % 1 Test-Term Exam ... Template that can be downloaded from the course Moodle. • The assignments are to be individually solved and submitted in person during the tutorials.