- Help Center
- Google Docs Editors
- Privacy Policy
- Terms of Service
- Submit feedback
- Google Slides

Use slides recording in Google Slides
You can only record your presentations in Google Chrome Browsers. However, you can view, share, and delete recordings from any browser.
Record a slideshow
- There's a 30-minute limit to every recording.
- Information about Slides recordings isn't available in Revision History.
- If you exceed your Drive Storage quota, you can’t create more recordings.
- You must have edit access to the slides in order to create a new recording.
- To open your presentation, go to Google Slides .
- To start over, pause and click Re-record .
- To save your recording, pause and click Save to Drive .
Find your recording
- On your computer, go to Google Slides .
- Open the presentation where you created the recording.
- Select your recording from the list that appears.
Tip: Recordings are saved into a My Drive folder called Slides recordings.
Share your recording
Recordings can be shared to collaborators on the document immediately after creation.
- To share your recording, click the title of the recording from the list.
- The video in the full-screen player layout appears.
- Select the user, audience, or URL visibility rules.
Tip : Alternatively, you can share a recording like you would share any file in Drive. Learn how to share files from Google Drive .
Remove a recording
- If you created the recording, you also have the option to move the recording file in Drive to Trash. If the recording in Drive isn't moved to Trash, the recording stays visible in Drive to anyone with access.
- If you didn't create the recording, it's still visible in the creator's Drive and anyone to with access.
Use external device
You can use a microphone or camera that isn't built into your computer, such as a USB-based external camera or wireless earbuds.
To get started, set up your camera or microphone device like you would normally use it with your computer.
- Open your presentation.
- When the recording studio opens, at the bottom toolbar, click Settings .
- If your external microphone or camera is available, it's listed in the dropdown of devices available to use while recording.
Troubleshoot camera & microphone
When you create a Slides recording for the first time, it asks for a series of permissions to use the camera and microphone of your computer.
Tip: Camera and microphone access isn't required to start recording.
If you decide not to grant access to your camera or microphone, you can change it later.
- On your computer, open Chrome.
- chrome://settings/content/microphone
- chrome://settings/content/camera
- Adjust the settings to grant access.
Need more help?
Try these next steps:.
Using Google products, like Google Docs, at work or school? Try powerful tips, tutorials, and templates. Learn to work on Office files without installing Office, create dynamic project plans and team calendars, auto-organize your inbox, and more.
- Affiliate Disclaimer
- Privacy Policy
- Terms & Conditions
eLearning Desk
Your Online Learning Guide
How to Record a Google Slides Presentation (with Audio & Video)

Whether you’re teaching an online class or having an important meeting, recording your Google Slides presentation can come in handy later for your or your students’ reference.
Stay with us as we break down how to record a Google Slides presentation with audio and video using free software.
- 1.1 Step #1: Ensure You Have the Required Resources
- 1.2 Step #2: Install Required Software
- 1.3 Step #3: Run the Tool
- 1.4 Step #4: Set Up Your Presentation
- 1.5 Step #5: Prepare to Record
- 1.6 Step #6: Start Recording
- 2.1 Related posts:
How to Record a Google Slides Presentation (with Audio & Video)
Before you can begin recording your Google Slides presentation, you will need a few things:
Step #1: Ensure You Have the Required Resources
- A microphone (you can use your laptop’s mic or wear a headset)
- Recording software (we touch on this in the coming section)
- A Google account
Step #2: Install Required Software
There are several software tools available online for free that you can use to record a Google Slides presentation. For the sake of ease and clarity, we use Apowersoft, a free tool that you can download from CNET .
After downloading the executable, double click on it to run it and complete the wizard to install.

We recommend using this tool because it is 100% free to use and does not limit how much of your presentation you can record.
While an earlier version of the tool did not add a watermark to recorded videos, in the new version, you will have to sign up with Apowersoft to record videos without a watermark.
It’s important to remember that the basic tool does not offer any editing features. In other words, you will need to record your presentation in one take or use another editing program to piece together the clips of your presentation.
If you’re a teacher, we recommend recording short videos since they’re convenient to make and also easier for students to watch.
Step #3: Run the Tool
When you launch Apowersoft Free Screen Recorder, it will show you the region you can record with the tool right away.

You can change the region the tool will record by moving the recording area around by clicking and dragging the button in the middle. You can alter the bounds of the recording area by simply dragging the bounds as you please.
Alternatively, you can click on the “Full Screen” icon on the panel on the bottom. Since you need to record a Google Slides presentation, this is the button you want to click.
It’s also important to set up the tool correctly before proceeding to the next steps. If you look at the Apowersoft recorder’s panel, you will find video and audio options next to the record button on the left.

Ensure that the tool is set to record your screen and not your webcam and that the tool is recording audio from the correct microphone.
Note that if there is a video in your slideshow, you will need to record the sound from your computer.
Remember that choosing to record the system’s sounds also means that your computer’s error sounds (“bing”) and all other system sounds may also be recorded.
Step #4: Set Up Your Presentation
Before you can start recording, navigate to slides.google.com and find your presentation. Next, click on the “Slideshow” button in the top right corner. This will display the presentation in full-screen mode.

It’s important to ensure that your slides on Google slides load completely before you start recording. If all the slides aren’t fully loaded, the transitions from slide to slide may look choppy in your recording.
Step #5: Prepare to Record
When both the recording tool and your presentation are ready, you can hit the record button on the panel. Clicking the button will make a popup appear. If you have logged into your Apowersoft account, it will record without a watermark.
You will also see the hotkeys you can use to control the recording in the popup.

If you hit the “OK” button, a 3-second countdown timer will appear before the tool starts recording. If you don’t want the Apowersoft recorder’s panel to appear in your recording, like in the following image:

You will need to navigate to the options menu by clicking on the three dots button on the right side of the panel.
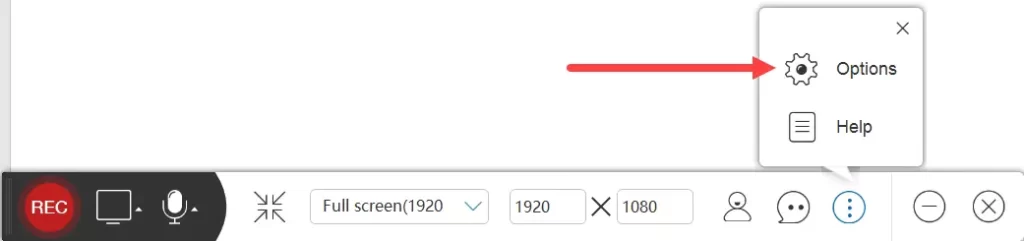
You can then toggle the “Show recording toolbar” option off from the options menu.

You can also change several other settings from this menu, including the recording format and the “Record” and “Stop Recording” keyboard shortcuts.
Step #6: Start Recording
Navigate to your slideshow window and click the “Rec” button. The tool will start recording after the countdown. You can go through the slides by pressing the right and left buttons.
One of the most useful features of this tool is that it allows you to pause recording at certain points if you need a moment to proceed to your next talking point.
If you’ve left the recording panel enabled, you can use it to pause the recording whenever you want.
Alternatively, you can press Ctrl-Alt-F3 to pause the recording. After you’ve caught up with the talking points or taken a moment to focus, you can press Ctrl-Alt-F1 to start the recording again.
After you finish recording the slideshow, press Ctrl-Alt-F2 to stop recording. The tool will then automatically start playing the video you recorded, and you can go through it.
You can use the handles on the extreme left and right of the player to trim the beginning and end of the video.
However, we suggest that you do not do any trimming with this software since it sometimes ruins the recording by not trimming at the correct point.
If you’re satisfied with the recording, click on the “Save” button on the bottom right to save the video.
A menu with a default name for the recording and the folder where it’ll be saved will open up.
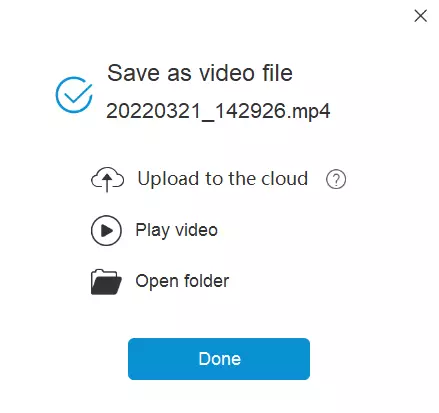
You can rename the file from this menu without any hassle. You can also select where you want to save the video from the “Open Folder” button.
If you’ve signed up with Apowersoft, they will offer you free cloud storage to save your videos. You can upload the video directly to the cloud storage by clicking on the “Upload to the cloud” button in the Save menu.
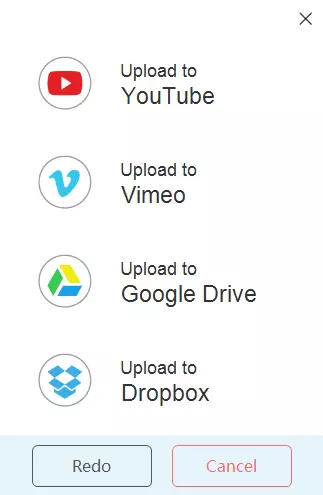
Alternatively, you can upload the video you recorded straight to YouTube, Vimeo, Google Drive, or Dropbox by clicking the “Cloud” button instead of the “Save” button.
If you are a teacher, saving the video to Google Drive may be the right way to go. You can easily share the video with your students by making the video sharable and sending them the link to the file.
How to Convert Google Slides to PowerPoint in Simple Steps
While there are many ways to record a Google Slides presentation, using the Apowersoft free video recorder is one of the easiest ways to go about it.
The software is quite intuitive, and you should be able to figure out what buttons perform which function without expressly reading through this guide.
That being said, learning all the functions before you begin using the tool is an excellent way to ensure you get the most out of the tool and make a solid recording for your future reference or for your students.
Related posts:
- 10 Top Disadvantages of Online Classes
- 15 Huge Benefits of Online Classes
- The Role of Operating Systems
By Maverick
This is Maverick. During Covid-19 Pandemic, A School Teacher turned into an online Instructor. Here I Share How you can build your own Online School and offers eLearning to your Students. I'm trying to make the eLearning Desk a resource for Students as well as for Teachers.
Related Post
10 ways to use a document camera for online learning, 10 best free drawing apps for students and digital artists 2024, 10 best wireless microphone for teachers in 2024.
Educircles.org
This tutorial will show you how to teach lessons online by recording a Google slides lesson with audio and video.
Recording your Google Slides presentation is something you might want to do if you have to teach using distance learning and you want to create some digital resources for your students.
So, in this tutorial, I will show you
- How to record a video of you teaching a lesson using Google Slides.
- Some free software that you can use to record screencasts.
- How to upload the video to Google Drive
- How to get a link to share with your students (if you’re a teacher.)
NOTE: This video is also good if you’re a student:
- Instead of teaching a lesson, you’re probably recording a presentation for your teacher.
- At the end, you can use the link to share your video with your teacher to hand in your homework.
Resources you need for this tutorial
A couple of things to know before we start…
- You need a microphone. Maybe your laptop has a microphone, or maybe you want to wear a headset.
- The free software to record the screencast (I’ll show you how to get it in a second) and
- of course you need a Google account.
You do not need a webcam because we’re not doing any video of ourselves. So you can record in your pyjamas or with bed head, and no one will be the wiser.
What software can I use to record a Google Slides presentation (screencast)?
Free screencast software option #1: apowersoft free screen recorder.
I use something called Apowersoft Free Screen Recorder and I use the version from CNET – it’s a very specific download that I use.
I like it because…
- it’s free (it’s not a trial version.)
- There is no time limit to how long of a Google Slideshow video that you can record.
- There’s no watermark.
Of course, because it’s free, it’s a basic version with zero editing features.
(This means you have to record everything in one cut… or use another program or the premium version to edit together your video.)
PRO TEACHER TIP:
- If you record short teacher videos, it’s easier for you to record and maybe less intimidating for your students to watch (i.e. it’s not too long.)
- Also, shorter videos with good titles might make it easier for students to find what they’re looking for later on if they want to review a lesson.
Free Screencast Software Option #2: FlashBack Express
I’m going to show you how to get the Apowersoft download from CNET but of course I’m also recording this screencast of me doing a tutorial of a screencast, so the second screen recorder I’m exploring right now is called FlashBack Express.
SIDE NOTE: It seems like it’s a little easier to trim the beginning and end of a video using FlashBack express, but I find it takes longer to save the video, and I have to go in and set the resolution of the recording myself or the video looks kind of pixelated.)
Video Tutorial:
How to record a google slide presentation for distance learning.
Click here to watch the tutorial on YouTube
Okay so let’s go to Google. If I Google Apowersoft Free screen recorder, I get a couple of options.
The first few are from the official website – they’ve updated the software, which is great, but now this version is a free trial version and so it doesn’t have all of the features that the old version used to have.
I want to go to this CNET link which has an old version of the software, and I know this is the one I want because it has a blue camera icon with a red dot. I just click download here to get it from CNET.
I have already installed this, so I’m going to do a demo screencast of this slideshow about critical thinking.
When the software opens up, it’s going to right away show me a region that I can record. I probably want to record just my screen, so present the slideshow and change the bounding area (the recording area) so it just records the size of the slides in my Google slides.
A couple of things:
You want to wait for your Google slides to completely load. There is a loading bar at the bottom of the screens. You can start your slideshow before the loading bar is completely done, but your animations and transitions may look a little bit choppy. I recommend waiting until the Google slides was completely loaded so that your animations look great.
This is the recording toolbar from the screenshot software I’m using.
- I could go fullscreen and record everything or
- I can just record a region.
There’s an option for video – you can choose between your WebCam or your screen.
There’s an option for audio – right now I’m just recording my microphone.
You may want to choose the system sound and microphone setting if you have a video playing on your computer (in your lesson) and you want to record the sound from the video and your lesson.
Just be aware, the system sound also includes things like “bing” sound effects – like when your windows open.
Couple of other things on the side here.
- I have options and I could turn off the recording toolbar once I start recording if I don’t want it in. If you leave it on the screen, it will be part of your slideshow. (Unless you drag it to the side offscreen.)
- If I click on record (I can see there is) no watermark and the microphone is on.
- I’m going to click okay and so it counts down and then I can start my lesson.
- Once it starts recording, I’m going to make sure that I click on the window with the slideshow to make sure that I’m in the slideshow and then I can use the right and left cursor buttons on my keyboard so that I can slide through the slideshow and that way I don’t have to worry about accidentally moving my mouse when I click on the screen to move forwards.
When I stop recording on this video…
- it will automatically start playing back what it recorded.
- There’s a save button here.
- Even though there’s an option here to change and trim out the beginning and the end to get the exact section I want to record, I find that this older version of the software is a little bit glitchy, and sometimes I’ll set it to record a certain part and then it won’t actually record that part it. (It won’t actually trim to that spot.)
- So, I find it’s best in this free software just to start a presentation right away and then at the end leave a few seconds (of silence) as I end it.
So I’m going to close this – I’m not going to say that version.
I can see my slideshow here. My Google slides is here and the toolbar here is ready to record so I’m gonna hit record and then I’m going to move the toolbar out of the way and I’m gonna start this lesson.
Am I ready yes move that all the way…
SAMPLE LESSON ON CRITICAL THINKING:
Okay, today we’re going to start a unit on critical thinking and before we can talk about critical thinking , I’m just going to ask you a few questions to get your minds on and ready for this lesson.
So, the first “minds on” question is this: What is thinking and what does it mean to think?
So I’m going to get you to pause the video and I’m going to have you jot down on paper or in a Google Docs, what is thinking what does it mean to think?
So, pause the video and jot down some ideas.
Okay, we’re back. So, I’m going to ask you a second “minds on” question and it’s this:
What is critical thinking, and how is critical thinking different from regular thinking?
So, on your jot notes page, jot down a few ideas and pause the video. How is critical thinking, different from regular thinking? Pause the video.
Here is the third, final “minds on” question: How is critical thinking different from being critical of someone else’s ideas?
So, sometimes you might say, oh, that person is criticizing someone. Well, what’s the difference between critical thinking and being critical of someone or someone else’s ideas?
Pause the video and jot down some ideas about how is critical thinking different from criticizing someone.
Pause the video.
Okay, so now that you’ve had a chance to think about critical thinking, I’m going to have you write a paragraph response and I’m going to give you two options.
The first paragraph question is this: Why do we need to think critically?
So, if you choose this option, you look at your jot notes and you write a paragraph. Why do we need to think critically?
Or, option number two: What might happen when we don’t think critically?
So, if you choose the second option, you look at your jot notes from the previous “minds on” questions and you write a paragraph. What might happen when we don’t think critically?
To recap… You’re going to write a paragraph to one of these two questions:
- Option #1. Why do we need to think critically?
- Option #2. What might happen when we don’t think critically?
Once you write your paragraph, hand it in and tomorrow in our next lesson, we’re going to be looking at critical thinking.
So I paused this video. Apowersoft is automatically playing back what I had.
I can see that the lesson started around seven seconds.
If I move this scrubber to seven seconds, I can see the time at the beginning.
So if I move my mouse over the blue triangle – It changes into a white line with two arrows. That’s how I know I can move it backwards and forwards.
If I jump to the end of the video – I can see that even though I jumped forwards, the software is a little bit glitchy and it got rid of my blue timeline area.
So what I do is, on a separate piece of paper, I just write down when I want the video lesson to end (in this case at 242)
I know that because at the bottom here in white, it says 242 in the timeline.
At the beginning, I think I want to start around seven seconds. Maybe, I will start it at five.
Click and drag from around five seconds to three minutes.
(It automatically starts playing back my voice so just pause it.)
I’m just going to move my mouse – hover over the blue triangle
I’m gonna move it to around seven seconds to begin with and then at the other and I’m to move it to around 242 (and I know this because I watched the video and then I just wrote down sometimes.)
So now I have this blue area where I’m going to save.
I’m going to hit the save button… save as a video …file and I can play the video
(I’m not entirely sure that cropped any sounds – and I’ve found, sometimes in the past, this software is not great at trimming at the beginning.)
I’m just going to go to the end of the video…
Okay, so that looks pretty good. I’m pretty happy with that.
… If I open the folder to see where it saved it. It shows me this place where it saves all the videos.
It automatically records
- the first file was just a trial that we had
- the second one is once it records, it saves the file right away.
- this top file here – This is the one I want to upload.
So, I’m just going to rename the file. I’m going to call it Minds On Critical Thinking.
I’m going to play it just to double check this is the video I want.
If I go back to the recording software, I have to click done. If I click anywhere else, it will just beep at me. But, if I click done, there’s a couple of options here:
- this one is to save the file to the cloud. I’m not going to use it. It uploads it to a service that they have here ShowMore. That’s what they’re using. I don’t want to use.
- I could click this button over here that says share. But, I find I don’t actually use these options. It just opens up the Google Drive and I can do that manually myself.
Okay, so I’m going to hit cancel. So I have saved this. I’m going to close the recording. it automatically goes back to recorder. I’m going to close that software.
I’m going to go to my Google drive.
This is the folder where I want to upload my video.
What I’m gonna do is just drag the video file from the folder where it was saved into Google Drive.
Now it is uploading the file into Google Drive.
I find initially, it may take a few minutes for Google to process the video.
So, if I try to watch it right now, I’ll get this message that says, “hey, we’re processing the video. Check it out later” and later on, it will be fine.
I’m going to just escape and get out of that.
But now that it’s up here in my Google folder, I can get the link to share with somebody.
So if I right–click here on the file name, I can click on share and I can choose some options.
I can get a shareable link up here.
- I might change it so that only the people in my school can see it.
- I might change it so that anyone can see it.
If I click on more, I have…
- the option to make the video link either public on the Internet or
- I can make it so that anyone who has the the specific link can find it.
If I choose the top two versions, it means they don’t have to sign in. They can just watch it and that might be what works for you.
Or, you may choose it so that only people at your school or organization can view this.
Or, you might decide, hey, I don’t want that it all. I don’t want to link share and what I can do is then type in people’s names directly and share the video like a normal Google doc.
I’m going to copy this link. And now if I open a new window, if I pasted the link in here, the video will show.
This was the link that I would share with my students or with my teacher.
So that was a tutorial on how to record a Google slide presentation that includes audio and video.
How to Record a Presentation on Google Slides
Recording a presentation can be an excellent way to share information asynchronously, ensure consistent delivery, or prepare for a virtual audience.
While Google Slides is a widely used tool for creating presentations, it does not have a built-in feature to record presentations directly. However, there are effective ways to record your Google Slides presentation, including narration, using various tools and techniques.
This guide will walk you through the process and share some best practices to ensure a professional and engaging recording.
2 Million+ Google Slides Themes, Presentation Templates + More With Unlimited Downloads
Download thousands of Google Slides themes, and many other design elements, with a monthly Envato Elements membership. It starts at $16 per month, and gives you unlimited access to a growing library of over 2,000,000 presentation templates, fonts, photos, graphics, and more.

Delica Google Slides
133+ unique slides.

Creative Template

Company Profile Template
Google slides.

Alloyz Business Template

Ciri Slides Template
Clean & minimal.

Kloe Minimal Template
Clean & simple design.
Explore Google Slides Themes
Step 1: Preparing Your Google Slides Presentation
Ensure that your presentation is complete with all the necessary content, animations, and transitions. It’s important to rehearse and familiarize yourself with the flow of the presentation.
If you plan to include narration, use the speaker notes section at the bottom of each slide to jot down key points or a script for your presentation.
Step 2: Choosing a Screen Recording Tool
Since Google Slides does not natively support recording, you will need to use a screen recording tool.

Choose a screen recording tool that suits your needs. Popular options include Loom , ScreenPal , and OBS Studio . Many of these tools offer free versions with basic features.
Before recording your presentation, spend some time getting to know the screen recording software. Learn how to start and stop recording, how to include your webcam (if desired), and how to capture audio.
Step 3: Setting Up for Recording
Proper setup is crucial for a high-quality recording.
Check Your Microphone and Webcam
If you are including narration or a video of yourself, ensure that your microphone and webcam are working properly. Do a test recording to check the audio and video quality.
Eliminate Distractions and Interruptions
Record in a quiet, well-lit room. Turn off notifications and other potential interruptions on your computer to ensure a smooth recording.
Step 4: Recording Your Presentation
Now you’re ready to record your presentation.
1. Open Your Presentation

Launch your Google Slides presentation and open the screen recording tool. You may have to sign-in to your account, depending on which screen recording tool you use.
2. Start Recording

Begin the recording following the screen recorder’s instructions. For example, when you open Loom, it gives you an interface with several options for recording your presentation.
You can choose whether to record fullscreen or a specific window, include your webcam, and much more.
Once you hit the Start Recording button, it will even give you a countdown to begin the recording. But that feature is only available in Loom.
It’s usually a good practice to wait a few seconds before starting your presentation to ensure the recording captures everything.
3. Deliver Your Presentation
Go through your slides at a steady pace. Use your speaker notes as a guide, but try to sound natural and engaging.
4. End the Recording
Once you’ve reached the end of your presentation, pause for a few seconds and then stop the recording. Save the file in your preferred format and location.
Step 5: Editing and Sharing Your Recorded Presentation
After recording, you might want to edit your presentation for a polished look.
Edit the Recording
Use video editing software to trim the start and end of the recording, remove any mistakes, or add additional elements like music or text overlays.
Free video editing apps like Clipchamp and CapCut are perfect for these simple projects.
Share Your Presentation (Optional)
Upload your recorded presentation to a video-sharing platform like YouTube, Vimeo, or Google Drive, and share the link with your audience.
Some screen recording tools, like Loom, allow you to host your videos and share directly from the platform as well.
Tips for a Successful Google Slides Recording
1. practice makes perfect.
Before hitting the record button, practice your presentation several times. This will help you speak more fluently, maintain a good pace, and reduce the number of pauses or errors during the actual recording.
2. Control Your Speaking Volume and Speed
Speak clearly and at a moderate pace. Avoid speaking too quickly, as this can make it difficult for your audience to follow along. Also, modulate your voice to emphasize key points and keep the presentation dynamic.
3. Test Audio and Video Quality
Do a trial recording to check the audio and video quality. Make sure there’s no background noise, and the microphone is picking up your voice clearly. If using a webcam, check the lighting and camera angle.
4. Utilize Editing to Refine Your Presentation
Post-recording editing can significantly enhance the quality of your presentation. Use editing tools to trim unnecessary parts, correct errors, or add additional visual elements like captions or transition effects.
5. Be Conscious of File Size and Format
Larger video files can be difficult to share and may not be easily accessible to all audience members. Optimize your video for a smaller file size without significantly compromising quality. Also, choose a widely compatible video format like MP4.
6. Plan for Audience Questions
If your recorded presentation is part of a larger event, plan for a live Q&A session afterward or provide a way for viewers to submit questions, such as through a form or email.
In Conclusion
Recording a Google Slides presentation might seem daunting at first, but with the right tools and preparation, it can be a straightforward and rewarding process. By following these steps and best practices, you can create a professional and engaging presentation that resonates with your audience, regardless of where or when they view it.
How to Record a Presentation on Google Slides?
- Share on Facebook
- Share on Twitter
By Nikolay Kaloyanov
in How-To Tutorials
2 years ago
Viewed 3,232 times
Spread the word about this article:
Recording your presentation can be a very powerful move, as you don’t want to embarrass yourself in front of your audience. Instead of relying on your “inner feelings”, you can check how you sound, how you look, what gestures you make, and how well you play with words and details.
For this guide, we will use some of the most popular online tools on the market (Panopto and Loom) and some totally free options for Windows and Mac computers.
Article overview: 1. Why do people record their presentations? 2. How to record a presentation on Google Slides using Panopto? 3. How to record a presentation on Google Slides using Loom? 4. How to record a presentation on Google Slides using Microsoft Windows? 5. How to record a presentation on Google Slides on a Mac? 6. Other tools you can try
1. Why do people record their presentations?
There is a reason why people record their presentations. Unfortunately, you don’t know how your voice will sound or articulate when you are presenting. In such situations, it will be best to record your presentation to see if there is something you need to change before doing it live. Also, recording your presentations is a very good way to remember what you are about to say. But let’s see the main use cases when recording your Google Slides presentation will make great sense:
- Practice your presentation skills – you can’t hear yourself while talking. That is why recording your voice might be a good indicator of how you present. Is your tone of voice smooth? Do you need to raise it? Are you mumbling or “like”-ing? Recordings can help you identify problems in advance.
- Save valuable time – instead of recording each lecture, you can save your efforts once, and later sent them.
- When you have stage fright – not everyone has the natural confidence of Elon Musk. If you are a shy person who gets terrified when speaking in front of huge audiences, recording your presentation is a great move.
- Avoid distractions – during live presentations, interruptions are more common which can affect your flow. A recording of your presentation at home can later be sent as a follow-up.
2. How to record a presentation on Google Slides using Panopto?
There are plenty of tools that could be utilized, so feel free to use anything which you might find suitable. Panopto is a good option since it doesn’t require us to download a software extension, and it has a free plan which is more than enough for starters. Your videos are also stored on Panopto’s drive, so you will avoid issues with cluttering your computer or mobile device.
✔️ Panopto is very easy to use.
✔️ The software is cloud-hosted.
✔️ Speech and OCR (optical character recognition).
❌ Pricing model is scaling.
❌ Slow rendering process.
❌ Issues with captions.
Step 1. Open Panopto.com
When you open the website, you will see there are plenty of options out there.
Step 2. Click on “Record”
Once you’ve opened the website, click on the big red button “Record” (next to Company and before Get Started ).

Step 3. Select your Audio, Video, and Screen Options
The browser will ask for permission, so make sure you grant Panopto access to your webcam(s) and audio source(s). Usually, if you don’t have more than one source, they will be launched by default.

Step 4. Choose what to share
Now, you have to click on Screens and Apps , and select your preferred option.
Entire screen (if you have 2 or more, you can either select one of the screens or all of them), a Window , or a Chrome Tab .

Step 5. Fix the settings
When you click on the “Settings” button (in the bottom right corner), there will be a menu that you can access.

Step 6. Start recording
Click on the big circle in the center to start recording.

Step 7. Save your recording
Once you end your recording, you can send it to Panopto , YouTube , Classroom , or download it on your computer.

3. How to record a presentation using Loom?
Loom is among the most used recording pieces of software globally. It is great for teamwork and has a lot of collaboration tools. Let’s see where it shines.
✔️ It is very easy to use.
✔️ You can share the videos with a single click.
✔️ Developers are constantly updating the app.
❌ The 5-minute free plan is not enough for long projects.
❌ It renders the videos slowly.
❌Lack of options to insert tags and notes in a video.
Step 1. Open Loom.com
The first step is to launch Loom. Just like Panopto, it’s an online-based service, so you don’t have to download or install anything.
Step 2. Sign up
Now, you have to open an account. The good news is you can use your Google Account to log in.
Step 3. Enter the recording settings
In order to start recording, click on New Video , and then from the dropdown menu select Record a video .

Step 4. Start the recording
Once you have selected whether or not you will use your Screen, Camera (or both), you can add some specific options and start recording. You’re limited to five minutes on the free plan, so don’t waste much time.

Step 5. Pause/Finish the recording
On the bottom left corner, you will have the option to pause or finish (the red square button) the recording. Before saving, you will have the options to Trim the Video, change the title (Loom | Free Screen & Video Recording Software – Day/Month/Year is by default), and make some Video Preferences.
Step 6. Share the video

Video Tutorial
4. How to record a presentation using Microsoft Windows?
There is also a free way to record presentations on your Windows computer. If you use Windows 10 or 11, this might be a good option.
✔️ You don’t have a record limit (as long as you have memory).
✔️ It is totally free forever.
❌ It is a very basic recording option.
Step 1. Open Game Bar
Many of you may seem surprised, but Windows has a built-in recording tool. It’s called Game Bar. To access it, you need to press the WIN + G . Of course, make sure it is enabled first.
Step 2. Click on “Capture”
The Capture button is next to the sound button. It will unlock you with the option to record.

Step 3. Click on “Record”
Click on the Record button which is the third from left to right. You can also start recording with Win + Alt + R .

Step 4. Record your clip
Now, you can freely record your clip.
Step 5. Delete or save the clip
Once you have filmed your presentation, you can either go to the folder where your file is stored, or delete it.
5. How to record a video on a Mac?
Last but not least, we have another free option for Apple users.
✔️ QuickTime is free forever.
✔️ There are plenty of recording options.
✔️ You can record an unlimited time.
❌ You are storing the files on your Mac.
❌ Not available on desktop PCs for free.
Step 1. Open QuickTime
The first thing you need to do is open your QuickTime.
Step 2. Click on File -> New Screen Recording
Once you’ve opened QuickTime, you have to select File -> New Screen Recording .
Step 3. Select what portion you would like to be recorded
There are several options that you can choose from.

Step 4. Start recording
After you have selected what portion of your screen you will record, you are free to start recording your screen. You have plenty of options for convenience, such as a timer, built-in microphone, where to save the recording, etc.
Video tutorial
6. Other recording tools
Of course, these 4 are just the tip of the iceberg. There are many more apps that also deserve attention but couldn’t rank higher on our list. Let’s see which they are:
- Zoom – Zoom is one of the most popular presentation software on the market, and the only reason it doesn’t appear here is because of its significance. We have prepared a separate tutorial on how to record a presentation in Zoom .
- AnyMeeting – it’s a very powerful presentation recording software. However, over the past few years, it lost some of its sheer power and it got passed by different platforms that offer much more versatility at more affordable prices.
- Camtasia – what we love about Camtasia is that you can create a next-level video experience. The cross-platform functionality is a great addition. However, it seems too hard for small tasks and the $300 purchase is not the value we are looking for here.
- OBS Studio – it’s a top solution for cross-platform live streaming. It has high-end functionalities and it is open-source. That’s great but there’s a catch – it’s too complicated for the average user.
- Debut – Debut is a great free tool that allows webcam recording and presentation recordings, too. However, it’s not compatible with any other OS than Windows, and the user interface looks dull.
- Screencast-O-Matic – it’s a very simple and effective tool but you need to pay a decent amount of money to get value out of the app. The free version doesn’t support HD recordings which limits its capabilities a lot.
Many people wonder how to record a presentation on Google Slides. Fortunately, there are many programs, and you can easily switch to anything you want. We have found that QuickTime and the Game Bar are amazing options for unlimited recording which also comes for free. However, if you’d like to upload your content online with a click of a button, you might fight Panopto and Loom better.
If you liked our presentation about screen recording, you can find these tutorials helpful, too:
- How to Write Scannable Content? Step-by-Step Guide
- How to Convert Your PowerPoint Presentation into Google Slides
- How to Start and End a Presentation: 10 Practical Tips to Grab Attention and Make an Impact

Add some character to your visuals
Cartoon Characters, Design Bundles, Illustrations, Backgrounds and more...
Like us on Facebook
Subscribe to our newsletter
Be the first to know what’s new in the world of graphic design and illustrations.
- [email protected]
Browse High Quality Vector Graphics
E.g.: businessman, lion, girl…
Related Articles
How to record a powerpoint presentation [2022 user guide], top 16 tutorials to learn adobe character animator [2022], how to add, duplicate, move, hide, and delete slides in google slides, cartoon yourself today with 10+ tools, tutorials & tips, how to create a radial chart in google slides and visualize data, 500+ free and paid infographic templates compatible with google slides:, enjoyed this article.
Don’t forget to share!
- Comments (0)
Nikolay Kaloyanov
Nikolay is a copywriter with vast experience in Technology, Marketing, and Design. When he isn't playing with words and crafting texts, he watches sports and asks questions. He is a funny person...until you put him on a diet.

Thousands of vector graphics for your projects.
Hey! You made it all the way to the bottom!
Here are some other articles we think you may like:

How-To Tutorials
Color theory basics for non-designers: everything you should know.
by Al Boicheva

How to Make Cartoon Animation Like Ted-Ed
by Lyudmil Enchev

Free Vectors
Simple vector robot character in illustrator (tutorial + freebie).
by Bilyana Nikolaeva
Looking for Design Bundles or Cartoon Characters?
A source of high-quality vector graphics offering a huge variety of premade character designs, graphic design bundles, Adobe Character Animator puppets, and more.
How to Record a Google Slides Presentation: A Comprehensive Guide
Google Slides is a powerful tool for creating visually engaging and interactive presentations. Whether you are a student, a professional, or simply someone who wants
Feni Rutcher
October 7, 2023
Google Slides is a powerful tool for creating visually engaging and interactive presentations. Whether you are a student, a professional, or simply someone who wants to share their ideas, knowing how to record your Google Slides presentation can be a game-changer. In this article, we will guide you through the steps to effortlessly record your presentation, enabling you to create dynamic and captivating content that can be shared with others.
Recording a Google Slides presentation is a valuable feature that allows you to explain your slides, provide additional context, and add a personal touch to your content. This can be especially useful when conducting remote presentations or creating tutorial videos. By recording your presentation, you can ensure that your message is effectively conveyed and easily accessible to your audience.
Table of Contents
Setting Up Your Presentation
Before diving into the recording process, it’s essential to set up your Google Slides presentation correctly. This section will cover the necessary steps to ensure a seamless recording experience. We will discuss selecting the appropriate slide layout, organizing your content, and incorporating multimedia elements.
Choosing the Right Slide Layout
When creating a Google Slides presentation, it’s important to choose the right slide layout that suits your content. Different layouts offer various options for text placement, image positioning, and multimedia integration. By selecting the most appropriate layout, you can ensure that your presentation looks polished and professional.
Organizing Your Content
Organizing your content is crucial for delivering a coherent and structured presentation. Before recording, take the time to plan your slides and arrange them in a logical order. Use headers, subheadings, and bullet points to break down complex information into easily digestible chunks. This will help you maintain a smooth flow when recording and make it easier for your audience to follow along.
Incorporating Multimedia Elements
Google Slides allows you to enhance your presentations by incorporating multimedia elements such as images, videos, and audio clips. Consider adding relevant visuals and media to support your message and make your presentation more engaging. However, be mindful of using multimedia sparingly and only when it adds value to your content.
Accessing the Recording Tools
In this section, we will explore how to access the recording tools within Google Slides. We will guide you through the process of locating the recording toolbar and becoming familiar with its features, including the microphone and camera settings.
Finding the Recording Toolbar
To access the recording tools in Google Slides, you need to first open your presentation. Once you have your presentation open, look for the “Present” button located in the top-right corner of the screen. Clicking on this button will initiate the presentation mode and bring up the recording toolbar.
Understanding the Microphone Settings
Before you start recording, it’s essential to ensure that your microphone is set up correctly. Click on the microphone icon in the recording toolbar to access the audio settings. Here, you can select the microphone you want to use for recording and adjust the input volume to ensure optimal audio quality.
Exploring Camera Settings
If you want to include video footage of yourself in your presentation, Google Slides also allows you to enable your camera. Click on the camera icon in the recording toolbar to access the camera settings. From here, you can choose the camera you want to use and adjust settings such as video resolution and frame rate.
Adjusting Audio and Video Settings
Audio and video quality play a crucial role in creating a professional and engaging presentation. This section will provide you with tips on adjusting your audio and video settings to ensure optimal recording quality. We will discuss microphone selection, audio levels, camera placement, and lighting techniques.
Selecting the Right Microphone
The microphone you use for recording can significantly impact the audio quality of your presentation. If possible, consider using an external microphone for better sound capture. USB microphones or lapel microphones are popular options that offer improved audio clarity and minimize background noise.
Adjusting Audio Levels
When recording your presentation, it’s crucial to monitor and adjust the audio levels to ensure a balanced sound. Test your microphone and adjust the input volume to avoid distorted or too soft audio. Aim for clear and audible speech that is easily understandable by your audience.
Optimizing Camera Placement
If you choose to include video footage in your presentation, the placement of your camera is essential. Position your camera at eye level to create a more natural and engaging visual experience. Avoid extreme angles or unflattering lighting conditions that may distract your audience from the content of your presentation.
Utilizing Proper Lighting Techniques
Lighting is another crucial aspect of video recording. Good lighting can significantly improve the overall quality of your presentation. Place yourself in a well-lit area, preferably facing a natural light source or using artificial lighting setups such as ring lights or softboxes. This will help ensure that your face is clearly visible and that your presentation looks professional.
Recording Your Presentation
Now that you have set up your presentation and adjusted the necessary settings, it’s time to start recording! This section will walk you through the process of recording your Google Slides presentation step by step. We will cover how to control the recording, pause or resume as needed, and provide tips for delivering your content smoothly.
Starting the Recording
To begin recording your presentation, click on the “Record” button in the recording toolbar. A countdown will start, giving you a few seconds to get ready. Once the recording starts, the timer will be displayed, indicating the duration of your recording.
Controlling the Recording Process
During the recording, you have full control over the process. You can use the navigation arrows or click on specific slides to move through your presentation. Take your time to explain each slide clearly and provide any necessary commentary or insights. Remember to speak clearly and confidently to ensure that your message is effectively conveyed.
Pausing or Resuming the Recording
If you need to take a break or pause the recording temporarily, you can do so by clicking on the “Pause” button in the recording toolbar. This will temporarily halt the recording while allowing you to gather your thoughts or make any necessary adjustments. To resume the recording, click on the “Resume” button.
Delivering a Smooth Presentation
When recording your presentation, it’s essential to maintain a smooth and engaging delivery. Speak clearly and at a steady pace, allowing your audience to follow along easily. Emphasize key points, use appropriate tone and inflection, and engage with your viewers by asking questions or encouraging interaction.
Editing and Enhancing Your Recording
Once you have finished recording your presentation, you may want to make some edits or enhancements to improve the overall quality. This section will introduce you to various editing tools and techniques within Google Slides, allowing you to refine your recording by trimming unwanted sections, adding captions, or incorporating annotations.
Trimming Unwanted Sections
When recording a presentation, it’s natural to have some pauses or moments that may not be relevant to the main content. To ensure a more concise and focused recording, use the trimming feature in Google Slides to remove any unwanted sections. This will help streamline your presentation and make it more engaging for your audience.
Adding Captions or Subtitles
Adding captions or subtitles to your recorded presentation can enhance accessibility and improve comprehension for viewers. Google Slides allows you to include text overlays or captions, making it easier for individuals with hearing difficulties or language barriers to understand your content. Take advantage of this feature to cater to a broader audience.
Incorporating Annotations or Visual Enhancements
To further enhance your recording, consider incorporating annotations or visual enhancements. Google Slides provides various annotation tools, such as laser pointers, highlighting, or drawing. These tools can be used to emphasize important points, guide your audience’s attention, or add visual interest to your presentation.
Sharing and Exporting Your Recording
After you have perfected your recording, it’s time to share your masterpiece with others. This section will guide you through the process of sharing and exporting your recorded Google Slides presentation. We will explore different sharing options, including embedding your presentation on websites or sharing it via email or social media.
Sharing Your Presentation with Specific Individuals
If you want to share your recorded presentation with specific individuals, such as colleagues or clients, Google Slides allows you to grant access to selected individuals. You can share the presentation directly from Google Slides by entering the email addresses of the recipients. This ensures that only authorized individuals can view your recording.
Embedding Your Presentation on Websites or Blogs
If you have a website or a blog, you can embed your recorded Google Slides presentation directly into your web pages. This allows visitors to view your presentation without leaving your site. Simply copy the embed code provided by Google Slides and paste it into your website’s HTML code.
Sharing Your Presentation via Email or Social Media
If you prefer to share your recorded presentation via email or social media, you can export it as a video file. Google Slidesoffers the option to export your presentation as an MP4 video file, which can be easily shared through various platforms. Exporting your recording as a video file ensures compatibility across different devices and allows for easy sharing on platforms like YouTube, Facebook, or Instagram.
Best Practices for Recording Presentations
In this section, we will provide you with some best practices and tips for recording presentations using Google Slides. From rehearsing your content to engaging with your audience, these insights will help you create impactful and memorable recordings that captivate your viewers.
Rehearsing Your Presentation
Before hitting the record button, it’s essential to rehearse your presentation. Practice your delivery, familiarize yourself with the content, and ensure that you are comfortable with the flow of your slides. Rehearsing will help you feel more confident and natural during the recording process.
Engaging with Your Audience
Even though you are recording your presentation, it’s important to maintain a conversational tone and engage with your audience. Imagine that you are speaking directly to someone and try to create a connection through your voice and delivery. Encourage interaction by asking questions or providing opportunities for viewers to participate.
Using Visual Aids Effectively
Visual aids, such as images, graphs, or charts, can enhance the understanding and impact of your presentation. When using visual aids, ensure that they are clear, relevant, and complement your spoken words. Avoid overcrowding your slides with excessive text or complicated visuals that may distract or confuse your audience.
Keeping Your Presentation Concise
While it’s important to provide thorough explanations and insights, it’s equally crucial to keep your presentation concise and focused. Avoid going off on tangents or including unnecessary details that may dilute your main message. Stick to the key points and deliver them in a clear and concise manner.
Troubleshooting Common Recording Issues
Encountering technical difficulties while recording can be frustrating. This section will address some common issues that users may face during the recording process and provide troubleshooting tips to overcome these challenges. We will cover topics such as audio syncing problems, video freezing, and software compatibility.
Dealing with Audio Syncing Problems
If you notice that your audio and video are not in sync during the recording, there are a few steps you can take to resolve this issue. First, ensure that your microphone and camera are properly connected and recognized by your computer. If the problem persists, try closing other applications or restarting your computer to free up system resources.
Resolving Video Freezing or Lagging
Video freezing or lagging can occur due to various factors, such as a slow internet connection or insufficient processing power. To address this issue, make sure you have a stable internet connection and close any unnecessary programs or browser tabs that may be consuming system resources. Additionally, consider reducing the video quality settings or recording in shorter segments to minimize the chances of freezing or lagging.
Ensuring Software Compatibility
If you are experiencing compatibility issues with Google Slides or your recording software, ensure that you are using the latest versions of both applications. Check for any available updates and install them if necessary. If the problem persists, consult the support documentation or contact the respective software’s customer support for further assistance.
Exploring Advanced Recording Features
Google Slides offers advanced recording features that can take your presentations to the next level. In this section, we will delve into these advanced features, such as screen sharing, live captions, and interactive polls. By exploring these options, you can create more immersive and engaging presentations.
Utilizing Screen Sharing
Screen sharing allows you to share your entire screen or a specific application window during the recording. This feature is particularly useful when demonstrating software, conducting tutorials, or showcasing online content. By sharing your screen, you can provide a more comprehensive and interactive experience for your audience.
Enabling Live Captions
Live captions can enhance accessibility and facilitate comprehension for individuals with hearing impairments or language barriers. Google Slides offers the option to enable live captions during your presentation. By enabling this feature, your spoken words will be automatically transcribed and displayed as captions on the screen, ensuring that everyone can follow along.
Incorporating Interactive Polls
If you want to engage your audience and gather instant feedback during your presentation, consider incorporating interactive polls. Google Slides allows you to create and insert polls directly into your presentation. This interactive element encourages viewer participation and provides valuable insights that can enhance the overall effectiveness of your presentation.
Recording a Google Slides presentation allows you to elevate your content and engage your audience effectively. With the step-by-step guidance provided in this article, you can confidently record your presentations and share them with others. Embrace the power of Google Slides and take your presentations to new heights!
Remember, practice makes perfect, so don’t be afraid to experiment with different techniques and explore the advanced features Google Slides has to offer. With each recording, you’ll become more proficient and create presentations that leave a lasting impact on your viewers. Start recording your Google Slides presentations today and unlock a world of possibilities!

Related Post
Rule 34 how to train your dragon: unveiling the forbidden world of fan-made content.
October 21, 2023
Remnant 2: How to Turn On Flashlight – Shedding Light on the Darkness
Unleash the magic: wild hearts, how to use flying vine, how to write a check for $150.00: a comprehensive guide.
October 20, 2023
How to Write a Check for $500: A Step-by-Step Guide to Financial Transactions
How to make cold in little alchemy: a complete guide, how to make a lace front wig, leave a comment cancel reply.
You must be logged in to post a comment.
How to Remove a TV from a Wall Mount: A Step-by-Step Guide
How to Pronounce Clothes: A Complete Guide to Perfect Pronunciation
How to Make Hot Cheeto Mozzarella Sticks: A Fiery Twist on a Classic Snack
How to Remove Moisture from Car Headlight Without Opening: A Comprehensive Guide
How to Open Carry in a Car: A Comprehensive Guide for Responsible Gun Owners
Popular Post
Recover from Binge Eating Disorder: A Step-by-Step Guide to a Healthy Relationship with Food
How to Protect Assets If Your Spouse Goes into a Nursing Home
How to Move a Couch by Yourself: The Ultimate Guide for Easy and Safe Couch Transportation
How to Prevent BPPV from Recurring: Effective Strategies to Maintain Balance
How to Open a Ghost Kitchen: A Complete Guide to Launching a Successful Virtual Restaurant
[email protected]
Quick Links
Privacy policy
How to Record a Presentation on Google Slides

Recording your Google Slides presentations can be extremely useful for sharing with wider audiences or repurposing content. However, Google Slides does not have a built-in recording function. You need to use third-party software to capture your screen, face, and voice.
In this comprehensive guide, we will walk you through the entire process of recording a presentation on Google Slides, from initial setup to sharing the final video. Whether you want to create tutorial videos, record webinars, or share presentations with remote teams, this guide has you covered.
Why Record Your Google Slides Presentation?
Here are some of the key reasons you may want to record your Slides presentation:
- Share presentations with people who couldn’t attend live sessions
- Repurpose webinars, training sessions, or sales pitches as evergreen content
- Create tutorial or demonstration videos
- Capture presentations for later review or critique
- Standardize delivery of presentations across a distributed team
What You Need to Record Google Slides Presentations
To record your Google Slides presentation, you will need:
- A Google account
- The Google Slides presentation you want to record
- A computer with audio/video capabilities
- Recording software like Screencastify, Loom, etc.
- Optional: Webcam, microphone
Step-by-Step Recording Instructions
Follow these steps to seamlessly record your Google Slides presentation:
1. Set Up Your Recording Software
Choose your preferred recording platform like Loom, Screencastify, or ScreenPal. Install any necessary browser extensions or applications. Most recording platforms offer free versions, but you may need to upgrade for advanced features.
Familiarize yourself with the recording options and test your microphone/webcam setup before proceeding.
2. Open Your Presentation in Google Slides
In a separate tab or window, launch your Google Slides presentation. Navigate to the specific slide deck you wish to record.
Presenter view can help you preview slides and notes as you record. Click “Present” then “Switch to presenter view” to enable this.
3. Start Your Recording
Go back to your recording platform tab and click the record button. Choose your audio sources and preferred video feed.
Give yourself a brief introduction if needed, then share your screen with the Google Slides tab open.
4. Deliver Your Presentation
Click through your Google Slides as you present, using transitions and animations as needed. Pause when necessary.
Annotate slides with a digital pen or laser pointer to draw attention to key elements. Enable your webcam to appear alongside slides.
5. End the Recording
When finished, stop your recording and confirm save settings. Most platforms process and compile recordings automatically with no editing needed.
6. Share Your Recorded Presentation
Once processed, access your new video file from your recording platform’s cloud storage or local folders. Share via link, email, or embed on websites.
Upload to video platforms like YouTube or Vimeo for wider distribution.
Tips for Better Google Slides Recordings
Follow these tips to create polished, professional recordings:
- Practice your presentation to minimize mistakes
- Speak slowly and clearly for better comprehension
- Balance vocal pace and volume with slide transitions
- Use slide notes to remember key details
- Zoom in on complex diagrams as you discuss them
- Engage the audience with eye contact if using a webcam
- Edit out unwanted sections if your software allows
Troubleshooting Google Slides Recording Issues
If you encounter problems, try these troubleshooting tips:
- Grant permission for microphone/camera access
- Check audio inputs and adjust recording volumes
- Reboot software and test connectivity
- Close unnecessary programs hogging bandwidth
- Switch to wired internet connections for stability
By following this easy guide, you can quickly record engaging Google Slides presentations to share with any audience. Take your presentations to the next level!
About The Author
Vegaslide staff, related posts.

How to Add Fonts to Google Slides

How to Create Choice Board in Google Slides

How To Loop Google Slides

How to Crop & Mask an Image in Google Slides

- PowerPoint Themes
- Latest PowerPoint Templates
- Best PowerPoint Templates
- Free PowerPoint Templates
- Simple PowerPoint Templates
- PowerPoint Backgrounds
- Project Charter
- Project Timeline
- Project Team
- Project Status
- Market Analysis
- Marketing Funnel
- Market Segmentation
- Target Customer
- Marketing Mix
- Digital Marketing Strategy
- Resource Planning
- Recruitment
- Employee Onboarding
- Company Profile
- Mission Vision
- Meet The Team
- Problem & Solution
- Business Model
- Business Case
- Business Strategy
- Business Review
- Leadership Team
- Balance Sheet
- Income Statement
- Cash Flow Statement
- Executive Summary
- 30 60 90 Day Plan
- SWOT Analysis
- Flow Charts
- Gantt Charts
- Text Tables
- Infographics
- Google Slides Templates
- Presentation Services
- Ask Us To Make Slides
- Data Visualization Services
- Business Presentation Tips
- PowerPoint Tutorials
- Google Slides Tutorials
- Presentation Resources
How to Record a Presentation on Google Slides?
Presentations play an important role in effective communication. Sometimes, if a team member, a student, or a client cannot attend your presentation, or you might require it for a future purpose, recording it becomes useful. Learn how to record presentations in Google Slides seamlessly with external screen recording software.

Remote presenting is crucial in the modern business landscape, offering the flexibility to engage audiences globally. It enhances accessibility, allowing seamless communication regardless of geographical barriers. Occasionally, you may record Google Slides presentations to report data related to your teamwork when working remotely, among other uses.
While presenting remotely, if you record a Google Slides presentation, you can use it repeatedly for various purposes. Business professionals can use the recordings to take specific notes for improvement. Teachers can share the videos with students for study purposes. You can utilize the recorded presentation as a YouTube instructional or demonstration. Participants who missed the live webinar can also access the recording. For all of these purposes, recording a Google Slides presentation is essential. This blog will help you understand how to record on Google Slides presentations from anywhere, anytime.
Can you Record a Presentation On Google Slides?
Being able to record a presentation on Google Slides itself is an effortless way to store and document data for future purposes. However, as of now, Google Slides does not have a feature that allows you to do so. Although you can record a presentation if you are working on Google Chrome Browsers, users prefer to utilize other tools. Such tools will allow you to record both audio and video alongside your face and the slide deck.
What Tools Can be Used to Record Google Slides Presentations?
It’s necessary to employ screen recording software to record a Google Slides presentation. The prerequisites include a Google account and a recording platform, with additional requirements such as a webcam or microphone depending on your device and desired audio/video quality.
- Screen Recorder Software: Register or download screen recorder software to capture the video or audio during your presentation. Some viable options for recording software are: Riverside (free and paid), Yawcam (free, available only on Windows), VLC Media Player (free), QuickTime Player(for MAC users), and Windows 10 users have the Windows Camera app.
- External Mic: If your device lacks an internal microphone or you aim for higher-quality audio, consider obtaining an external computer microphone for use during your presentation.
- Webcam: If your device’s video quality is insufficient, invest in an external webcam or connect a DSLR camera for superior video footage.
NOTE: Each platform may have different settings and features, including editing capabilities for audio and video files, as well as options for capturing the webcam.
Follow the steps below to record a Google Slides presentation:
- Install a screen recording extension.
- Set up your screen recorder, open your Google Slides, and select the presentation you want to record.
- Go to “View” and click on “Slideshow”.
- Go to the screen recorder and choose “Only Screen”, then select “None” to just record the screen.
- A window will be displayed. In the “Entire Screen” > select the presentation tab > click on the “Share” button.
- Start your presentation. You can hide the screen recording prompt by hitting the “hide” button.
TIP: If you are recording without audio, give the viewers sufficient time to read the slide before switching to the next slide.
How to Record a Presentation on Google Slides
ALSO READ : How To Screen Record A PowerPoint Presentation?
With the above steps, you can easily record over Google Slides presentation. Although Google Slides does not allow you to record audio and video, you may save the presentation using a webcam and screen recording software.
How to Record a Presentation on Google Slides with Audio and Video?
Google Slides doesn’t have a built-in feature to record presentations with audio and video directly. However, you can use external tools and services. Here’s how to record presentations in Google Slides with audio and video:
- Set up your screen recorder and open the Google Slides presentation that you wish to record.
- Go to the screen recorder, choose “Only Screen,” then select “System” to record audio. You can choose any option that suits best for your presentation.
- Go back to your presentation and click on “Slideshow,” open your screen recorder and click on “Screen Recording”.
- A window will be displayed. In the “Entire Screen” > select the presentation tab > enable “Also share system audio” > click on the “Share” button.
- Once you start to record over Google Slides, you can hide the screen recording prompt by hitting the “hide” button.
- After you’ve finished recording your presentation, click on “Stop sharing,” and a preview window will be displayed.
- View the preview, and if satisfactory, hit the “Save” button to save the recorded screen. The recorded screen will be saved in your computer downloads folder.
TIP: You can choose any other screen recorder software to record Google Slides presentation with audio and video .
How to Record a Presentation on Google Slides with Audio and Video
Knowing how to record a Google Slides presentation is useful in the age of distant communication, whether you’re a business professional, an educator, or a content creator. Seize the chance that recording presentations helps to establish a connection with your audience across distances. By being proficient in recording presentations, you can improve your capacity to impart knowledge and facilitate efficient distant communication.
With SlideUpLift’s professionally designed Google Slides Themes and Templates , you can easily create presentations that leave a lasting impression on your audience. Take advantage of the power of recorded presentations to improve your online presence. Download Now!
Can you record a presentation on Google Slides?
Google Slides do not offer an in-built feature to record a presentation. Instead, you can opt for external recording software like Riverside, Clipchamp, VLC media player, etc.
Can I edit my recorded Google Slides presentation afterward?
Absolutely. You can use video editing software to trim, enhance, or add elements to your recorded presentation.
Can I share my recorded presentation with others who don't have a Google account?
Yes, the recording is usually saved in a standard format like MP4, making it easily shareable with anyone, regardless of their Google account status.
Is there a time limit for recording a Google Slides presentation?
The time limit may depend on the screen recording tool you use. Most of the software doesn’t have any time limit.
Can I record a live audience during a presentation using Google Slides?
Google Slides doesn’t have a feature for recording a live audience. Riverside is a good tool for recording videos with live audiences.
Table Of Content
Related presentations.

New Manager Training Deck

Agenda Powerpoint Template

30 60 90 Day Plan For New Manager PowerPoint Template
Related blogs.

10 Bad PowerPoint Slides Examples to Avoid

10 Best Business PowerPoint Templates for Presentations

10 Best Business Presentation Topics to Captivate Your Audience

10 Best Google Slides Templates And Themes For Presentations
Tags and categories, privacy overview.
Necessary cookies are absolutely essential for the website to function properly. This category only includes cookies that ensures basic functionalities and security features of the website. These cookies do not store any personal information
Any cookies that may not be particularly necessary for the website to function and is used specifically to collect user personal data via ads, other embedded contents are termed as non-necessary cookies. It is mandatory to procure user consent prior to running these cookies on your website.
TechRepublic
Account information.

Share with Your Friends
How to Record a Video Presentation With Google Slides
Your email has been sent

Google Slides now lets you record a presentation with inset video from your webcam. Each recording may be a maximum of 30 minutes long. No longer do you need to turn to a third-party tool or web meeting app, such as Google Meet , to record a presentation. Instead, you can start and finish the task with nothing more than Google Slides on a laptop.
As of March 2024, slide recordings may be made by customers who use Google Workspace Business Standard or Plus; Enterprise Starter, Essentials, Essentials Plus, Standard or Plus; and Education Plus editions.
How to make a basic slide recording in Google Slides
To create a slide recording, you’ll need to use Google Chrome on a computer that has a camera and microphone.
- Go to Google Slides and open your presentation.
- Select the Rec button in the upper right area, then select the Record new video button ( Figure A ).
The system will switch to the screen recording interface, with recording controls displayed below your slides. By default, the system will display your inset (picture-in-picture) video in medium size in the lower right corner of a slide, since this portion of a slide is often empty.

- Optionally, before you start recording, you might adjust three settings:

- Modify the size of the inset video frame. Select the size icon, found to the right of the video inset location icon, then choose either a small, medium or large video frame size.
- Open speaker notes with the button found to the immediate left of the back slide (<) icon. This will display speaker notes for your reference while recording. (Ideally, you would not need to refer to speaker notes, so that you could instead look directly at the camera as you record.)
- When you are ready to record, select the large red button at the bottom of the screen.
- If prompted, you may need to allow access ( Figure C ) to the tab, along with the camera and microphone. For example, when recording on a Chromebook, you may be prompted to “Allow docs.google.com to see this tab?” and “Also allow tab audio.” Select Allow, if prompted.

In a few cases, you may need to visit the following links in Chrome to adjust permissions for:
- Camera: chrome://settings/content/camera.
- Microphone: chrome://settings/content/microphone.
- A brief countdown should display (i.e., 3, 2, 1), then your recording will begin. Record your video, advancing your slides as desired.
- To pause recording, press the large red button at the bottom of the screen.
- Once paused, you may select from two options ( Figure D ):

After you select Save to Drive, wait a bit until the system indicates the file has been saved. If you leave or close the tab too soon, you may lose your recording.
How to select inset video shapes and sizes
On any slide, you may use the Insert | Speaker spotlight option ( Figure E ), then select a shaped video frame. This inserts a frame where the speaker video will display on that slide. You may reposition or resize the frame: Select the shape, and then drag-and-drop it to move it to a different place on your slide, or select a corner and drag it to resize it.

When you insert a speaker spotlight shape, that supplants the position and size you might have selected on a basic recording. In other words, the speaker’s video will display in one of the corners or the center, and in the small, medium or large shape chosen with the settings — unless you’ve inserted a speaker spotlight shape on a page ( Figure F ). Use the speaker spotlight option to convey the most polished professional effect, since it allows precise control over the shape, size and location of a video frame.

How to play, share and manage slide recordings
You may access slide recordings within Google Slides on a computer. However, unlike recording, which requires you to use Google Chrome, you may access and play existing recordings within Google Slides on a variety of modern browsers. For example, the following steps all work when you use Google Slides within either Google Chrome or Apple’s Safari browser.
To access recordings associated with a Google Slides presentation, follow these steps.
- Select the Rec button in the upper right area. The recordings you’ve made of the presentations will display. Importantly, the system shows both the date and duration of each recording.
- To view, share or download a recording, click anywhere on the playback icon or title of the recording ( Figure G ). It should open in a new tab. Within this tab, you might:
- Select the Play icon in the center of the video image to play the recording.
- Select the Share button in the upper right corner of the screen to modify access settings and give other people access to the file.
- Select the Download icon in the down arrow above a tray icon in the upper right area of the screen to download the file.

- Select the three dot menu to the right of a listed recording to:
- Rename a file something other than the default recording title.
- Remove a previously made recording you no longer need.
- Copy link and obtain the Google Drive URL for the recorded file.
All Google Slides recordings are stored in a Slides recordings folder on Google Drive. The recordings are saved as .webm files, which is a widely supported web video format. You may easily open and play .webm files on both Apple and Android mobile phones. Any recordings you make using Google Slides should be easy to view on almost any device.
Does the ability to record a presentation within Google Slides streamline your workflow? What sorts of video presentations will you create with this new capability? Mention or message me on X ( @awolber ) to let me know how you use screen recording within Google Slides.
Subscribe to the Google Weekly Newsletter
Learn how to get the most out of Google Docs, Google Cloud Platform, Google Apps, Chrome OS, and all the other Google products used in business environments. Delivered Fridays
- How to share video with Google Sites
- How to present Google Slides in Google Meet
- Prezi announces Google Slides integration
- Google Meet: A cheat sheet to the app and platform features
- Google Meet: 3 presenter controls for smoother presentations
- Best software for businesses and end users

Create a TechRepublic Account
Get the web's best business technology news, tutorials, reviews, trends, and analysis—in your inbox. Let's start with the basics.
* - indicates required fields
Sign in to TechRepublic
Lost your password? Request a new password
Reset Password
Please enter your email adress. You will receive an email message with instructions on how to reset your password.
Check your email for a password reset link. If you didn't receive an email don't forgot to check your spam folder, otherwise contact support .
Welcome. Tell us a little bit about you.
This will help us provide you with customized content.
Want to receive more TechRepublic news?
You're all set.
Thanks for signing up! Keep an eye out for a confirmation email from our team. To ensure any newsletters you subscribed to hit your inbox, make sure to add [email protected] to your contacts list.

How to record on Google Slides (+ Expert Tips)
Ever lost a deal or the boardroom over a botched presentation? We've all been there. In the B2B world, every slide matters. But here's the thing: in 2023, being present in every meeting or pitch is a challenge.
The solution? Recording your Google Slides presentation. It's not just about convenience. It's about nailing that pitch, every single time, everywhere.
Whether you're catching up with a client or impressing a room of investors, learning how to record on Google Slides can make your slides the secret weapon.
Ready to up your game? Let's dive into the future of presentations.
When should you consider recording on Google Slides?

In the fast-paced tech world, time is our most valued currency. When you're steering a ship, decisions about how to communicate shouldn't weigh you down.
So, when should you pivot to an async presentation , whether it's for your team or that crucial external pitch?
- Syncing Squads : Global teams, one mission. Async presentations? That’s our glue, ensuring everyone sings the same tune, no matter where they are.
- Iterate on the Fly : Tech thrives on agility. Tweak, pivot, and lock decisions all in a digital room. No waiting for that elusive "everyone’s in the office" day.
- Scaling the Team : Got fresh talent? Drop the formalities. Async training offers a self-paced learning curve. Record once, and use it for every new cohort.
- Deep Dives & Analysis : Some topics need pause, rewind, and replay. Async ensures complex data or strategy discussions are absorbed at the viewer's pace, not the presenter's.
- 24/7 Reach : We’re global, and so are our clients and partners. Recorded presentations play by their rules, without the scheduling back-and-forth.
Bonus : Instead of real-time Q&A, when you opt for async, your audience can digest, reflect, and provide more thoughtful input after watching your presentation.
Getting Started: Preparing Your Presentation

As with any tool or approach, success lies in the prep work. So before learning how to record on Google Slides, ensure your presentation isn't just good, but stellar. Here's how:
- Define Clear Objectives : What's the goal? Whether it's a pitch, update, or training , have a clear endgame in mind for your presentation.
- Develop a Narrative Arc : A good presentation unfolds a story. It has a clear introduction, engaging content progression, and a powerful conclusion. This structure helps engage viewers and keeps them hooked till the end.
- Make it easy to repurpose : Structure your slides in a way that allows you to swap out parts of your presentation for specific audiences without having to redo the whole thing. Personalized content can significantly increase engagement.
- Visual Appeal Matters : Use high-quality graphics, consistent fonts, and a cohesive color scheme. Your slides should command attention, not distract.
- Simplicity is Key : Each slide should communicate one main idea. If you're cramming too much, it's time to trim.
- Engage, Don’t Bore : Incorporate multimedia elements – videos, animations, or infographics. But remember, only if they add value.
- Interactive Touchpoints : Consider adding polls, Q&A prompts, or clickable links. Engage your audience, don't just talk at them.
- Leverage Slide Master : This lesser-known feature lets you create universal changes across your presentation – ensuring consistency and saving time.
- Practice Makes Perfect : Run through your slides multiple times. Familiarity breeds confidence, and it'll show when you record.
How to record a Google Slides with Claap
Ready to learn how to record on Google Slides with Claap? Check out this short tutorial and steps below:
Step 1: Get Onboard with Claap
First things first, set yourself up with a free Claap account. It's right here . Once done, pick your poison—either the Chrome extension or the Mac desktop app . Honestly, both are solid choices.

Step 2: Choose Recording Settings
Before diving in, you've got choices to make:
- Recording Mode : Screen only, cam only, or a blend of both? Your pick.
- Audio and Cam sources : If possible, choose an external microphone (or headphones that come with one) for high quality sound.
- Filters : Feeling bold? Play around with camera filters.
- Action : Ready to roll? Click on Record.
Tip : Begin with cam-only to grab attention, then seamlessly switch to cam+screen when presenting your slides.

Step 3: Edit for Engagement
A presentation is more than just delivering content; it's about creating a connection . Here’s how Claap helps you make the most of your recording:
- Give it a clear title: Think of it this way – the title is your first impression. Make it count. Without a doubt, a catchy title not only garners attention but also sets clear expectations right from the start.
- Link to the Goods: Got a presentation that pairs with your Claap? Drop that link right in the description. Any relevant content you've got? Toss it in there too. This way, everything's at everyone's fingertips.
- Make it digestible : Sharing a lengthy video? Break. It. Down. Use video annotations to carve out sections just like you do in your deck.
- Name Drop with Purpose: Claap's user mentions are gold. Utilize them! Want someone's eyes or feedback on something specific? Mention them. But hey, clarity is key. Always specify if you're seeking a response or just giving a heads up.
- Harness the Power of Polls: Need a quick show of hands? Add a poll. It's the perfect way to get instant feedback at scale. Plus, it gives everyone a chance to chime in and, if they want, elaborate with a comment.
Bonus tip : Claap’s AI Copilot can create automated titles, subtitles, chapters, tags and thumbnails in seconds!

Step 4: Share Your Work
Once you master how to record on Google Slides, it’s time to share it. Here’s how:
- Directly invite your team via email;
- Grab that Claap link for wider sharing—think Slack or Notion.
- And if , how about embedding it as a gif in emails?

Step 5: Get Feedback
After mastering how to record on Google Slides, here's where the magic happens. Collaboration isn’t just about sharing; it's about alignment and making decisions. Engage with your team, clients, or partners directly on the video. Start discussion threads, receive feedback through video replies, or let them attach. Want to see how your presentation is performing? Delve into video analytics.

Ready to upgrade your presentation game? Sign-up today for free.
related articles
How To Cut Snippets out of your Meeting Recordings
Make your Team Sell Better Than Ever with Video Sales Training (In Minutes)
7 Practical Ways to Increase Remote Team's Efficiency
Get started for free.
- Bandicam Screen Recorder
- Bandicut Video Cutter
- Bandicam + Bandicut discount package!
Record Yourself Presenting a PowerPoint or Google Slides
Record a PowerPoint or Google Slides presentation with your face

With a PowerPoint or Google Slides presentation, you can represent your data in an organized manner and show a profound projection of your research that fetches an excellent impression over your study and presentation style. You can record a PowerPoint presentation and save PowerPoint as a video with a free screen recorder, Bandicam, for a variety of purposes, from school assignments to business projects. Today’s blog aims to show you how to record your PowerPoint or Google Slides within a few clicks using Bandicam.
Google Slides vs. PowerPoint
With PowerPoint Presentation or Google Slides, you can brief your studies and research with prominence. Both are great tools for making presentations, but there are differences in accessibility and price.
– Price : Google Slides is free to use if you have a Google Account. PowerPoint, on the other hand, is part of the Microsoft Office package. As such, you need to have a license for Microsoft Office to use PowerPoint. – Use & Accessibility : You do not need to install software to use Google Slides, as it is a cloud-based software. To start Google Slides, all you need to do is go to your Google account and open the Google Slides tool. The data will automatically be saved to your Google Drive, and you can access all of your presentations across devices. Meanwhile, you need to install the PowerPoint app on your PC in order to use it. Your presentations will be saved on your hard disc, which means they are accessible on your personal computer.
Recording a presentation
If you can record the PowerPoint presentation with a free screen recorder like Bandicam, it would be a cakewalk. Bandicam can record the entire PowerPoint as you are presenting and save the file for a later watch. The free screen recorder Bandicam allows you to record your Windows screen with quality video and audio. Compatible with Windows, Bandicam supports several features that meet the present demand and help you to record anything on your screen. Notable features include the following:

Add live webcam video : If you want to record a presentation with a webcam, use the webcam overlay feature in Bandicam. This feature allows you to record a video of yourself during the presentation. You can also change the Webcam PIP border shape (square, circle, or ellipse).

Draw on slides during a presentation : Bandicam provides the best drawing tool for PC. Its real-time drawing facilities allow you to draw very effective outlines in Google Slides presentations or PowerPoint presentations.

Add narrations to presentations : You can mix your voice while recording your entire presentation. This feature allows you to easily record your computer screen, computer sound, and microphone all together.
Display and record keystrokes : With the Bandicam Screen Recorder , you can display keyboard shortcuts on your screen while recording. This feature is useful when making ‘how to’ tutorial videos.
Such powerful features will facilitate your screen recording task with comfort. If you want to record a presentation with audio , begin by installing Bandicam on your PC and continue reading below.
How to Video Record Yourself Presenting a PowerPoint
Bandicam is a user-friendly tool that allows for easy installation and helps you capture your screen. Let’s check out the steps to capture a presentation with audio:
Step 1: Start Bandicam and select Fullscreen mode.

Step 2: To add your voice, choose “Your microphone device” for the Microphone in the settings. You can also select either “(Default Output Device)” or “Disable” for the Speakers.

Step 3: You can record your face on PowerPoint. Check the “Add webcam overlay to video” option, select webcam device, and set the webcam size or shape in Advanced settings.

Step 4: Start the PowerPoint presentation. Tap on the ● REC button to begin or end the recording.

With the webcam overlay feature , you can move the webcam screen or maximize it to fullscreen while recording.
Step 5: If you’ve finished your presentation, tap on the Rec button again to end the recording. Click on Home -> Video to view, edit, or upload the video file to social media or store it for later watch.

With the help of the free screen recorder Bandicam, you can record a presentation with audio and share or save it in your storage. Your captured presentation will have high quality and clarity in audio and video in terms of sound and picture resolution.
Record a Google Slides presentation

Google slides can be represented through Google Docs, Google Sheets, Google Draw, Google Forms, Google Sites, etc. You can capture Google Slides in full-screen mode to cover the entire presentation. You can record a Google Slides presentation with the help of Bandicam. This process is similar to capturing a PowerPoint presentation, and you will be able to save or share your recording instantly.
Install Bandicam on your computer and allow the program to run. Details can be found on “ How to record Google Slides Presentations .”
Frequently Asked Questions
Q1. how do i make a countdown timer.
You may need a recording countdown function to provide some warm-up time before starting your recording. Bandicam can set the count timer from 1 to 10 seconds.

Q2. How do I record a cursor in PowerPoint or Google Slides?
You can record your mouse cursor or add mouse clicks and put a highlighting effect on your video. This feature is useful when you want to emphasize a certain area while recording.
Q3. How do I add a logo to my presentation?
You can add an image watermark (logo) to your video with Bandicam’s logo overlay feature.
Q4. Can Bandicam record other programs on Windows?
Yes, the tool can capture other programs on Windows such as Chrome, Microsoft Edge, Internet Explorer, Excel, and YouTube with high-quality audio and video.
If your PowerPoint presentation is coming close and you want to make video presentations with webcam , install Bandicam and charge up your efforts. This state-of-the-art software allows you to record a PowerPoint or Google Slides presentation and save it in your system storage or instantly share it on your social media accounts. Let your friends applaud you for your hard work and dedication!
Mirror Android Screen to Windows 10/11 [2024]
How to record stock trades screen on your pc, top 5 free av1 converters in 2024.

Latest Posts
Multi-monitor screen recording at scheduled times, 11 best video grabber software in 2024.
- Screen Recorder
- Game Recorder
- Webcam Recorder
- Video Cutter
- Video Splitter
- Video Joiner
For Business
- Bandicam SDK
- Bandicam Video Library
- Request a Quote
- Brand Resources
- Reviews & News
Google Slides
How to Turn Google Slides into a Video?

Table of Contents
Using slides for presentations is a popular choice. However, if you don’t plan on giving the presentation live more than once, converting it into a video might be a better option. This way, you can add your voice to the presentation, and viewers won’t have to manually click through each slide.
Videos are easier to share and don’t run into compatibility issues like slideshows might. While Google Sheets and Excel can work together, they’re not always perfectly compatible. Videos, on the other hand, can be played on almost any modern video player or platform, including YouTube.
Although Google doesn’t have this feature built-in, there are free add-ons available in Google Workplace that can do the job. In this guide, we’ll show you how to use one of these add-ons, along with a few more methods, to convert your presentations into videos effortlessly.
How to Convert Google Slides to Video?
Looking to take your Google Slides presentations to the next level? Converting them to videos allows you to share them more easily and create engaging content. Here are several methods to achieve this:
1. Make Use of Add-ons:
Creator Studio is a handy tool you can add to Google from the Google Workspace Marketplace. It changes Google Slides into GIF images and MP4 video files. You can also add an MP3 audio file or record your voice to narrate your presentation. When your presentation becomes a video, it will include the background sound you added. If you want to know more, take a look at the step-by-step instructions below:
Step 1 – Install: Go to Extensions > Add-ons > Get add-ons . Search for “ Creator Studio ” and install it.
Step 2 – Open: Go to Extensions > Creator Studio > Create Video .
Step 3 – Customize: Set Output width and Interval between slides . Choose Video File (MP4) or Video with Audio (if adding narration).
Step 4 – Convert: Click Go and wait for the video to render.

2. Using PowerPoint
If you have access to Microsoft PowerPoint, you can export your Google Slides presentation as a PPTX file and then use PowerPoint’s built-in “Create a Video” feature. This method offers advanced control over video quality and resolution, making it suitable for professional presentations.
Step 1 – Download: Go to File > Download as > Microsoft PowerPoint (.pptx) .

Step 2 – Open in PowerPoint: Launch PowerPoint and open the downloaded file.
Step 3 – Export to Video: Go to File > Export . Choose Create a Video .
Step 4 – Customize: Select the desired video quality and resolution .
Step 5 – Record Narration (Optional): Click Record Narration to add your voiceover.
Step 6 – Save: Click Create Video and choose your preferred saving location.
3. Using Canva
Canva, a popular design platform, allows you to import your Google Slides presentation and convert it into a video. With its user-friendly interface and pre-designed templates, Canva is a great option for creating visually appealing video presentations without extensive editing skills. To convert your slides using Canva follow these steps:
Step 1 – Import Slides: Go to Canva and click Create a Design . Choose Presentations and select Import from Google Slides .
Step 2 – Edit (Optional): Make any desired edits using Canva’s editing tools.
Step 3 – Convert to Video: Click the Share button and choose Download as MP4 .
4. Using a Recording App
For a quick and straightforward solution, consider using a screen recording app. While this method doesn’t offer the same level of customization as the other options, it can be effective for basic presentations where narrating your slides is sufficient. Have a look at the steps below to see how it’s done:
Step 1 – Choose an App: Select a screen recording app like Loom or Screencastify.

Step 2 – Set Up Recording: Choose the recording area (entire screen or specific window).
Step 3 – Record: Start recording your presentation while narrating or adding annotations (if the app allows).
Step 4 – Stop Recording: End the recording and edit the video (optional) using the app’s features.
Step 5 – Save: Download the final video in your preferred format.
What are the Benefits of Converting Google Slides into a Video?
1. easy to watch and share.
When making presentations, people often use formats that anyone can easily see. Videos are one such format because they work on phones, TVs, computers, and tablets. This makes them accessible even for those who aren’t familiar with Google Slides. People can share videos on platforms like YouTube, TikTok, Facebook, or others without needing special software.
Plus, videos don’t need any special programs to watch or share files. Unlike Google Slides, which needs a Google account to see and send files.
2. Engaging Content Everywhere
Videos work well on different platforms, reaching a wide audience. They get lots of likes and comments on social media. You can also put videos on websites for tutorials and demos, making your site more exciting and keeping people’s attention longer.
If you add a video to emails, people are more likely to click and watch. It’s a way to keep people interested using modern techniques like email marketing.
3. Better Storytelling
In business, presentations can be really important. Sometimes Google Slides might not be enough to explain ideas to investors. Using videos can make storytelling better by mixing text with pictures and effects. Adding voiceovers and narrations can make presentations more personal.
Videos can create strong emotional connections with music and animations. When explaining hard stuff, videos can make it easier for people to understand ideas.
4. Easy Offline Viewing
Change Google Slides into a video and get a file with all the pictures and stuff. You can save this file on your device or share it with others. Unlike Google Slides, you don’t need the internet to see the file. You can download videos and watch them later, even if you’re not online. Also, you can record conferences to remember what was said later.
Frequently Asked Questions
How do i convert google slides to powerpoint.
You can change your Google Slides into PowerPoint. Just download your Google Slides file as a PowerPoint file. To do this, go to the top bar, click on “File,” and then select “Download.”
How to Convert Google Slides to PowerPoint with Audio?
Unfortunately, you can’t directly convert Google Slides to PowerPoint with audio. You’ll need to export the Slides as a PPT file. After downloading it, open the file in Microsoft PowerPoint and then add the audio manually.
Will my slide animations work in the video?
Sometimes, depending on the method you choose.
How long does it take to convert Google Slides to video?
It depends on the length of your presentation and the tool you use.
Save Time and Effortlessly Create Presentations with SlidesAI


Google Slides: How to add GIFs and stickers to your presentation
G oogle Slides helps you make impressive presentations with its diverse template library, collaboration options, and seamless integration with Google apps. You can use it on your Android phone, iPhone, desktop PC, laptop, or affordable Chromebook . Your audience might lose interest if your slides appear uninspired. Break the monotony by including an occasional GIF or sticker. This tutorial shows you how to add GIFs and stickers to Google Slides.
When to add GIFs and stickers to Google Slides
A GIF (Graphics Interchange Format) is an image file that uses a series of pictures to create an animated sequence. It's like a video without sound and is typically used to express reactions or make memes.
If you think your presentation might cause audience members to nod off to sleep, add a GIF or two to your Google Slides. There's a time and place for humor, so use it sparingly. For instance, a funny Star Wars GIF or sticker will attract your classmates' attention. But it might not fly during a board meeting presentation.
How to autoplay your Google Slides presentation
How to get gifs and stickers for your presentation.
If you can't find a particular GIF or sticker online, go to Giphy or Tenor.com and enter your search term. You can also explore the trending section to find popular GIFs. If you're using a phone, download the Giphy app from the Google Play Store or Apple App Store. You'll also find other third-party apps for Android and iOS.
How to add GIFs and stickers on desktop
We walk you through three ways of adding GIFs and stickers to Google Slides. The first method adds them from the web, the second accesses GIFs downloaded to your desktop PC, and the third uses a web link.
How to add GIFs and stickers from the web
- Open Google Slides .
- Click Insert from the toolbar.
- Select Image .
- Choose GIFs and stickers .
- Enter your search term.
- Select the GIF or sticker you want to add.
- Click Insert .
- To resize the image, click and drag any corner.
How to add GIFs and stickers saved on your computer
Adding GIFs and stickers from your computer is the easiest way to include them in your slideshow. You must download them to your PC before following these steps.
- Click Upload from computer .
How to add GIFs and stickers via URLs
First, keep your GIF or sticker's URL handy.
- Choose By URL .
- Paste the link.
- Click Insert image .
How to add GIFs and stickers on mobile
The Google Slides mobile app isn't as feature-rich as the desktop version. However, it will do in a pinch. First, download the GIFs or stickers you want on your phone. You can't add them to your presentation via URL.
The following steps work on Android and iOS. We use an Android smartphone in this tutorial, but iPhone users can follow along.
- Open the Google Slides app.
- Tap the plus icon in the upper-right corner.
- Select Image . Close
- Tap From photos .
- Choose a GIF or sticker from your gallery. Close
Why can't I add a GIF or sticker to Google Slides?
There are many reasons why your GIF or sticker might not load correctly despite following the steps listed above.
- Older versions of Google Slides might have issues with GIF playback, so get the latest update.
- GIFs and stickers may not appear as intended if you have poor internet connectivity. To avoid issues, download and add them to your slides instead of using URLs.
- Large GIF files may not work well with Slides. Compress the images or replace them with smaller files.
The best Google Slides templates for work, school, and home
How to edit gifs and stickers in google slides.
You can customize GIFs to match the theme of your presentation. You can add a border, crop, resize, and recolor images.
How to crop an image
- Double-click the GIF or sticker.
- Drag the black tabs until the image gets cropped to your preference.
- When you're happy with the final image, press Enter . If you aren't, type Ctrl + Z to undo the changes.
How to use formatting options
Use Google Slides' formatting options to change your GIF or sticker's orientation, size, color, opacity, and brightness.
- Select your GIF or sticker by clicking it.
- Select Format from the toolbar.
- Click Format options .
- Adjust the orientation or size from the Size and Rotation section.
- Change the tone of the image from the Recolor section.
- Customize your image's opacity, brightness, or contrast from the Adjustments section.
How to add a border
- Click the GIF or sticker.
- Select the pencil icon from the menu bar.
- Choose a border color.
- Click the border weight icon to adjust the thickness.
Get your point across with GIFs and stickers
If a picture is worth a thousand words, animated GIFS are worth even more. Pique your audience's interest by adding GIFs and stickers in Google Slides. If you want to make custom GIFs on Android, we have a guide for creating GIFs from stop-motion photos .

COMMENTS
You must have edit access to the slides in order to create a new recording. To open your presentation, go to Google Slides. To record your slideshow, in the top right, click Rec Record new video. To start recording, in the middle, click the red record button. To start over, pause and click Re-record. To save your recording, pause and click Save ...
Step #4: Set Up Your Presentation. Before you can start recording, navigate to slides.google.com and find your presentation. Next, click on the "Slideshow" button in the top right corner. This will display the presentation in full-screen mode. It's important to ensure that your slides on Google slides load completely before you start ...
Step 5: Record your presentation. After you've done a test of at least the first couple slides of your presentation, you're ready to record your Google Slides with your face or just narration. Open your custom Riverside studio and click Share in the bottom toolbar. Choose Entire Screen, Window, or Chrome Tab - depending on where your ...
Recording your Google Slides presentation is something you might want to do if you have to teach using distance learning and you want to create some digital resources for your students. So, in this tutorial, This tutorial will show you how to teach lessons online by recording a Google slides lesson with audio and video. Recording your Google ...
Step 2 - Start Recording. Next, grant Vimeo Record permission to access your microphone and camera. Ensure that you are on the screen with your Google Slides presentation. Vimeo Record automatically syncs with your audio and video sources. Click on the Record button.
Open Your Presentation. Launch your Google Slides presentation and open the screen recording tool. You may have to sign-in to your account, depending on which screen recording tool you use. 2. Start Recording. Begin the recording following the screen recorder's instructions.
Let's learn how to record a Google Slides presentation in just a few quick steps. Once you learn, you'll find yourself using this easy process every time you build a slide deck in Google Slides. 1. Build Slides With a Premium Template. Before you record a Google Slides presentation, you need to build a winning slide deck.
Step 2. Click on "Record". Once you've opened the website, click on the big red button "Record" (next to Company and before Get Started ). Step 3. Select your Audio, Video, and Screen Options. The browser will ask for permission, so make sure you grant Panopto access to your webcam (s) and audio source (s).
Recording a Google Slides presentation is a valuable feature that allows you to explain your slides, provide additional context, and add a personal touch to your content. This can be especially useful when conducting remote presentations or creating tutorial videos. By recording your presentation, you can ensure that your message is effectively ...
Recording your Google Slides presentations can be extremely useful for sharing with wider audiences or repurposing content. However, Google Slides does not have a built-in recording function. You need to use third-party software to capture your screen, face, and voice. In this comprehensive guide, we will walk you through the entire process of ...
Go to "View" and click on "Slideshow". Go to the screen recorder and choose "Only Screen", then select "None" to just record the screen. A window will be displayed. In the "Entire Screen" > select the presentation tab > click on the "Share" button. Start your presentation. You can hide the screen recording prompt by ...
Learn how to record your webcam over the top of your presentation in Google Slides.Google Chome Extenstion of Screen & Webcam recorder - Flonnect: https://ch...
In this video, we'll show you how to record a full-screen Google Slides presentation in a way that still allows you to embed your webcam and use our drawing ...
In this video you will learn how to record video and video feedback without ever leaving the Google Slides editor.Using the Extension 'Record to Slides' you ...
Below are detailed steps: Step 1. Download and install MiniTool Video Converter and open it. Later, you can open your Google Slides presentation. MiniTool Video ConverterClick to Download100%Clean ...
Open your slide deck in Google Slides; Start presenting the deck in "Presenter view" (be sure to click the arrow next to the "Present" button) Start a browser tab recording. If you want your audience to hear and see you, choose to turn on "Microphone" and "Embed webcam" Here is a quick walkthrough of the process:
Go to Google Slides and open your presentation. Select the Rec button in the upper right area, then select the Record new video button ( Figure A ). The system will switch to the screen recording ...
Step 3: Edit for Engagement. A presentation is more than just delivering content; it's about creating a connection. Here's how Claap helps you make the most of your recording: Give it a clear title: Think of it this way - the title is your first impression. Make it count.
Tutorial to show teachers and students how to record a google slideshow with audio and video. Teachers can use this to record distance learning lessons for t...
You can choose to record with, or without, your camera. Open your Google Slides deck, launch the Loom extension, and select Full Desktop for your recording settings. Hit Start Recording, then in the top right of your Google Slide page, you'll see Slideshow. Click Slideshow to move into full-screen presentation mode.
Google Slides vs. PowerPoint. With PowerPoint Presentation or Google Slides, you can brief your studies and research with prominence. Both are great tools for making presentations, but there are differences in accessibility and price. - Price: Google Slides is free to use if you have a Google Account. PowerPoint, on the other hand, is part of ...
Open PowerPoint, Google Slides, or Keynote . Open your screencasting app . Set up your equipment (you choose the devices in your screencasting app) Hit "presenter mode" and record! Stop the recording. That's how you record your PowerPoint, Google Slides, or Keynote presentation with audio and/or a webcam. You don't use the slide ...
Creator Studio is a handy tool you can add to Google from the Google Workspace Marketplace. It changes Google Slides into GIF images and MP4 video files. You can also add an MP3 audio file or record your voice to narrate your presentation. When your presentation becomes a video, it will include the background sound you added.
How to have a video of yourself over your Google Slides presentation while screen recording using QuickTime.
Google Slides helps you make impressive presentations with its diverse template library, collaboration options, and seamless integration with Google apps. You can use it on your Android phone ...