How-To Geek
How to screen share a powerpoint presentation in zoom.

Your changes have been saved
Email is sent
Email has already been sent
Please verify your email address.
You’ve reached your account maximum for followed topics.

I Won't Use a VPN Without These 6 Features
How to switch from google to proton, chrome is top dog, but firefox is still my favorite browser, quick links, grant access to share screens in zoom, screen share a powerpoint presentation in zoom.
No matter where you work, meetings all have one thing in common: PowerPoint presentations. If you use Zoom, you can easily present your slideshow to the participants by sharing your screen . Here's how it's done.
If you're the host of the Zoom meeting , you'll be able to share your screen without issue. However, if you're joining a meeting that you aren't the host of, you may need to request permission from the host to be able to share your screen.
As a general rule, we recommend that hosts disable the screen-share feature for participants by default for security reasons . If you aren't the host of the meeting, be sure to reach out to the host in advance to request permission to share your screen during the Zoom call. Hosts can always enable the feature during the call, but it's always good to be a step ahead.
If you're the host of the meeting and someone is requesting permission to share their screen during the meeting, click the up arrow next to "Share Screen" at the bottom of the window.
In the menu that appears, click "Advanced Sharing Options."

The "Advanced Sharing Options" window will appear. In the "Who Can Share" section, click the bubble next to "All Participants."

All participants in the meeting can now share their screen.
To screen share your PowerPoint presentation, go ahead and open the PowerPoint presentation that you would like to present. However, before you put the presentation in Slide Show view, you'll want to share your screen. At the bottom of the Zoom meeting window, click "Share Screen."

If you're using a single monitor, you will immediately start sharing your screen. If you're using dual monitors , you'll need to click the screen that your presentation will be shared on. In our case, that will be "Screen 2."

To begin sharing that screen, click "Share" at the bottom-right corner of the screen select window.

You're now sharing your screen. Now, in Microsoft PowerPoint, select the "Slide Show View" icon in the bottom-right corner of the application.
From here, deliver your presentation as though you were standing in front of a live audience.
If you are giving a big presentation through Zoom, you're not going to just jump straight into it. You may need to speak to the audience a bit before sharing your screen. If so, here are a few tips on how to look better on your Zoom call .

Use zoom for PowerPoint to bring your presentation to life
If you would like to make your presentations more dynamic and exciting, try using zoom for PowerPoint .

To add a zoom, go to Insert > Zoom .
To summarize the entire presentation on one slide, choose Summary Zoom
To show selected slides only, choose Slide Zoom
To show a single section only, choose Section Zoom

When you create a zoom in PowerPoint, you can jump to and from specific slides, sections, and portions of your presentation in an order you decide while you're presenting.
Note: See the Requirements table below regarding which versions of PowerPoint support the features described in this article.
Summary zoom
A summary zoom is like a landing page where you can see the pieces of your presentation all at once. When you're presenting, you can use the zoom to go from one place in your presentation to another in any order you like. You can get creative, skip ahead, or revisit pieces of your slide show without interrupting the flow of your presentation.
Create a summary zoom
Go to Insert > Zoom .

Select Summary Zoom .
The Insert Summary Zoom dialog box opens.
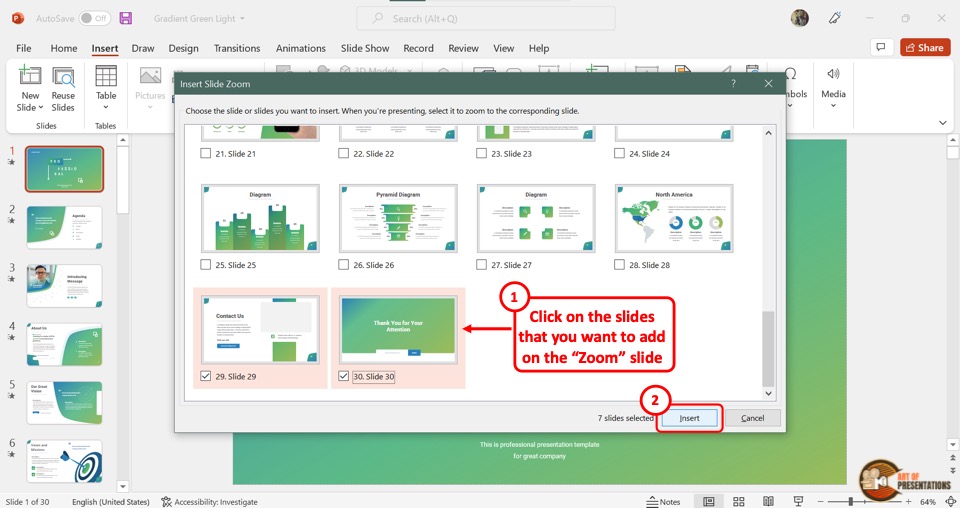
Select slides you want to include in your summary zoom. These become the first slides of your summary zoom sections . To learn more about using sections in PowerPoint, see Organize your PowerPoint slides into sections .

If you already have sections in your presentation, the first slide of each section is preselected by default. If you don't want to include certain sections in your zoom, deselect them. Then, if you want PowerPoint to get rid of any sections you didn't include in your summary zoom, clear the check box next to Keep unused sections in your presentation . Don't worry—the slides in the sections you're discarding will still be part of your presentation.

Once you've selected all the slides you want to use for your summary zoom, select Insert . Your summary zoom is created, and it appears as a new slide just before the first slide you included in your summary zoom.

Add or remove sections from your summary zoom
Once you've created a summary zoom, you might still want to add or remove sections of your presentation. If you've made changes since first making your summary zoom that you want to capture, you don't have to start from scratch—just update your summary zoom.
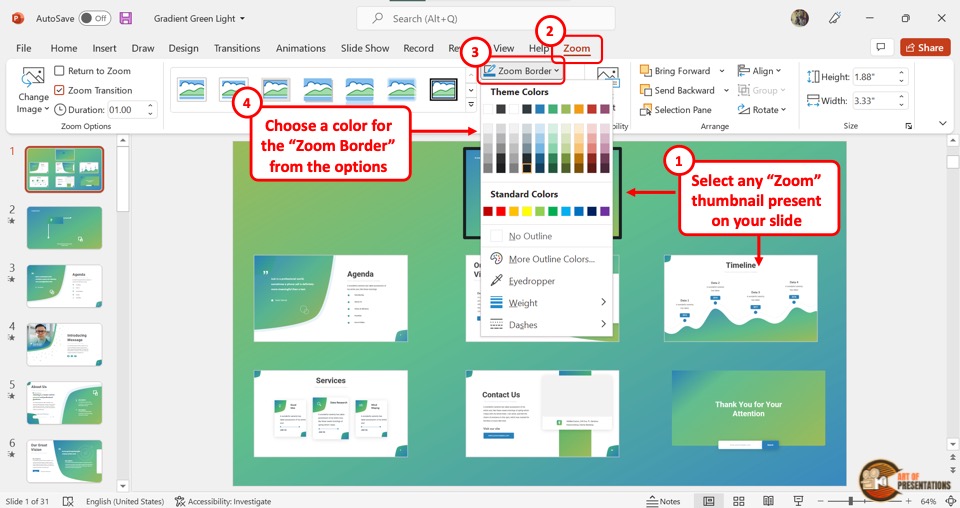
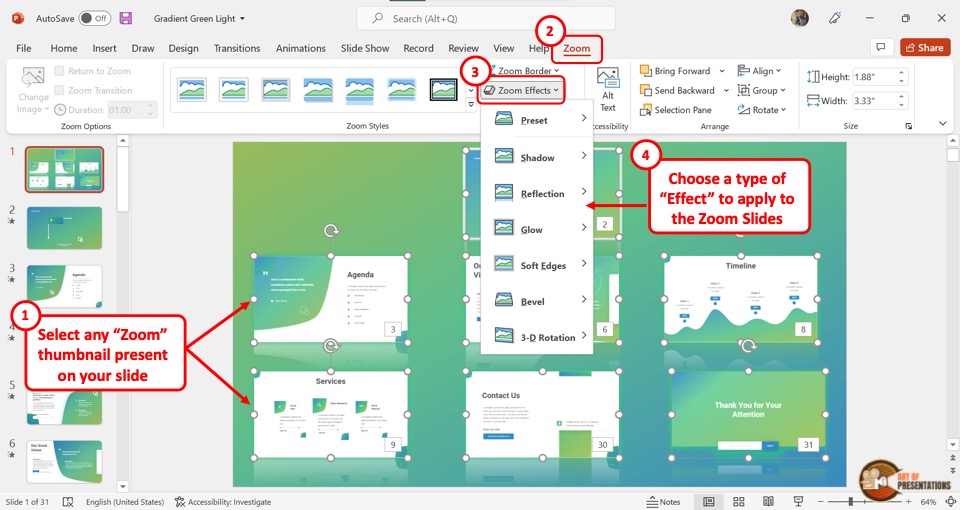
Select your zoom, and then select the Format tab on the ribbon.

Select Edit Summary , choose the sections you want to have in your summary zoom, and then select Update .
Note: You won't be able to add or remove sections from your presentation in this view, just from your summary zoom.
A slide zoom can help you make your presentation more dynamic, allowing you to navigate freely between slides in any order you choose without interrupting the flow of your presentation. They're a good option for shorter presentations without lots of sections, but you can use slide zooms for lots of different presentation scenarios.
Slide zooms help you drill down into multiple pieces of information while feeling as though you're staying on the same canvas.
Create a slide zoom
Select Slide Zoom .
The Slide Zoom dialog box opens. Select the slides you want to use in your slide zoom.
Once you've selected all the slides you want to use, select Insert .
An item for each slide you selected in step 3 is added to the slide. Select each item in turn and drag to arrange them on the slide.
Tip: If you want to, you can create a slide zoom quickly by simply selecting the slide you want from the thumbnail pane and dragging it onto the slide you'd like to have your slide zoom on. This way, you can create slide zooms and change them quickly, and arrange them however you like simply by clicking and dragging.
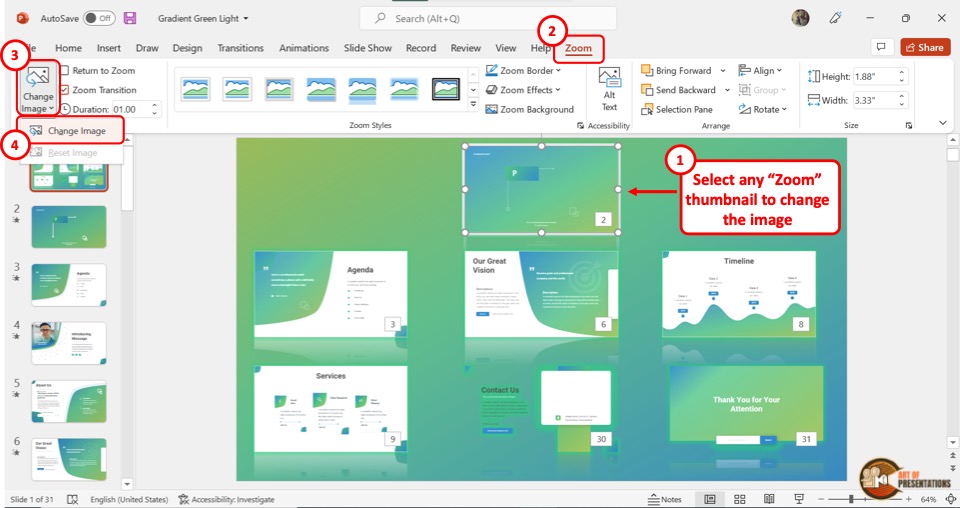
Change the preview image of your slide zoom
Your slide zoom by default will be a preview thumbnail image of the slide, but you can choose a new image from your PC or the web to represent the section or slide you'll be going to.

Select Change Image to choose a new picture from the web or your PC to use instead of the thumbnail.

Choose or search the web for the image you want. When you've selected the image you want, select Insert .

You can also choose various looks for your zooms from Zoom Styles —you can change the border, add visual effects, or pick from any of the border and effect combinations in the gallery.

Section zoom
A section zoom is a link to a section already in your presentation. You can use them to go back to sections you want to really emphasize, or to highlight how certain pieces of your presentation connect. To learn more about using sections in PowerPoint, see Organize your PowerPoint slides into sections .
Create a section zoom
Select Section Zoom .
Select the section you want to use as a section zoom.
Select Insert . Your section zoom will be created.
Tip: If you want to, you can create a section zoom quickly by simply selecting the section name you want in the thumbnail pane and dragging it onto the slide you'd like to have a section zoom on.
Change the preview image of your section zoom
Your section zoom by default will be a preview thumbnail image of the slide, but you can choose a new image from your PC or the web to represent the section or slide you'll be going to.
More zoom options
Zoom for PowerPoint truly lights up when you make it your own. Select the Format tab of the ribbon to get to the Zoom Tools , which you can choose to create just the look and feel you're going for when you present.
Choose to return to the home page or continue through your presentation
If you want to return to the zoom slide after viewing sections or slides in your summary, slide, or section zoom, make sure the Return to Zoom check box is selected. If you want to move on to the next slide after viewing part of your zoom, uncheck it.
(If you're working with a summary zoom or a section zoom, you'll return to the zoom slide by default when you're presenting after going to the section. If you're using a slide zoom, you'll move on to the next slide by default after viewing your slide zoom.)
Make the background of your zoom transparent
Another way you can change the look of your zoom is by choosing to adopt the background of the slide where your zoom lives to make the zoom almost indistinguishable from the main canvas while you present. Select Zoom Background to make your summary, section, or slide zooms blend in to their home slide.
In the Zoom Styles group, select Zoom Background . The zoom will adopt the background of the home slide.
Change the transition options of your zoom
By default, your zooms will use the zoom transition when you present, which is what helps make the zooms feel so lively. However, if you don't want to use the zoom transition, or if you want to change the duration of the transition, you can do so.
In the Zoom Options group, make sure the box next to Zoom Transition is checked if you want to use the zoom transition when presenting your zoom.
If you don't want to use the zoom transition when presenting, uncheck the box next to Zoom Transition .
To change the timing of the zoom transition, use the up and down arrows next to the Duration indicator to change how long the zoom transition lasts.
Requirements
See the following table for details on the minimum version numbers required in PowerPoint to create or play zoom links.
| PowerPoint version | What you can do with Zoom |
|---|---|
| or newer PowerPoint 2019 | Create and play zoom |
| or newer | Play zoom |
| PowerPoint 2016 | Play zoom as hyperlinks with no zooming transition. |
| PowerPoint for the web PowerPoint Live in Teams | None None |
| PowerPoint for Android PowerPoint for iOS PowerPoint Mobile for Windows | Play zoom |

Need more help?
Want more options.
Explore subscription benefits, browse training courses, learn how to secure your device, and more.

Microsoft 365 subscription benefits

Microsoft 365 training

Microsoft security

Accessibility center
Communities help you ask and answer questions, give feedback, and hear from experts with rich knowledge.

Ask the Microsoft Community

Microsoft Tech Community

Windows Insiders
Microsoft 365 Insiders
Was this information helpful?
Thank you for your feedback.
How to Present PowerPoint Slides in Zoom

Your changes have been saved
Email is sent
Email has already been sent
Please verify your email address.
You’ve reached your account maximum for followed topics.
Preparing to present PowerPoint slides in Zoom for the first time can feel overwhelming. It's a different experience than face-to-face presentations, and naturally, you want to get it right. But don't worry, we've all been there, and we're here to help.
In this article, we’ll guide you through the process step-by-step, so you can deliver your presentation with confidence and avoid awkward pitfalls. Let’s dive in.
Present PowerPoint Slides in Zoom by Sharing Your Entire Screen
One of the easiest ways to share your PowerPoint slide deck is by sharing your entire screen. Here’s how to go about it.
- Open your PowerPoint presentation.
- Start or Join a Zoom meeting . Knowing how to use Zoom like an expert makes this step easy.

When you hide the toolbar, it may appear as a minimized window in your taskbar. Click the window icon to reveal it when you’re ready to stop sharing.

- Press the Esc key on your keyboard to exit the slideshow after your presentation.
- Click Stop sharing .
Sharing your entire screen lets you seamlessly switch between your PowerPoint window and other windows while bringing your audience along. However, it has a downside—your audience will see sensitive details or notifications if they pop up.
Present PowerPoint Slides in Zoom by Sharing a Window
With this method, you share only your PowerPoint window, so your audience won't see other areas of your desktop, including popup notifications. Here’s how to get it done.

- Join the Zoom meeting.

Ensure your PowerPoint window is maximized and running in the background, or it won't appear under the Window tab.

- Click Stop sharing or Stop share when you’re done presenting.
This method is perfect for multi-tasking—that is, sharing your PowerPoint window while viewing your notes (in a separate document) or seeing what’s happening in Zoom.
Rock Your PowerPoint Presentation in Zoom Like a Pro
And that's a wrap! You now know all the key steps to present PowerPoint slides effectively in Zoom. Remember, you have two main options: share your entire screen when you need to switch between different windows during the presentation or share a specific PowerPoint window if you're multitasking and want to keep the rest of your desktop private.
Practice using these features before your next presentation, so you're comfortable and ready. Alongside this, using a whiteboard in Zoom can make your presentations more interesting.
- Productivity
- Microsoft PowerPoint
Easy PowerPoint Zoom Tutorial (Free Templates & Examples)

Sara Wanasek

Tired of navigating your slides in a chronological order? Looking for ways to spice up the way you interact with your presentation and engage your audience?
Transform your boring presentations into something more engaging and captivating with PowerPoint’s Zoom feature. PowerPoint Zoom allows you to create dynamic, non-linear presentations. Think of it as building a Prezi inside PowerPoint. Jump from one point in your presentation to the next seamlessly by creating links to the different sections of your presentation.
By utilizing PowerPoint’s Slide Zoom, Section Zoom, and Summary Zoom, you can easily create an entertaining and engaging presentation for your audience. There are many different ways to add these to your presentation, so read on to learn how to use PowerPoint Zoom and implement it in the best ways!
Table of Contents
What is powerpoint zoom.
PowerPoint’s Zoom feature is a tool that allows you to create interactive PowerPoint presentations . It enables you to zoom in and out of specific sections or slides, creating a more dynamic and immersive experience for your audience. With PowerPoint Zoom , you can easily create links or “zoom areas” on your slides such that when clicked during a presentation, can allow you to navigate to specific slides or sections and focus on the content that is most relevant at any given time—there’s no need to be stuck with whatever slide is chronologically next.
Why Use PowerPoint Zoom?
PowerPoint Zoom lets you present in a more flexible and interactive way. For instance, you can create a dynamic menu that allows your audience to help you choose which topics to cover first. With just a click, you can jump to that slide or section and relay that information.
PowerPoint Zoom is also particularly useful for storytelling , guiding your audience through a series of complex information without being restricted to a traditional linear slide progression.
No need for hyperlinks, tedious work, or coding—PowerPoint Zoom allows for a seamless setup and flow of your presentation.
Let’s dive right in and discover how to make a zoom effect in PowerPoint!
How to Make a Zoom Effect in PowerPoint?
PowerPoint’s Zoom feature consists of three different options: Slide Zoom, Section Zoom, and Summary Zoom. While their setups are similar, the reasons for using each one vary.

Below we will delve into each of these PowerPoint Zoom options in depth.
Download our FREE PowerPoint Zoom template to follow along! 👇
Slide Zoom PowerPoint Templates
Turn your PowerPoint into an interactive experience today with this Slide Zoom template!
When to use Slide Zoom? ⏲️
Slide Zoom, as the name suggests, allows you to create links and “zoom in” on the content of another slide without following the traditional slide-to-slide progression. This comes in especially handy when you want to direct your audience’s attention to a particular image, chart, or piece of information on a slide instantly.
How to use Slide Zoom? 💻
1. Select the Main Starting Slide : To use PowerPoint Slide Zoom, first select the starting slide where you intend to apply the Zoom effect. In our example, we are using the Iceberg Model illustration as our starting slide. We want to zoom into the different description slides from our Iceberg Model slide.
2. Access the Slide Zoom Feature : Next, click Insert > Zoom > Slide Zoom . From here, choose the slide, or slides, that you want to zoom into. Click Insert and a thumbnail or thumbnails of the slides will appear on your current slide.

3. Rearrange the Thumbnails : Rearrange the thumbnails on your slide to match your design and layout.
4. Test the Slide Zoom: Now, in presentation mode, when you click on the slide thumbnails, you can zoom into the particular slides!
With a smooth Slide Zoom effect, you will notice that transitioning from slide to slide has become significantly more engaging!
Zoom Option: Zoom Background

Notice the thick outline of each slide you added to Zoom? Let’s remove that for a cleaner, more professional look on your slides.
To do that, click on the added Zoom slide thumbnail , then click the Zoom tab in the PowerPoint ribbon. Now, click on the Zoom Background option to hide the default background and match the background of the thumbnail to the background of your current slide.
Zoom Option: Return to Zoom
Another customizable option is the Return to Zoom feature.
With the current setup of Slide Zoom, once you click on the Zoom thumbnail and navigate to the zoomed in slide, you cannot return to the main starting slide. In other words, you will move on to the next slide in a linear order, with essentially an added zoom transition.
On the other hand, by applying Return to Zoom, you will be brought back to your main starting slide every time instead. This way you can click change the order of your slides. For example, with Return to Zoom enabled, when I can click on next slide after clicking on the “Phase #3 The Structure” slide, I will be brought back to the main starting slide instead of the “Phase #4 Mental Models” slide.

To make this happen, after selecting each of your Zoom slide thumbnails, simply click on the Return to Zoom option from the Zoom tab.
Section Zoom
When to use section zoom ⏲️.
While Slide Zoom allows you to zoom into one slide at a time, Section Zoom allows you to zoom into a specific section containing multiple related slides of your presentation. This is especially helpful for longer presentations or presentations with multiple topics.
How to use Section Zoom? 💻
Here, we have a deck about the Solar System. Each planet has its own section with a couple slides underneath each section. Our main slide has an overview of the whole Solar System. In this case, I would like to be able to click on a planet, then be able to learn more about that planet. You can easily do this with Section Zoom!
1. Select the Main Starting Slide : Similar to PowerPoint Slide Zoom, you have to select a starting slide where you intend to apply the Zoom effect for Section Zoom. Here we are using the Solar System slide as our main starting slide where we can zoom into the different planet sections.
2. Access the Section Zoom Feature : On the overview slide, click Insert > Zoom > Section Zoom . Then choose the sections you would like to Zoom into and click Insert . The thumbnails of the first slide of each section will appear in your current slide.
Zoom Option: Change the Image
Don’t like how the different thumbnails are making your slide looks cluttered, fret not, you can change the thumbnail image of your slides for easier viewing.
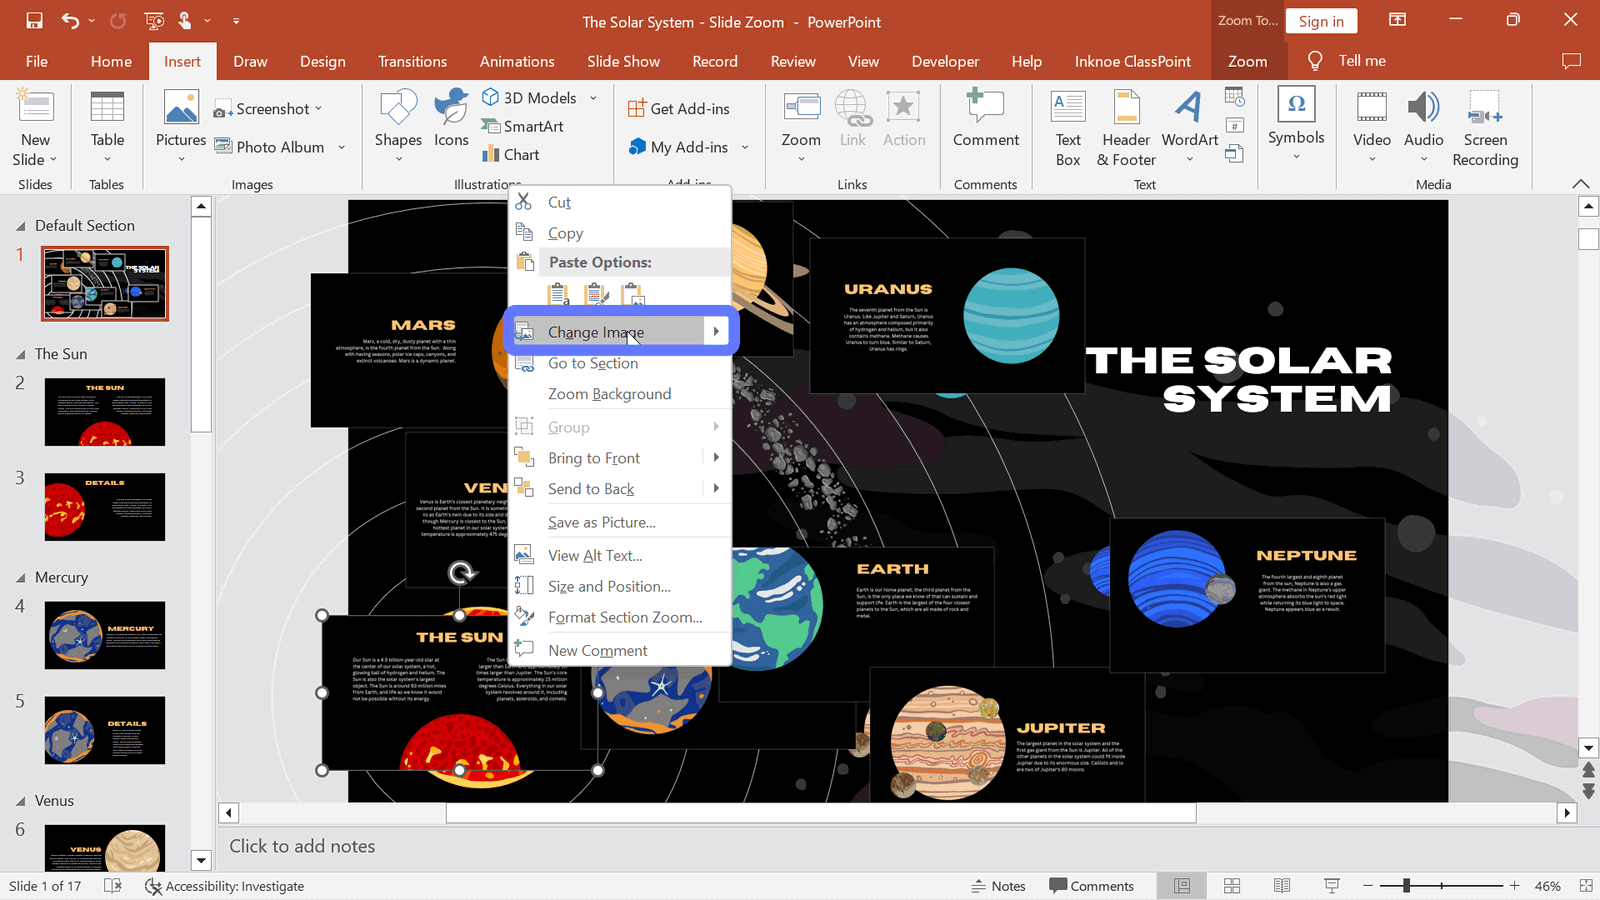
To do this, right-click on the zoom slide thumbnail and select Change Image . Then, substitute it with an image or screenshot from your device. For instance, you can take screenshots of the different segments in your slide to “hide” the zoom slide thumbnails underneath these screenshots.
Now, when you enter presentation mode, instead of clicking z zoom slide thumbnail, you can click on a planet to zoom into a desired section! Watch this video to learn exactly how to do it!
Summary Zoom
When to use summary zoom ⏲️.
The third and final PowerPoint Zoom feature is Summary Zoom. It lets you create a summary or overview slide that acts as a hub for your presentation. It is perfect for those times when you want to give your audience a quick recap or provide them with a visual roadmap of your presentation.
Similar to Section Zoom, Summary Zoom contains links to specific sections or slides in your presentation, allowing you to navigate to the most relevant parts of your presentation. The main distinction lies in the fact that the Summary Zoom feature will automatically generate a summary slide containing thumbnails of each section or slide for your convenience.
How to use Summary Zoom? 💻
1. Select the Main Starting Slide : Similar to both PowerPoint Slide Zoom and Section Zoom, you have to select a starting slide where you intend to apply the Zoom effect for Summary
2. Access the Summary Soon Feature : To use PowerPoint Summary Zoom, click Insert > Zoom > Summary Zoom . This will create a new slide that displays a summary of your presentation, with thumbnails of each slide.
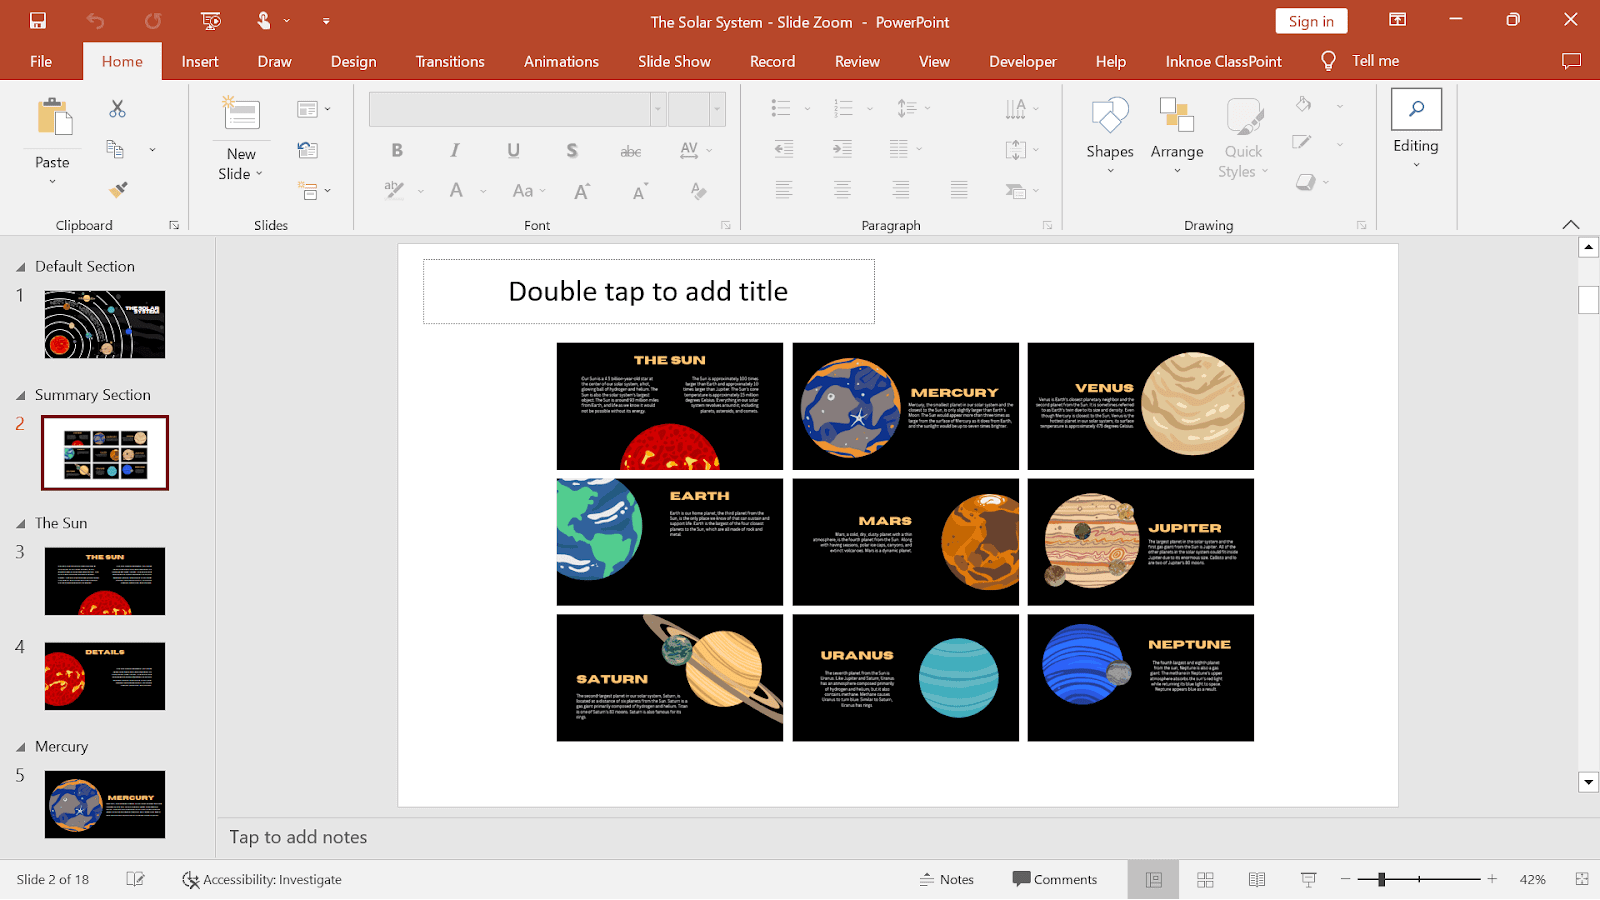
3. Customize Appearance : You can customize the appearance of the Summary Zoom slide by selecting the Format tab. Here, you can choose from various layouts, fonts, and colors to make the slide visually appealing and aligned with your presentation’s theme.
During your presentation, easily navigate to any slide by clicking on the different Zoom slide thumbnails. It’s a great way to give your audience an easy-to-follow roadmap and ensure they stay engaged and focused throughout your presentation.
Real-World PowerPoint Zoom Examples to Engage Your Audience
Here are some real-life examples of how to use PowerPoint Zoom to create engaging and immersive presentations:
- Sales Pitch
Create interactive slides with zoomed-in images and key features for your products or services. By allowing the audience to explore products in detail, you can generate more interest and engagement during a pitch.
- Educational Lecture with Organised Sections
Similar to our Solar System deck, you can organize your presentation into sections so that students can go through the presentations at their own pace starting with what interests them the most.
Add interactive questions to the presentation using ClassPoint , to make it even more engaging.
- Team Meeting Roadmap
Create an engaging team meeting with Summary Zoom. Highlight key milestones and deliverables in a visual and clear roadmap to help the team stay focused and engaged throughout the meeting.
- Interactive Visuals
Use maps and charts as your overview slide and add zoom slide thumbnails of added information to showcase further data, information, and analytics.
- Virtual Tours or Walkthroughs
Simulate a virtual tour or walkthrough using images on your slides. Add the Zoom feature to replicate “moving” from one “location” to another.
PowerPoint Zoom FAQ
Here are some common FAQ’s about this powerful tool:
What are the differences between the PowerPoint Zoom Options?
Slide Zoom zooms from one slide to the next while Section Zoom zooms into a whole section of your presentation before bringing you back to the overview slide. The Summary Zoom option provides you with a Table-of-Contents-like slide for an easy overview of your whole presentation.
How to make Prezi in PowerPoint?
You can make a PowerPoint that looks similar to Prezi with PowerPoint’s Zoom feature. With your selected slide to Zoom into, click on the Insert tab, Zoom, and select Slide, Section, or Summary Zoom.
Can I use PowerPoint Zoom on any version of PowerPoint?
PowerPoint Zoom is available on PowerPoint 2019, PowerPoint 2016, and PowerPoint for Microsoft 365. Make sure you have the latest version to take advantage of this feature.
Will my audience need any special software to view the Zoom features?
No, your audience does not need any special software. The Zoom features will work seamlessly when you present your PowerPoint file on any device with PowerPoint installed.
Can I use Zoom in combination with other PowerPoint animations and transitions?
Yes, you can! PowerPoint Zoom works well with other animations and transitions, allowing you to create a truly immersive and engaging presentation.
Can I edit or remove Zoom features from my presentation?
Absolutely! You can easily edit or remove Zoom features from your presentation at any time. Just follow the steps outlined in this blog post to make any necessary changes.
Yay! You now can create an even more engaging presentation with PowerPoint’s Zoom feature.
The versatility and impact of PowerPoint Zoom can be used in various settings. By incorporating this feature into your presentations, you can captivate your audience, enhance information retention, and create a memorable experience for your listeners.
Experience the power of PowerPoint Slide Zoom firsthand! Begin by exploring our templates and seamlessly integrate this feature into your upcoming presentations.
About Sara Wanasek
Try classpoint for free.
All-in-one teaching and student engagement in PowerPoint.
Supercharge your PowerPoint. Start today.
800,000+ people like you use ClassPoint to boost student engagement in PowerPoint presentations.
How to Present on Zoom: Google Slides and Powerpoint Presentation Guide & Tips

Presenting in front of your peers and superiors has to be one of the most daunting tasks ever. You’re never quite sure about the feedback you’d be getting, which only adds to the tension. However, in this pandemic season, the task of presenting has somehow gotten even more challenging. There are a lot of technical hurdles to overcome, which can seriously take the winds out of someone’s sail — especially if they are not very experienced on the matter.
Zoom, of course, has been the most popular video conferencing application over the last few months and offers a plethora of tools to put our minds at ease. Today, we’ll take you through all of them and even give you a couple of pointers to improve your presentation in Zoom.
Related: Awesome Halloween Zoom Backgrounds To Download
What is Zoom Screen Share and why is it important?
Screen Share is one of the most used and most important features of Zoom. It allows you to demonstrate your thoughts, give your peers a glimpse of your ideas. You can either share an application window, your entire desktop, or even a whiteboard — the possibilities are limitless here.
You can also start a screen sharing session without jumping through hoops of creating a separate meeting. Simply click/tap on the ‘Share Screen’ button in the Zoom client — both PC and mobile — and you’re good to go.
Related: How to use Zoom Filters
Remember you’ll need a sharing key or meeting key for this to work. If you don’t have access to either, you must share your screen while you’re in a meeting.

To share your screen during a meeting, first, log in with the appropriate credentials and start a meeting. Then, hit the ‘Share Screen’ — ‘Share’ while on mobile — button right in the middle of the meeting options panel and what you want to share with the class.

We’ve covered the topic of screen sharing on Zoom quite extensively in a separate article. So, be sure to check that out .
Related: What Does Pin Video on Zoom Mean? Do They Know If You Pin a Video?
How to present a Powerpoint PPT in Zoom?
Microsoft Office suite is, without a doubt, the most widely-used presentation applications on the planet. It’s been on our computers for ages and it’s likely to stay put for a considerable amount of time.
With that said, Zoom doesn’t straight up give you the option to load the Microsoft Office component in the application. Still, there’s a pretty straightforward method of presenting in front of the class.
Related: 50+ Best Zoom Games
You can achieve the desired results with the help of Zoom’s Screen Sharing feature — yes, the bit we covered in the previous section. It simply allows you to pick a window of your choice and share it with the class.
What’s even more awesome is that the participants could even pitch in and share their thoughts if they see fit. Alternatively, you can also share your entire desktop screen, which is the best way to get more screen real estate.
With the basics out of the way, let’s see how you can present a slide on Zoom.
Related: Zoom Error Code 3113 Fix
1. Create a separate slideshow window
If you have a traditional single-screen setup, this is the only guide you need to concern yourself with. The methodology is split into two bits — one: PowerPoint and two: Zoom.
First, open up Microsoft PowerPoint and pick the slide you want to share. Now, click on the ‘Slide show’ tab and hit ‘Set Up Slide Show.’
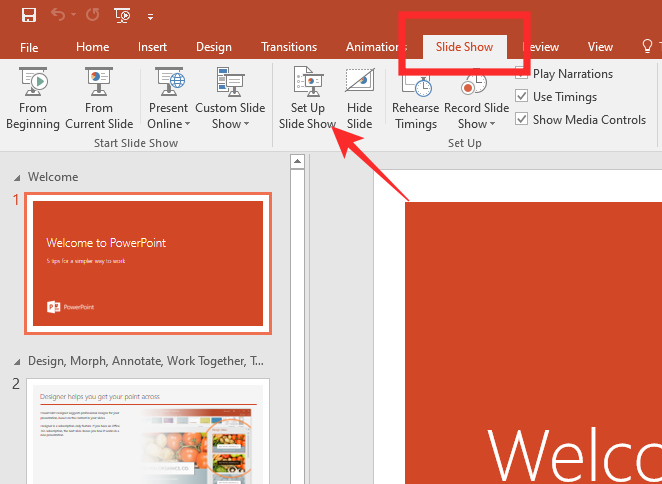
Then, select ‘Browsed by an individual (window)’ under ‘Show type.’ Hit ‘Ok’ to confirm.
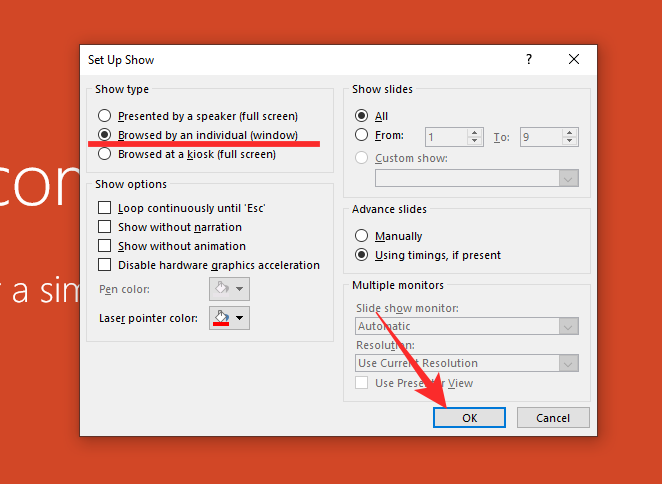
Finally, switch to slide show mode by clicking on the ‘Slide Show’ tab and selecting either ‘From Beginning’ or ‘From Next Slide.’
This would open a slide show window, separately. If you do not want to show the slideshow in a separate window, all you have to do is skip the previous step — ‘Browsed by an individual (window)’
2. Present PPT on Zoom
Now, go back to your Zoom meeting and click on the ‘Share Screen’ option.

Now that the PPT has been launched in a separate window, you can easily select that window on the next screen and commence the slideshow. Click on ‘Share’ to begin.
Here’s how it’d look:
How to present using Google Slides on Zoom?
If Microsoft PowerPoint is a little too heavy for you, you could always opt for Google’s adequately powerful alternative called Slides. It allows you to create interesting yet simple presentations and share as you see fit. Of course, it also needs Zoom’s Screen Share feature to work as intended, which, at this point, should feel pretty natural to you.
Related: How to Mute on Zoom
1. Use Presenter View
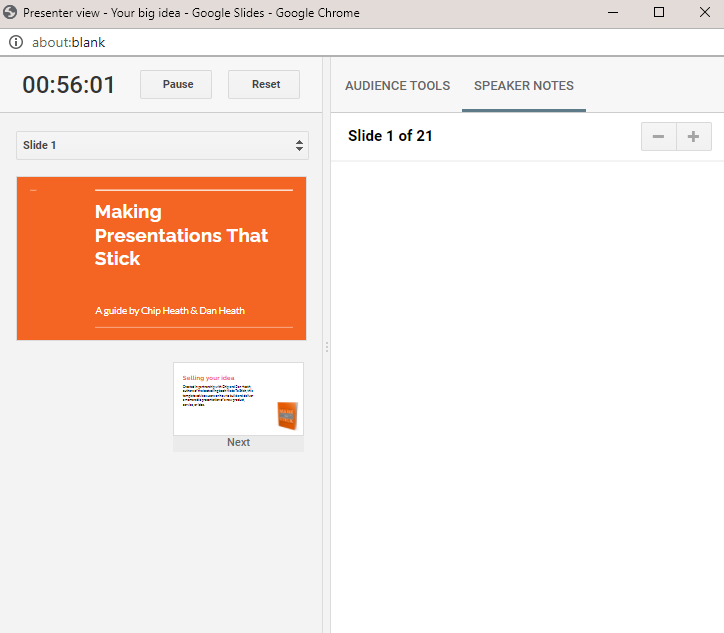
Now, if you want a more immersive experience and also keep track of the notes you might have, we recommend using the ‘Presenter View.’ With the View enabled, Google Slides would create a separate window for all your notes, which only you’d be able to see. The main presentation window, on the other hand, would remain clutter-free and free from distractions.
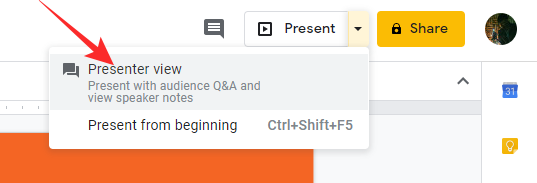
To use the ‘Presenter View,’ first, you simply need to go to your presentation page, click on the little downward arrow right next to the ‘Present’ button at the top-right.
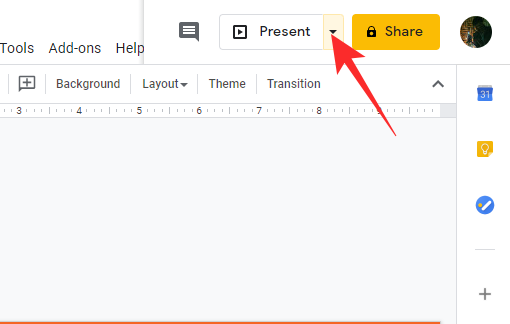
Now, hit ‘Presenter View.’
As soon as you click that button, you’ll get a separate space for all your notes, while another clean window would appear for slideshows.
2. Use Zoom to present
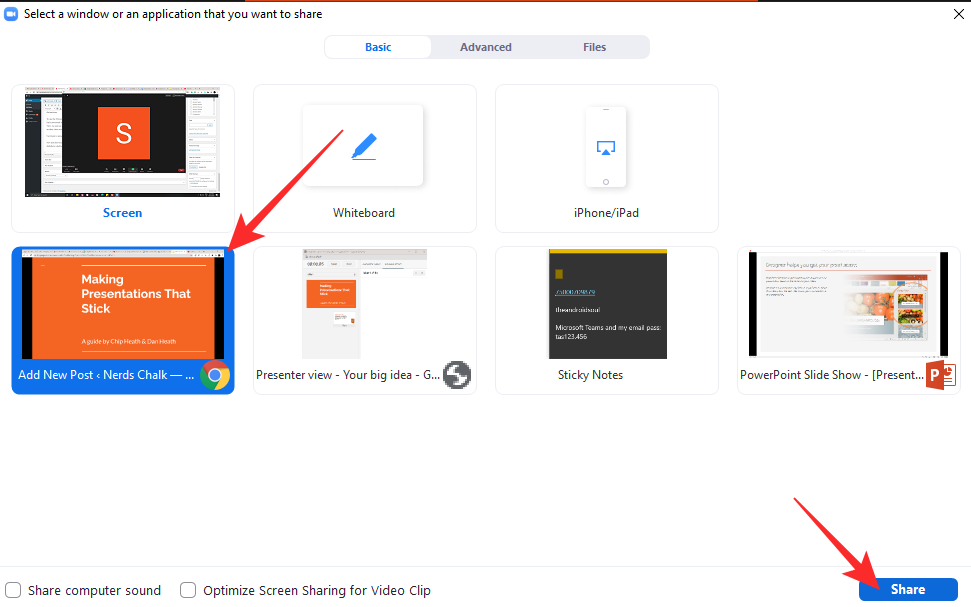
Now that the windows have been separated, you can easily use Zoom to present the slideshow window. While in a meeting, click on the ‘Share Screen’ button and select the browser window with Google Slides on top.
Finally, hit ‘Share’ to start the screen-sharing session.
Some tips for a successful presentation
As we’ve discussed, presenting is one of the most daunting tasks in the world for most, even virtually. The techy jargon often only adds to the tension, making many people dread the sessions, even when they are completely prepared. Below are some basic handy tips for your next presentation.
Related: How to annotate on Zoom
1. Master your craft
Knowing the material is always the best way to prepare for a hectic presentation. If you know what you’re presenting and have complete faith in the report, you’re ought to do exceptionally well. However, when it comes to Zoom presentations, knowing just the material isn’t enough. You also need to make sure all your components are in order and you’re presenting with confidence.
Try a couple of dry runs, see if your presentation is working just as it’s supposed to. Practice the pitch if you have to. Checking all of these boxes would improve your chances of success, remarkably.
2. Dress for the occasion
When you’re not forced to present in a swanky conference room, it’s not difficult to lose track of the dressing etiquette. However, you must remember the scale of your presentation and try your best to look the part. Wearing a perfectly ironed shirt and fitted trousers would not only impress your peers and superiors, but it’ll also instill a sense of confidence in you.
Related: How to see everyone on Zoom
3. Create a quiet environment
Zoom is quite capable of filtering some noise out of video chats. However, it doesn’t have the quality to cancel out everything you throw at it. So, before you start a video conferencing session and go about your presentation, make sure you’re in a relatively quiet environment. There can be a bit of noise, here and there, but make sure your subtle points aren’t drowned by some rogue barks from the street below.
- How to Watch Netflix on Zoom With Your SO and Friends
- How to blur your background on Zoom
- Change Your Name on Zoom
- Zoom virtual background not working problem fixes
- How to record a Zoom meeting without host permission
- What Does Pin Video on Zoom Mean? Do They Know If You Pin a Video?
- How to Change Zoom Background on Chromebook: Step-By-Step Guide
- How to download poll reports during a Zoom meeting

A mediocre engineer hoping to do something extraordinary with his pen (well, keyboard). Loves Pink Floyd, lives football, and is always up for a cup of Americano.
You may also like

How to Transfer Google Photos to iCloud

How to Search Your Calls in iPhone in iOS 18

How to Run Microsoft Phi-3 AI on Windows Locally

YouTube Premium Users Can Now Skip Sponsored Segments Using ‘Jump Ahead’
This is scary
Comments are closed.
How To Present Powerpoint On Zoom

- How-To Guides
- Software Tutorials

Choosing the Right Presentation Format
When it comes to presenting your PowerPoint on Zoom, choosing the right format is crucial to ensure that your audience can view and interact with your slides effectively. Whether you’re conducting a business meeting, delivering a training session, or giving a presentation, consider the following factors when deciding on the best format for your presentation:
- Full Screen: This format allows you to occupy the entire Zoom window with your slides. It’s ideal for presentations that heavily rely on visuals or require your audience to focus solely on the content.
- Presenter View: If you need to access your notes, manage your slides, or view upcoming slides while presenting, the Presenter View format is your best bet. It gives you a separate window with additional tools and features.
- Side-by-Side: This format enables you to display your PowerPoint slides alongside other applications or materials, such as a video conferencing window or a shared document. It’s useful if you need to refer to external resources during your presentation.
- Custom Layout: Zoom allows you to customize the layout of your presentation, allowing you to combine multiple formats or adjust the size and position of your slides and other elements on the screen.
Consider the nature of your presentation, your objectives, and the visual elements you plan to incorporate when selecting the presentation format. Additionally, take into account the size of your audience, the devices they’ll be using, and the level of interactivity you wish to achieve.
Remember, a well-chosen presentation format can enhance your delivery and engage your audience more effectively. Spend some time experimenting with different formats in Zoom’s settings before your presentation to determine the layout that works best for your needs.
Preparing Your PowerPoint Slides
Before presenting your PowerPoint on Zoom, it’s important to ensure that your slides are well-prepared and optimized for the virtual environment. Here are some essential tips to consider:
- Simplify Your Content: Keep your slides concise and focused. Use bullet points, short sentences, and key phrases to convey your message effectively. Avoid overcrowding slides with excessive text or complex images.
- Use High-Quality Visuals: Choose high-resolution images and graphics that align with your topic and enhance understanding. Avoid pixelated or distorted visuals that may hinder audience comprehension.
- Consider Font Size and Typeface: Use a clear and legible font size, typically around 24-32 points, to ensure readability on different screen sizes. Stick to standard fonts like Arial or Calibri to avoid technical issues.
- Contrast Colors: Opt for high contrast between the background and text colors to ensure visibility. Dark text on a light background or vice versa works best. Avoid using color combinations that strain the eyes or make text illegible.
- Include Engaging Multimedia: Incorporate videos, animations, or interactive elements to enhance audience engagement. However, ensure that the multimedia elements are relevant, purposeful, and do not distract from your main points.
- Consistent Design: Maintain a consistent design across your slides for a professional and cohesive look. Use the same font styles, colors, and layout throughout your presentation to create a visually appealing and easily navigable experience for your audience.
- Proofread and Edit: Check for spelling, grammar, and content errors in your slides. Ensure that all text is grammatically correct and appropriate for your target audience. Consider seeking feedback from colleagues or friends to validate the clarity and effectiveness of your slides.
By following these tips, you can create visually appealing and well-structured PowerPoint slides for your Zoom presentations. Investing time and effort in the preparation phase will translate into a more engaging and impactful virtual presentation experience.
Optimizing Your Zoom Settings
Before you start presenting your PowerPoint on Zoom, it’s essential to optimize your Zoom settings to ensure a smooth and hassle-free experience for both you and your audience. Consider the following settings to enhance the quality and functionality of your presentation:
- Audio Settings: Test your microphone and speakers to ensure clear audio. Adjust the microphone sensitivity and speaker volume as needed. Consider using an external microphone for better sound quality.
- Video Settings: Check your camera settings and ensure that you’re well-lit and in focus. Adjust the video resolution based on your internet connection to maintain a stable presentation stream.
- Screen Sharing: Familiarize yourself with the screen sharing options in Zoom. Choose the appropriate settings to optimize the display of your PowerPoint slides. Select the “Optimize for full screen video” option for a smoother playback experience.
- Virtual Background: If desired, experiment with Zoom’s virtual background feature to create a professional and distraction-free backdrop. Choose a background image that aligns with your presentation topic and enhances your visual presence.
- Chat and Q&A: Decide whether you want to enable the chat or Q&A feature during your presentation. This allows your audience to ask questions or provide feedback. Determine how you want to manage and address these interactions during your presentation.
- Recording: If you plan to record your presentation, ensure that you have sufficient storage space and that you’ve enabled the recording function in Zoom. Inform your audience in advance if you intend to record the session.
- Mute and Unmute: Familiarize yourself with the mute and unmute controls in Zoom. During your presentation, be mindful of muting yourself when not speaking to minimize background noise and distractions.
- Practice and Test: Before your actual presentation, conduct a practice session to test your Zoom settings. Ensure that everything is working as expected, including audio, video, screen sharing, and any interactive features you plan to use.
By optimizing your Zoom settings in advance, you can ensure a seamless and professional presentation experience. Paying attention to audio, video, screen sharing, and other essential settings will help you deliver a high-quality presentation that engages your audience effectively.
Sharing Your Screen on Zoom
One of the key features of Zoom is the ability to share your screen, allowing you to display your PowerPoint slides to your audience. Follow these steps to successfully share your screen during a Zoom presentation:
- Start a Zoom Meeting: Open Zoom and start a meeting. You can choose to start a new meeting or join an existing one.
- Open Your PowerPoint Presentation: Open the PowerPoint file that contains your presentation. Make sure it’s ready to be displayed.
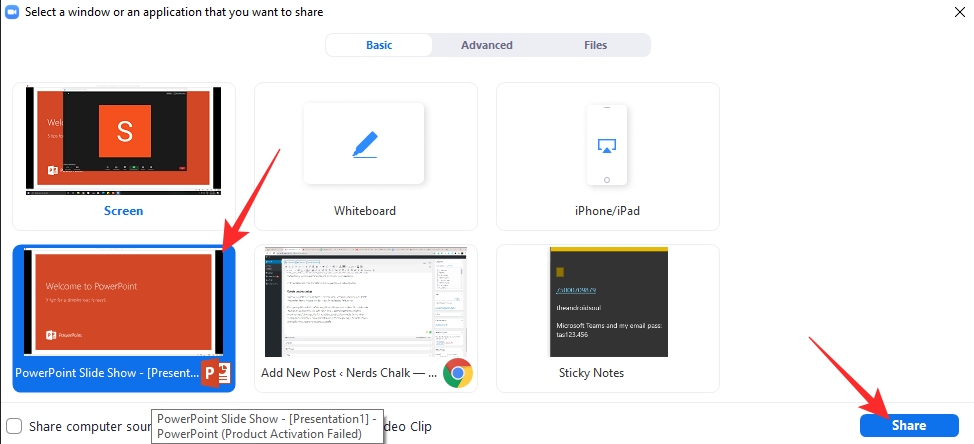
- Click the “Share Screen” Button: In the Zoom meeting window, locate the green “Share Screen” button at the bottom of the screen and click on it.
- Select Your PowerPoint Window: A dialog box will appear with a list of available screens and windows to share. Choose the window that has your PowerPoint presentation open.
- Ensure “Share Computer Sound” is Checked: If your PowerPoint presentation includes audio or video, make sure to check the “Share computer sound” checkbox in the dialog box. This will transmit the audio along with your slides.
- Click “Share”: Once you have selected the appropriate window, click on the “Share” button in the bottom right corner of the dialog box.
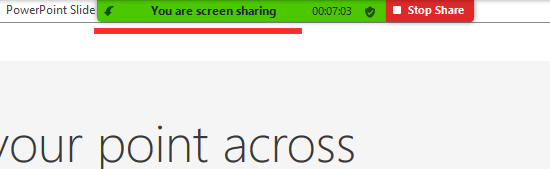
- Start Presenting: Your PowerPoint presentation will now be visible to your audience in the Zoom meeting. Begin presenting your slides as you normally would.
- Stop Sharing: To stop sharing your screen, locate the “Stop Share” button at the top of your screen or in the Zoom meeting controls and click on it.
Remember to ensure that your PowerPoint slides are visible and legible to your audience. Check the Zoom meeting preview window to verify the quality of your shared screen. Adjust the size and position of your slides if necessary to optimize visibility.
Sharing your screen on Zoom allows your audience to view your PowerPoint presentation in real-time, enhancing their engagement and understanding of your content. Practice this process before your actual presentation to become familiar with the steps and ensure a smooth screen sharing experience.
Using Presenter View
Presenter View is a powerful feature in PowerPoint that allows you to view your speaker notes, manage your slides, and have better control over your presentation while presenting on Zoom. Follow these steps to use Presenter View effectively:
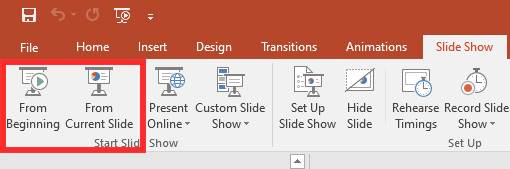
- Enable Presenter View: Before you start your presentation, click on the “Slide Show” tab in PowerPoint and check the “Use Presenter View” box. This will activate Presenter View on your screen.
- Start the Slide Show: Begin your presentation by selecting the “From Beginning” or “From Current Slide” option under the “Slide Show” tab, depending on where you want to start.
- Access Presenter View: Once your presentation starts, you’ll see two different windows. The main window displays the current slide that your audience sees, while the Presenter View window contains your speaker notes, thumbnails of upcoming slides, and slide navigation controls.
- View Speaker Notes: In the Presenter View window, you can see your speaker notes for each slide, allowing you to stay on track with your talking points and key information.
- Preview Upcoming Slides: Take advantage of the thumbnail view in Presenter View to preview the next few slides. This helps you anticipate and smoothly transition to the next topic without losing your flow.
- Annotate Slides: Use the annotation tools available in Presenter View to highlight important points or draw attention to specific areas of your slides. This can enhance your audience’s understanding and engagement during your presentation.
- Manage Slides: In Presenter View, you can easily navigate between slides using the arrow keys or the slide navigation controls. This allows you to jump back and forth between slides or quickly go to a specific slide as needed.
- End the Presentation: Once you’ve completed your presentation, press the Esc key or click on the “End Slide Show” button in the Presenter View window to exit the presentation mode.
Presenter View in PowerPoint and Zoom provides you with the tools and flexibility to deliver a seamless and professional presentation. Take advantage of its features to stay organized, deliver your content effectively, and engage your audience during your Zoom presentation.
Navigating Slide Show Controls
When presenting your PowerPoint on Zoom, it’s important to familiarize yourself with the slide show controls to navigate through your slides smoothly and deliver an engaging presentation. Here are the key controls you can use while in slide show mode:
- Advance to Next Slide: To proceed to the next slide, simply press the right arrow key on your keyboard, click the mouse, or use a presenter remote if available. This allows you to progress through your presentation at your desired pace.
- Go Back to Previous Slide: If you need to revisit a previous slide, press the left arrow key on your keyboard or click the mouse’s left button. This enables you to go back and address questions or clarify information for your audience.
- Jump to a Specific Slide: If you want to navigate to a specific slide in your presentation, press the slide number on your keyboard followed by the Enter key. Alternatively, you can right-click on the slide and choose the desired slide from the context menu.
- Access Slide Thumbnails: In PowerPoint’s slide show mode, you can access a thumbnail view of your slides by pressing the Ctrl key and clicking on any slide. This enables you to quickly navigate to a specific slide without disrupting the flow of your presentation.
- Zoom In and Out: If you need to highlight specific details or make text more readable to your audience, use the Ctrl key and the plus (+) or minus (-) keys to zoom in and out, respectively. This feature is especially useful when showing complex diagrams or small texts.
- End the Slide Show: To exit the slide show mode, press the Esc key on your keyboard or right-click anywhere on the screen and select “End Show” from the context menu. This will bring you back to the normal editing view in PowerPoint.
- Use Presenter View: If you have enabled Presenter View, you can access additional controls and features to manage your presentation more effectively. Refer to the “Using Presenter View” section for more details on how to utilize this feature.
By familiarizing yourself with these slide show controls, you can navigate through your PowerPoint presentation confidently and deliver a more dynamic and interactive experience for your audience on Zoom.
Engaging Your Audience in a Zoom Presentation
Engaging your audience is crucial when presenting on Zoom to maintain their attention and ensure the effectiveness of your message. Here are some strategies to actively involve your audience and make your Zoom presentation interactive:
- Ask Questions: Pose questions to your audience throughout your presentation to encourage participation. You can use the chat feature in Zoom or ask attendees to unmute themselves and speak up.
- Use Polls: Take advantage of Zoom’s polling feature to gather instant feedback or opinions from your audience. Create engaging poll questions related to your presentation topic to encourage active participation.
- Encourage Chat Participation: Remind your audience to use the chat feature to ask questions, share insights, or provide feedback. Monitor the chat regularly and respond to messages to make attendees feel heard and valued.
- Incorporate Interactive Activities: Break up your presentation with interactive activities to keep your audience engaged. This could include case studies, brainstorming sessions, group discussions, or virtual simulations.
- Share Relevant Resources: Provide links to additional resources related to your topic in the chat or through screen sharing. This encourages further exploration and engagement even after the presentation ends.
- Use Visual Aid: Utilize visual aids such as charts, graphs, and images to enhance understanding and engagement. Visuals can help convey complex information in a more digestible and memorable way.
- Tell Stories: Incorporate relevant stories or anecdotes to make your content more relatable and captivating. Personal experiences are powerful tools for capturing your audience’s attention and keeping them engaged.
- Interact with Body Language: Use appropriate facial expressions, gestures, and body language to convey enthusiasm and connect with your audience. Non-verbal cues can enhance engagement and create a more memorable experience.
- Pause for Questions: Give your audience regular opportunities to ask questions or seek clarification. Pause after key points or at designated breaks to allow for interaction and address any queries.
- Display Empathy: Be attentive and empathetic towards your audience’s needs and emotions. Show genuine interest in their thoughts and perspectives, and create a safe and inclusive environment for discussion and interaction.
By incorporating these strategies, you can create a more interactive and engaging Zoom presentation that captivates your audience’s attention and encourages their active participation throughout the session.
Troubleshooting Audio and Video Issues
Technical difficulties with audio and video can disrupt the flow of your Zoom presentation. To ensure a smooth experience, it’s important to be familiar with troubleshooting common issues that may arise. Here are some troubleshooting tips for audio and video problems during your Zoom presentation:
- Check Your Internet Connection: A stable and reliable internet connection is crucial for smooth audio and video. Ensure that you have a strong connection and consider connecting via an Ethernet cable for a more stable connection.
- Test Your Audio and Video Devices: Before your presentation, test your microphone and camera to ensure they are functioning properly. Use the Zoom audio and video settings to select the correct devices and adjust their settings if needed.
- Adjust Your Audio Settings: If your audio is distorted, low, or inconsistent, check the audio settings in Zoom. Increase the volume, adjust the microphone sensitivity, and ensure that the correct audio device is selected.
- Restart Your Devices: If you experience audio or video issues during your presentation, try restarting your computer and reopening the Zoom application. This can resolve any temporary glitches that may be affecting your devices.
- Close Unnecessary Applications: Close any unnecessary applications or software running in the background during your presentation. This can free up system resources and prevent audio or video lag or interference.
- Use Headphones or External Microphones: If you are experiencing audio issues, consider using headphones or an external microphone. This can help eliminate background noise, improve audio quality, and minimize the chance of audio feedback.
- Optimize Camera Placement: Ensure that your camera is positioned correctly and at eye level. Avoid backlighting or excessive lighting that may affect the quality of your video. Adjust the camera angle and lighting as needed for the best visual appearance.
- Update Your Software: Keep your Zoom application and other relevant software up to date. Updates often include bug fixes and performance enhancements that can solve audio and video issues.
- Seek Technical Support: If you encounter persistent audio or video issues that you cannot resolve, consider contacting Zoom technical support or consulting with a technical expert for assistance.
By following these troubleshooting tips, you can minimize audio and video issues during your Zoom presentation and deliver a seamless and professional experience for your audience.
Tips for a Successful PowerPoint Presentation on Zoom
When delivering a PowerPoint presentation on Zoom, it’s essential to adapt your approach to the virtual environment. Here are some valuable tips to help you create a successful and impactful presentation:
- Practice and Rehearse: Familiarize yourself with your presentation and practice it multiple times before your actual Zoom presentation. This will boost your confidence, help you refine your delivery, and ensure a smoother flow.
- Create a Engaging Opening: Capture your audience’s attention with a strong opening that introduces the topic and highlights its relevance. Use a compelling anecdote, surprising statistic, or thought-provoking question to hook your audience from the start.
- Use Visuals Wisely: Leverage the power of visuals to support your message. Incorporate impactful images, charts, and graphs that enhance understanding and engagement. Avoid overwhelming your slides with excessive text or cluttered visuals.
- Speak Clearly and Slowly: Pay attention to your diction and pace of speech. Enunciate your words clearly and speak slowly and deliberately to ensure that every participant can follow along easily.
- Engage with Eye Contact: Look directly into the camera to establish eye contact with your virtual audience. This creates a stronger connection and helps maintain engagement throughout your presentation.
- Use Gestures and Body Language: Incorporate appropriate gestures and body language to enhance your presentation. It adds dynamism and visual interest, making your delivery more engaging and authentic.
- Encourage Interaction: Foster audience engagement by inviting questions, encouraging comments, or conducting interactive activities. This promotes a two-way communication and keeps participants actively involved.
- Time Management: Keep track of time and pace yourself accordingly. Avoid rushing through slides or going over time. Practice beforehand to ensure your presentation fits within the allocated timeframe.
- Use Breaks Strategically: Incorporate short breaks throughout your presentation to give your audience a chance to process information, ask questions, or engage in discussions. This helps maintain energy and prevents Zoom fatigue.
- Be Mindful of Your Background: Choose a clean and uncluttered background for your video. Consider using a virtual background or a well-organized physical setting that is visually appealing and free from distractions.
- Technical Backup: Have a backup plan in case of technical issues. Keep a secondary device ready, ensure you have a stable internet connection, and have a contact person to help troubleshoot any unforeseen problems.
By implementing these tips, you can maximize the impact of your PowerPoint presentation on Zoom. Remember to adapt to the virtual medium while maintaining your confidence, engaging your audience, and delivering a compelling presentation.
Leave a Reply Cancel reply
Your email address will not be published. Required fields are marked *
Save my name, email, and website in this browser for the next time I comment.
- Crowdfunding
- Cryptocurrency
- Digital Banking
- Digital Payments
- Investments
- Console Gaming
- Mobile Gaming
- VR/AR Gaming
- Gadget Usage
- Gaming Tips
- Online Safety
- Tech Setup & Troubleshooting
- Buyer’s Guides
- Comparative Analysis
- Gadget Reviews
- Service Reviews
- Software Reviews
- Mobile Devices
- PCs & Laptops
- Smart Home Gadgets
- Content Creation Tools
- Digital Photography
- Video & Music Streaming
- Online Security
- Online Services
- Web Hosting
- WiFi & Ethernet
- Browsers & Extensions
- Communication Platforms
- Operating Systems
- Productivity Tools
- AI & Machine Learning
- Cybersecurity
- Emerging Tech
- IoT & Smart Devices
- Virtual & Augmented Reality
- Latest News
- AI Developments
- Fintech Updates
- Gaming News
- New Product Launches
- 12 Best Free AI Image Sharpeners in 2024 WebPCMobile
Sanjuksha Nirgude Soaring High with Robotics
Related post, unveiling the secrets of sls printing and its role in robotics, unleashing efficiency: the role of robotic process automation in industry 4.0, advancing cybersecurity: the integration of robotics with emerging sms phishing alert tools – innovations, challenges, and future perspectives, robotics redefining long-term investment horizons, bridging software development and robotics for enhanced automation, the role of robotics in cnc machining for large part production, related posts.

How To Make A Zoom Background

How To Connect Powerpoint To Projector

How To Make A Powerpoint On A Tablet

How To Share A Document On Zoom

How To Download Images From Powerpoint

How To Zoom Out On A PC

How To Zoom In With Keyboard

How To Zoom Out On Dell Laptop
Recent stories.

12 Best Free AI Image Sharpeners in 2024 (Web/PC/Mobile)

OpenStack Backup and Recovery Software

Apple Wallet Availability in the PocketGuard App: Sync your Apple Card, Apple Cash, and Savings from Apple Card Accounts

5 Ways to Improve IT Automation

What is Building Information Modelling?

How to Use Email Blasts Marketing To Take Control of Your Market

Learn To Convert Scanned Documents Into Editable Text With OCR
- Privacy Overview
- Strictly Necessary Cookies
This website uses cookies so that we can provide you with the best user experience possible. Cookie information is stored in your browser and performs functions such as recognising you when you return to our website and helping our team to understand which sections of the website you find most interesting and useful.
Strictly Necessary Cookie should be enabled at all times so that we can save your preferences for cookie settings.
If you disable this cookie, we will not be able to save your preferences. This means that every time you visit this website you will need to enable or disable cookies again.
8 tips on how to present over Zoom like a pro

Today, Zoom is a central part of the remote workplace. It and other video conference platforms are widely used for meetings, job interviews, webinars, and presentations.
In-person presentations can be stressful enough, and having to conduct them virtually can seem even more daunting.
But it doesn't have to be that way. Our eight pro tips for presenting over Zoom may help you feel more prepared, comfortable, and confident. Read on to find out more.
1. Plan out your Zoom background/location ahead of time.
You can use a location in your home or a virtual Zoom background. If you select a place in your house, make sure it is uncluttered and clean. A plain wall or shelves with neatly arranged books provide a professional setting.
Consider lighting. Soft lighting placed in front of you illuminates you evenly; sitting in front of a window can cause glare and shadows.
Make sure your background doesn't distract from you and your presentation. You don't want your audience focusing on a family photo or the dishes in the sink.
2. Test your equipment before your presentation.
Your equipment can make or break your Zoom presentation.
To avoid surprises, check your internet connection, plug in your laptop, and ensure that your camera angle is correct and that the microphone works.
You can confirm your internet connection, audio, and visual with a Zoom test meeting . Using a hard-wired connection rather than wifi is the safer option. And closing any applications you won't need during the presentation can conserve bandwidth.
Taking precautions can avoid or minimize frozen screens, views of the top of your head, dead batteries, and sound problems.
3. Put notes in the right place on your screen(s).
Zdnet recommends, the best webcams for remote-working video calls.
The pandemic lockdown will leave a legacy of increased remote working, so it's a good time to upgrade your webcam. Here are ten leading contenders.
You need your notes where you can see them, but you don't want to keep looking down or off to the side during your presentation.
To combat this, you can use dual monitors . Position your presentation on one of them, visible to all, and your presenter's notes — plus the webcam you're using — on the other, visible only to you.
Or you can present your slide show in a window and put a private view of your notes in another window on the same screen. Zoom provides step-by-step instructions for single and dual screens.
4. Practice Zoom presenting as if it were the real thing.
Zoom allows you to practice in the precise environment where you will be presenting. Set up your background, lighting, and screens as you will on presentation day. You can schedule a webinar practice session on Zoom and run through your presentation exactly as you will on the day. You can invite a friend to join you and offer feedback.
Practicing can make the difference between a smooth presentation or an awkward one. Rehearse as often as you can, and visit our page of public speaking tips .
SEE: What tech jobs don't require public speaking?
5. Minimize clutter on your slides.
Slides are a key part of a virtual presentation and can help you and the audience stay on track.
Slides should be easy to read and navigate. Avoid brightly colored backgrounds, complicated fonts, and too many graphics.
Each slide should communicate one concept or idea. Avoid a long list of bullet points on a single slide.
While a slide with few words in readable, bolded font works fine, visuals like charts, maps, and illustrations or photos can be more effective and keep your audience engaged.
6. Use easy-to-understand visuals.
Visuals liven up your Zoom presentation in ways words don't. Instead of a long list of numbers explaining company statistics, try a graph or pie chart. Visuals aid understanding and keep your audience interested.
Explaining technical procedures with videos or illustrations rather than wordy descriptions alone enables you to show and tell. They also accommodate different learning styles within your audience.
Microsoft posts tutorials for incorporating visual elements into PowerPoint slides and inserting videos from the web or your computer .
7. Explain your agenda before you begin presenting.
Most people like to know what to expect when logging onto a meeting. Opening your presentation with a slide outlining your agenda sets the timeline for your meeting and reassures your audience. If you plan to allow audience interaction, make sure to highlight when and how in your agenda.
You can list the points you're going to cover in your presentation on your slide(s) and/or use graphics. You can pose a question on a slide, then show how you plan to answer it. Starting off with a funny (but work-appropriate) photograph or illustration can put you and your audience at ease.
8. If appropriate, encourage your audience to interact.
Unless you have a good reason not to, encourage your audience to interact during or after your presentation.
Some presenters ask participants to use Zoom's chat function for questions and pause the presentation periodically to answer them or wait until the end. Presenters can mute and unmute the audience and allow time for comments and questions that way. Zoom also allows for engagement through participant polls during the presentation
The size of your audience may dictate how you want to handle audience interaction.
Not allowing participant interaction risks losing your audience to their phones and other distractions.
In conclusion
The hardest part of presenting on Zoom may be the technology for some and the public speaking for others. We hope our tips help.
Online public speaking courses can help with anxiety and discomfort. Developing emotional intelligence skills can also benefit your Zoom presentations.
Zoom Feature in PowerPoint – How to Use it Correctly!
By: Author Shrot Katewa

It is hard to accept but even the most seasoned PowerPoint users find it hard to create a table of contents that is visually modern-looking and interactive! The “ Zoom ” feature can help not only with the table of contents but much more than that!
The zoom feature in PowerPoint helps create visual links between sections of your presentation. It makes the presentation interactive by adding a clickable thumbnail of a slide or a section in your presentation and allowing you to easily navigate within your presentation with cool effects!
Even if you use PowerPoint regularly, chances are you aren’t fully aware of the “Zoom” feature in PowerPoint.
And, by now if you are thinking about zooming in on the slides using the functions provided at the bottom-right corner of PowerPoint, then you really need to go through this article as you might not be aware of one of the most awesome features in PowerPoint called “ Zoom “.
1. What is Zoom in PowerPoint?
Imagine if you could just click on an image on your slide and it just zooms into that image, opening the section of your presentation that provides more information about that image! The “Zoom” feature in PowerPoint, does exactly that!
The zoom feature in Microsoft PowerPoint is a new feature that makes your presentations interactive and dynamic. Using the zoom feature in PowerPoint, you can create a zoom slide from which you can jump to and from specific slides or sections in any order you may need during the presentation.
Let’s explore this feature by checking out some of the different types of “zoom” that you can add to your presentation –
1a. Summary Zoom
The “Summary Zoom” in Microsoft PowerPoint is a landing page where you can see the summarized slides within a page.
In the summary zoom, you can select which slides to show. You can even create summary slides to show on the summary zoom. During the presentation, you can click on any slide on the summary to proceed according to the need of the audience rather than the preset slide progression.
1b. Section Zoom
In Microsoft PowerPoint, “Section Zoom” is a slide that contains the preview and the link to the sections within the presentation.
You can click on them to jump from one section to another to highlight the important parts of your presentation.
1c. Slide Zoom
The “Slide Zoom” feature in PowerPoint allows you to navigate freely through the slides in a presentation. In the slide zoom, you can add all the slides or a few selected slides.
From this section, you can move freely between slides, emphasize the important slides, and even cut the presentation short without seeming so to the audience.
2. How to Insert Slide Zoom in Microsoft PowerPoint?
To use the “Zoom” feature in PowerPoint, first, click on the “Insert” tab. Then, click on the “Zoom” button from the ribbon. Choose the type of zoom from “Summary”, “Section”, and “Slide” zoom. Next, select the slides from the window that pops up by holding the “Ctrl” key, and click on “Insert”.
Here’s a step-by-step process with visual aids on what you need to do –
Step-1: Click on the “Insert” tab
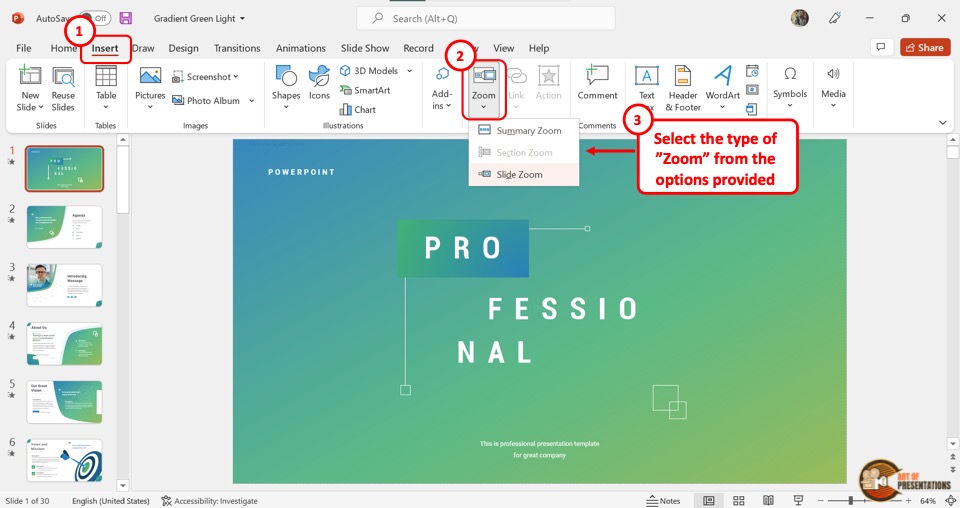
The first step is to open the “Insert” menu. Click on the “Insert” tab which is located in the menu ribbon at the top of the screen.
Step-2: Click on the “Zoom” button
In the “Links” section of the “Insert” menu, click on the “Zoom” button. This will open a dropdown menu. Click on the “Slide Zoom” option from the dropdown menu.
Step-3: Choose the Slide and Click on “Insert”
Clicking on the “Slide Zoom” option will open the “Insert Slide Zoom” dialog box.
Select the slides you want to include in the slide zoom and then click on the “Insert” button at the bottom of the dialog box. Now all you have to do is arrange the slides in the slide zoom according to your preference.
3. How to Edit Slide Zoom in PowerPoint?
Once you add the slide zoom to your presentation, you can easily edit it. To access the editing pane, all you have to do is click on the slide zoom. Then click on the “Zoom” tab in the menu ribbon.
3a. Change Borders in Slide Zoom
To add or change the border of the slides in slide zoom, click on the “Zoom Border” option. In the dropdown menu, you can click on your preferred color for the border.
You can also click on the “Weight” option and select the border width from the secondary menu. To change the border design, click on the “Dashes” option.
3b. Add Effects in Slide Zoom
You can add various effects in the slide zoom. To do so, you have to first click on a single or multiple slides in the slide zooms where you want to add effects.
Then click on the “Zoom Effects” option. In the dropdown menu, you can click on any effect option to open a secondary pop-up menu. Click on your preferred effect. You can add multiple effects on a single zoom slide.
3c. Remove Background in Slide Zoom

In Microsoft PowerPoint slide zoom, you can remove the slide background of each slide in the slide zoom. Click on the “Zoom Background” option in the “Zoom Styles” section under the “Zoom” tab. This will remove the background of the selected slide.
4. How to Change Picture in Slide Zoom?
In Slide Zoom, the default thumbnail pictures are a screenshot of the slides. However, you can change the pictures if you want. All you have to do is follow the 4 easy steps.
Step-1: Click on the “Zoom” tab
The first step is to click on the slide thumbnail that you want to change. Then click on the “Zoom” tab at which is the last tab in the menu ribbon.
Step-2: Click on the “Change Image” option
The second step is to click on the “Change Image” button which is the first option in the “Zoom Options” section of the “Zoom” menu (as shown in the image in step 1).
Then click on the “Change Image” option from the dropdown menu.
Step-3: Click on “From a File”
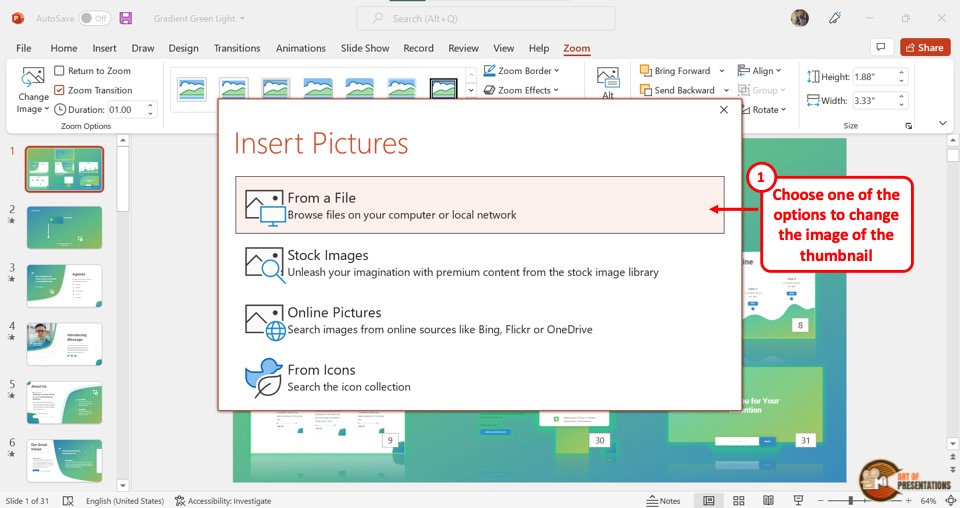
When you click on the “Change Image” option, it will open a dialog box. In the “Insert Pictures” dialog box, click on the “From a File” option. This will open another dialog box.
Step-4: Click on the “Insert” button
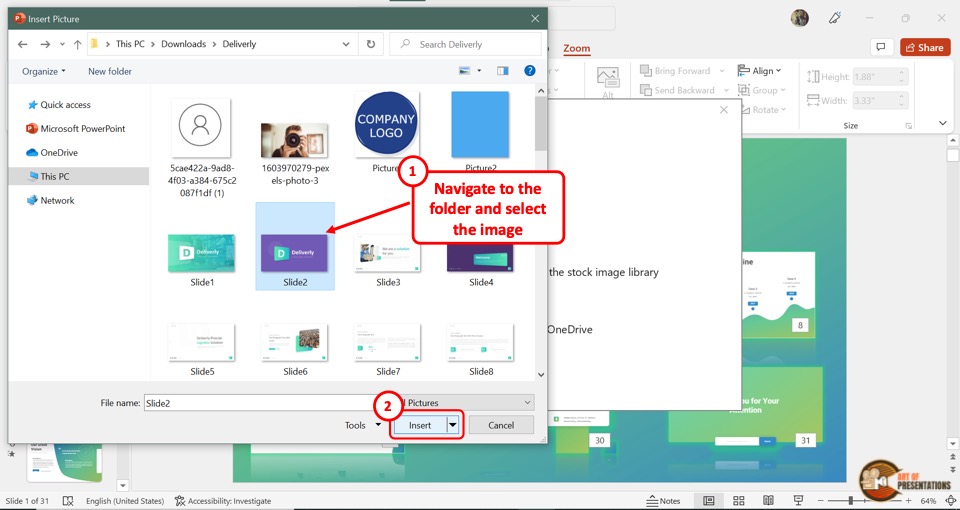
In the “Insert Picture” dialog box, click on the image which you want to add to the slide thumbnail in the slide zoom.
Then click on the “Insert” button at the bottom of the dialog box. In the slide zoom, the original thumbnail will be changed to the selected image.
4a. How to Reset Picture in Slide Zoom?
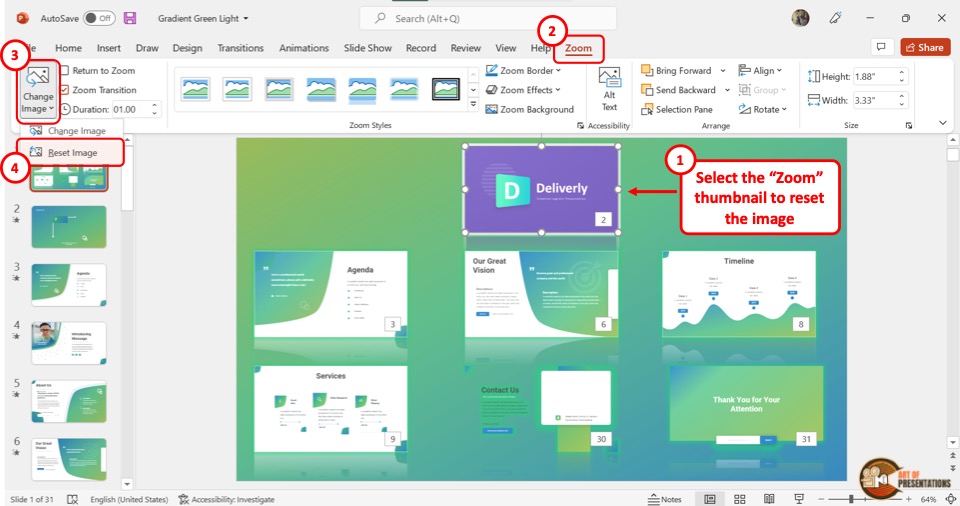
Once you change the picture of the slide thumbnail in the PowerPoint slide zoom, you can revert it to the original thumbnail.
All you have to do is click on the “Change Image” button in the “Zoom” menu. Then click on the “Reset Image” option from the dropdown menu.
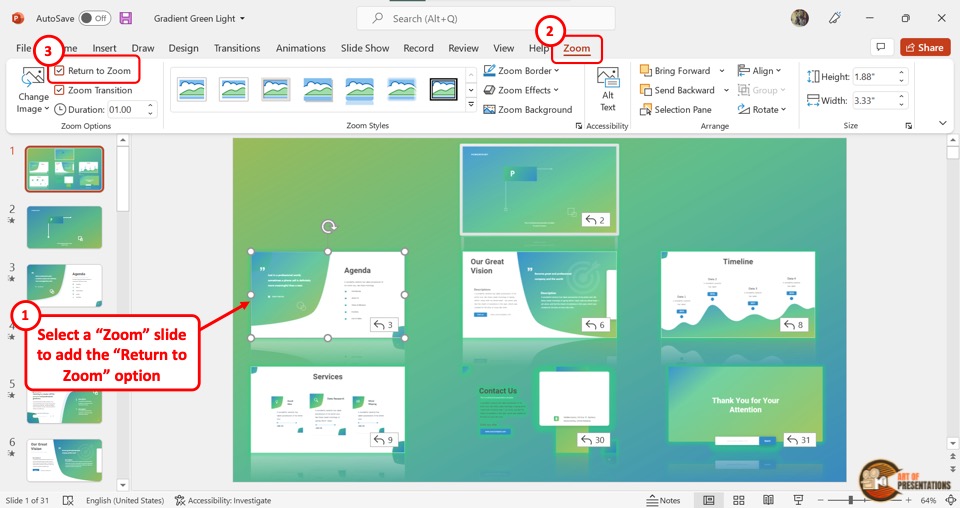
5. How to Stop Slide Zoom?

In the Microsoft PowerPoint slide show, the presentation will return to the slide zoom, after each slide. To stop this, select the slide in the slide zoom and then click on the “Zoom” tab in the menu bar.
In the “Zoom” menu, click on the “Return to Zoom” option. The checkmark in the box next to it will disappear. This will stop the slides from returning to the slide zoom screen.
5a. How to Return to Slide Zoom?
Once you stop the slide zoom on Microsoft PowerPoint, you can turn on the feature again. All you have to do is select the slide again and click on the “Zoom” tab. Then click on the box next to the “Return to Zoom” option.
The checkmark will appear again. Now the screen will return to the slide zoom after the selected slide during the presentation.
Credit to nakaridore (on Freepik) for the featured image of this article (further edited)

- Certifications
PowerPoint Zoom: A Great Way to Make Interactive Presentations
- December 27, 2022
- 101 Comments

The PowerPoint zoom feature is a great way to make the presentation dynamic and interactive. When you use this feature, the slides are not presented in a usual order. This feature helps present slides in any order as one likes during the presentation making it more interactive .
This feature is available in Microsoft 365 and Microsoft office 2019. It is not available in other modules.
Have you read our blog on 80 PowerPoint Shortcut Keys
Understanding the Zoom Feature
Zoom feature can be leveraged in just 2 steps
Step 1 – Create basic slides
Create the slides you want to have in your presentation.
For our example, we have 5 slides showing the Presentation rules.
Step 2 – Insert the Zoom Feature
To insert the Zoom feature. Insert an additional blank slide. Then Go to Insert > Zoom
Then Select Slide Zoom.
Choose the slides you want in the Zoom Summary slide. Then click insert. You get the screen shots of the selected slides on one slide. This slide becomes your Summary Zoom Slide .
Format the Summary Zoom Slide. Change the background (if required) and place the screen shots as required (Example shown below).
Now when you go to the presentation mode, you have the option to jump to specific slides and portions of your presentation by clicking on the relevant screen shot.
You can decide where to go based on the flow of the presentation . Summary Zoom Slide helps you control your presentation. You can get move ahead, skip a section, or revisit slides of your presentation without interrupting the flow of your presentation.
Now let us discuss a few other important points.
Here is Free PowerPoint course to learn basic skills
Section Zoom
This feature is useful if your presentation has multiple slides in one section. In such case, divide your presentation to the appropriate sections. Then insert a blank Slide and Go to Insert > Zoom > Insert Section Zoom. Seen Screen shots below.
Once you click insert. You get the screen shots of the selected sections on one slide. This slide becomes your Summary Zoom Slide .
Now you can choose specific sections you want to present based on the flow of your presentation.
Read our blog on How to Create an Effective Business Presentation in 5 Steps
Change Image
Instead of screenshots (as shown in the example) if you want to use any other image, click on the slide screenshot then Click on Zoom > Change Image
Once you click on Change image, you can select the images from a file , or select online. You can also use icons.
Once you make the relevant selection, the slide screen shot changes to the chosen image.
Return to Zoom
If you want to move to the Zoom Summary slide after discussing the chosen slide or section, you should select Return to Zoom.
Click on the slide screenshot then Click on Zoom >Return to Zoom
You should repeat this step for all the slides in the Summary Zoom slide. For select slides/section, if you do not want to move back to the Summary Zoom slide then do not choose this option.
Zoom Transition
The Zoom Transition feature helps create an impressive visual effect when you move from one slide to the other. The default option chosen is Zoom Transition. If you do not want this transition effect, then Go to Zoom> Deselect Zoom Transition
Want to master in Presentation Skills , Join our PowerPoint Online Course right here.
There are multiple design options/border/effects options available in the Zoom Feature. These can be chosen to change the images on the Zoom Summary slide.
This is how we can make our presentation lively. Rather than following the usual flow of slides, with the help of the new Zoom feature we can navigate between slides depending on the flow of our presentation.
Keep learning new things and have fun.
Sign up for our PowerPoint Presentation Skills Training Online

Share This Post:
101 thoughts on “powerpoint zoom: a great way to make interactive presentations”.
[…] sections or slides, creating a more dynamic and immersive experience for your audience. With PowerPoint Zoom, you can easily create links or “zoom areas” on your slides such that when clicked […]
… [Trackback]
[…] Find More Information here to that Topic: skillfine.com/powerpoint-zoom-make-interactive-presentations-guide/ […]
[…] Read More here on that Topic: skillfine.com/powerpoint-zoom-make-interactive-presentations-guide/ […]
I truly appreciate this blog post.Really looking forward to read more. Great.
Thanks-a-mundo for the blog post. Really Cool.
Thanks for sharing, this is a fantastic blog article.Thanks Again. Cool.
Im grateful for the blog post. Really Cool.
wow, awesome article post.Really looking forward to read more.
Major thankies for the blog article.Really looking forward to read more. Awesome.
Im grateful for the blog post.Really looking forward to read more. Much obliged.
Hey, thanks for the blog.Really looking forward to read more. Awesome.
Fantastic blog post.Really thank you!
Wow, great blog post.Thanks Again. Keep writing.
Thank you for your article post.Really thank you! Awesome.
I think this is a real great article post.Thanks Again. Much obliged.
I cannot thank you enough for the blog. Will read on…
Thanks again for the blog post.Really thank you! Really Great.
Thanks so much for the blog post.Thanks Again. Really Great.
Very good blog.Really thank you! Really Great.
Thanks for the blog post.Really looking forward to read more. Cool.
Really informative post.Thanks Again. Will read on…
Really enjoyed this post.Really looking forward to read more. Really Great.
I really enjoy the blog.Much thanks again. Really Cool.
Thank you for your blog article.Thanks Again.
Thank you for your blog.Really looking forward to read more. Really Cool.
Very good blog article.Thanks Again. Cool.
I value the blog article.Thanks Again.
A round of applause for your blog post.Really thank you! Will read on…
Great, thanks for sharing this article.Much thanks again. Really Cool.
Awesome blog.Really thank you! Great.
Thanks again for the blog post.Really looking forward to read more.
Enjoyed every bit of your blog article.Really looking forward to read more. Really Great.
Thank you for your post. Really Cool.
I think this is a real great blog.Really thank you! Great.
This is one awesome blog post. Will read on…
Hello everyone I am new here, I am waiting for all the guests!
Looking forward to reading more. Great blog.Really thank you! Awesome.
I am so grateful for your post.Really thank you! Great.
I appreciate you sharing this blog article.
I appreciate you sharing this blog article.Really thank you! Really Great.
A round of applause for your blog. Really Cool.
I really like and appreciate your blog.Really thank you! Really Cool.
Enjoyed every bit of your blog article.Really looking forward to read more. Want more.
Fantastic blog post.Thanks Again. Really Great.
This is one awesome post.Much thanks again. Fantastic.
I really liked your blog article.Much thanks again. Cool.
A big thank you for your blog.Thanks Again. Awesome.
Wow, fantastic weblog format! How long have you ever been blogging for?
you made running a blog glance easy. The total glance of your website is magnificent, as smartly as the content! You can see similar: dobry sklep and here sklep online
Im thankful for the blog article.Much thanks again.
Appreciate you sharing, great blog.Much thanks again. Much obliged.
Appreciate you sharing, great article.Much thanks again. Much obliged.
Great, thanks for sharing this article. Keep writing.
Im thankful for the blog post. Great.
Im thankful for the post.Much thanks again. Much obliged.
Fantastic blog post.Thanks Again. Really Cool.
Thank you for your article post.Really thank you! Cool.
wow, awesome blog article.Really looking forward to read more. Keep writing.
Thanks again for the article post.Thanks Again. Keep writing.
I appreciate you sharing this blog article.Really looking forward to read more. Want more.
Say, you got a nice blog.Really looking forward to read more. Will read on…
Looking forward to reading more. Great blog post.Much thanks again. Really Great.
Thanks a lot for the article.Thanks Again. Want more.
Great, thanks for sharing this post.Really thank you! Really Cool.
Im thankful for the blog article.Thanks Again.
I really enjoy the blog.Much thanks again. Will read on…
I appreciate you sharing this post. Will read on…
Thank you ever so for you article.Much thanks again. Cool.
Fantastic article.Really looking forward to read more. Really Great.
I appreciate you sharing this article post. Want more.
Looking forward to reading more. Great blog.Much thanks again. Awesome.
I really liked your blog article.Really thank you! Really Cool.
Thanks-a-mundo for the blog. Fantastic.
Wow, great blog post.Really looking forward to read more. Cool.
I cannot thank you enough for the article post. Will read on…
Wow, great post.Really thank you! Will read on…
Really appreciate you sharing this blog article.Much thanks again. Keep writing.
Thanks so much for the blog post.Much thanks again. Cool.
A round of applause for your blog post. Really Cool.
Thanks so much for the blog post.Really thank you! Awesome.
Im grateful for the post.Much thanks again. Really Cool.
A big thank you for your blog post. Much obliged.
Im thankful for the blog.Much thanks again. Cool.
I am so grateful for your blog.Thanks Again. Cool.
I really like and appreciate your blog article.Really looking forward to read more. Awesome.
Thanks-a-mundo for the blog post.Thanks Again. Will read on…
Very neat article.Really thank you!
Major thanks for the article post.Really thank you!
Really appreciate you sharing this blog.Much thanks again. Cool.
Very informative blog post.Really thank you! Keep writing.
Im obliged for the blog post.Thanks Again. Cool.
wow, awesome article.Really looking forward to read more. Cool.
Awesome blog.Much thanks again. Fantastic.
I think this is a real great post. Really Cool.
Thank you ever so for you blog.Really thank you! Really Cool.
Im grateful for the article post.Really looking forward to read more. Awesome.
Very informative post.Thanks Again. Really Cool.
A big thank you for your blog article.Much thanks again. Really Cool.
Thanks again for the article post.Really looking forward to read more. Really Great.
Thank you for your blog. Want more.
Thanks for sharing, this is a fantastic post.Really thank you! Cool.
Great job, It’s posts like this that keep me coming back and checking this blog regularly, thanks for the info!
Add a Comment Cancel reply
Save my name, email, and website in this browser for the next time I comment.

Reset Password
Insert/edit link.
Enter the destination URL
Or link to existing content
- Presentation creation
- PowerPoint templates
- Presentation training
- Print design
- Pitch deck example
- PPT Template example
- Investor deck example
- Product deck example
- Presentation services
- Infographic design
- Pitch decks
- Investor presentations
- Marketing presentations
- Conference presentations
- Finance presentations
- Product presentations
- CPD presentations
- Training overview
- Virtual presentation skills training
- PowerPoint template training
- Storytelling training
- Our showreel
- Charity presentation example
- Conference presentation example
- CPD presentation example
- Investor deck example – Seed stage
- Investor deck example – Series C
- Marketing presentation example
- PowerPoint template example
- Product presentation example
Blog / PowerPoint Tips / How to use Zoom in PowerPoint for interactive presentations.

How to use Zoom in PowerPoint for interactive presentations.
Use PowerPoint’s Zoom feature to add navigation to your presentations, without breaking a sweat.
Regular readers will know that Buffalo 7 is basically PowerPoint’s unofficial fan club. We rave about the possibilities of PowerPoint on a daily basis. Sometimes we’ll talk about other presentation software , but it’s always being compared to the OG of presentation programs.
However, we work with PowerPoint day in, day out, and we’re certainly not looking through rose-tinted glasses. We know all her weaknesses, all too well. And, naturally, we’ve found a way around each one. But we understand that you don’t have the time or inclination to hack your presentation software until it does everything you need it to.
And if what you need it to do is crazy, nauseating menus, we can see why you might lean towards Prezi as your preferred presentation program.
But before you make your final choice, give us just a few moments of your time. It seems as though Microsoft has been listening to your Prezi praising. Sort of. Enter Zoom: PowerPoint’s quick menu-making magic wand.
Before we begin, we need to preface this article by saying this:
“We never use the Zoom feature.” Buffalo 7
However, if you don’t have a lot of time on your hands and you need to have the option to move around your presentation freely, Zoom might be the answer to your prayers.
What is Zoom?
The name is confusing in this modern world where a pandemic has changed every aspect of our lives and one of the innovations keeping the earth turning is also called Zoom . But we’re not talking about the VC software now .
Originally launched in 2016, the Zoom feature in PowerPoint allows you to present your slides in any order you want. PowerPoint presentations have traditionally followed a strict linear format. They start at the start, end at the end and should you have cause to jump back to an earlier slide, well, your audience is just gonna have to wait while you cycle through them.
Not anymore. With just a couple of click, PowerPoint will create a menu slide and all the hyperlinks for you, giving you the freedom to move around your slides in whatever order you, or your audience, want.
Why use Zoom?
Interactivity can be the difference between an okay presentation and a next-level one. Interactivity puts your audience at the heart of your story, hands the reins over to them, and builds trust between viewer and speaker. It breaks down imaginary walls between those on the stage and those off it. Walls are never a good thing if you’re trying to build relationships.
By implementing a menu system in PowerPoint, you can let your audience choose where they want to go next and, in just one click, you’ll be able to get to the slide that supports the conversation. While menu systems have always been possible in PowerPoint, before Zoom they required a lot of manual labour, duplicated slides, invisible triggers, and hyperlinks up the wazoo. Now PowerPoint does all the heavy lifting for you.
What do each of the Zoom features do?
Zoom options can be found in your top ribbon, by clicking the Insert drop down. The keen-eyed amongst you will see there are three different types of Zoom. Let’s take a look at each one.

How to use Summary Zoom in PowerPoint
Think of Summary Zoom as a master menu. Once you’ve built your presentation, simply click Insert > Zoom > Summary Zoom to open the dialogue box. You select which slides you want to be able to jump to, and PowerPoint will not only create the links, but the menu slide as well. PowerPoint will automatically put your menu slide to the front, but you can move it to wherever you want it to sit within your narrative , without worrying about breaking the links.

You’ll also see that PowerPoint creates sections in the thumbnail slide view down the left-hand column of your window, based on which slides you choose. More on this later, but if you want to get super organised, it could be a good idea to rename these to reflect the section content.
In Slide Show mode, click the slide image within your menu that represents the slide you want to move to, and, like magic, you’ll end up there. If only life was that simple. Once you reach the end of the section, another click will see you navigate right back to your main menu.
If you need to edit your menu at any time, select Zoom > Format > Edit Summary . Here you can update the sections that feature on your summary page. When you’re done, select Update and that’s a wrap.
How to use Section Zoom in PowerPoint
Like the chapters in a book, a lengthy or complex presentation can be divided into sections. This makes it easier for your audience to follow along and gives you the opportunity to ask them which solution they’d like to see first. Whether it’s to revisit a section or skip one altogether, Section Zoom removes the need for embarrassing, unprofessional, and seemingly-endless scrolling.
For Section Zoom to work, you will need to section off your slides first. You can do this by clicking the first slide in the section in the slide thumbnail view of your PowerPoint window. Then, under the Home tab, click Section and Add Section .
Once you’ve got your sections in order, select Insert > Zoom , click on Section Zoom , make your navigation choices, and hit Insert . It’s that simple.

At this point you might be thinking, if PowerPoint creates sections after you’ve chosen your navigable slides in Summary Zoom, why would I bother making sections to be able to use Section Zoom? It’s a good question, and one we don’t know the answer to either. We did start this blog by saying she’s not perfect.
How to use Slide Zoom in PowerPoint
Slide Zoom gives you the option to navigate to any slide you like, from any slide. Instead of creating a separate main menu slide to house your navigation buttons, Slide Zoom adds the button to your chosen slide.
This is a great way to hide excess information that doesn’t need to form part of your main presentation, but that one particularly pernickety audience member may challenge you on. In just one click you can navigate to a deep dive slide and leave them reeling that you could be so prepared.
As before, you simply choose which slide you want to navigate from, then Insert > Zoom > Slide Zoom and choose the slide you want to navigate to.

Zoom really is super easy to use. But is it worth it?
Design matters
One of the reasons we don’t use the Zoom function is because we’re damn fussy about design. We don’t want to compromise; we want to have beautiful presentations that also have intricate menu systems and interactive elements. There are very limited ways to customise your Zoom menus in PowerPoint. You can move them around a bit, change the size, add an ugly border and mess with the transition effects. But that sort of limitation just doesn’t fly around here.
That being said, you can change the button image by right-clicking and choosing Change Image. For all other customisation options, click the button in edit mode and you’ll see Zoom Tools in your ribbon, if you’re on a Mac, and Zoom Styles if you’re on a PC.
Zoom Background in PowerPoint
To help with the lack of design options available, Zoom Background makes your buttons transparent, so your beautiful slide design can shine. Just make sure you remember where the trigger is. We find it works to place the invisible button over a design element, such as your company logo, so it looks as though you’re clicking on that to trigger the navigation. You’ll find Zoom Background in the Zoom Tools/Styles tab.
We can see why Microsoft felt the need to introduce Zoom. After 7 years of hearing about how ‘cool’ Prezi’s menus were, they probably caved just to shut people up. But, unless you don’t know the first thing about creating hyperlinks, or you promised your boss an interactive PowerPoint and you only remembered at the very last minute, we can’t see many reasons why you’d want to use Zoom.
At Buffalo 7, we’re proud of the work we create. We pour innovation and passion and creativity into every deck, and we sure as hell never cut corners. If something’s worth doing, it’s worth doing right. Why not get in touch today and talk about a fully-interactive, navigable deck that won’t make your audience sea sick?
Here are just a few examples of our carefully-crafted menu systems in action. None of which were created with Zoom.
LIKE WHAT YOU'VE READ? WHY NOT share
Work Can wait
Put off writing that email just a little longer. Send your incoming calls to voicemail. Put your feet up, grab a brew and explore more presentation insight in the Buffalo 7 Library
- Vote: Reader’s Choice
- Meta Quest 4
- Google Pixel 9
- Google Pixel 8a
- Apple Vision Pro 2
- Nintendo Switch 2
- Samsung Galaxy Ring
- Yellowstone Season 6
- Recall an Email in Outlook
- Stranger Things Season 5
How to use Microsoft PowerPoint

Creating a successful slideshow is no small task. So, if you’re new to Microsoft PowerPoint, you’ll need to familiarize yourself with the features and tools you need to build a presentation.
How to create a slideshow
How to add a slide, how to insert slide elements, how to use different views, how to add speaker notes, how to start and end a presentation.
We’ll guide you through the process of creating a PowerPoint slideshow by adding slides and elements as well as how to present the show when you finish. These basics are just what you need as a beginner and should get you off to a terrific start with PowerPoint.
Note : The information in this tutorial applies to PowerPoint for Microsoft 365 on Windows. While you may see variations in features or menus, most PowerPoint versions have the same basic options.
When you open the application, you can create a new blank slideshow or use a built-in PowerPoint template . To best familiarize yourself with the application and the items we’ll walk through here, select a Blank slideshow on the Home screen and follow along.
Next, you’ll want to name and save your presentation file. Select File > Save or Save As name the file on the right, choose a location for it, and select Save .
Be sure to continue saving your slideshow regularly as you work on it by selecting Save in the Quick Access Toolbar.
A blank presentation in PowerPoint starts you off with a main slide. You’ll notice a text box at the top for the title and one beneath for the subtitle. Simply click inside these boxes to enter your text.
While it’s good to get in the habit of using title slides like these to begin future presentations, you’ll also need to know how to insert the additional slides.
Go to either the Home or Insert tab and open the New Slide menu in the ribbon.
Choose the layout you want to use for the new slide. You’ll see several options that include placeholders, which is handy for popping in what you need like text, lists, or images.
Once the slide appears, click inside a placeholder to add the necessary elements.
Continue to insert as many slides as you want the same way.
Along with using the placeholders on the slides, you can add your own items. This is helpful if a slide doesn’t contain the number or type of placeholders you need.
Add a text box
One popular slide element to add is a text box, which is just like the title and subtitle boxes on the title slide. With it, you can insert and format text as you wish.
Go to the Insert tab and select Text box in the Text group.
You can use your cursor to draw the size of the box you want or simply click the slide and begin typing inside the box.
To format the text in the box, select it and go to the Home tab. Use the options in the Font section of the ribbon to adjust the style, size, color, or emphasis.
Specific to PowerPoint on Windows, you’ll also see a floating toolbar appear near the text that you select. This toolbar contains the same features as on the Home tab along with additional options.
Add images, shapes, and icons
Because a slideshow is a visual tool, you’ll likely want to add photos, illustrations, shapes, or icons to slides.
Go to the Insert tab and open the Pictures , Shapes , or Icons menu.
- Pictures : Pick an image from your device, one of the stock images, or an online picture and select Insert .
- Shapes : Pick a shape from the menu and use your cursor to draw it on the slide.
- Icons : Search or use the categories to find the icon, select it, and click Insert .
Once you insert one of the above on your slide, you’ll see the corresponding tab appear to format the object. For pictures, you have a Picture Format tab, for shapes, you have a Shape Format tab, and for icons, you have a Graphics Format tab.
You can use the tools in the ribbon to do things like change the color, add a border, align or rotate the object, and resize it.
Add audio or video
Another useful object to add to your slides is an audio file or video. You can then play the sound or video clip during your presentation.
Go to the Insert tab and open the Audio or Video menu.
- Audio : Pick an audio file to add to PowerPoint from your device or record audio on the spot.
- Video : Pick a video to embed into your presentation from your device, one of the stock videos, or an online video and select Insert .
Like with images and shapes, you’ll see tabs appear to format the file you insert. For audio, you have an Audio Format tab, for video, you have a Video Format tab, and for both types of files, you have a Playback tab.
Use the Format tabs to adjust the color, add a border, or apply an effect and the Playback tab to set a fade in or out effect, loop the playback, or play it in the background.
You can take advantage of different views in PowerPoint for accomplishing various tasks. This is helpful for seeing all of your slides in a grid, viewing a notes page, or working with an outline.
Go to the View tab and you’ll see the options in the Presentation Views group.
- Normal : Use this to create and edit your slides.
- Outline View : Use this to work with an outline of your presentation. Each slide is numbered with a hierarchy of slide elements.
- Slide Sorter : Use this to see your slides in a grid format for an overall slideshow view.
- Notes Page : Use this to view your presentation with notes — this is where you print a PowerPoint presentation with notes .
- Reading View : Use this to play your slideshow in the same window without entering full-screen mode.
Use the tools in the Show section of the View tab to display a Ruler , Gridlines , or Guides . These items can help you line up your slide elements.
You can also select the Zoom and Fit to Window options in the Zoom section of the ribbon to get a better view of slide items or the overall slide.
Presenting a slideshow is similar to giving a speech where you may want to use speaker notes. Like note cards, you can add notes to each slide in your presentation. When you present the slideshow, only you can view your notes; your audience cannot see them.
Select Notes in the Status Bar at the bottom of the PowerPoint window or go to View > Notes .
Add your notes in the section that appears below the slide.
You can use the options in the Font section of the Home tab to add emphasis or create a list.
For more detail, check out our how-to for adding notes in PowerPoint .
When you’re ready to present your PowerPoint slideshow or to see it as your audience will, you can start the presentation anytime.
Go to the Slide Show tab.
To display your speaker notes and a dashboard of controls while you present, check the box for Use Presenter View in the Monitors section. Then, select the monitors for the slideshow display and presenter view using the Monitor drop-down menu.
On the left side of the ribbon, pick From Beginning or From Current Slide per your preference.
When the slideshow starts, you’ll see what your audience sees on one monitor with Presenter View on the other. This is a super helpful way to present your slideshow because the Presenter View window provides you with controls.
If you’re unable to use more than one monitor, you’ll also see controls on the bottom left of the slides.
In the Presenter View window, you’ll see the current slide on the left with the controls beneath and the next slide on the right along with your speaker notes.
To use a control, hover your cursor over each button for a brief description.
From left to right, you can choose a laser pointer or pen, see all slides in a grid, zoom in on the slide, display a black screen, turn the subtitles or camera on or off, and view additional options like changing the subtitle settings or ending the presentation.
To stop presentation mode, press your Esc key, select End Slide Show at the top, or use the three dots to choose End Show .
While this beginner’s guide to using PowerPoint should get you off to a great start creating and presenting your first slideshow, there’s plenty more to learn. Check out how to use Presenter Coach for rehearsing your presentation and best practices for making awesome PowerPoint slides for tips and suggestions.
Editors’ Recommendations
- What is Microsoft Teams? How to use the collaboration app
- What is Microsoft Edge and how to use it
- Best Microsoft Office deals: Get Word, PowerPoint, and Excel for free
- Copilot Pro: how to use Microsoft’s advanced AI sidekick
- Microsoft Copilot: how to use this powerful AI assistant

Microsoft hasn't been shy about pushing first-party services and apps in Windows, but this time, it's getting a little ridiculous. As reported by Windows Latest, the Microsoft application PC Manager claims you can "fix" your computer simply by changing Bing to be the default search engine.
The change was spotted when using the Edge browser and having, for example, Google as the default search engine. After you run a health check, one of the suggested changes will be to set Bing as your default search engine. If that's how you want to go, there's a button to make it happen.
In its Annual Work Trend Index, Microsoft has, unsurprisingly, published some fresh data around AI in the workplace. The big stat is that according to its survey, 75% of "knowledge workers" are already using generative AI at work, with that number doubling in the last six months alone.
The survey defines "knowledge workers" as "those who typically work at a desk (whether in an office or at home)," which is a pretty broad demographic.
Microsoft Teams was introduced in 2017 as a unified communication and collaboration platform aimed at helping businesses and organizations get things done. Microsoft leveraged the company's existing Office software experience and created a unified experience between Teams, Office 365, and Skype for Business. However, as with all software, things don't always go according to plan. Sometimes you can run into Teams problems.
We're big Teams users here at Digital Trends -- it's our go-to communication and meeting tool -- and we've come across a few issues ourselves over the years. In the event you're having Microsoft Teams issues, here's how to fix some of the most common problems.
Home Blog Presentation Ideas How to Make a Presentation Longer: 7 Strategies to Master
How to Make a Presentation Longer: 7 Strategies to Master

A common question asked by presenters is how to extend a presentation’s duration. This can be because they feel the topic is covered superficially for the audience’s knowledge level or because they find themselves intimidated by the allocated time slot. Either way, adding filler content without care can lead to losing audience interest and significantly impact the presentation’s effectiveness.
The key to making a presentation longer without compromising quality lies in enhancing content depth, utilizing visual and interactive elements, and effectively managing the timing of the delivery. In this article, we will explore seven different strategies for extending a presentation’s length while preserving its quality and ensuring the additional time is meaningful.
Table of Contents
Strategy 1 – Expanding Content Depth
Strategy 2 – enhancing visuals and multimedia, strategy 3 – interactive elements and audience engagement, strategy 4 – revisiting and recapping, strategy 5 – time management and pacing, strategy 6 – supplementary materials and handouts, strategy 7 – enhancing the introduction and conclusion, final words.
As we previously mentioned, the feeling that the presentation can go much in depth is frequent when presenters have to simplify the complexity of their ideas (check our article on how to present complex concepts for more information) to meet the audience’s knowledge level. This can either work or be a total disaster if the presentation is trimmed without considering if the audience is getting a clear picture of what you’re explaining.
N.B.: If you’re wondering how to simplify explanations in your presentation to speak with a non-technical audience, check our article on applying Feynman’s Technique for presentations .
Revisiting Core Topics: Adding Depth to Key Points
Start by reviewing the main topics of your presentation. Identify areas where you can provide additional insights or expand on existing points. This could involve discussing the historical context, exploring underlying theories, or addressing potential counterarguments. By doing so, you not only lengthen your presentation but also offer a more thorough exploration of the subject matter. This is a strategy commonly applied in thesis presentations .
For example, if your presentation is on marketing strategies, you could delve into the psychological principles behind consumer behavior or discuss the evolution of marketing trends over the years. This added depth can provide valuable context and make your presentation more compelling.
Providing Additional Examples and Case Studies
Real-world examples and case studies are powerful tools that help illustrate key points and make abstract concepts more relatable. By including more examples and detailed case studies, you can extend the length of your presentation while enhancing its practical value.
Consider breaking down elaborate examples step-by-step, analyzing the outcomes, and discussing lessons learned. You can also compare multiple case studies to highlight different approaches or outcomes, adding depth and duration to your presentation. An ideal tool for such a purpose is a comparison chart .

Integrating Data and Statistics
Data and statistics add credibility and authority to your presentation. More data points, charts, and graphs can help you fill additional time while supporting your arguments with concrete evidence.
When presenting data , take the time to explain its significance, how it was gathered, and what it means in the context of your topic. This will add length and ensure that your audience fully understands the importance of the information presented.
Visual elements and multimedia can significantly contribute to a presentation’s overall length and quality. By thoughtfully incorporating more slides, videos, and interactive media, you can both extend your presentation and make it more visually appealing.
Using More Slides with Detailed Information
One simple way to extend your presentation is by adding more slides. However, it’s essential to ensure that these slides contribute meaningful content. Apply one of the core concepts of the 10-20-30 rule of PowerPoint presentations and deliver one idea per slide.
For instance, if discussing a new software tool, you could dedicate one slide to its features, another to its benefits, and additional slides to real-world applications. This approach allows you to cover more ground without overwhelming your audience with too much information on a single slide.

Adding Videos and Animations
Working with video presentations and adding animations to PowerPoint slide decks can effectively increase the length of your presentation while providing a dynamic change of pace. Videos can serve as powerful visual aids, offering demonstrations, testimonials, or additional context that might be difficult to convey through text alone.
Ensure that any videos or animations used are directly relevant to the content and add value to the presentation. You can also pause after the video to discuss its content in detail, further extending the time. Another tip we can mention from our experience is to test the control buttons for the video, as sometimes presenters lose a lot of time trying to stop or rewind a video if a question arises.
Incorporating Infographics and Diagrams
Presentation infographics and diagrams are valuable tools for summarizing complex information in a visually engaging way. By taking the time to explain each component of an infographic or diagram, you can extend your presentation while helping your audience better understand the material.
For example, if your presentation involves explaining a process, a flowchart or diagram can break down each step. You can then discuss each part in detail, highlighting its significance and how it contributes to the overall process.
Let’s be clear: audience engagement is THE power element to extend your presentation’s length. This can be as simple as incorporating exercises inside your presentations, like questions to let the audience think about an idea. This section will explore three different approaches to boosting engagement through audience interaction.
Including Q&A Sessions
Designating specific times for Q&A sessions throughout the presentation effectively engages your audience and extends the presentation’s length. Encourage your audience to ask questions about the content you’ve covered and provide thorough answers.
If you anticipate questions that require more detailed responses, consider preparing additional slides or materials to support your answers. This lengthens the presentation and ensures that your audience feels their questions are being addressed comprehensively.
Q&A sessions don’t have to be neglected to the final part of your presentation. You can add them in the middle after defining a series of concepts and then engage with the audience to test their understanding until that point.
Utilizing Polls and Surveys
Interactive presentation elements like polls and surveys are great tools for involving your audience and gathering real-time feedback. You can use polling software to ask questions during the presentation, and the results will be displayed instantly on the screen, or work with a traditional method like survey PPT templates .

After each poll, discuss the results. You can compare them to industry data or research and explore what the answers might imply about your audience’s perspectives. This interaction extends the presentation and makes it more engaging for participants.
Encouraging Group Discussions
This strategy is commonly used in motivational presentations when speakers invite their audience to do two—to three-minute exercises in which a question is asked between pairs.
After the group discussions, bring the audience together to share insights and observations. You can then comment on these points, adding your own perspective and tying the discussion back to the main content of your presentation.
Revisiting key points and providing recaps is a highly effective strategy for increasing content retention while extending the duration of your presentation.
Summarizing Key Points After Each Section
Summarize the key points at the end of each major section of your presentation. This reinforces the material and helps the audience retain the information.

Briefly recapping the content allows you to transition smoothly into the next section, which can naturally lengthen the presentation. This practice not only aids retention but also ensures that your audience stays on track with the flow of the presentation. Additionally, it can be a good strategy if the slide deck is repurposed in PDF format so the audience can revisit each section and remember the concepts.
Providing Multiple Recaps Throughout the Presentation
In addition to summarizing after each section, consider including recaps at various points throughout your presentation. These could be more detailed and involve revisiting earlier content in light of new information presented later.
For instance, if you introduce a concept early in the presentation, you could revisit it in a new context, showing how it applies to a different aspect of your topic. This would extend the presentation and deepen the audience’s understanding of the content.
We’ve spoken in the past about the importance of time management in leadership . For presenters, time management is as clear as understanding which is the adequate pacing for your speech, which areas to prioritize, and where you feel you can add an extra edge for the sake of improving your performance as a presenter.
Slowing Down Delivery for Emphasis
Presenters can naturally extend their presentation by slowing down their delivery, particularly when emphasizing key points. Speaking more slowly and deliberately can give your audience time to absorb the information and reflect on your words.
This approach also gives you the opportunity to elaborate on important concepts, ask rhetorical questions, and create a more thoughtful, measured pace for your presentation.
Practicing to Ensure Adequate Timing
Practice is essential for acknowledging that your presentation is the correct length. By rehearsing multiple times, you can identify areas where you can slow down, add more detail, or insert pauses for reflection or interaction.
Consider timing yourself during practice runs to see where you might need to extend or shorten sections. This will help you achieve a balanced, well-paced presentation that meets your time goals.
Providing supplementary materials and handouts can add depth to your presentation and extend its duration by encouraging ongoing engagement with the content.
Preparing Extended Handouts
Create detailed presentation handouts that expand on the content of your talk. These can include additional information, resources for further reading, or detailed explanations of complex topics.
Refer to these handouts during the presentation and walk through them with your audience. This not only extends the presentation but also ensures that the audience has access to valuable take-home materials.
Distributing Reading Materials During the Presentation
If appropriate, you can distribute reading materials during the presentation and give the audience time to read them before continuing. These could be articles, reports, or any other document that adds to the presentation content.
After the reading, take the time to discuss the material with the audience, asking for their thoughts or providing your analysis. This is a well-known method of encouraging active learning in presentations.
Using Post-Presentation Content for Extended Engagement
To extend engagement after the presentation, consider offering additional content or activities. This could include follow-up emails with additional resources, online discussions, or even a webinar that delves deeper into the topic.
The introduction and conclusion of a presentation are critical moments that set the stage and leave a lasting impression. Expanding these sections can effectively lengthen your presentation while ensuring it is impactful from start to finish.
Starting with a Detailed Introduction
Presenters often dwell on the best way to start a presentation . A well-crafted introduction does more than just outline the structure of your presentation—it sets the tone and provides context that can draw in your audience. Take time to introduce the topic comprehensively, explaining why it matters and how it relates to the audience’s interests or challenges.
You might also include a brief overview of what led you to explore the topic, such as personal experiences, research findings, or current industry trends. This adds a narrative element to your presentation, making it more engaging and setting the stage for the detailed content to follow.
Additionally, consider using an anecdote, a thought-provoking question, or a surprising statistic to hook your audience from the start. These elements capture attention and allow you to explore the topic from different angles, thus extending the length of your introduction.
Expanding on the Conclusion with Actionable Takeaways
The conclusion of your presentation should do more than simply recap the content—it should also offer actionable takeaways that the audience can apply in their own work or lives. Take the time to clearly articulate these takeaways, explaining why they are important and how they can be implemented.
You can also revisit any questions or challenges posed in the introduction, providing answers or solutions based on the content covered in the presentation. This full-circle approach reinforces the material and adds additional time as you guide the audience through applying what they’ve learned.
Consider ending with a call to action slide , encouraging your audience to take specific steps based on the information presented. Whether it’s implementing a new strategy, conducting further research, or simply reflecting on the insights shared, a strong conclusion with clear next steps can significantly extend the duration of your presentation while leaving a lasting impact.
We’ve explored seven ways of creating more meaningful time in your presentations, several of which encourage active audience participation. Working on your presentation skills is a good idea to optimize your abilities in handling transitions, unexpected pauses, unplanned questions, and any inconvenience that can divert your attention from the planned course.
Whether you are preparing for a business, academic, or public speaking event, the strategies outlined in this article provide a comprehensive guide to ensuring your presentation is both longer and more impactful.
Like this article? Please share
Presentation Skills, Presentation Tips Filed under Presentation Ideas
Related Articles

Filed under Google Slides Tutorials • August 29th, 2024
How to Insert an Equation in Google Slides
Make your math-related slides stand out by learning the different methods for how to insert an equation in Google Slides.

Filed under Presentation Ideas • August 22nd, 2024
How to Write a Presentation Script
The script of a speech is a vital aspect for a presentation’s success. Join us here to learn the process of writing a presentation script.

Filed under Google Slides Tutorials • August 6th, 2024
How to Use Google Slides Strikethrough Text
Customize your presentation slides by using Google Slides strikethrough and add a factor of humor, emphasize, or track changes in a truly visual method.
Leave a Reply
Get work done more efficiently with Zoom AI Companion. The AI Companion Onboarding Center is now live!
Empowering you to increase productivity, improve team effectiveness, and enhance skills.
Communication
Productivity, apps & integration, employee engagement, business services, customer care, developer tools.
- Financial Services
- Manufacturing
- Small and Midsize businesses
- IT Professionals
- Customer Experience
- Sales and Revenue
- Marketing and Events
- Meeting SDK
- App Marketplace
- Developer Solutions
- Partner Solutions
- Find a Partner
- Become a Partner
- Partner Portal
- Partner Learning Center
- Resource Library
- Webinars & Events
- Customer Stories
- Zoom Trust Center
- Zoom Community
- Learning Center
- How-to Videos
- Global services
- Hardware options
- Customer Managed Key
- Customer Support
- Premier Support
- Developer Support
- Premier Developer Support
Download the Zoom app
Keep your Zoom app up to date to access the latest features.
Zoom Virtual Backgrounds
Download hi-res images and animations to elevate your next Zoom meeting.
- Plans & Pricing
- Join by Meeting ID
- Public Event List
- Screen Share Only
- With Video On
- With Video Off
AI Companion
- Phone System
- Mail & Calendar
- Marketplace
- Rooms and Workspaces
- Workspace Reservation
- Contact Center
- Virtual Agent
- Revenue Accelerator
- Events and Webinars
- Work Transformation Summit
- Customer Success Events
- Customer Success Forum
- OnDemand Learning
- Zoom Status
- Submit Feedback
- Community Terms and Guidelines
- Getting Started
- Community Center
- Happy Rewards
- Social Corner
- Community Champion Program
- Billing & Account Management
- Zoom Events and Webinars
- Re: playing video from powerpoint slides as virtua...
- Subscribe to RSS Feed
- Mark Topic as New
- Mark Topic as Read
- Float this Topic for Current User
- Printer Friendly Page
- zoom video suddenly stopped working in Zoom Meetings 2024-09-02
- Help with virtual background requirements in Zoom Meetings 2024-08-27
- Virtual Background option in Zoom Meetings 2024-08-27
- virtual background in Zoom Meetings 2024-08-26
- Zoom virtual background in Zoom Meetings 2024-08-25
playing video from powerpoint slides as virtual background
- Mark as New
- Report Inappropriate Content
2022-02-08 09:01 AM
Solved! Go to Solution.

2022-02-08 09:30 AM - edited 2022-02-08 09:32 AM
View solution in original post
- All forum topics
- Previous Topic
2022-07-06 06:15 PM
2022-07-15 08:16 AM
2022-02-08 09:33 AM
IMAGES
VIDEO
COMMENTS
Switch back to Powerpoint and click the Slide Show tab. Begin the presentation by selecting the Play from Start or Play from Current Slide options. PowerPoint will display the slide show in a window. In Zoom, start or join a meeting. Click Share Screen in the meeting controls. Select the PowerPoint window and then click Share.
In this article I am using the Zoom app in Windows 10. The six options are: Share your entire screen/desktop. Share the Slide Show window. Share the editing window with a clean look. Run the Slide Show in a window and share that window. Use Presenter View to show the audience your slides while you see Presenter View.
In this step-by-step tutorial, learn how to best present Microsoft PowerPoint slides in Zoom Video Conferencing.⌚ Timestamps0:00 Introduction1:19 Share entir...
At the bottom of the Zoom meeting window, click "Share Screen." If you're using a single monitor, you will immediately start sharing your screen. If you're using dual monitors, you'll need to click the screen that your presentation will be shared on. In our case, that will be "Screen 2." To begin sharing that screen, click "Share" at the bottom ...
Here is how you can do that-. Step 1: First, start or join a Zoom meeting. Step 2: Click on " Share Screen " and select the " Advanced " option. From there, select " PowerPoint as Virtual Background " and select the file you want for your presentation. Then click on " Share ".
If you would like to make your presentations more dynamic and exciting, try using zoom for PowerPoint . To add a zoom, go to Insert > Zoom. To summarize the entire presentation on one slide, choose Summary Zoom. To show selected slides only, choose Slide Zoom. To show a single section only, choose Section Zoom.
Here's how to get it done. Open your PowerPoint presentation. Launch the slideshow in a window—navigate to the Slide Show tab and click Set Up Slide Show. In the dialog box that appears, select Browsed by an individual (window) and click OK. Navigate to the Slide Show tab and select From Beginning or From Current Slide.
This video shows you how to share Powerpoint slides in Zoom, including dual-monitor scenarios and the new "Powerpoint as virtual background" feature. You can...
The default when presenting a PowerPoint presentation on Zoom is to share your screen. But that is not your only option (and is often not the best option).Th...
Start Presenter View Preview by pressing Alt+F5. In Zoom, share a portion of the screen from the Advanced sharing options. Make the current slide larger in Presenter View and adjust the sharing rectangle so you just share the current slide portion of the screen in Zoom. Deliver your presentation. Full detailed article.
We want to zoom into the different description slides from our Iceberg Model slide. 2. Access the Slide Zoom Feature: Next, click Insert > Zoom > Slide Zoom. From here, choose the slide, or slides, that you want to zoom into. Click Insert and a thumbnail or thumbnails of the slides will appear on your current slide.
2. Use Zoom to present. Now that the windows have been separated, you can easily use Zoom to present the slideshow window. While in a meeting, click on the 'Share Screen' button and select the browser window with Google Slides on top. Finally, hit 'Share' to start the screen-sharing session.
We want to zoom into the different description slides from our Iceberg Model slide. 2. Access the Slide Zoom Feature: Next, click Insert > Zoom > Slide Zoom. From here, choose the slide, or slides, that you want to zoom into. Click Insert and a thumbnail or thumbnails of the slides will appear on your current slide.
Click the "Share Screen" Button: In the Zoom meeting window, locate the green "Share Screen" button at the bottom of the screen and click on it. Select Your PowerPoint Window: A dialog box will appear with a list of available screens and windows to share. Choose the window that has your PowerPoint presentation open.
In PowerPoint, select the Slide Show menu option. On the Slide Show ribbon, click on the Set Up Slide Show toolbar icon. In the upper left corner of the Set Up Show dialog box, click on the Presented by a speaker (full screen) radio button and then click on the OK button. Return to your Zoom meeting screen by clicking on the Zoom icon in either ...
Start the PowerPoint Slide Show and in Zoom just share the PowerPoint window, not the full screen. Move your mouse over the PDF and use your mouse wheel to scroll the notes pages. If you accidentally click on the PDF window, click on the edge of the PowerPoint window to return focus to PowerPoint so you can advance your slides.
Our eight pro tips for presenting over Zoom may help you feel more prepared, comfortable, and confident. Read on to find out more. 1. Plan out your Zoom background/location ahead of time. You can ...
Here's how to do that in Zoom. Note that these instructions are for folks wih just one screen. Zooming in Presenter View. To view in Presenter View while presenting in Zoom, you will need to: Click on Presenter View in the menu ribbon at the top of the screen. The presentation will look like this:
To use the "Zoom" feature in PowerPoint, first, click on the "Insert" tab. Then, click on the "Zoom" button from the ribbon. Choose the type of zoom from "Summary", "Section", and "Slide" zoom. Next, select the slides from the window that pops up by holding the "Ctrl" key, and click on "Insert". Here's a step ...
Step 2 - Insert the Zoom Feature. To insert the Zoom feature. Insert an additional blank slide. Then Go to Insert > Zoom. Then Select Slide Zoom. Choose the slides you want in the Zoom Summary slide. Then click insert. You get the screen shots of the selected slides on one slide. This slide becomes your Summary Zoom Slide.
For Section Zoom to work, you will need to section off your slides first. You can do this by clicking the first slide in the section in the slide thumbnail view of your PowerPoint window. Then, under the Home tab, click Section and Add Section. Once you've got your sections in order, select Insert > Zoom, click on Section Zoom, make your ...
Real-time Q&A: Encourage your audience to ask questions throughout the presentation using platforms like Zoom's chat feature. Use Engaging Visuals and Media. Visual aids can significantly enhance understanding and retention. However, overload of text or poorly designed slides can disengage your audience. ... PPT to PDF Turn your PowerPoint ...
A blank presentation in PowerPoint starts you off with a main slide. You'll notice a text box at the top for the title and one beneath for the subtitle. Simply click inside these boxes to enter ...
Zoom allows you to share different screens with your meeting participants. You can use PowerPoint to present slides in a clean visual format; however, how to...
By thoughtfully incorporating more slides, videos, and interactive media, you can both extend your presentation and make it more visually appealing. Using More Slides with Detailed Information. One simple way to extend your presentation is by adding more slides. However, it's essential to ensure that these slides contribute meaningful content ...
Keep your Zoom app up to date to access the latest features. Download Center Download the Zoom app. ... She cannot find the control/play button to play a video embedded in her powerpoint presentation. Is that an option or is it shut off when she's using slides as a virtual background? When she is just sharing the slides normally, the control ...
In this step-by-step tutorial video, learn how to use the new Summary Zoom, Section Zoom, and Slide Zoom features in Microsoft PowerPoint. Zoom in PowerPoint...
540 Likes, 35 Comments. TikTok video from Deb Ashby | Cellmates (@cellmates_): "Learn how to make your slides look less PowerPointy and engage your audience with interactive navigation using the Slide Zoom feature in PowerPoint. Master the art of creating dynamic presentations with these helpful tips. #PowerPointTutorial #SlideZoom #PowerPointPresentation #PowerPointTips".