How Do I Record a Presentation in Canva?

Recording a presentation can be a great way to share your ideas and engage your audience. Canva, the popular design tool, not only allows you to create visually appealing presentations but also lets you record them. In this tutorial, we will explore how to record a presentation in Canva using simple steps.

Step 1: Create Your Presentation
If you haven't already, start by creating your presentation in Canva. Canva offers a wide range of templates and customization options to help you create a stunning and professional-looking presentation.
Step 2: Navigate to the Present Mode
Once your presentation is ready, navigate to the "Present" mode by clicking on the "Present" button located at the top right corner of the Canva editor. This will open your presentation in full-screen mode.
Step 3: Start Recording
Now that you're in the Present mode, it's time to start recording your presentation. Look for the "Record" button at the bottom center of the screen and click on it to begin recording.
If you want to add voice narration to your presentation, make sure your microphone is properly set up and working before starting the recording.
Step 4: Deliver Your Presentation
Once you hit the Record button, Canva will start capturing everything on your screen, including any transitions or animations you have included in your presentation. Deliver your presentation as if you were presenting it live. Speak clearly and make sure to engage with your audience.
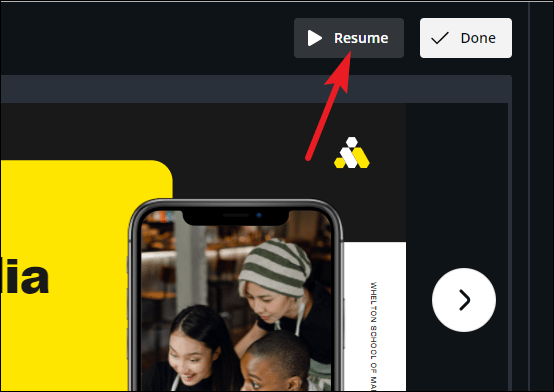
If you make any mistakes during recording or want to pause for any reason, simply press the "Pause" button located next to the Record button. You can resume the recording by clicking on the "Resume" button.
Step 5: Stop Recording
When you have finished delivering your presentation, click on the "Stop" button to end the recording. Canva will then process the recording and generate a video file of your presentation.
Step 6: Download Your Recorded Presentation
After Canva has finished processing your recording, a pop-up window will appear with an option to download your recorded presentation. Click on the "Download" button to save the video file to your computer.
Before downloading, you can preview your recorded presentation by clicking on the "Preview" button in the pop-up window. This allows you to make sure everything looks and sounds as intended before downloading.
Recording a presentation in Canva is a simple and convenient way to share your ideas with others. By following these steps, you can create engaging and informative presentations that can be easily shared and accessed by your audience. So go ahead, start recording, and make an impact with your presentations!

About the author:

Related posts
How Do You Record and Present in Canva? Recording and presenting in Canva is a breeze with its user-friendly interface and powerful features. Whether you are creating a tutorial, a... October 5, 2023 canva -->
How Do I Record My Screen in Canva? Recording your screen can be a helpful way to create tutorials, demos, or showcase your work. Canva, the popular graphic design platform, offers a... October 2, 2023 canva -->
How Do You Animate a Presentation in Canva? Animating a presentation can add a dynamic touch to your content and make it more engaging for your audience. Canva, a popular graphic design... October 4, 2023 canva -->
How Do I Record Video in Canva? Are you looking to create engaging video content using Canva? Recording videos in Canva is a fantastic way to add a personal touch to your designs... October 4, 2023 canva -->
How Do I Control an Animation in Canva? In this tutorial, we will learn how to control an animation in Canva using HTML. Animations can add a dynamic and engaging element to your designs,... October 4, 2023 canva -->
How Do I Make an Attractive Presentation in Canva? Creating an attractive presentation is essential to captivate your audience and convey your message effectively. With Canva, you can easily design... October 5, 2023 canva -->
How Do I Make an Interactive Presentation in Canva? Making an interactive presentation in Canva can greatly enhance your ability to engage and captivate your audience. With its user-friendly interface... October 5, 2023 canva -->
How Do I Add Animations in Canva? Have you ever wondered how to add animations to your designs in Canva? Animations can bring your designs to life and make them more engaging. In... October 5, 2023 canva -->
How Do I Edit a Photo in Canva? Are you looking to enhance your photos and make them stand out? Canva is a fantastic online tool that allows you to edit and customize your photos... October 2, 2023 canva -->
How Do I Create a Spreadsheet in Canva? Creating a Spreadsheet in Canva Spreadsheets are an essential tool for organizing and analyzing data. While Canva is primarily known for its... October 4, 2023 canva -->
You haven't yet saved any bookmarks. To bookmark a post, just click .
How to Create a Talking Presentation in Canva using 'Present and Record' Feature
Cannot present in a live session? No worries, pre-record your presentations with Canva's Talking Presentations.

Canva is a great tool for creating presentations, professional as well as personal. With thousands of templates and a rich content library for images, videos, and graphics, the presentations you can create with Canva are sure to stand out.
But that’s not all Canva is great for. Have you ever seen the words ‘Talking Presentation’ on Canva’s Home Page and wondered what they are? It’s Canva’s solution to a very real problem people face all the time.
A lot of people use presentations in webinars these days, or it’s a part of their website. The point being, presentations aren’t confined to just conference rooms these days. They have far greater reach. But presenting on the internet can be daunting. Talking presentations can help with that. They’re also great for when you cannot be present in person or maybe when some other people couldn’t attend.
Now, obviously, it isn’t really a presentation that talks, as in it doesn’t have any talking elements. You’re the one doing all the talking. It is basically a recording of the presentation with your video and voice-over. Canva studio makes the task so easy that you could do it with your eyes shut (metaphorically speaking, of course).
Creating a Talking Presentation
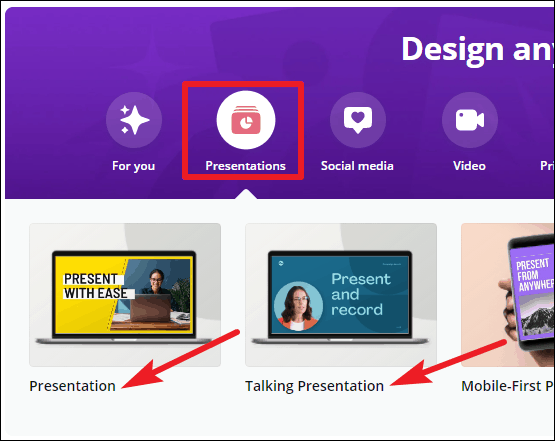
Go to canva.com and click on ‘Presentations’ to get started. It’s better to start with a template instead of a blank slate, but you can do either. Canva has a different category for ‘Talking presentations’. But it doesn’t matter whether you choose ‘Presentations’ or ‘Talking Presentations’, you can record for both types.
Create your presentation as you normally do. You can also go to Canva and open any of your existing presentations to convert them into a talking presentation.
Once your presentation is complete, go to the toolbar at the top of the editor.
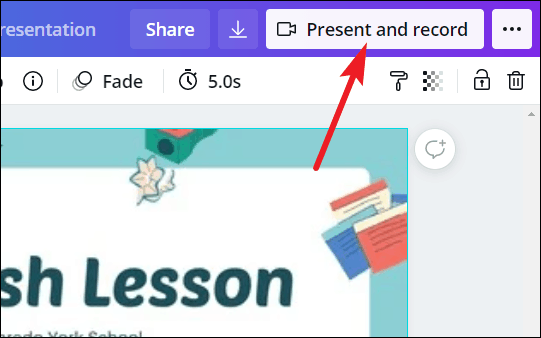
Now, if you chose ‘Talking Presentations’ while creating the presentation, the option for ‘Present and Record’ will appear on the toolbar itself.
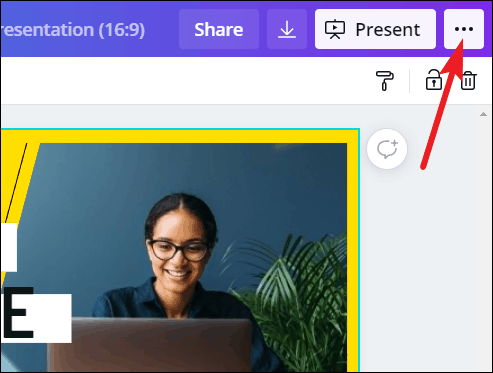
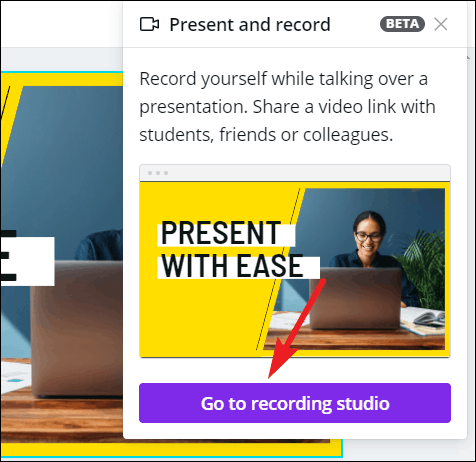
Otherwise, click the ‘three-dot’ icon next to the ‘Present’ button.
Then, select ‘Present and Record’ from the menu that appears.
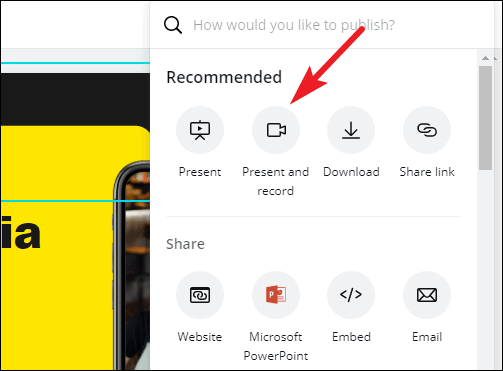
Click the ‘Go to Recording Studio’ button.
Recording the Presentation
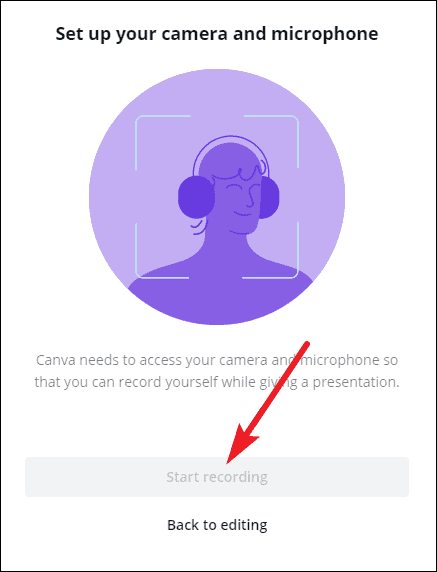
Your browser will display a pop-up that Canva wants access to your camera and microphone. Click ‘Allow’.

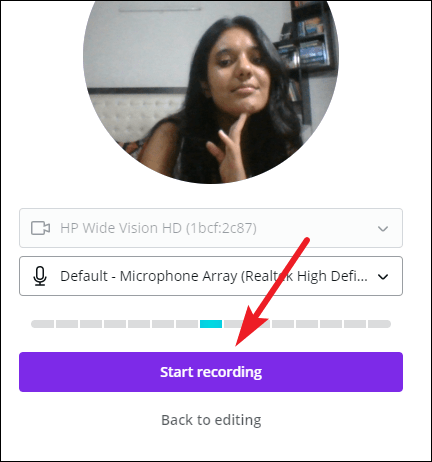
Once Canva has access to both, the ‘Start Recording’ button will become clickable. Canva needs access to both your camera and microphone for the Present and Record feature. If for some reason, access to either of these being blocked, you won’t be able to use the functionality.
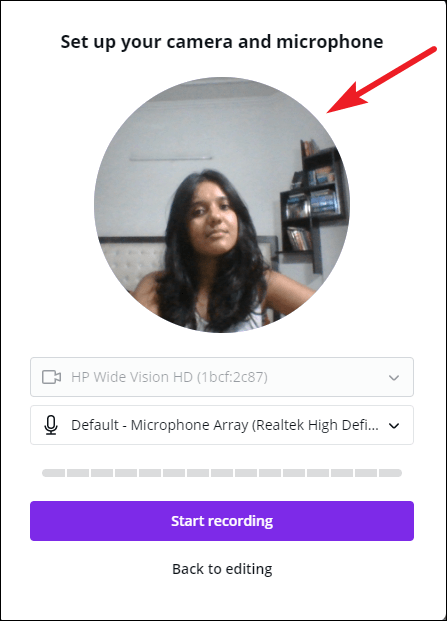
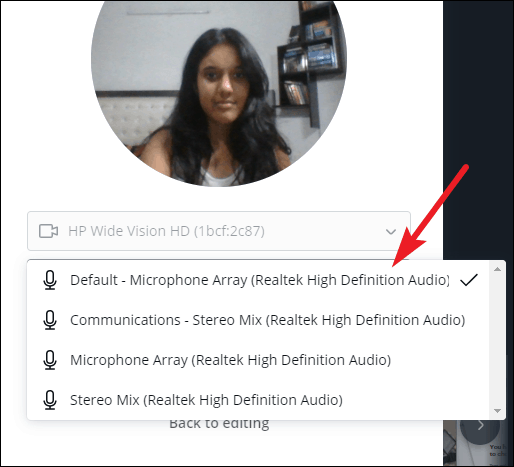
Before proceeding, check that your camera and microphone are working. You can see the preview of your video in the pop-up. You can also adjust your camera based on this preview, as this bubble represents how your video will appear while recording the presentation.
To check your microphone, say something. The bar beneath the microphone option will turn blue from gray if your microphone is working properly and Canva detects sound.
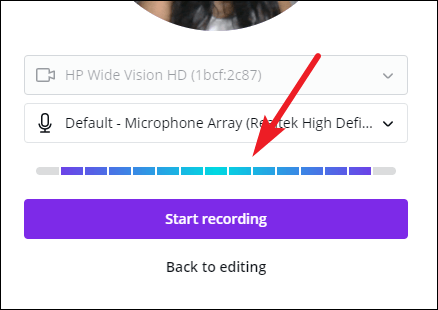
You can also change which camera or microphone to use (in case you have multiple) from the drop-down menus.
Once everything is spick and span, click the ‘Start Recording’ button to begin.
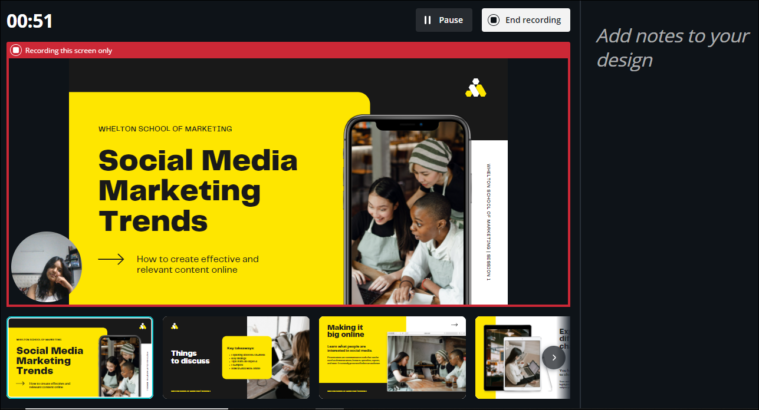
A 3-second timer will display on your screen; ready yourself for the recording during this time.

The recording screen will show all the slides in thumbnails and your notes in the right panel. But in the actual recording, only the presentation part (with your video in the lower-left corner) will be visible, which is highlighted in red during the recording session.
You can pause the recording at any time for a breather. Click the ‘Pause’ button to pause the recording.
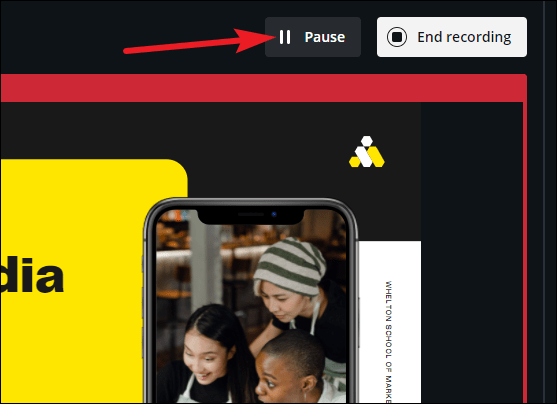
It’ll become the ‘Resume’ button when the recording is paused, click it restart the recording.
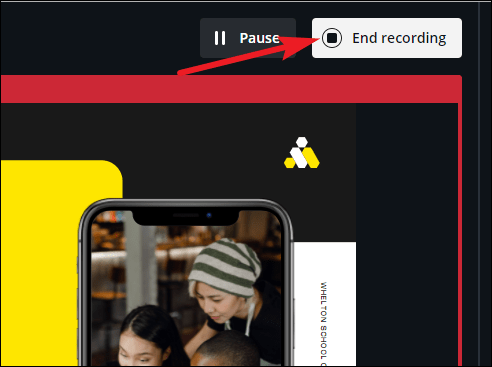
When you’re done, click the ‘End Recording’ button next to pause.
Sharing the Presentation
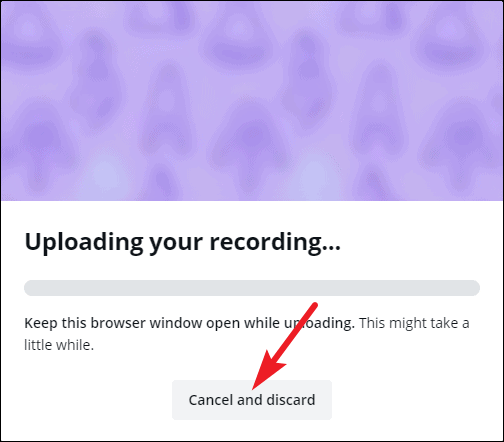
It’ll take a few seconds for your recording to process and upload. You can discard the recording at this stage if you weren’t happy with it and begin again.
Once it uploads, the link for your recording will be ready. You can share it with others directly. Or you can download it on your computer. If you want to watch the recording before sharing it with others, you can either go to the recording link yourself or download it and then watch it.
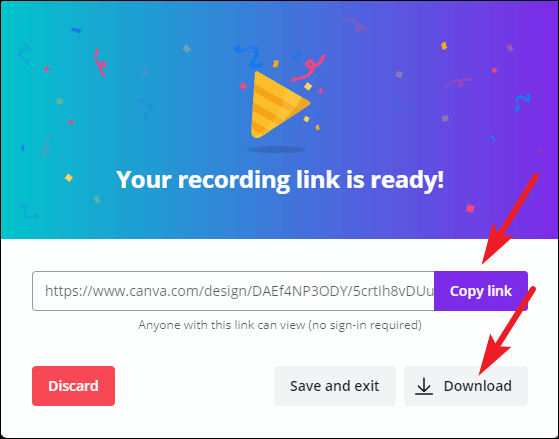
You can also just ‘Save and exit’ instead of choosing from either of the above options. Or click ‘Discard’ if you want to record again.
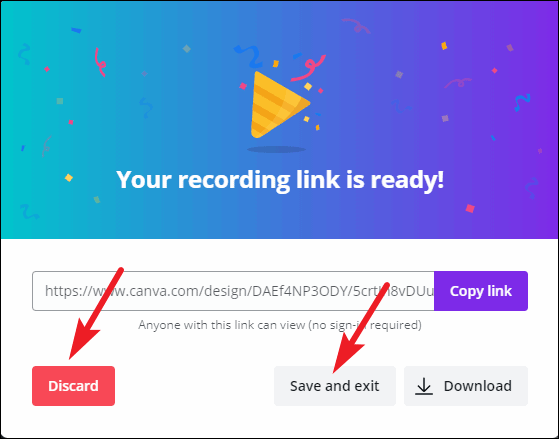
If you click ‘Save and exit’, you can access the recording again at any time. Open the presentation, and click the ‘Present and Record’ button.
The Present and Record menu will open, and it will have the link to the recording as well the options to download and delete it. If you want to re-record, you’ll first have to delete this recording.
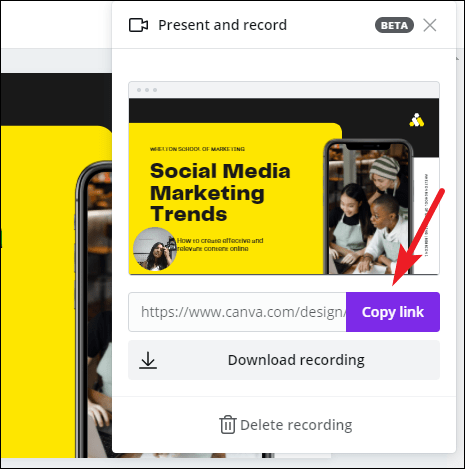
Anyone can go to the link and watch the presentation without any requirement for a sign-in. Or you can download it and upload it to your website, or use it in your webinar. The options are boundless and it’s up to you.
If you want people to no longer be able to watch the presentation recording, simply delete it from the ‘Present and Record’ menu, and the link will no longer show the recording.
Canva is the perfect tool for your presentations. Not only can you create amazing presentations, but it also provides tools for what comes after. Like presenting it in circumstances when you cannot do it live. Recording the presentation adds that personal touch that simply sending it to people cannot capture.

How to Code Using AI

Microsoft Copilot Pro Review: There is a lot of Unrealized Potential

How to Create a Custom Copilot GPT
Get all the latest posts delivered straight to your inbox., member discussion.

How to Use Copilot in Teams Meetings

How to Pin Messages in WhatsApp

How to Sync Your Arc Browser between Mac and Windows

How to Install Extensions in Edge Browser for Android

How to Download All Your Photos from Google Photos
How to Record Talking Presentation in Canva
Home » Blog » How to Record Talking Presentation in Canva

Founder of CanvaTemplates.com & Professional Graphic Designer
Jake Tucker
Canva Templates is reader supported. When you buy through links on our site, we may earn an affiliate commission. Learn more
Canva is a popular graphic design tool that allows users to create presentations, social media graphics, flyers, and more. One of the latest features added to Canva is the ability to record a talking presentation directly within the platform. This feature is a game-changer for those who want to create engaging presentations without the need for additional software or equipment.
Recording a talking presentation in Canva is a simple process that can be completed in just a few steps. First, users need to select the presentation they want to record and click on the “Present” button. From there, they can choose to enable the “Talking Presentation” feature and then click on “Present and Record.” Once they are in the recording studio, they can set up their camera and microphone, start recording, and go through their presentation as they would with an audience.
Understanding Canva’s Talking Presentation Feature
What is canva’s talking presentation.
Canva’s Talking Presentation is a feature that allows you to record your voice while presenting your design. With this feature, you can create a video presentation with your voiceover, making it easier for your audience to understand your message. Canva’s Talking Presentation is an excellent tool for educators, business professionals, and anyone who wants to create engaging presentations.
Why Use Canva’s Talking Presentation?
Canva’s Talking Presentation is a powerful tool that can help you create engaging and interactive presentations. Here are some reasons why you should use Canva’s Talking Presentation:
- Easy to use : Canva’s Talking Presentation feature is easy to use, even if you’re not tech-savvy. You can record your voiceover directly in the Canva app, and the platform will guide you through the process.
- Engaging : Canva’s Talking Presentation feature can make your presentation more engaging and interactive. With your voiceover, you can explain your message more clearly, and your audience can better understand your ideas.
- Time-saving : Canva’s Talking Presentation feature can save you time. Instead of creating a separate video presentation, you can record your voiceover directly in Canva. This feature can help you create presentations more efficiently, saving you time and energy.
Canva’s Talking Presentation feature is an excellent tool for anyone who wants to create engaging and interactive presentations. With this feature, you can create a video presentation with your voiceover, making it easier for your audience to understand your message.
Preparing to Record a Talking Presentation in Canva
Before you start recording a talking presentation in Canva, there are a few things you need to do to ensure a smooth recording process. In this section, we will discuss how to create a presentation in Canva, set up your microphone and camera, and add audio and visual elements to your presentation.
Creating a Presentation in Canva
To create a presentation in Canva, you need to have a Canva account. If you don’t have one yet, you can sign up for a free account on the Canva website. Once you have an account, follow these steps to create a presentation:
- Log in to your Canva account and click on the “Create a design” button.
- Select the “Presentation” option from the list of design types.
- Choose a template or start from scratch.
- Customize your presentation by adding text, images, and other design elements.
Setting Up Your Microphone and Camera
To record a talking presentation in Canva, you need to have a microphone and camera set up on your computer. Here’s how to set up your microphone and camera:
- Open your computer’s settings and go to the “Audio” or “Sound” section.
- Make sure your microphone is selected as the default recording device.
- Open your computer’s camera app and make sure your camera is working properly.
Adding Audio and Visual Elements
To make your talking presentation more engaging, you can add audio and visual elements to your presentation. Here’s how to add audio and visual elements in Canva:
- Click on the “Uploads” tab in the left-hand sidebar and select “Audio” or “Video” to upload your audio or video file.
- Drag and drop your audio or video file onto the slide where you want it to appear.
- Adjust the size and position of your audio or video file as needed.
In conclusion, preparing to record a talking presentation in Canva involves creating a presentation, setting up your microphone and camera, and adding audio and visual elements to your presentation. By following these steps, you can create a professional-looking talking presentation that will engage your audience.
Recording Your Talking Presentation in Canva
Creating a talking presentation in Canva is a great way to add a personal touch to your presentation. Here’s how you can record your talking presentation in Canva.
Starting the Recording Process
To start recording your presentation, open your Canva design and click on the “Present” button at the top right corner of the screen. If you have already created a talking presentation, you will see the “Present and Record” option. Click on it to start the recording process.
Recording Your Presentation
Once you click on the “Present and Record” option, you will be taken to the recording studio. Here, you can set up your camera and microphone. Before starting the recording, make sure your camera and microphone are working properly. Click on the “Start Recording” button to begin the recording process.
Pausing and Resuming Your Recording
If you need to take a break during the recording process, you can pause the recording by clicking on the “Pause” button. When you are ready to resume recording, click on the “Resume” button. You can pause and resume the recording as many times as you need to until you are satisfied with your presentation.
Stopping and Saving Your Recording
When you have finished your presentation, click on the “End Recording” button to stop the recording process. Canva will then process your recording and save it to your account. You can access your recorded presentation from the “All Your Designs” section of your Canva account.
In conclusion, recording a talking presentation in Canva is a simple process that can add a personal touch to your presentation. By following the steps outlined above, you can easily create a professional-looking talking presentation that will impress your audience.
Editing Your Talking Presentation in Canva
Once you have recorded your talking presentation in Canva, you can edit it to make it more engaging and professional. Here are some ways to edit your recording:
Trimming Your Recording
If you want to remove some parts of your recording, you can easily trim it in Canva. Simply select the recording from your design, and click on the “Trim” button. You can then drag the sliders to select the portion of the recording that you want to keep, and click on the “Save” button.
Adding Music and Sound Effects
To make your talking presentation more interesting, you can add music and sound effects to it. Canva provides a library of music and sound effects that you can use for free. Simply click on the “Music” or “Sound Effects” button in the editor, and select the audio file that you want to add. You can then adjust the volume and duration of the audio file to fit your presentation.
Adjusting Audio and Video Quality
If you want to improve the quality of your recording, you can adjust the audio and video settings in Canva. Simply click on the “Settings” button in the editor, and select the “Audio” or “Video” tab. You can then adjust the volume, bitrate, and other settings to improve the quality of your recording.
In conclusion, editing your talking presentation in Canva is easy and straightforward. By trimming your recording, adding music and sound effects, and adjusting the audio and video quality, you can make your presentation more engaging and professional.
Exporting and Sharing Your Talking Presentation
Once you have completed your talking presentation in Canva, you can export and share it with others. There are several ways to do this, including saving the presentation in Canva, downloading it as a video file, and sharing it on social media.
Saving Your Presentation in Canva
To save your talking presentation in Canva, click on the “Download” button in the top right-hand corner of the screen. From here, you can choose to save your presentation as a PDF, an image, or a presentation. Select “Presentation” and choose the format you would like to save it in.
Downloading Your Presentation as a Video File
If you want to download your talking presentation as a video file, you can do so by clicking on the “Download” button and selecting “Video.” You will then be prompted to select the resolution and quality of the video. Once you have made your selections, click “Download” to save the video to your device.
Sharing Your Presentation on Social Media
Sharing your talking presentation on social media is a great way to reach a wider audience. To share your presentation, click on the “Share” button in the top right-hand corner of the screen. From here, you can choose to share your presentation on Facebook, Twitter, or LinkedIn. You can also copy the link to your presentation and share it on other social media platforms or via email.
I hope you found this guide covering how to record a talking presentation in Canva, useful! Be sure to check out our blog for more article covering the essential tips, tricks, and advice for Canva! Also, if you haven’t already tried CanvaPro, you can try it for free for 30 days !
How to Record on Canva Presentation

Canva is a popular free online design and publishing tool that allows users to create beautiful graphics, presentations, videos and more. One handy feature of Canva is the ability to record video presentations directly within the editor. This allows you to add a personal touch to your presentation by including a video of yourself explaining the content.
In this step-by-step guide, we will walk through the entire process of recording a video presentation in Canva.
Step 1: Create Your Presentation
First, open Canva and start a new presentation design. You can choose from a variety of professionally designed templates or create your own custom layout from scratch.
Build out your presentation by adding text, images, charts/graphs, and any other visual elements you need to effectively communicate your message. Make sure to include clear section headings using Canva’s wide selection of fonts and text boxes.
You may also want to add animations and transitions between slides to make your presentation more dynamic.
Step 2: Set Up Your Recording Equipment
Before recording your presentation, you’ll need to set up your video and audio equipment. At minimum, you’ll need:
- A webcam or video camera
- A microphone (your computer’s built-in mic may suffice)
Position your camera properly so that you are clearly visible. Frame yourself from mid-chest up with your face taking up a reasonable portion of the screen.
Make sure there is adequate lighting on your face and minimal background noise in your recording environment. Test your equipment setup by taking a short sample recording.
Step 3: Start Your Recording Session
Once your presentation design and recording equipment is ready to go, it’s time start capturing your presentation.
In Canva, click on the “Present” button near the top menu bar and select “Present & Record”. This will launch Canva’s integrated recording studio.
You’ll be prompted to grant Canva access to your microphone and webcam. Click allow when the permission popups appear in your browser.
Canva will automatically detect your connected recording devices. If needed, you can manually select your preferred microphone, speakers and camera using the dropdown menus.
When ready, click the round red “Record” button to start your recording session. Your camera feed will appear in the bottom right corner so you can monitor yourself during recording.
Step 4: Deliver Your Presentation
With the recording started, shift your focus to delivering your presentation. Speak clearly and confidently as you explain each slide. Use natural hand gestures as needed to emphasize important points.
Navigate through your presentation slides using your keyboard arrow keys or by clicking the onscreen slide thumbnails. Canva will automatically switch slides and record everything seamlessly.
Feel free to pause and resume the recording as needed if you make a mistake or just need a short break.
Step 5: End Your Recording
After presenting the final slide, click the square “End Recording” button to finish capturing your presentation video.
Canva will now process and compile your full video, combining your webcam video with the presentation slides and any accompanying animations.
Once processing is complete, Canva will display a preview of your recorded presentation video. Review the playback to ensure proper video and sound quality.
Step 6: Export and Share Your Video
If satisfied with your recorded presentation, click the “Download” button to export the final video file to your computer. Canva will output an .MP4 video that can then be shared online or with your intended audience.
Consider uploading your Canva presentation video to YouTube, Vimeo or a video hosting platform to seamlessly integrate it into your website or blog using an embedded video player.
You can also directly share the link to your Canva presentation or send the exported video file via email or file transfer service.
Additional Tips for Recording Presentations in Canva
Here are some additional tips to help you create high-quality and effective presentation videos in Canva:
- Use Canva’s integrated teleprompter to add a script that will scroll as your record. This will help you remember key talking points.
- Customize your recording studio background or add your brand colors/logo for a more professional look.
- Record multiple takes of your entire presentation or specific slides until you achieve the perfect delivery.
- Use Canva’s audio editing tools like volume adjustment, noise reduction and audio trimming to polish your recording.
- Add background music to your presentation video to set the tone and engage your viewers.
With its user-friendly recording tools and robust presentation features, Canva makes it simple for anyone to produce sleek presentation videos. Just follow these tips and you’ll have a professional video ready to help drive your message home.
About The Author
Vegaslide staff, related posts.

How to Loop Canva Presentation

How to Present Canva Presentation on Zoom

How to Change Canva Slide Size

How to Add Video to Canva Presentation

Android Police
How to curve text in google slides.
Grab everyone's attention with curved text in presentation slides
Google Slides offers formatting options to tweak text, photos, videos, and other elements in a presentation. However, it lacks a few important add-ons. For instance, unlike PowerPoint, there isn't a built-in way to curve text in Google Slides. If you want to make your presentation stand out among the rest, use the tricks below to curve text in Google Slides.
Adding curved text is a neat way to elevate your presentation. Still, don't go overboard with curve text in Google Slides. It may create unnecessary distractions and make it hard for your audience to read a slide. Instead, highlight a few headings or text you want to separate from the other paragraphs.
Although Google Slides is available on mobile platforms like iPhone and Android phones , we focus on the web version in the steps below.
Curve text in Google Slides using PowerPoint
There are a couple of ways to curve text in Google Slides. If you have a Microsoft 365 subscription plan, use the PowerPoint desktop app to curve text and copy it into Google Slides. In another trick, you can use a web tool like Canva or InkPx to get the job done. Let's start with PowerPoint.
- Open Microsoft PowerPoint on Windows or Mac.
- Create a new presentation and go to any slide.
- Select Insert at the top and click Text box .
- Resize a text box and enter the text you want to add in Google Slides.
- Expand the text effects icon and click Transform .
- PowerPoint offers several curved text effects. Pick the one you prefer.
- Check your curved text in action. Drag the white dots around the text box to resize it.
- When you're satisfied with the text format, right-click it and select Copy . If you select and copy text, it is pasted as plain text in Google Slides. Copy the entire text box.
- Open a presentation in Google Slides and select a slide where you want to add curve text.
- Right-click the slide and select Paste .
PowerPoint offers dozens of curved text styles. You'll have no trouble finding a style that matches your presentation tone and theme.
How to delete a text box in Google Slides
Use an online tool to curve text in google slides.
PowerPoint requires a paid Microsoft 365 plan. If you don't have a subscription, use the tools below to generate and upload curved text in Google Slides.
Curve text using Canva
Canva is one of the best graphic design tools available. The web app offers several editing tools to create curved text in a design. You can download the image with a transparent background and upload it to Google Slides. Follow the steps below.
- Launch Canva on the web, sign in with your account details, and create a design.
- Select Text from the sidebar and search for curved .
- Pick a curved text style that you want to use. Double-click it to edit the text.
- Use the top menu to tweak text style, color, size, and more.
- When you're done with the changes, click Share at the top and select Download .
- Pick PNG and click the checkmark beside Transparent background . Select Download .
- Open a slide in Google Slides. Click Insert at the top, expand Image , and select Upload from computer .
- Upload your downloaded image and check your curved text in action.
The ability to download an image with a transparent background requires a Canva Pro subscription.
How to add transparency to an image in Google Slides
Curve text using inkpx.
InkPx is a web tool for creating curved text. You can make one and upload it on Google Slides.
- Visit InkPx .
- Pick a curve text style.
- Enter text and pick a color, style, and size. Then, tweak the radius, spacing, and other details.
- Check the preview at the top. Click Download .
- Pick a PNG or JPG image type and save the image.
- Launch a presentation in Google Slides.
- Click Insert , expand Image , and select Upload from computer .
- Select your image and open it in Google Slides.
- Google Slides uploads the image. You can resize it and place it in a relevant position.
Unlike Microsoft PowerPoint and Canva, InkPx is free to download and use. And unlike other web tools, you don't need to create an account to use the service.
Make your presentation stand out
Aside from curve text, there are other ways to make an interesting pitch. However, creating an engaging presentation from scratch can be time-consuming. Check the top Google Slides templates to get started and complete an applaud-worthy presentation in no time.
The Federal Register
The daily journal of the united states government, request access.
Due to aggressive automated scraping of FederalRegister.gov and eCFR.gov, programmatic access to these sites is limited to access to our extensive developer APIs.
If you are human user receiving this message, we can add your IP address to a set of IPs that can access FederalRegister.gov & eCFR.gov; complete the CAPTCHA (bot test) below and click "Request Access". This process will be necessary for each IP address you wish to access the site from, requests are valid for approximately one quarter (three months) after which the process may need to be repeated.
An official website of the United States government.
If you want to request a wider IP range, first request access for your current IP, and then use the "Site Feedback" button found in the lower left-hand side to make the request.
COMMENTS
Wait for your recording to upload. On the next screen, you can do the following: Share a link to your recording: Click Copy link. Download your recording: Click Download. Delete your recording: Click Discard. Save your recording and go back to the editor: Click Save and exit. A Public view link is automatically created when you record a talking ...
In this video, you'll learn how to use the CANVA PRESENT AND RECORD FEATURE as well as how to edit videos in Canva. Canva video editing can be done but with...
CANVA PRESENTATIONS:- Learn how to present with special effects using Canva. - Learn how to engage with your audience using Canva LIVE during Zoom meetings...
HOW TO FILM AND EDIT A YOURSELF DELIVERING A PRESENTATION (CANVA TUTORIAL)Yes you can create a presentation, film yourself presenting it, and edit the presen...
Step 3: Upload Your Recorded Video. In the Canva video editor, click on the "Uploads" tab located on the left-hand side of the screen. Then click on the green "Upload media" button and select your recorded video from your computer or any other connected storage device.
Canvahas integrated recording into the editor so you can record your presentations and export audio files if necessary. I'll show you how to make that happen so you can simplify your virtual presentations in the future. Without further ado, let's hop in. CanvaPresentation is an incredible way for you to design powerful and engaging presentation ...
Step 4: Deliver Your Presentation. Once you hit the Record button, Canva will start capturing everything on your screen, including any transitions or animations you have included in your presentation. Deliver your presentation as if you were presenting it live. Speak clearly and make sure to engage with your audience.
Now, if you chose 'Talking Presentations' while creating the presentation, the option for 'Present and Record' will appear on the toolbar itself. Otherwise, click the 'three-dot' icon next to the 'Present' button. Then, select 'Present and Record' from the menu that appears. Click the 'Go to Recording Studio' button.
via GIPHY. First, go to Canva and create a new design and select "Presentation". Select a template to begin designing your presentation, or create your own from scratch. Once you're done, click on Present and Record. Once you click on "Present and Record", you will see a window asking if you'd like to head to the "recording studio".
Canva has integrated recording into the editor so you can recor... If you've been recording presentations via Loom or Zoom, you no longer need to add that step. Canva has integrated recording ...
Starting the Recording Process. To start recording your presentation, open your Canva design and click on the "Present" button at the top right corner of the screen. If you have already created a talking presentation, you will see the "Present and Record" option. Click on it to start the recording process.
In this Canva tutorial for beginners, you'll learn how to use Canva for beginners on how to edit video in Canva. Watch this Canva video tutorial on Canva video editing so that you can make the most out of your Canva social media video and Canva video animation. If you're looking for social media video ideas for your Canva video presentation ...
Step 3: Start Your Recording Session. Once your presentation design and recording equipment is ready to go, it's time start capturing your presentation. In Canva, click on the "Present" button near the top menu bar and select "Present & Record". This will launch Canva's integrated recording studio. You'll be prompted to grant ...
Click on End recording once done. You can also Pause or Restart your recording as needed. Click on Save and back to editing to save your video and to add it to the current page of your design. You can also select Save and record another or Discard recording as needed. You can also find your video recording from the Videos tab under Uploads.
Here's a great feature built right into Canva! You can record yourself talking over your slides without having to use any third-party service. Design your pr...
Step 2: Create a free account on Canva.com. Click Here To Create Free Account and get 30 days Free Trail (Affiliate link) Step 3: Click on "Create a Design" button on top Right corner. Type ...
In another trick, you can use a web tool like Canva or InkPx to get the job done. Let's start with PowerPoint. Open Microsoft PowerPoint on Windows or Mac. Create a new presentation and go to any ...
Canva now has a screen recording option and video editing! What's hot and new in Canva.Try Canva. NEW Canva Affiliate Link: https://partner.canva.com/PRegier...
All existing record keeping or reporting requirements should be made consistent with these standards through a non-substantive change request to the Office of Information and Regulatory Affairs (OIRA), or at any time a collection of information is submitted to OIRA for approval of either a revision or extension under the Paperwork Reduction Act ...
Hello viewers! This video explores Canva's new feature - present & record. This will allow you to create beautiful slide video lectures, which you can use fo...