Problem-Solving Flowchart: A Visual Method to Find Perfect Solutions
Lucid Content
Reading time: about 7 min
“People ask me questions Lost in confusion Well, I tell them there's no problem Only solutions” —John Lennon, “Watching the Wheels”
Despite John Lennon’s lyrics, nobody is free from problems, and that’s especially true in business. Chances are that you encounter some kind of problem at work nearly every day, and maybe you’ve had to “put out a fire” before lunchtime once or twice in your career.
But perhaps what Lennon’s saying is that, no matter what comes our way, we can find solutions. How do you approach problems? Do you have a process in place to ensure that you and your co-workers come to the right solution?
In this article, we will give you some tips on how to find solutions visually through a problem-solving flowchart and other methods.

What is visual problem-solving?
If you are a literal thinker, you may think that visual problem-solving is something that your ophthalmologist does when your vision is blurry. For the rest of us, visual problem-solving involves executing the following steps in a visual way:
- Define the problem.
- Brainstorm solutions.
- Pick a solution.
- Implement solutions.
- Review the results.
How to make your problem-solving process more visual
Words pack a lot of power and are very important to how we communicate on a daily basis. Using words alone, you can brainstorm, organize data, identify problems, and come up with possible solutions. The way you write your ideas may make sense to you, but it may not be as easy for other team members to follow.
When you use flowcharts, diagrams, mind maps, and other visuals, the information is easier to digest. Your eyes dart around the page quickly gathering information, more fully engaging your brain to find patterns and make sense of the data.
Identify the problem with mind maps
So you know there is a problem that needs to be solved. Do you know what that problem is? Is there only one problem? Is the problem sum total of a bunch of smaller problems?
You need to ask these kinds of questions to be sure that you are working on the root of the issue. You don’t want to spend too much time and energy solving the wrong problem.
To help you identify the problem, use a mind map. Mind maps can help you visually brainstorm and collect ideas without a strict organization or structure. A mind map more closely aligns with the way a lot of our brains work—participants can bounce from one thought to the next defining the relationships as they go.

Mind mapping to solve a problem includes, but is not limited to, these relatively easy steps:
- In the center of the page, add your main idea or concept (in this case, the problem).
- Branch out from the center with possible root causes of the issue. Connect each cause to the central idea.
- Branch out from each of the subtopics with examples or additional details about the possible cause. As you add more information, make sure you are keeping the most important ideas closer to the main idea in the center.
- Use different colors, diagrams, and shapes to organize the different levels of thought.
Alternatively, you could use mind maps to brainstorm solutions once you discover the root cause. Search through Lucidchart’s mind maps template library or add the mind map shape library to quickly start your own mind map.
Create a problem-solving flowchart
A mind map is generally a good tool for non-linear thinkers. However, if you are a linear thinker—a person who thinks in terms of step-by-step progression making a flowchart may work better for your problem-solving strategy. A flowchart is a graphical representation of a workflow or process with various shapes connected by arrows representing each step.
Whether you are trying to solve a simple or complex problem, the steps you take to solve that problem with a flowchart are easy and straightforward. Using boxes and other shapes to represent steps, you connect the shapes with arrows that will take you down different paths until you find the logical solution at the end.

Flowcharts or decision trees are best used to solve problems or answer questions that are likely to come up multiple times. For example, Yoder Lumber , a family-owned hardwood manufacturer, built decision trees in Lucidchart to demonstrate what employees should do in the case of an injury.
To start your problem-solving flowchart, follow these steps:
- Draw a starting shape to state your problem.
- Draw a decision shape where you can ask questions that will give you yes-or-no answers.
- Based on the yes-or-no answers, draw arrows connecting the possible paths you can take to work through the steps and individual processes.
- Continue following paths and asking questions until you reach a logical solution to the stated problem.
- Try the solution. If it works, you’re done. If it doesn’t work, review the flowchart to analyze what may have gone wrong and rework the flowchart until you find the solution that works.
If your problem involves a process or workflow , you can also use flowcharts to visualize the current state of your process to find the bottleneck or problem that’s costing your company time and money.

Lucidchart has a large library of flowchart templates to help you analyze, design, and document problem-solving processes or any other type of procedure you can think of.
Draw a cause-and-effect diagram
A cause-and-effect diagram is used to analyze the relationship between an event or problem and the reason it happened. There is not always just one underlying cause of a problem, so this visual method can help you think through different potential causes and pinpoint the actual cause of a stated problem.
Cause-and-effect diagrams, created by Kaoru Ishikawa, are also known as Ishikawa diagrams, fishbone diagrams , or herringbone diagrams (because they resemble a fishbone when completed). By organizing causes and effects into smaller categories, these diagrams can be used to examine why things went wrong or might go wrong.

To perform a cause-and-effect analysis, follow these steps.
1. Start with a problem statement.
The problem statement is usually placed in a box or another shape at the far right of your page. Draw a horizontal line, called a “spine” or “backbone,” along the center of the page pointing to your problem statement.
2. Add the categories that represent possible causes.
For example, the category “Materials” may contain causes such as “poor quality,” “too expensive,” and “low inventory.” Draw angled lines (or “bones”) that branch out from the spine to these categories.
3. Add causes to each category.
Draw as many branches as you need to brainstorm the causes that belong in each category.
Like all visuals and diagrams, a cause-and-effect diagram can be as simple or as complex as you need it to be to help you analyze operations and other factors to identify causes related to undesired effects.
Collaborate with Lucidchart
You may have superior problem-solving skills, but that does not mean that you have to solve problems alone. The visual strategies above can help you engage the rest of your team. The more involved the team is in the creation of your visual problem-solving narrative, the more willing they will be to take ownership of the process and the more invested they will be in its outcome.
In Lucidchart, you can simply share the documents with the team members you want to be involved in the problem-solving process. It doesn’t matter where these people are located because Lucidchart documents can be accessed at any time from anywhere in the world.
Whatever method you decide to use to solve problems, work with Lucidchart to create the documents you need. Sign up for a free account today and start diagramming in minutes.
Lucidchart, a cloud-based intelligent diagramming application, is a core component of Lucid Software's Visual Collaboration Suite. This intuitive, cloud-based solution empowers teams to collaborate in real-time to build flowcharts, mockups, UML diagrams, customer journey maps, and more. Lucidchart propels teams forward to build the future faster. Lucid is proud to serve top businesses around the world, including customers such as Google, GE, and NBC Universal, and 99% of the Fortune 500. Lucid partners with industry leaders, including Google, Atlassian, and Microsoft. Since its founding, Lucid has received numerous awards for its products, business, and workplace culture. For more information, visit lucidchart.com.
Related articles

Sometimes you're faced with challenges that traditional problem solving can't fix. Creative problem solving encourages you to find new, creative ways of thinking that can help you overcome the issue at hand more quickly.

Dialogue mapping is a facilitation technique used to visualize critical thinking as a group. Learn how you and your team can start dialogue mapping today to solve problems and bridge gaps in knowledge and understanding (plus get a free template!).
Bring your bright ideas to life.
or continue with
Have a language expert improve your writing
Run a free plagiarism check in 10 minutes, generate accurate citations for free.
- Knowledge Base
- Starting the research process
- What Is a Fishbone Diagram? | Templates & Examples
What Is a Fishbone Diagram? | Templates & Examples
Published on January 2, 2023 by Tegan George . Revised on January 29, 2024.
A fishbone diagram is a problem-solving approach that uses a fish-shaped diagram to model possible root causes of problems and troubleshoot possible solutions. It is also called an Ishikawa diagram, after its creator, Kaoru Ishikawa, as well as a herringbone diagram or cause-and-effect diagram.
Fishbone diagrams are often used in root cause analysis , to troubleshoot issues in quality management or product development. They are also used in the fields of nursing and healthcare, or as a brainstorming and mind-mapping technique many students find helpful.
Table of contents
How to make a fishbone diagram, fishbone diagram templates, fishbone diagram examples, advantages and disadvantages of fishbone diagrams, other interesting articles, frequently asked questions about fishbone diagrams.
A fishbone diagram is easy to draw, or you can use a template for an online version.
- Your fishbone diagram starts out with an issue or problem. This is the “head” of the fish, summarized in a few words or a small phrase.
- Next, draw a long arrow, which serves as the fish’s backbone.
- From here, you’ll draw the first “bones” directly from the backbone, in the shape of small diagonal lines going right-to-left. These represent the most likely or overarching causes of your problem.
- Branching off from each of these first bones, create smaller bones containing contributing information and necessary detail.
- When finished, your fishbone diagram should give you a wide-view idea of what the root causes of the issue you’re facing could be, allowing you to rank them or choose which could be most plausible.
Prevent plagiarism. Run a free check.
There are no built-in fishbone diagram templates in Microsoft programs, but we’ve made a few free ones for you to use that you can download below. Alternatively, you can make one yourself using the following steps:
- In a fresh document, go to Insert > Shapes
- Draw a long arrow from left to right, and add a text box on the right-hand side. These serve as the backbone and the head of the fish.
- Next, add lines jutting diagonally from the backbone. These serve as the ribs, or the contributing factors to the main problem.
- Next, add horizontal lines jutting from each central line. These serve as the potential causes of the problem.
Lastly, add text boxes to label each function.
You can try your hand at filling one in yourself using the various blank fishbone diagram templates below, in the following formats:
Fishbone diagram template Excel
Download our free Excel template below!

Fishbone diagram template Word
Download our free Word template below!

Fishbone diagram template PowerPoint
Download our free PowerPoint template below!

Fishbone diagrams are used in a variety of settings, both academic and professional. They are particularly popular in healthcare settings, particularly nursing, or in group brainstorm study sessions. In the business world, they are an often-used tool for quality assurance or human resources professionals.
Fishbone diagram example #1: Climate change
Let’s start with an everyday example: what are the main causes of climate change?

Fishbone diagram example #2: Healthcare and nursing
Fishbone diagrams are often used in nursing and healthcare to diagnose patients with unclear symptoms, or to streamline processes or fix ongoing problems. For example: why have surveys shown a decrease in patient satisfaction?

Fishbone diagram example #3: Quality assurance
QA professionals also use fishbone diagrams to troubleshoot usability issues, such as: why is the website down?

Fishbone diagram example #4: HR
Lastly, an HR example: why are employees leaving the company?

Fishbone diagrams come with advantages and disadvantages.
- Great tool for brainstorming and mind-mapping, either individually or in a group project.
- Can help identify causal relationships and clarify relationships between variables .
- Constant iteration of “why” questions really drills down to root problems and elegantly simplifies even complex issues.
Disadvantages
- Can lead to incorrect or inconsistent conclusions if the wrong assumptions are made about root causes or the wrong variables are prioritized.
- Fishbone diagrams are best suited to short phrases or simple ideas—they can get cluttered and confusing easily.
- Best used in the exploratory research phase, since they cannot provide true answers, only suggestions.
Here's why students love Scribbr's proofreading services
Discover proofreading & editing
If you want to know more about the research process , methodology , research bias , or statistics , make sure to check out some of our other articles with explanations and examples.
Methodology
- Sampling methods
- Simple random sampling
- Stratified sampling
- Cluster sampling
- Likert scales
- Reproducibility
Statistics
- Null hypothesis
- Statistical power
- Probability distribution
- Effect size
- Poisson distribution
Research bias
- Optimism bias
- Cognitive bias
- Implicit bias
- Hawthorne effect
- Anchoring bias
- Explicit bias
Fishbone diagrams have a few different names that are used interchangeably, including herringbone diagram, cause-and-effect diagram, and Ishikawa diagram.
These are all ways to refer to the same thing– a problem-solving approach that uses a fish-shaped diagram to model possible root causes of problems and troubleshoot solutions.
Fishbone diagrams (also called herringbone diagrams, cause-and-effect diagrams, and Ishikawa diagrams) are most popular in fields of quality management. They are also commonly used in nursing and healthcare, or as a brainstorming technique for students.
Cite this Scribbr article
If you want to cite this source, you can copy and paste the citation or click the “Cite this Scribbr article” button to automatically add the citation to our free Citation Generator.
George, T. (2024, January 29). What Is a Fishbone Diagram? | Templates & Examples. Scribbr. Retrieved March 21, 2024, from https://www.scribbr.com/research-process/fishbone-diagram/
Is this article helpful?

Tegan George
Other students also liked, how to define a research problem | ideas & examples, data collection | definition, methods & examples, exploratory research | definition, guide, & examples, unlimited academic ai-proofreading.
✔ Document error-free in 5minutes ✔ Unlimited document corrections ✔ Specialized in correcting academic texts
Problem Solution Mapping — Everything You Need to Know!
Edraw content team, do you want to make your problem solution mapping.
EdrawMax specializes in diagramming and visualizing. Learn from this article to know everything about what is a problem solution map, problem-solving process, how to make your problem solution map. Just try it free now!
When facing a problem, you have two options. You can either continue untangling the problem in your mind. Or, you can put it all out in a problem-solution map and save time and energy. A problem-solution map helps you find the root cause of the problem. Then, when you know the reasons, you can also find your ultimate solution.
So, let's explore more about problem and solution maps and elements of the problem-solving process in the following guide. We'll also learn about EdrawMax - a free online software to fulfill all your diagramming needs!
So, let's dive into it!

1. What is a Problem Solution Map
A problem solution map represents a logical analysis of available data leading towards a solution. In other words, a problem solution map uses the given data to provide a solution to the problem. A straightforward solution map can have various elements. Typically, it has the following structure:
- a problem statement
- problem definition
- possible causes and effects
- an effective solution
You can change the structure of a solution map according to the problem. However, it should include all the possible laws and principles at all stages to find a practical solution. Solution mapping is crucial and better than thinking about a solution. It's because solution mapping makes you visualize your problem and simplify it.
You consider all the possible reasons behind the problem and milestones to achieve to solve it. As a result, your thoughts become organized and clearer in a visual representation. It also saves your time and effort and increases your productivity.
2. Problem-Solving Process
Practical problem-solving is more than just visualizing and figuring out the solution. It is a process with several steps to guide you to the optimal solution. It includes:
- Problem definition
- Problem analysis
- Possible solutions
- Analysis of the solutions
- Select the best solution
- Execute the solution

Let's explore these!
Problem Definition
Before you start working on your problem solution map, you should define your problem. It might surprise you but defining a problem is more challenging than just writing it on paper. It's because the main problem is often a vague idea merged with unnecessary, distracting conflicts. So, please understand the problem and clear up its confusion.
Problem Analysis
After defining the problem, the next step is to analyze it. When deciding if a solution will truly work, it is vital to recognize where the problem begins, how it fits with the latest advancements, and what the present environment is.
For instance, the following is a problem solution map example. It is a problem tree designed on EdrawMax displaying the causes behind poor health conditions among Gapachi Vileans. You can tell a problem's roots from its consequences (branches) by comparing them to a tree (trunk).

Possible Solutions
In this step, you should focus on solutions. However, it is essential to come up with as many solutions as possible without evaluating them. You should consider it a solution, even if it seems vague. So, think for some time and list all the ideas that come to mind as solutions to the problem.
Analysis of the Solutions
Here, you will go back to all the solutions you wrote in the previous step. Then, you will consider each idea individually and investigate it. When analyzing an argument, assess its positive and negative aspects and whether it addresses the problem entirely. You can also write unique benefits of each idea to differentiate it from others.
For example, consider this Graphic Organizer: Problem Solution diagram by EdrawMax. It simplifies finding a solution as you can write all the possible choices and their pros and cons. Then, you can select the most effective solution as the final one.

Select the Best Solution
After writing the pros and cons of all the ideas side by side, you need to filter the best solutions from the list. You can also improve it by revising the ideas and refining their individual traits. In the end, you might have one or more solutions (the best ones!). If not, consider reevaluating the problem statement or repeating the 3rd and 4rth steps.
Execute the Solution
Once you have come up with the solution, the final step is to execute it. Then, consider what you should do next to follow that particular solution. In other words, you need to plan your solution to solve the problem.
3. Visualize Your Problem Solution Map Process
The best thing about a solution map is that it is open-ended. However, it also means no hard and fast rule or rocket science behind creating a solution map .
Still, creating a problem and solution map from scratch takes a lot of work. The good thing is that you can always take advantage of powerful software like EdrawMax . It is an incredibly powerful online service to tackle all your diagramming needs.

EdrawMax has all the features you need to visualize your problem-solution map. For instance:
- You can insert tables, charts, timelines - anything that can help define and analyze the problem and/or solutions.
- You can add, remove, replace, and do much more with symbols and shapes through Predefine Libraries in EdrawMax.
- You can use the Connector feature and drag it to draw a line (arrows) to a connection point on the shape you want to connect to.
- You can edit color, line weight, dash style, and arrow style using the Line or Line Style feature to customize your solution map.
What else? You can also find hundreds of ready-made solution map templates on the EdrawMax community. These editable templates make everything easy, as you can edit them according to your preference. Creating a solution map from scratch takes less time and effort.
4. Conclusion
Every problem has a solution, but finding that solution can be challenging. The road map to finding the ultimate solution is often chaotic and messy. With a problem and solution map , you can visualize your problem, its root causes, and possible solutions. A problem solution map is a way to analyze the available data and find the perfect solution to solve the problem. With EdrawMax , you can easily create your problem solution map. Or you can also save time by editing an already published template on the EdrawMax community!
You May Also Like
Hierarchy organizational chart complete guide, modern organizational chart complete guide, it organization chart complete guide, matrix org chart complete guide, product organization structure complete guide, accounting flowchart complete guide.
Visual Problem Solving with Mind Maps and Flowcharts
Updated on: 25 July 2023
Everyone has problems, and we spend most of our working lives solving them. For those who find this quite negative, problems can be also termed as Issues, Challenges or Opportunities.
Some people are especially gifted at problem-solving while others struggle. Some are only good at solving some types of problems, while some other are simply great at finding viable solutions for any problem. Society generally calls the latter, smart.
What if I was to tell you that there’s a simple way to solve any problem you may encounter. In fact, it can be regarded as the smart way to solve problems.
Before we get into it, let’s see how people really fail at solving problems.
Problem-Solving Fails
You Solve the Wrong Problem
Well, if you don’t know what the problem area is and don’t understand it very well, you’ll probably solve a problem that actually doesn’t exist while the actual problem remains as it is.
You Solve It Half Way
Again, this happens if you don’t know what the full problem is. Identifying and understanding the problem is so important before you start.
You Solve it but New Problems Show Up
This is typical when you don’t know much about the background about the problem area. If you know nothing about computers and you try to fix a broken computer, you probably won’t get very far and will likely make it worse.
You Don’t Know How
Well, obviously if you are trying to solve a problem that you have no clue about, this is going to be hard. When that’s the case, get the help of an expert in the domain the problem you are trying to solve belong to.
How to Solve Any Problem
As it’s quite clear the first step to solving any problem is understanding it thoroughly. Apart from getting a domain expert involved, the best trick I can bring you in is to draw it out. If you are a visual person this is the first thing you should do.
Different kinds of problems require different diagrams, but mind maps and flowcharts are common solutions to most problems.
Thinking Around the Problem
To get a background idea on what the problem and problem area is, mind maps can help greatly. Start with the core idea and branch out as you think about various aspects of the problem.

A mind map is a good place to start visual problem solving ( click on image to create your own mind map )
After thinking about wide aspects of the problem, it’s best to document what the immediate context of the issue is.
To do this, a concept map helps. A concept map is a diagram where you use various shapes to show areas of the problem and how they are connected.
Breaking It Down
Any big problem can be broken into a series of smaller problems. These are usually connected so a flowchart helps . Break the problem into smaller steps with a flowchart.
If you are analyzing an existing solution and trying to optimize it, a flowchart makes perfect sense as it also does the ‘defining’ part of the problem as well.

Analyze your problem further with a flowchart
Once you have broken down the problem into smaller easily solvable problems in a flow chart, you can start creating another chart for the solution as well.
Getting Help
You should always get help if it’s available when you are solving any problem. A second opinion or a second pair of eyes can help a lot in getting the optimal solution.
Tools to Aid Visual Problem Solving
While there is a myriad of tools to help you draw things, Creately is definitely one of the easiest ways to visualize your problem.
We support mind maps, flowcharts, concept maps and 50+ other diagram types which you can use for visual problem-solving.
Our professionally designed templates and productivity features help you just focus on the drawing as it’s really easy to draw a beautiful diagram in it.
It also comes with built-in real-time collaboration so it helps when you want to get someone else to collaborate on your problem.
Other choices for drawing diagrams to solve problems include Dia, Google Draw or even Microsoft office packages.
Join over thousands of organizations that use Creately to brainstorm, plan, analyze, and execute their projects successfully.

More Related Articles

Leave a comment Cancel reply
Please enter an answer in digits: twenty + one =
Download our all-new eBook for tips on 50 powerful Business Diagrams for Strategic Planning.
How to create a problem-solving flow chart
Problem-solving is one of those topics that we’ve often discussed on this site (check out our Problem Solving guide ). We think it’s one of THE vital skills of business. Why? Because you’ll come across problems every day, and you need to arm yourself with the right tools to solve them.
A problem-solving flowchart is one of those tools. It’ll help you take a problem statement, break the problem down into likely causes helping you get to the bottom of what’s gone wrong.
In this post, we’ll cover
- What is a Problem Solving Flow Chart
- How to create a Problem Solving flow chart
- Example 1 of Problem Solving flow chart
- Example 2 of Problem Solving Flow chart
- What flow chart shapes to use
- When should you use a flow chart
- 7 tips on creating your Problem Solving chart
Key Benefits & Likely issues with the tool
Let’s get started!
What is a Problem Solving Flowchart
A Problem Solving flow chart is a diagram that uses shapes, arrows, and text to show a moving sequence of actions and/or activities that help solve a problem.
How to create a Problem Solving flowchart
- Describe your problem.
- Pose Yes/No Questions that can help identify the cause of the problem
- Question each stage of the process until it is fully examined
- Repeat steps 2 & 3 until you have identified a solution
- Try the solution; if it is successful in addressing the root cause, then you’ve fixed your problem. If not, repeat the process until you have a solution that works.
A problem-solving flowchart attempts to identify a root cause/solution to the trigger that is causing the problem allowing you to change the process and prevent the problem from occurring.
Let’s now demonstrate the effectiveness of a problem solving flowchart by showing some examples.
Example 1 Problem solving flow chart
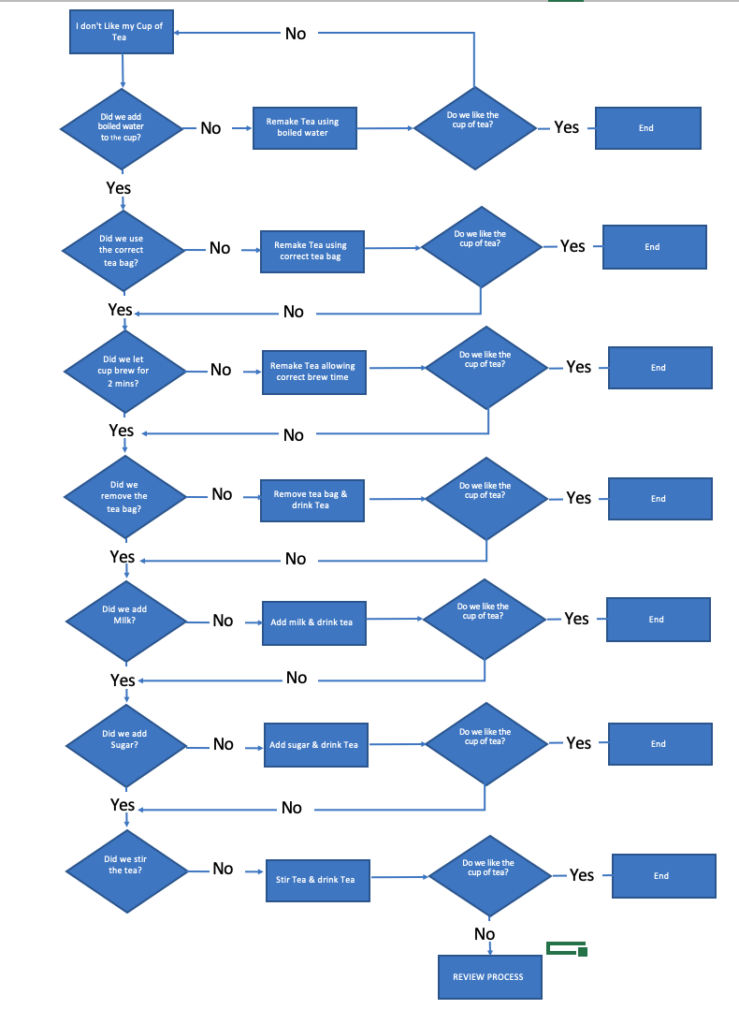
In our first example, we’re going to start with something simple to show you the principle of the tool.
We have been given a cup of tea and we don’t like it!
Let’s use a problem-solving flow chart to find out what’s gone wrong.
We’ve used Excel to capture this flow chart using flowchart shapes (insert –> shapes), you can, of course, use other applications to do this, you don’t’ have to have specialized flow chart software to do this. ( there’s a great flowchart in Excel video here ). Or you can simply use a pen and paper.
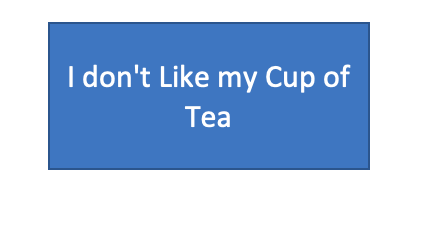
Use a rectangle and add your problem statement.
Remember to keep your problem statement unambiguous and straightforward. Here we’ve used “I don’t like my cup of tea.”
Now that we’ve got our problem statement, we’re going to start asking questions.
We’re going to examine the variables that go into a cup of tea in an attempt to find out what’s gone wrong.
** TIP** – Work through your process – rather than start from scratch, if you have a documented process, work through that examining each step to ascertain if there are issues. If not, you might find it useful to research and sketch out the process before starting with your flowchart.
We have a process for the cup of tea, which is:
1/ Boil Water
2/ Place Breakfast Tea teabag in the cup
3/ Add Water
4/ Leave to sit for 2 mins
4/ Remove teabag
5/ Add milk
6/ Add sugar
So our problem solving flow chart needs to examine each of those steps to determine where the failure has occurred.
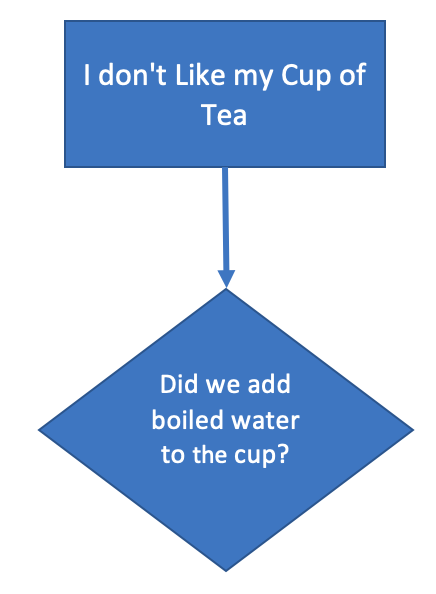
We’ll add a question shape (diamond), connect out problem statement to it using an arrow to check if we boiled the kettle. Our Diagram will now look like:
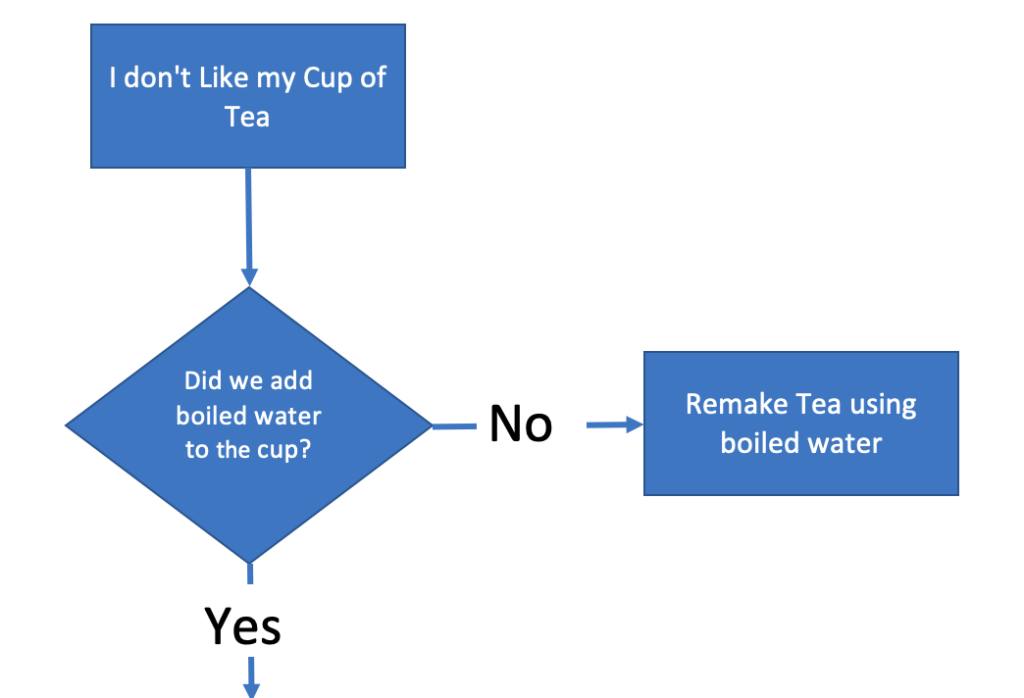
As a question, we want two possible routes – Yes and No.
Our process asks us to boil the kettle if we did, and the answer is Yes, then we can go to the next process step.
If the answer is No, then we have a problem. Our tea will be cold.
Here we can do one of two things. We can terminate the flow chart, or we can add an activity to rectify the problem (this might be to remake the drink or to perhaps heat the drink up in the microwave).
Our flow chart now looks like this:
Step 2 in our Tea making process was to add a Breakfast-tea tea bag.
So, once again, we’ll ask a question about that step.
“Did we add an English Breakfast teabag.”
As before, we’ll use a question shape, using Yes or No answers. If we performed the process step correctly, we’d move on. If we didn’t, we’ll either end the problem solving (we’ve found the root cause), or we’ll add a corrective action.
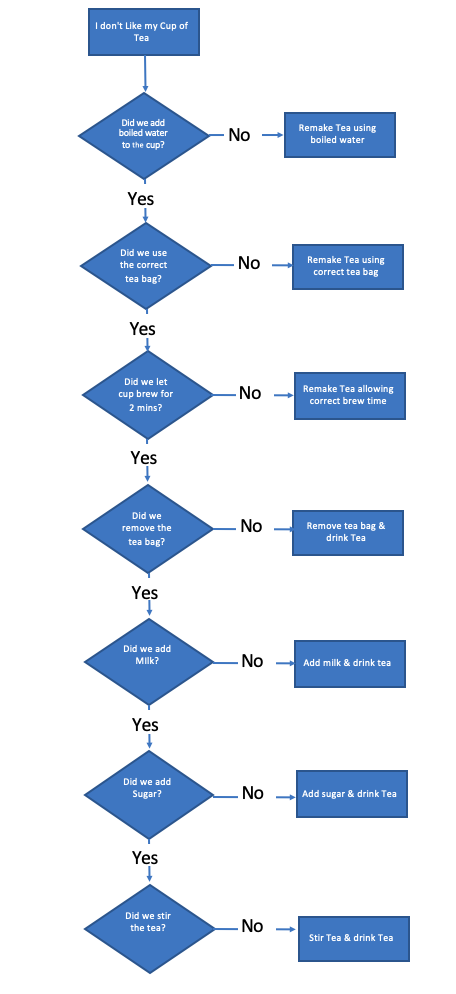
Now we’ll repeat this process until we’ve reviewed the whole process.
Our finished flowchart looks like this.
However, we’re not finished.
What happens if we follow the flow chart, and we find we didn’t use boiled water. We remake the tea using boiled water, and we still don’t like it?
We need to ask some further questions.
We need to update our flow chart to validate that we solved the problem and what to do if we didn’t.
So for each step of the process, our problem solving flowchart now looks like this.
Here’s our completed flow chart.
As you can see, we’ve identified the problem, and we’ve described a corrective action.
But there’s a problem here. With this flowchart, you can still follow it, validating the process, and still end up with a cup of tea that’s unsatisfactory.
Why is that?
Well, it’s perfectly possible that we started out with a process that’s incorrect. What happens if the process called for using an incorrect tea bag from the start?
So we’ll simplify things by adding a block at the end that if you’re still not happy at the end of reviewing the steps, a full review of the process will be undertaken. This is a simple answer to this problem, and I would expect that you would expand this section in more detail if you were creating a flowchart yourself.
So what does a more complex process look like, how about we look at a business problem?
Example 2 Problem Solving flow chart
OK, so example 1 may have been a bit simple, and you are maybe looking for something in a business context.
So in Example 2, let’s look at a scenario that’s a little more complex.
Let’s assume that your organization has received a non-conforming part. You have been assigned to work with the Vendor to:
- Find out what went wrong
- Prevent recurrence
We’re going to use a problem solving flow chart to help us do that.
As with the first example, we’re going to state the problem.
“The part is non conforming.”
Using the production process from the Vendor, we’ll work through the stages to see if we can spot what’s gone wrong.
The diagram below shows an analysis of the first two steps of the production process using a problem-solving flow chart.
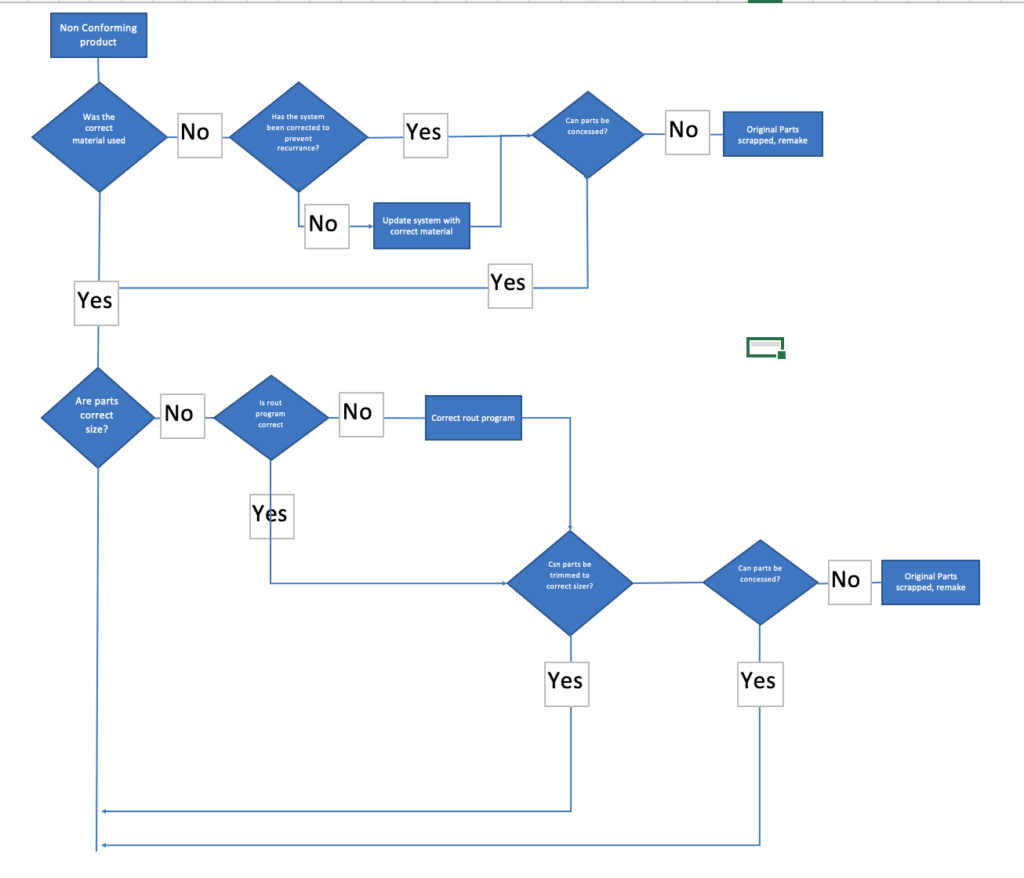
The first thing you’ll notice is that on one process step, there may be many questions to ascertain the potential issue.
Some of these may be complex and require careful thought.
There may be multiple variables (systems, processes, tools, inputs, etc.) that may require attention.
You will need to analyze each process step, in full, to be sure you have caught all the possible causes of the fault.
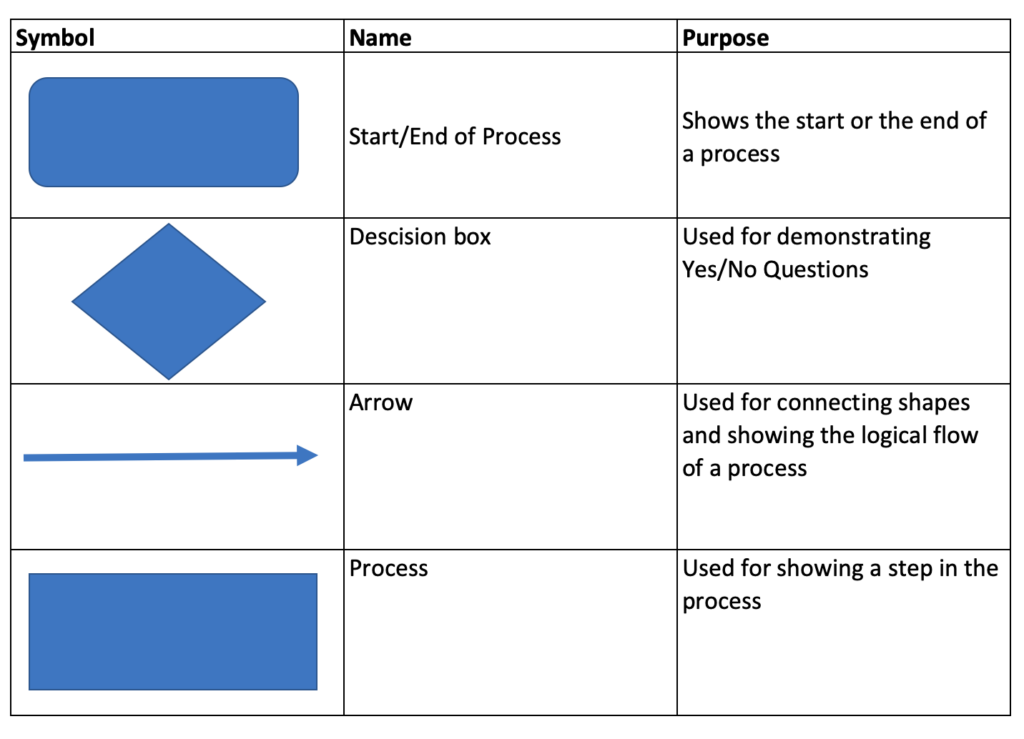
Which Flow chart shapes should you use.
A problem solving flow chart usually utilizes only a small number of shapes. We show these in the table below.
When should you use a Problem Solving flow chart
There are many many problem tools available.
A flow chart lends itself to be used when:
- You are looking for a tool that is simple to use
- You are looking to use a tool that does not require complex software
- You want to validate a process.
- You want something that facilitates collaboration
- You want something that you can use to communicate with others
7 Tips on creating great problem solving flow charts
1/ Use standard shapes!
2/ Make it easy to follow!
3/ Keep things on one page
4/ Don’t overload your boxes with text
5/ Go into enough detail. Don’t try and simplify activities as it might hide problems from being seen.
6/ Collaborate. Where you can utilize a team to help document the problem and the activities do so. The more knowledge of the process, the better chance you’ll have of locating the issue.
7/ Use a consistent direction to flow your process, moving things around the page can confuse people who might look at it.
A flow chart can provide you with a great advantage when looking to solve problems. Some of the key benefits include
- A visual aide that’s easy to understand
- Simple to use, does not require hours and hours of training
- A tool that facilitates collaboration
- Effective for aiding communication
- Provides an effective method of analysing a process
However, as with everything, there are some issues to look out for
- Flowchart fails to capture all process steps and therefore root cause analysis is hit and miss
- Lack of knowledge of the process by the individual compiling the flowchart results in inaccurate problem solving
- Inconsistent flow of process makes maps confusing
- Complex processes may be better suited to other tools (fishbone etc)
- Inconsistent formatting and/or use of shapes result in flowchart that is difficult to utilise.
There are a great many tools out there for problem-solving, and flow charts can be used either as a stand-alone tool or conjunction with one of these other tools.
Flowcharts can make for a great problem-solving tool.
They’re simple to use, effective, and facilitate collaboration.
We hope you’ve found our article useful, in particular the example walkthroughs.
If you’re looking to use the tool, we’d love some feedback from you and hearing how you’ve got on. Why not fire us a message on twitter or use the comments section below.
This article is part of our Problem Solving Guide.
Our Content
- Calculators
- Career Skills
- Communications
- Human Resources
- Strategy and Leadership
- Supply Chain Management
We use essential cookies to make Venngage work. By clicking “Accept All Cookies”, you agree to the storing of cookies on your device to enhance site navigation, analyze site usage, and assist in our marketing efforts.
Manage Cookies
Cookies and similar technologies collect certain information about how you’re using our website. Some of them are essential, and without them you wouldn’t be able to use Venngage. But others are optional, and you get to choose whether we use them or not.
Strictly Necessary Cookies
These cookies are always on, as they’re essential for making Venngage work, and making it safe. Without these cookies, services you’ve asked for can’t be provided.
Show cookie providers
- Google Login
Functionality Cookies
These cookies help us provide enhanced functionality and personalisation, and remember your settings. They may be set by us or by third party providers.
Performance Cookies
These cookies help us analyze how many people are using Venngage, where they come from and how they're using it. If you opt out of these cookies, we can’t get feedback to make Venngage better for you and all our users.
- Google Analytics
Targeting Cookies
These cookies are set by our advertising partners to track your activity and show you relevant Venngage ads on other sites as you browse the internet.
- Google Tag Manager
- Infographics
- Daily Infographics
- Graphic Design
- Graphs and Charts
- Data Visualization
- Human Resources
- Training and Development
- Beginner Guides
Blog Business
What is a Problem-Solving Flowchart & How to Make One
By Danesh Ramuthi , Aug 10, 2023

Problem-Solving Flowcharts, contrary to what many believe aren’t just aesthetic wonders — they’re almost like magical blueprints for troubleshooting those pesky problems that many of us face.
Flowcharts take business challenges and turn them into a navigable pathway. In this post, I will guide you on key aspects of problem-solving flowcharts such as what it is, the advantages of problem-solving flowcharts, how to create one and more.
Besides, you’ll also discover how to create problem-solving flowcharts with the help of Venngage’s Flowchart Maker.
And for those of you thinking, “I’m no designer, how can I create one?” worry not! I’ve got you covered. Just hop on Venggage’s Flowchart Templates and you’ll be charting your way to problem-solving glory in no time.
Click to jump ahead:
What are problem-solving flowcharts?
When to use problem-solving flowcharts, what are the advantages of flowcharts in problem-solving, what are the 7 steps of problem-solving flowcharts.
- 5 different types of problem-solving flowcharts
Best practices for designing effective problem-solving flowcharts
How to make a flowchart using venngage , problem-solving flowcharts faqs.
- Final Thoughts
Problem-Solving Flowcharts is a graphical representation used to break down problem or process into smaller, manageable parts, identify the root causes and outline a step-by-step solution.
It helps in visually organizing information and showing the relationships between various parts of the problem.
This type of flowcharts consists of different symbols and arrows, each representing different components or steps in the problem-solving process.
By following the flow of the chart, individuals or teams can methodically approach problem, analyze different aspects of it and come to a well-informed solution.

Problem-Solving Flowcharts is a versatile tool that can be used in various scenarios. Here’s when to consider utilizing one:
- Complex Problems: When faced with a multifaceted issue that involves multiple steps or variables, flowcharts can help break down the complexity into digestible parts.
- Team Collaboration: If you’re working with a team and need a common understanding of problem and its potential solutions then a flowchart provides a visual that everyone can refer to.
- Analyzing Processes: In a situation where you need to understand a particular process, whether it’s within a project or a part of regular operations then mapping it out in a flowchart can offer clarity.
- Decision Making: When various paths or decisions might be taken, a flowchart can outline the potential outcomes of each aiding in making an informed choice.
- Training and Onboarding: Flowcharts can be used in training materials to help new employees understand complex processes or procedures which makes the learning curve smoother.
- Identifying Root Causes: If you’re looking to identify the underlying causes of problem then a flowchart can facilitate a systematic approach to reaching the root of the issue.
Related: How to Use Fishbone Diagrams to Solve Complex Problems
Problem-solving flowcharts can offer several benefits to the users who are looking to solve a particular problem. Few advantages of flowcharts in problem solving are:
Visual Clarity
When you’re dealing with multifaceted problems or processes, words alone can make the situation seem even more tangled. Flowcharts distill these complexities into easily understandable visual elements.
By mapping out each phase or component of problem, flowcharts offer a bird’s eye view enabling individuals to grasp the bigger picture and the finer details simultaneously.
Sequential Representation
Flowcharts excel in laying out the sequence of events or actions. By indicating a clear starting point and illustrating each subsequent step, they guide users through a process or solution path methodically.
This linear representation ensures that no step is overlooked and each is executed in the right order.
Collaboration
Problem-solving often requires team effort and flowcharts are instrumental in fostering collaborative environments.
When a team is discussing potential solutions or trying to understand problem’s intricacies, a flowchart serves as a collective reference point.
It aids in synchronizing everyone’s understanding, minimizing miscommunications and promoting constructive discussions.
Read more about: Flowcharts Symbols and Meaning

1. Define the Problem
Before anything else, it’s essential to articulate the problem or task you want to solve clearly and accurately. By understanding exactly what needs to be addressed you can ensure that subsequent steps align with the core issue.
2. Identify the Inputs and Outputs
Determine what inputs (such as data, information or resources) will be required to solve the problem and what the desired outputs or outcomes are. Identifying these factors will guide you in structuring the steps needed to reach the end goal and ensure that all necessary resources are at hand.
3. Identify the Main Steps
Break down the problem-solving process into its main steps or subtasks. This involves pinpointing the essential actions or stages necessary to reach the solution. Create a roadmap that helps in understanding how to approach the problem methodically.
4. Use Decision Symbols
In problem-solving, decisions often lead to different paths or outcomes. Using standard symbols to represent these decision points in the flowcharts allows for a clear understanding of these critical junctures. It helps visually present various scenarios and their consequences.
5. Add Descriptions and Details
A well-designed flowcharts is concise but clear in its labeling. Using arrows and short, descriptive phrases to explain what happens at each step or decision point ensures that the flowcharts communicates the process without unnecessary complexity.
6. Revise and Refine
Creating a flowcharts is not always a one-and-done process. It may require revisions to improve its clarity, accuracy or comprehensiveness. Necessary refinement ensures that the flowcharts precisely reflects the problem-solving process and is free from errors or ambiguities.
7. Use Flowchart Tool
While it’s possible to draw a flowcharts manually, using a flowcharts tool like Venngage’s Flowchart Maker and Venngage’s Flowchart Templates can make the process more efficient and flexible. These tools come with pre-designed templates and intuitive interfaces that make it easy to create, modify and share flowcharts.

5 different types of problem-solving flowcharts
Let’s have a look at 5 most common types of flowcharts that individuals and organizations often use.
1. Process Flowchart s
A process flowcharts is a visual representation of the sequence of steps and decisions involved in executing a particular process or procedure.
It serves as a blueprint that showcases how different stages or functions are interconnected in a systematic flow and it highlights the direction of the process from its beginning to its end.

Process flowcharts are instrumental in training and onboarding, sales process , process optimization, documentation, recruitment and in any scenario where clear communication of a process is crucial.

2. Flowcharts Infographic
A flowcharts infographic is a great way to showcase the process or a series of steps using a combination of graphics, icons, symbols and concise text. It aims to communicate complex information in a clear and easy-to-understand manner, making it a popular tool for conveying information, data and instructions in a visually engaging way.

For example, you can use this flowchart to illustrate a health insurance process that visually explains the steps involved from finding a provider to paying for your healthcare provider.

3. Circular Flowcharts
A circular flowcharts is used to illustrate the flow of information, goods, services or money within a closed system or process. It gets its name from its circular shape, which emphasizes the continuous and cyclical nature of the flow.

Circular flowcharts are widely used in various fields such as economics, business, engineering and process management to help visualize and understand complex systems.
In a circular flowcharts , elements are represented using various shapes and connected with arrows to indicate the direction of flow. The circular arrangement indicates that the process is ongoing and repeats itself over time.

4. Swimlane flowcharts
Swimlane flowcharts , also known as cross-functional flowcharts are a specific type of flowchart that organizes the process flow into lanes or “swimlanes.”
Each lane represents a different participant or functional area involved in the process and the flowchart shows how activities or information move between these participants.

Swimlane flowcharts are particularly useful for illustrating complex processes that involve multiple stakeholders or departments.
In a swimlane flowcharts, the process is divided horizontally into lanes and each lane is labeled with the name of the department, person or role responsible for that part of the process. Vertically, the flowchart displays the sequence of steps or actions taken in the process.

5. Decision Flowchart s
Decision flowcharts, also known as decision trees or flow diagrams are graphical representations that illustrate the process of making decisions or solving problems.
They are widely used in various fields such as computer science, business mapping , engineering and problem-solving scenarios.

Decision flowcharts help break down complex decision-making processes into simple, sequential steps, making it easier to understand and follow.
A decision tree is a specialized flowchart used to visually represent the process of decision-making.
Businesses and other individuals can employ a decision tree analysis as a tool to aid in evaluating different options and the possible consequences associated with each choice.
Decision trees Infographics can be used to create a more nuanced type of flowchart that is more informative and visually appealing by combining a decision flowchart and the flowchart infographic.
Decision flowcharts are valuable tools for visualizing decision-making processes, analyzing complex problems and communicating them effectively to others.

Designing effective problem-solving flowcharts involves careful consideration of various factors to ensure clarity, accuracy and usability. Here are some best practices to create efficient and useful problem-solving flowcharts:
- Understand the problem first & clearly define it
- Keep it simple
- Use standard & recognizable symbols
- Ensure that the flowchart follows a logical and sequential order
- Clearly label each decision point, action and outcome
- Verify the flowchart’s accuracy by testing it
- Clearly state the decision criteria that lead to different branches
- Provide context when the flowchart is part of a larger process or system
- Review and revise the flowchart
Creating problem-solving flowchart on Venngage is incredibly simple. All you have to do is:
- Start by Signing Up and Creating an Account with Venngage
- Choose a flowchart template that best suits your needs from our library.
- Start editing your flowchart by choosing the desired shapes, labels and colors.
- You can also enhance your flowchart by incorporating icons, illustrations or backgrounds all of which are readily available in our library.
- Once done, you will have 2 options to choose from, either sharing it online for free or downloading your flowchart to your desktop by subscribing to the Premium or Business Plan.
Is flowchart the representation of problem solutions?
Flowcharts are not the representation of problem solutions per se; rather, they are a visual representation of processes, decision-making steps and actions taken to arrive at a solution to problem.
What are the 3 basic structures of flowcharts?
3 Basic Structures of Flowcharts are:
- Sequence: Simplify Complexity
- Selection (Decision): Embrace Choices
- Repetition (Loop): Emphasize Iteration
What are the elements of a good flowchart?
A good flowchart should exhibit clarity and simplicity, using consistent symbols and labels to depict a logical sequence of steps. It should be readable, with appropriate white space to avoid clutter while eliminating ambiguity through well-defined decision criteria and paths.
Can flowcharts be used for both simple and complex problem-solving?
Yes, flowcharts can be used for both simple and complex problem-solving scenarios. Flowcharts are versatile visual tools that can effectively represent various processes, decision-making steps and problem-solving approaches regardless of their complexity.
In both cases, flowcharts offer a systematic and visual means of organizing information, identifying potential problems and facilitating collaboration among team members.
Can problem-solving flowcharts be used in any industry or domain?
Problem-solving flowcharts can be used in virtually any industry or domain. The versatility and effectiveness of flowcharts make them applicable to a wide range of fields such as Business and Management, Software Development and IT, Healthcare, Education, Finance, Marketing & Sales and a lot more other industries.
Final thoughts
Problem-solving flowcharts are a valuable and versatile tool that empowers individuals and teams to tackle complex problems with clarity and efficiency.
By visually representing the step-by-step process of identifying, analyzing and resolving issues, flowcharts serve as navigational guides simplifying intricate challenges into digestible parts.
With the aid of modern tools like Venngage’s Flowchart Maker and Venngage’s Flowchart Templates , designing impactful flowcharts becomes accessible to all while revolutionizing the way problems are approached and solved.

Visual problem-solving: The secret sauce of successful teams
Reading time: about 7 min
- Strategic planning
Our brains process visual cues faster and more easily than written or verbal cues. That’s why many of us rely on landmarks to help us navigate around town and why outdoor advertising is heavy on images and light on text.
Because images can often convey meaning more effectively than words, implementing visuals into your problem-solving will help your team easily find solutions faster.
What is visual problem-solving?
Visual problem-solving includes using visual aids like flowcharts, maps, diagrams, and sticky notes in your problem-solving process.
Visual problem-solving helps you to:
- Understand the problem : Visuals reveal the way that different elements relate to each other, offering enhanced clarity.
- Simplify the problem : Visuals help identify past patterns in your work, allowing you to apply previous solutions to current issues. Visuals can also break down complex elements into smaller, more manageable pieces.
Your exact visual problem-solving process might vary, but it will likely include the following basic steps:
- Identify and understand the problem
- Gather information that pertains to the problem
- Brainstorm and identify missing pieces
- Select the best solution
- Develop a plan and implement the solution
- Review the results and revise as necessary
How can you make problem-solving more visual?
Let’s break down the steps mentioned above to further explore how visuals can take your team to the next level of problem-solving.
Step 1: Identify and understand the problem
There are several different visual tools you can use that will help you identify and better understand the problem at hand. Here are just a couple of suggestions.
A mind map is a visual tool that closely aligns with how our brains work. You start with a central idea and then bounce from one thought to the next in a non-linear fashion while identifying relationships as you go.

Steps for identifying a problem with a mind map might include:
- In the center of a page, digital canvas, or whiteboard, write the problem you’re dealing with.
- Surrounding your central idea, add what you think might be possible causes of the problem. Connect these ideas back to your initial problem with lines or arrows.
- Continue to branch out from each of the ideas circling your central problem. Add examples, details, and any information that will help you to further identify the root problem and its causes. Be sure to show connections between ideas while keeping the most important ideas closest to the center.
- Use different colors, diagrams, and shapes to organize the different levels of thought—anything that makes sense to you and helps you identify the most pertinent information.
Mind maps have an endless number of uses. Students can utilize mind maps to brainstorm essay topics, creatives can implement mind maps into their workflow to collect strategy ideas, and management teams can use mind maps to illustrate potential effects of company-wide initiatives.
Cause-and-effect diagrams

To draw a cause-and-effect diagram :
- In a box at the right side of a canvas or whiteboard, write your main issue or problem.
- Draw a horizontal line from the left edge of the box. This line is known as the spine.
- From the spine, draw angled branches that represent a potential cause of the main problem. Each branch can also have sub-branches that contain information that relate to the stated cause.
By analyzing the relationships between your potential causes, you can more easily pinpoint (and solve) the core problem.
Step 2: Gather information that pertains to the problem
Gather information from surveys, website statistics, and so on. Then examine this feedback through pie charts, graphs, sticky notes, and more. By presenting the information visually, you’ll be able to analyze it more efficiently.
Step 3: Brainstorm and identify missing pieces
When brainstorming, encourage quantity over quality. As they say, no ideas are bad ideas when brainstorming. Reinforcing this attitude will empower your team to think quickly, creatively, and collaboratively. It will also provide a platform for everyone to feel comfortable sharing ideas.
Unsurprisingly, this step also generally becomes more effective when visual diagrams are implemented. As previously mentioned, mind maps in particular are great tools to use in a brainstorming session .
Step 4: Select the best solution
You should have a board or canvas full of ideas now. Next, you’ll need to eliminate any proposed solutions that seem less feasible or effective than the others. Once you’re left with plausible ideas, analyze and discuss the potential outcomes of each to determine which one might work best to solve your problem.
You’ll often find that there isn’t just one obvious fix to your problem. You might need to combine several ideas into a solution that will best suit your needs.
One simple exercise developed by Tom Wujec, a pioneer in business visualization, asks you to take two to three minutes to draw your process for making toast . This helps emphasize both how different people think, as well as how many approaches there are to solving a problem.
An exercise like this encourages collaboration and provides your team with applied practice in brainstorming and identifying the best ideas.
Step 5: Develop a plan and implement the solution
To implement a solution, you need to develop a plan—even just a simple one. A plan ensures that your team understands the path to success and knows what actionable steps to take next.
Flowcharts are effective visual aids in plan creation because they typically represent a more linear set of sequences. Using specific shapes and connectors to represent steps and decision paths, it’s easy for people to understand a process flow from start to finish. For example, use a flowchart template to help new hires understand the organization of a company or to illustrate the steps of a work task, like using the copy machine or replacing the printer ink. Or, use flowcharts on a marketing team to visually prepare for a product rollout or an upcoming campaign.

After implementing the solution, share the flowchart so everyone has access to the step-by-step plan. This helps your team members understand their role in the overall solution process.
Step 6: Review the results and revise as necessary
You may have fixed your problem, but that doesn’t mean you’re completely finished with the problem-solving process. Continue to monitor the implementation of your solution and analyze its results. That way, you can revise the process if necessary to increase effectiveness.
Flowcharts can be useful in this step, as well, to preemptively identify issues and process bottlenecks, anticipating and mitigating potential problems before they even occur.
Things to avoid with visual problem-solving
Cut down on inefficiency and wasted time by avoiding these common problem-solving mistakes:
- Not having a well-defined problem : Avoid trying to tackle too much at once. Break your problem down into smaller pieces and work your way up to the bigger problems.
- Giving up if your solution doesn’t work : Sometimes a clear answer is difficult to find, but exhaust all potential resources before throwing in the towel.
- Experiencing new problems when an initial solution is implemented : Don’t expect all issues to be solved right away. Ensure you’ve analyzed every facet of a possible solution in order to avoid future problems down the road.
- Failing to create an action plan : Without a strategic action plan, your team will struggle to align and act. Make sure to include a testing period within your plan.
As you get more comfortable using charts, diagrams, and other visuals, you’ll find that it’s easier for team members to quickly align and process important information. Potential problems will be easier to spot and data will make more sense.
Supercharge your problem-solving with a virtual whiteboard like Lucidspark. Lucidspark’s visual collaboration tools bring the whole team together no matter where they are located, keep ideas organized, and empower you to take action on the best ideas.

Take your problem-solving to the next level with Lucidspark.
About Lucidspark
Lucidspark, a cloud-based virtual whiteboard, is a core component of Lucid Software's Visual Collaboration Suite. This cutting-edge digital canvas brings teams together to brainstorm, collaborate, and consolidate collective thinking into actionable next steps—all in real time. Lucid is proud to serve top businesses around the world, including customers such as Google, GE, and NBC Universal, and 99% of the Fortune 500. Lucid partners with industry leaders, including Google, Atlassian, and Microsoft. Since its founding, Lucid has received numerous awards for its products, business, and workplace culture. For more information, visit lucidspark.com.
Related articles

A complete guide to understand mind mapping, how mind maps are often used, and steps to make a mind map of your own.

Let's explore how visual collaboration is empowering people to work in new and more productive ways and how you can begin to implement this practice on your own team.
Bring your bright ideas to life.
or continue with
- How to Use Ishikawa Diagrams to Solve Business Problems
- Learn Lean Sigma
- Root Cause Analysis
Do you want to solve business problems in an efficient manner? If this is the case, you should think about using Ishikawa Diagrams. Ishikawa Diagrams, also known as fishbone diagrams or cause-and-effect diagrams, are a visual tool that can help identify the root causes of a problem. As a result, they are an ideal solution for businesses looking to improve their processes and reduce errors.
We’ll look at how Ishikawa Diagrams can be used to solve business problems in this post. We’ll look at the anatomy of an Ishikawa Diagram and show you how to make one step by step. We’ll also look at real-world examples of business problems solved with Ishikawa Diagrams and the benefits gained by doing so. Finally, we’ll go over best practises for using Ishikawa Diagrams and how to avoid common pitfalls.
Whether you’re new to Ishikawa Diagrams or want to improve your problem-solving skills, this post will walk you through how to use this powerful tool to solve business problems.
Table of Contents
What is an ishikawa diagram.
Because of its appearance, the Ishikawa Diagram is also known as the fishbone diagram after its creator, Kaoru Ishikawa. The diagram is organised with a central spine and several branches that resemble fish bones. Each branch represents a possible cause category that contributes to the problem under consideration.
Because it is a versatile and widely used tool in problem solving and process improvement, an Ishikawa diagram is known by many different names. Here are some brief explanations for the various names:
Fishbone diagram: This name comes from the visual appearance of the diagram, which looks like a fish skeleton with the problem or effect at the head and the causes branching out like the bones of the fish.
Cause-and-effect diagram: This name reflects the diagram’s purpose, which is to aid in the identification of the root causes of a problem by mapping out the various factors that contribute to it. The diagram depicts the relationships between the causes and the effects, making it easier to determine where to focus improvement efforts.
Herringbone diagram: This is another name for the diagram’s appearance. The diagram’s branches resemble the bones of a herring, a type of fish.
While the names may be used interchangeably, they all refer to the same basic problem-solving and process-improvement tool.
An Ishikawa Diagram has six main branches, which are as follows:
- Personnel – This branch includes all human-related factors that may have an impact on the problem under consideration, such as training, communication, and teamwork.
- Process – This branch includes all of the steps and procedures involved in the process or activity, as well as the equipment, materials, and workflow.
- Machines – This branch includes all the physical equipment and machinery used in the process, including tools, machines, and technology.
- Materials – The raw materials and other inputs used in the process, such as supplies, ingredients, and components, are the focus of this branch.
- Environment – This branch includes all environmental factors that may affect the process, such as temperature, humidity, lighting, and noise.
- Measurement – This branch includes all metrics and measurements used to evaluate the process, such as quality standards, performance indicators, and statistical analysis.
Each of these branches is used to identify potential causes that may be contributing to the problem under investigation. For example, if a decrease in product quality is the issue, the Ishikawa Diagram can be used to identify the various factors that could be causing this problem, such as a lack of employee training, faulty equipment, or low-quality materials. The branches are used to identify as many potential causes as possible, which can then be further evaluated to determine the underlying cause of the problem.
The Ishikawa Diagram assists teams in gaining a better understanding of the problem being analysed and developing targeted solutions to address the root cause by identifying potential causes and organising them in a clear and concise manner.
How to Create an Ishikawa Diagram
Creating an Ishikawa Diagram is a simple process that begins with identifying the problem and breaking it down into its component parts. Here’s a step-by-step tutorial for making an Ishikawa Diagram:
- Step 1: Identify the problem and write it in a box at the top of the diagram.
- Step 2: To represent the main spine of the fishbone diagram, draw a horizontal arrow pointing to the problem box.
- Step 3: Draw a diagonal arrow for each of the diagram’s six main branches (People, Process, Equipment, Materials, Environment, and Measurement). Label each arrow with the name of the corresponding branch.
- Step 4: Determine the possible causes of the problem and document them on the appropriate branch. Create as many causes as you can and add them to the diagram.
- Step 5: If necessary, divide each cause into smaller sub-causes. Include these sub-causes in your diagram as well.
- Step 6: Determine the root cause of the problem by evaluating potential causes and sub-causes. The root cause is the underlying issue that is causing the problem being investigated.
- Step 7: Create and implement solutions to the root cause.
In addition to drawing an Ishikawa Diagram by hand, several software tools are available to help you create and collaborate on these diagrams. Among the most popular software tools are:
SmartDraw : This programme provides a variety of templates and tools for creating professional-looking Ishikawa Diagrams.
Lucidchart : This cloud-based software enables teams to work together in real-time to create Ishikawa Diagrams.
Creately : For creating Ishikawa Diagrams, this tool provides a variety of templates and customization options.
Creating Ishikawa Diagrams with software tools can save time and streamline the process of collaborating with team members. These tools also make it simple to share and export the diagram in a variety of formats, making it easier to include in presentations and reports.
Using Ishikawa Diagrams in Problem-Solving
Ishikawa Diagrams are a powerful problem-solving tool that can be used in root cause analysis. Teams can analyse the causes and develop solutions to address the root cause by identifying the various factors that contribute to a problem.
The process of determining the underlying cause of a problem rather than just addressing its symptoms is known as root cause analysis. This approach assists teams in developing more effective and long-term problem solutions.
To use an Ishikawa Diagram in root cause analysis, teams must first identify the problem and draw a fishbone diagram. The diagram’s six main branches (Personnel, Process, Machine, Materials, Environment, and Measurement) are used to identify potential problem causes. Teams can analyse the root cause by brainstorming and organizing these causes on the diagram.
Teams can use the “five whys” technique in addition to an Ishikawa Diagram to identify the root cause of a problem. The five whys technique is a method of drilling down into the root cause of a problem by asking “why” five times. The goal is for the team to keep asking “why” until they find the underlying root cause of the problem.
For example, if the issue is a product delivery delay, the five whys technique could be used as follows:
- Why was the product delivery delayed? – Because the shipment was sent to the wrong address.
- Why was it sent to the wrong address? – Because the shipping label was incorrect.
- Why was the label incorrect? – Because the person who prepared it didn’t check the address.
- Why didn’t they check the address? – Because they were in a rush to finish the task.
- Why were they in a rush? – Because they were given too many tasks to complete in a short amount of time.
In this example, the root cause of the product delivery delay is that the worker was assigned too many tasks to complete in a short period of time. By identifying the root cause, the team can develop solutions to the problem, such as allocating more time for tasks or more effectively delegating responsibilities.
To Summarize here is an overview of how Ishikawa Diagrams are used in root cause analysis follows:
Step 1: Brainstorm potential causes for each branch and write them on the diagram’s appropriate branch.
Step 2: Examine each possible cause to see if it is the root cause or a symptom of the problem.
Step 3: Use 5 Whys Analysis to ask “why” five times for each potential root cause identified to determine the underlying cause of the problem. Check out our 5 Whys Analysis Template to support this
Step 4: Once the root cause has been identified, develop and implement solutions to address it.
Here is an example of how a complete Ishikawa Diagram may look with potential problems identified on it.
To summarise, Ishikawa Diagrams are an effective problem-solving tool that can be combined with the five whys technique to identify the root cause of a problem. Teams can develop more effective and long-term solutions to improve their processes and operations by analysing potential causes and asking “why” to drill down into the underlying issue.
Examples of Business Problems Solved with Ishikawa Diagrams
Ishikawa Diagrams, also known as fishbone diagrams, have been used to solve a wide range of business problems. Here are some real-world examples of business problems solved with Ishikawa Diagrams:
Quality control issues in a manufacturing plant
A manufacturing plant was experiencing quality control issues with their products. The problem was identified using an Ishikawa Diagram, which helped the team to identify the potential causes of the problem. The diagram revealed that the issues were caused by a lack of training among the employees, poor machine maintenance, and inadequate raw materials. By addressing these issues, the plant was able to improve the quality of its products and reduce waste.
A call centre has a high employee turnover rate.
A call center’s ability to provide quality customer service was being hampered by high employee turnover. An Ishikawa Diagram was used to identify the problem, which assisted the team in determining the potential causes of the high turnover rate. According to the diagram, the problems were caused by low employee morale, insufficient training, and a lack of career development opportunities. The call centre was able to improve employee satisfaction and retention rates by addressing these issues.
Inventory management in a retail store is inefficient.
A retail store’s inventory management process was inefficient, resulting in excess inventory and stockouts. An Ishikawa Diagram was used to identify the problem, which assisted the team in determining the potential causes of the inefficiencies. According to the diagram, the problems were caused by inaccurate demand forecasting, insufficient inventory tracking, and poor communication among the store’s departments. The store was able to improve its inventory management process, reduce excess inventory, and prevent stockouts by addressing these issues.
The Ishikawa Diagram was used as a problem-solving tool in each of these examples to identify potential causes of the problem. The diagram enabled the teams to brainstorm and organise the various factors that could be contributing to the problem, allowing them to drill down to the root cause. The teams were able to implement more effective and long-term solutions to improve their processes and operations by addressing the root cause.
The advantages of using Ishikawa Diagrams in these scenarios include improved quality control, reduced waste, increased employee retention and satisfaction, and increased inventory management efficiency. The diagram enabled the teams to take a structured approach to problem-solving, allowing them to identify the root cause of the problem and develop more effective solutions.
Best Practice for Ishikawa Diagrams
Ishikawa Diagrams are a powerful problem-solving tool, but they must be used correctly to produce the desired results. Some best practises for using Ishikawa Diagrams in problem-solving processes are as follows:
- Clearly define the problem: Before you create an Ishikawa Diagram, you must first define the problem you are attempting to solve. This will aid your concentration and ensure that your diagram is relevant and effective.
- Involve a diverse team: Ishikawa Diagrams work best when used in a group setting. To ensure a well-rounded perspective, try to include a diverse group of people from various departments or areas of expertise.
- Brainstorm potential causes: Encourage team members to brainstorm all potential causes of the problem when creating the diagram. This will assist you in identifying all potential root causes and ensuring that your solutions are all-inclusive.
- Use clear and concise language: When labelling the branches of the diagram, use clear and concise language to ensure that everyone understands the meaning. Avoid using jargon or abbreviations that may be confusing to some team members.
- Prioritize potential causes: After identifying all potential causes, prioritise them based on their likelihood of contributing to the problem. This will allow you to concentrate your efforts on the most pressing root causes.
- Verify the root cause: Before implementing any solutions, test your hypothesis to determine the root cause of the problem. This will help you ensure that you are treating the underlying cause of the problem rather than just the symptoms.
Avoiding Common Mistakes When Using Ishikawa Diagrams
While Ishikawa Diagrams can be a useful problem-solving tool, there are some common errors that teams can make when creating and using them. Here are some errors to avoid:
- Jumping to conclusions: It is critical to avoid jumping to conclusions before identifying and evaluating all potential causes. Rushing to solutions without fully comprehending the underlying cause of the problem can result in ineffective and costly solutions.
- Excessive diagram complexity: Keep the diagram simple and focused on the problem at hand. Overcomplicating the diagram with too many branches or irrelevant information can make determining the true root cause of the problem difficult.
- Ignoring other sources of information: While Ishikawa Diagrams are a powerful tool, they should not be used as the sole source of information in problem-solving processes. Other data sources to consider include customer feedback, process data, and employee input.
Teams can effectively use Ishikawa Diagrams to identify and address the root causes of business problems by adhering to these best practises and avoiding common pitfalls.
Finally, Ishikawa Diagrams are a useful tool for solving business problems and determining the root causes of problems. Teams can effectively use Ishikawa Diagrams to find comprehensive solutions by following best practices such as clearly defining the problem, involving a diverse team, brainstorming potential causes, and prioritising root causes.
It’s critical to remember that Ishikawa diagrams should be used in conjunction with other sources of information to ensure a well-rounded approach to problem-solving. Teams can effectively leverage the power of Ishikawa diagrams in their problem-solving processes by avoiding common mistakes such as overcomplicating the diagram and jumping to conclusions.
Finally, using Ishikawa Diagrams to solve business problems can result in better processes, higher customer satisfaction, and a more efficient organisation. Teams can achieve greater success and propel their businesses forward by mastering this powerful tool.
- Ilie, G. and Ciocoiu, C.N., 2010. Application of fishbone diagram to determine the risk of an event with multiple causes . Management research and practice , 2 (1), pp.1-20.
- Radziwill, N., 2017. Creating ishikawa (fishbone) diagrams with R. Software Quality Professional , 20 (1), pp.47-48.
Daniel Croft
Daniel Croft is a seasoned continuous improvement manager with a Black Belt in Lean Six Sigma. With over 10 years of real-world application experience across diverse sectors, Daniel has a passion for optimizing processes and fostering a culture of efficiency. He's not just a practitioner but also an avid learner, constantly seeking to expand his knowledge. Outside of his professional life, Daniel has a keen Investing, statistics and knowledge-sharing, which led him to create the website learnleansigma.com, a platform dedicated to Lean Six Sigma and process improvement insights.
Free Lean Six Sigma Templates
Improve your Lean Six Sigma projects with our free templates. They're designed to make implementation and management easier, helping you achieve better results.
5S Floor Marking Best Practices
In lean manufacturing, the 5S System is a foundational tool, involving the steps: Sort, Set…
How to Measure the ROI of Continuous Improvement Initiatives
When it comes to business, knowing the value you’re getting for your money is crucial,…
8D Problem-Solving: Common Mistakes to Avoid
In today’s competitive business landscape, effective problem-solving is the cornerstone of organizational success. The 8D…
The Evolution of 8D Problem-Solving: From Basics to Excellence
In a world where efficiency and effectiveness are more than just buzzwords, the need for…
8D: Tools and Techniques
Are you grappling with recurring problems in your organization and searching for a structured way…
How to Select the Right Lean Six Sigma Projects: A Comprehensive Guide
Going on a Lean Six Sigma journey is an invigorating experience filled with opportunities for…
- Jigsaw Puzzles and Mazes: Problem Solving Activities for Fun and Learning
- Analyzing Arguments Logically
- Exploring Brainwalking: A Creative Problem-Solving Technique
- Solving Relationship Issues
- Analytical problem solving
- Identifying root causes
- Analyzing consequences
- Brainstorming solutions
- Heuristic problem solving
- Using analogies
- Applying existing solutions
- Trial and error
- Creative problem solving
- Mind mapping
- Brainstorming
- Lateral thinking
- Research skills
- Interpreting information
- Data collection and analysis
- Identifying patterns
- Critical thinking skills
- Recognizing bias
- Analyzing arguments logically
- Questioning assumptions
- Communication skills
- Negotiation and compromise
- Listening skills
- Explaining ideas clearly
- Planning techniques
- SWOT analysis
- Gantt charting
- Critical path analysis
- Decision making techniques
- Force field analysis
- Paired comparison analysis
- Cost-benefit analysis
- Root cause analysis
- Five whys technique
- Fault tree analysis
- Cause and effect diagrams
- Brainstorming techniques
- Brainwriting
- Brainwalking
- Round-robin brainstorming
- Creative thinking techniques
- Serendipity technique
- SCAMPER technique
- Innovation techniques
- Value innovation techniques
- Design thinking techniques
- Idea generation techniques
- Personal problems
- Deciding what career to pursue
- Managing finances effectively
- Solving relationship issues
- Business problems
- Increasing efficiency and productivity
- Improving customer service quality
- Reducing costs and increasing profits
- Environmental problems
- Preserving natural resources
- Reducing air pollution levels
- Finding sustainable energy sources
- Individual brainstorming techniques
- Thinking outside the box
- Word association and random word generation
- Mind mapping and listing ideas
- Group brainstorming techniques
- Synectics technique
- Online brainstorming techniques
- Online whiteboarding tools
- Virtual brainstorming sessions
- Collaborative mind mapping software
- Team activities
- Group decision making activities
- Debate activities and role-play scenarios
- Collaborative problem solving games
- Creative activities
- Creative writing exercises and storyboards
- Imagination activities and brainstorming sessions
- Visualization activities and drawing exercises
- Games and puzzles
- Crossword puzzles and Sudoku
- Logic puzzles and brain teasers
- Jigsaw puzzles and mazes
- Types of decisions
- Structured decisions
- Simple decisions
- Complex decisions
- Problem solving techniques
- Cause and Effect Diagrams: A Problem-Solving Technique
A comprehensive guide to understanding and utilizing cause and effect diagrams for problem solving and root cause analysis.

Cause and effect diagrams are a powerful problem-solving technique that can help you identify the root cause of any issue, from small everyday annoyances to complex organizational problems. By following a systematic process of gathering data, analyzing it and then developing solutions, cause and effect diagrams can be used to effectively tackle any problem that you may face. This article will provide an overview of the cause and effect diagram technique, outlining how it works and the steps involved in using it. We will also look at some examples of how it can be used to solve a variety of problems. When trying to solve a problem, it is important to break down all the possible causes.
A cause and effect diagram is a visual tool used to represent all the possible causes of a problem or event. It can be used to brainstorm different causes in order to identify the root cause of a problem. The process of creating a cause and effect diagram begins by identifying the problem or event, then listing all the possible causes that could be contributing to it. The causes can then be grouped together into categories.
For example, if the problem is a defect in a product, the categories might include “materials”, “suppliers”, “manufacturing process”, “transport”, etc. After the categories have been identified, arrows can be added to show the relationship between each cause and the effect. Once the cause and effect diagram is complete, it can be used to identify potential causes and solutions. By looking at the diagram as a whole, it is possible to identify which causes may have the most impact on the problem.
This can help narrow down potential solutions and make it easier to identify the root cause of a problem. There are several benefits of using cause and effect diagrams in problem-solving. First, they provide an organized way of looking at problems. By breaking down each component of the problem, it is easier to identify potential causes and solutions. Second, cause and effect diagrams can help individuals think more creatively about problems.
Benefits of Cause and Effect Diagrams
• they are useful for documenting problems and their solutions, which can be helpful when troubleshooting future issues., creating a cause and effect diagram.
Next, list all possible causes that could contribute to the problem or event. This includes both direct and indirect causes. Then, similar causes should be grouped into categories . This helps to narrow down the potential causes and makes the diagram easier to read.
After this, arrows should be added to show the relationship between each cause and the effect. Finally, the diagram should be reviewed as a whole to identify potential causes and solutions . Cause and effect diagrams can be an invaluable tool for problem solving and root cause analysis. By taking the time to create a diagram, individuals can better understand the various factors that may be contributing to a problem or event and identify potential solutions.
Cause and effect diagrams are an invaluable tool for problem solving and root cause analysis. By organizing problems into component parts, they allow individuals to think more creatively and identify potential causes and solutions more effectively. Furthermore, they provide a documented record of the problem and its solution for future reference. By following these steps, individuals can use cause and effect diagrams to effectively solve problems.

Learn how to use the creative problem-solving technique Brainwalking to solve challenging problems.

- Making Complex Decisions: A Comprehensive Overview
Learn how to make complex decisions, including the steps involved, strategies for making decisions, and different types of decisions.

- Crossword Puzzles and Sudoku: A Problem-Solving Exploration
This comprehensive guide covers all you need to know about crossword puzzles and Sudoku - from the history to the types of puzzles, strategies, and more.

- Negotiation and Compromise
Learn the key strategies for successful negotiation and compromise, and how to use them to effectively solve problems. Suitable for all skill levels.
- Recognizing Bias: A Problem Solving and Critical Thinking Skills Guide
- Fault Tree Analysis: A Comprehensive Overview
- Identifying Root Causes
- Collaborative Problem Solving Games: Exploring Creative Solutions for Teams
- Design Thinking Techniques: A Comprehensive Overview
- Exploring the SCAMPER Technique for Creative Problem Solving
- Round-robin Brainstorming: A Creative Problem Solving Tool
- Round-robin brainstorming: Exploring a Group Brainstorming Technique
- Structured Decisions: An Overview of the Decision Making Process
- SWOT Analysis: A Comprehensive Overview
- Simple Decisions - An Overview
- Data Collection and Analysis - Problem Solving Skills and Research Skills
- Virtual Brainstorming Sessions: A Comprehensive Overview
- Mind Mapping - Creative Problem Solving and Creative Thinking Techniques
- Interpreting Information: A Problem-Solving and Research Skills Primer
- Idea Generation Techniques: A Comprehensive Overview
- Exploring the Serendipity Technique of Creative Problem Solving
- Gantt Charting: A Primer for Problem Solving & Planning Techniques
- Collaborative Mind Mapping Software
Listening Skills: A Comprehensive Overview
- Brainstorming Solutions: A Problem-Solving Guide
- Value Innovation Techniques
Debate Activities and Role-Play Scenarios
- Finding Sustainable Energy Sources
- Questioning Assumptions: A Critical Thinking Skill
- Five Whys Technique: A Comprehensive Analysis
- Logic Puzzles and Brain Teasers: A Comprehensive Overview
- Visualization Activities and Drawing Exercises
- Creative Writing Exercises and Storyboards
- Cost-benefit Analysis: A Guide to Making Informed Decisions
- Reducing Costs and Increasing Profits: A Problem Solving Example
- Brainwriting: A Creative Problem-Solving Technique
- Improving Customer Service Quality
- Managing Your Finances Effectively
- Exploring Lateral Thinking: A Comprehensive Guide to Problem Solving Strategies
- Exploring Trial and Error Problem Solving Strategies
- Group Decision Making Activities
- Exploring Online Whiteboarding Tools for Brainstorming
- Paired Comparison Analysis: A Comprehensive Overview
- Brainstorming: A Comprehensive Look at Creative Problem Solving
- Brainwriting: A Group Brainstorming Technique
- Applying Existing Solutions for Problem Solving Strategies
- Thinking Outside the Box: An Overview of Individual Brainstorming Techniques
- Identifying Patterns: A Practical Guide
- Mind Mapping and Listing Ideas
- Word Association and Random Word Generation
- Choosing the Right Career: Problem-Solving Examples
- How to Explain Ideas Clearly
- Force Field Analysis for Problem Solving and Decision Making
Analyzing Consequences: A Problem Solving Strategy
- Reducing Air Pollution Levels
- Using Analogies to Solve Problems
- Preserving Natural Resources
- Imagination Activities and Brainstorming Sessions
- Critical Path Analysis: A Comprehensive Guide
- Mind Mapping: A Creative Problem Solving Tool
- Exploring Synectics Technique: A Comprehensive Guide
- Maximizing Efficiency and Productivity
New Articles

Which cookies do you want to accept?
You are using an outdated browser. Upgrade your browser today or install Google Chrome Frame to better experience this site.
Draw A Diagram To Show The Problem Solving Process Related To Equity Issues
Powerful drawing solution.
Problem solving

Bar Diagrams for Problem Solving. Create manufacturing and economics bar charts with Bar Graphs Solution

Cause and Effect Analysis

Flowchart Components

Purchasing Flow Chart. Purchasing Flowchart Example

Pyramid Diagram

PROBLEM ANALYSIS. Prioritization Matrix

Affinity Diagram

CORRECTIVE ACTIONS PLANNING. PERT Chart

Financial Comparison Chart

- Fishbone Diagram Problem Solving | Human Resource ...
- Bar Diagrams for Problem Solving . Create manufacturing and ...
- Bar Diagrams for Problem Solving . Create business management ...
- Pie Chart Related To Environment Problems
- Using Fishbone Diagrams for Problem Solving | Fishbone Diagram ...
- Ishikawa Diagram Examples Education
- Percentage Bar Diagram Problems
- How to Create a HR Process Flowchart Using ConceptDraw PRO ...
- Fishbone Diagram | Using Fishbone Diagrams for Problem Solving ...
- ERD | Entity Relationship Diagrams, ERD Software for Mac and Win
- Flowchart | Basic Flowchart Symbols and Meaning
- Flowchart | Flowchart Design - Symbols, Shapes, Stencils and Icons
- Flowchart | Flow Chart Symbols
- Electrical | Electrical Drawing - Wiring and Circuits Schematics
- Flowchart | Common Flowchart Symbols
- Log In
- Join CLN
- RSS Feed
Please log in below to comment and contribute to the Collaborative Leaders Network.
Not a Member? Join CLN .
Join the Collaborative Leaders Network
Members of the Collaborative Leaders Network (CLN) come from all walks of life. We are leaders of businesses and organizations, we are practitioners, and we are community members. What connects us is our belief that collaborative leadership and practices are necessary for solving the complex problems we face in Hawaii. There is no cost to joining CLN, nor any obligation to participate. Membership entitles you to contribute your own ideas and experiences to the site, receive updates, and engage with other collaborative leaders who are finding ways to shape Hawaii for the better.
Already a Member? Log in Now .
Forgot Your Password?
Simply enter your email address below, and a new password will be generated and emailed to you.
- Community Transformation
- Collaborative Problem Solving
- A Collaboration Incubator
- A Community Engagement Strategy for Negotiating a Package of Community Benefits
- A Collaborative Strategy Grounded in Polynesian Values
- Assisted Dialogue and Negotiation
Diagramming a problem
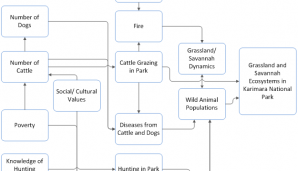
Diagramming the multiple causes of the problem—social, economic, environmental—can help to clarify their relative importance.
Sequence/Steps:
- Start by identifying the adverse social, environmental, economic, or organizational impact that the group hopes to change. Put it on the right side of a large piece of newsprint.
- To the left of the “impact” ask the group to list the direct “threats” or causes contributing to the problem/impact; draw arrows to the “impact.”
- Identify and list “indirect” threats or activities that influence the direct threats.
- Identify and diagram other contributing factors.
- Discuss the arrangement of direct, indirect, and contributing factors until the resulting diagram reflects the consensus view of the group.
In Practice
View problem diagram
About Strategies
This section features a step-by-step description of six different approaches to problem solving and includes tools, vignettes, and checklists useful to practicing facilitators.
Login and registration
- Forgot Username?
- Forgot Password?
Ishikawa diagram and root cause analysis
1. how to use the ishikawa diagram for root cause analysis - general method.
Here is the general method for addressing a problem within an organization using the Ishikawa / cause and effect diagram:
- Form a team: Gather a group of individuals with relevant skills and expertise for the problem you are attempting to address. This might include employees from various departments, managers, technical experts, and other stakeholders concerned with the issue.
- Clearly define the problem: Before beginning, ensure the team has a shared and clear understanding of the problem you aim to address. Define the undesired effect or the objective to be met in a specific and measurable manner.
- Create the main column: Draw a horizontal line resembling a fish's spine stemming from the identified problem. This column signifies the effect or the core problem you're analyzing.
- Establish cause categories: Preliminarily identify the general cause categories most relevant that might contribute to the undesirable effect. These categories often resemble "bones" branching out from the main column, hence the "fishbone diagram" name. The original method's categories are the 5 Ms: Machines, Manpower, Material, Methods, and Medium (often called Environment). We will further delve into category selection later on.
- Brainstorming: Organize brainstorming sessions with the team to pinpoint as many causes as possible. Advocate for the uninhibited expression of ideas without judgment. The objective is to generate a plethora of hypotheses about the potential causes of the problem. It's vital to understand that, at this juncture, the causes aren't necessarily verified or root ones.
- Deepening and structuring of causes: After generating the preliminary list of causes, the team transitions to the deepening and structuring phase. This is where you commence the in-depth exploration of each cause to discern why it occurs. Iteratively pose the question, "Why does this happen?" to probe further and unearth underlying causes. At this stage, you can also discern causal relationships between causes and cluster them into secondary bones (branches) for enhanced organization and comprehension.
- Prioritization: With a list of potential causes in hand, instruct the team to rank them based on their significance and impact on the issue. This assists in focusing on the most pivotal causes.
- Cause analysis: Delve deeper into the most paramount causes. For each, ascertain why they transpire and what evidence backs them. It may be requisite to gather data and embark on more comprehensive investigations.
- Action plan: Once the primary causes are discerned and understood, devise an action plan to tackle them. Allocate explicit responsibilities to each team member to initiate corrective measures.
- Monitoring and ongoing enhancement: Instigate a monitoring mechanism to gauge the effectiveness of the corrective actions. If need be, modify the action plan grounded on the results achieved. Ensure the improvements are sustained and embed them within the organization's practices.
- Communication: Update the entire organization regarding the outcomes of your analysis and the corrective steps undertaken. Transparency and open communication foster commitment and collaboration from the entire staff.
2. How to identify the true root causes and prioritize them with the Ishikawa diagram
Identifying and prioritizing the true root causes of a problem can be challenging, and sometimes it is necessary to go through iterations or loops to gain a deeper and more accurate understanding. Here are the common challenges and how to address them, indicating at which stages of the Ishikawa diagram method they occur.
2.1. Identification stage (Brainstorming)
Difficulty: It may be challenging to identify all potential causes in the first pass, or there might be a tendency to focus on symptoms rather than the real causes. Participants might also hesitate to share critical information for fear of blame.
- Encourage an open and non-judgmental environment where team members feel comfortable sharing their observations and insights.
- Ask open-ended questions to stimulate thinking about potential causes. For example, ask "Why is this happening?" or "What circumstances contribute to this problem?"
- Use creative brainstorming techniques to explore different perspectives and ideas.
- Use historical data, surveys, and interviews to gather accurate information.
2.2. Deepening and structuring causes stage
Difficulty: It may be challenging to determine which causes are direct causes of the problem and which are deeper or secondary causes. There may also be a feedback loop where you're unsure if a cause is genuinely the cause or an effect of the problem.
- Continually ask the question "Why is this happening?" to dig deep and uncover cause after cause. For instance, when you identify a direct cause, ask why that cause exists until you reach a more fundamental cause.
- When faced with loops, consider whether there are one or more causes that lead to both the "cause and effect," implying that both are in fact two "effects."
- Engage experts or stakeholders with deep process understanding to help identify underlying causes.
2.3. Cause prioritization stage
Difficulty: It might be challenging to determine which causes are most significant or influential, especially when faced with a long list of potential causes.
- Use prioritization methods like the impact/effort matrix to assess the impact of each cause against the effort required to address it.
- Engage the team in the prioritization process using voting or rating techniques.
- Consider the strategic importance of the causes, focusing on those with the most significant impact on the organization's goals.
- Use quantified data (e.g., Pareto charts), or if needed, undertake measurements or data analysis.
2.4. Cause analysis stage
Difficulty: A superficial analysis of causes can lead to erroneous conclusions or ineffective solutions. Causes might also be interconnected, complicating their identification and understanding.
- Use analysis tools like the "5 Whys" to delve deep and identify underlying causes. Repeatedly ask the question "Why is this happening?" until you reach the root cause.
- Engage experts or stakeholders with deep knowledge of the process or issue for more accurate analysis.
2.5 Iterations and non-linear Ishikawa diagram process
Some stages of the Ishikawa diagram process might require iterations or loops for a more comprehensive understanding. For example, after prioritizing causes, you might find that interconnected causes need revisiting. You might also revert to the identification stage if new insights or observations arise. Often, it becomes necessary to backtrack to further explore causes or adjust prioritization based on new findings. This leads to conducting multiple workshops, interspersed with measurement activities, data analysis, and expert consultations.
3. Categorization of causes in the Ishikawa diagram
The categorization of causes in an Ishikawa diagram helps organize potential causes into logical groups to facilitate problem analysis. It should be as relevant as possible depending on the context to facilitate reflection.
3.1 Original causes
- Machines: The equipment, machines, or tools used in the process.
- Materials: The raw materials, components, materials used in production.
- Manpower: The people involved in the process, including their skills and training.
- Methods: The procedures, working methods, and processes used.
- Medium (or Environment): Environmental factors such as temperature, humidity, lighting, etc., which can influence the process.
3.2 The "6M" and "7M"
The 6M with the addition of Management: Factors related to direction, supervision, and process management. This may include planning, communication, decision-making, etc. When this sixth M is used, it is important to differentiate it well from the M for Method.
The 7M with the addition of Measurement: Measurement systems, instruments, and control procedures used to monitor and measure the process.
3.3 Other environments
3.3.1 support or administrative functions.
Process: Problems related to inefficient processes, poorly designed workflows, non-standardized procedures, delays in workflow, etc.
Technology and IT Systems: Software problems, hardware, network connectivity, etc.
Human Resources: Problems related to staff, such as lack of training, workload overload, insufficient internal communication, motivation issues, etc.
Communication: Internal and external communication problems, including information transmission, mutual understanding, collaboration, etc.
Policies and Procedures: Problems related to administrative policies and procedures, such as compliance with policies, frequent procedure changes, etc.
Organizational Culture: Problems related to the organization's culture, like resistance to change, excessive bureaucracy, lack of innovation, etc.
Internal Customers: Problems related to interactions with internal customers, expectation management, delays in responding to requests, etc.
Data Quality: Problems related to data quality, including accuracy, consistency, and data integrity.
3.3.2. Sales
Customers and Market: Problems related to customers, their needs, market demand, trends, and purchasing behaviors.
Strategy and Planning: Problems related to business strategy, sales planning, goal setting, team alignment, etc.
Products and Services: Problems related to the products or services offered, their quality, relevance to the market, features, characteristics, etc.
Competition: Problems related to market competition, competitive analysis, competitor actions, differentiation, etc.
Sales Teams: Problems related to the performance of sales teams, training, motivation, territory management, customer management, etc.
Marketing Communication: Problems related to marketing campaigns, advertising, promotion, communication with customers, etc.
Sales Process: Problems related to the sales process, sales steps, process efficiency, Customer Relationship Management (CRM) tools, etc.
Technology and Tools: Problems related to sales technologies, sales management systems, automation tools, etc.
3.3.3. Research and Development
R&D Process: Issues related to research and development processes, methodologies, development cycles, testing protocols, etc.
Innovation and Creativity: Issues related to generating innovative ideas, the creativity of the R&D team, innovation management, etc.
Human Resources: Issues related to members of the R&D team, their expertise, their motivation, talent management, training, etc.
Technology and Tools: Issues related to R&D tools, technologies, laboratory equipment, modeling software, etc.
Internal and External Collaboration: Issues related to communication and collaboration among R&D teams, as well as with external partners, suppliers, and universities.
Project Management: Issues related to managing R&D projects, planning, deadline tracking, resource management, etc.
Technological Monitoring: Issues related to collecting and analyzing information on technological trends, patents, competition, etc.
Intellectual Property Management: Issues related to the protection of intellectual property rights, patent management, trademarks, and copyrights.
Management Support: Issues related to management's commitment to R&D, resource allocation, strategic decision-making, etc.
3.3.4. Logistics and Supply Chain Services
Logistics Processes: Issues related to supply chain management processes, demand planning, inventory management, transportation, distribution, etc.
Partners and Suppliers: Issues related to relations with business partners, suppliers, subcontractors, logistics service providers, etc.
Technology and Systems: Issues related to IT systems for supply chain management, inventory tracking tools, planning software, etc.
Logistics Infrastructure: Issues related to storage facilities, warehouses, transport infrastructure, handling equipment, etc.
Human Resources Management: Issues related to supply chain personnel, training, skills management, workforce planning, etc.
Security and Compliance: Issues related to the security of logistics operations, quality standards, regulatory compliance, risk management, etc.
Demand and Planning: Issues related to demand forecasting, production planning, procurement planning, etc.
Sustainability and Social Responsibility: Issues related to environmental sustainability, corporate social responsibility (CSR) in the supply chain, ethical practices, etc.
Communication and Collaboration: Issues related to internal and external communication and collaboration, especially with customers, carriers, service providers, etc.
Crisis Management: Issues related to crisis management, business continuity plans, disruption risk management, etc.
4. Ishikawa diagram: conclusion
Identifying the actual root causes is essential in the problem-solving process for rapid and sustainable improvement of an organization's efficiency. However, this process can prove to be complex, non-linear, quite lengthy, and resource-intensive, even becoming a true "project" within the problem-solving process. It is therefore essential to strictly follow the general problem-solving process, especially the initial problem clarification phase. It's during this phase that the task's difficulty should be estimated to implement the right mechanism... and effectively use the Ishikawa / cause and effect diagram.
You may also access our unique directory of management best practices by function and industry
When you subscribe to the blog, we will send you an e-mail when there are new updates on the site so you wouldn't miss them.
Related Posts
A3 is a principle, not a problem-solving method !!
The pdca cycle or deming wheel: how and why to use it, the 5 whys method: how and when to use it, 5w2h or 5w1h methods: how and when to use them, 8d method (8 disciplines), comparison of problem-solving methods and techniques, continuous improvement process : a challenge for significant benefits, dmaic process: a methodology to implement six sigma, what is an operational audit of the organisation, improvement and innovation excellence.

How it works
For Business
Join Mind Tools
Article • 12 min read
Systems Diagrams
Understanding how factors affect one another.
By the Mind Tools Content Team

Systems diagrams are powerful tools that help you to understand how complex systems work.
They're particularly helpful for showing you how a change in one factor may impact elsewhere. They're excellent tools for flushing out the long-term impacts of a change. Importantly, a good systems diagram will show how changing a factor may feed back to affect itself!
Drawing a systems diagram is a good way of starting to build a computer model. The technique helps you to map out the structure of the system to be modeled. It shows the factors and relationships that are important, and helps you to start quantifying the linkages between factors.
How Do Systems Diagrams Work?
To explore how systems diagrams work, let's look at seven key aspects of them:
1. Relationships Between Factors
At the heart of the use of systems diagrams is the idea of {{stub}}linking factors to show a relationship between them.
For example a company may link the factors of product quality and customer satisfaction. It believes that as the quality of its goods changes, so will customers' happiness. We show this as an arrow linking the two factors:
Figure 1: A Simple Same-Way Relationship Between Two Factors

The S shows that the factors move in the Same way – as quality improves, so will the happiness of customers. The arrow shows the direction of the relationship: raising customer happiness does not raise the quality of the goods!
These relationships can also work the other way. The company may link price with the customers' perceptions of the "good value" of its goods. This is shown below.
Figure 2: An Opposite Relationships Between Two Factors

The O shows that the relationship works in the opposite way: in this case, as you raise the price, customers' perceptions of good value reduce.
2. Feedback Loops
Feedback is an important concept in the use of systems diagrams. In very many cases, changing one factor will impact on another factor, which will then affect the first.
Feedback will either reduce the impact of the change, or amplify it.
3. Balancing Loops
Where feedback reduces the impact of a change, we call this a "balancing loop." The example below shows an example of a balancing loop, where an under-resourced service company is trying to raise quality.
Figure 3: An Example Balancing Loop

In this situation, improving the quality of service leads to improved customer satisfaction, which leads to an increase in demand for the company's service. In trying to meet this demand, the company has less time to devote to individual customers, which reduces its ability to improve quality further.
Note the small circular arrow in the middle of the loop. This shows which way round the loop is running. In complex diagrams with many loops, this arrow will be labeled and will identify loops.
The graph below shows how quality of service might vary with time in the example above.
Figure 4: Graph Showing How Quality Changes Over Time in the Balancing Loop in Figure 3

4. Reinforcing Loops
Where feedback increases the impact of a change, we call this a "reinforcing loop." The example below shows an example of a theater trying to improve its profitability by investing more in productions.
Figure 5: Reinforcing Loop Showing the Effect of Increasing Investment in a Theater

As more investment is put into a production, the theater is able to put on more-lavish plays with more-famous actors. Better plays should bring better reviews, and therefore higher ticket sales. This should lead to higher profitability, and therefore more money available to invest in future productions.
A graph showing how ticket sales might vary against time is shown below.
Figure 6: Graph Showing the Effect on Sales of the Reinforcing Loop in Figure 5

Note that this assumes that investment is increasing as time goes on. It also ignores some important facts: firstly that there is only a certain number of seats in the theater, and secondly that external factors such as competition and market saturation will eventually limit growth. On a systems diagram showing the way that the theater operates, these factors would be shown as balancing loops impacting on this reinforcing loop.
5. External Factors
The systems diagrams that we've looked at so far completely ignore the impact of these external factors on them.
In our balancing loop example above we assumed that demand was raised only as customers became more satisfied. In reality, demand is just as likely to be affected by the state of the economy. This is shown in the modified diagram below.
Figure 7: Diagram Showing the Effect of an External Factor on a System

We show an external factor as a labeled relationship arrow pointing to the appropriate part of the systems diagram.
In our reinforcing loop example above we related sales of theater seats to investment in productions. What we weren't able to build into the model was the fact that there's a limited number of seats in the theater.
Inevitably this will cap the growth of ticket sales, as the theater will seriously upset customers if it sells more tickets than it has seats available!
We build this into our model with the idea of a gap. There's a gap between the number of seats available (an external factor we haven't yet built into our model), and the number of seats used (tickets sold).
As the theater sells more tickets, the size of this gap reduces. At a particular point it can't sell any more tickets. Increases in investment beyond this point may not yield any more profit.
We show this by modifying our diagram to both show both the external factor of the limit of the number of seats, and to show the gap:
Figure 8: Systems Diagram Showing the Effect of a Gap on a System

When all seats are sold, i.e. when seats available - seats bought = 0, then profit will not rise any higher unless other factors are brought into the system.
Note that it's very important to get the gap definition correct for your model.
The impact of delay is the final area we need to consider in our systems diagrams.
Ideally when we make a change to a system it should adjust immediately to its new state. In reality, there's almost always a delay before other factors adjust. This delay may occur in a mechanical system simply as a result of inertia and friction. In a human system it will occur as people take time to communicate, get used to new ideas, and implement change.
We can show this delay in a simple model using antelopes and cheetahs. As the number of antelopes rises, more food is available for the cheetahs. More cheetahs will therefore survive, and will be able to breed.
One part of the delay within this system is given by the length of time it takes for a cheetah to be born and grow to maturity. The other part occurs as starving cheetahs take time to die.
Feedback occurs as cheetahs kill antelopes. The higher the number of cheetahs, the greater will be their impact on the antelope population.
The figure below shows this.
Figure 9: Diagram Showing Delay in a System

Note the double slash on the line showing the relationship between the antelope and cheetah populations. This shows that some form of delay is slowing the change of the related factor.
If there was no delay within the system, we might expect to see a graph showing the number of cheetahs over time like the one below.
Figure 10: Graph Showing the Adjustment in Cheetah Population in the Example in Figure 9 If There Was No Delay

Here adjustment would be immediate. Any change in the antelope population would be instantly matched by an increase in the cheetah population. These additional cheetahs would eat the additional antelopes, and then die immediately.
The delay in the system causes it to behave in a different way:
- Firstly, the cheetah population will take time to increase.
- Next, the large population of cheetahs will continue to breed as food starts to become scarce.
- This number of cheetahs will cause a big reduction in the number of antelopes.
- This will then lead to a crash in cheetah population as animals starve.
- The antelope population will then recover as there will be fewer cheetahs to restrict their numbers.
If nothing else has any impact on this system, then cheetah numbers may oscillate as shown below:
Figure 11: Graph Showing the Effect on Cheetah Populations When Delay Is Considered in Figure 9

This occurs as the cheetah population continually over-adjusts, first in growth, and then in decline. In this system, the longer it takes for a cheetah to breed and starve – i.e. the greater the delay – the greater will be the variations in cheetah populations.
Improving the Systems Model
The models we've looked at so far have been simple – they've ignored many possible impacts on each system. For example, in our model of antelopes and cheetahs, we've ignored the impact of disease, drought, human activity, etc.
We improve the model by building in as many of these external factors as we can think of. We can then simplify it by eliminating those factors that have a negligible impact.
External factors might be:
- Natural – weather, natural resources, disease, environmental change, etc.
- Technological – new technologies, changes in technology, etc.
- Human – psychological, emotional, ambitions, expectations, etc.
- Political – ideology, corruption, effectiveness, interest, etc.
- Social – values, social inertia, traditions, philosophies, etc.
- Financial – state of the economy, capital available, etc.
Ultimately, you may end up with a model made up of a number of reinforcing loops, balancing loops, and external factors. The example below shows a more sophisticated diagram of the antelopes and cheetahs system.
Figure 12: The Completed Systems Model Showing the Way in Which Antelope and Cheetah Populations Vary

Systems Diagrams as the Basis of Computer Models
Once you've established the relationships between factors on your diagram, you can look to see if you can put numbers to the relationships. In the example above you may find that if drought halves the amount of grass available to antelopes, then the antelope population reduces by one third.
You can build this relationship into a computer model. A useful way of starting this with simple and moderately complex models is to build the model on a spreadsheet.
You can use this model to make predictions by changing factors within it. This would allow you to assess the likely impact on your system of external changes, and investigate the effect of changes you might make within the system.
This article draws on the work of Peter Senge of the MIT Sloan School of Management, and his concepts of "systems thinking" and the "learning organization." To learn more, read Senge's highly influential 1990 book, "The Fifth Discipline." [1]
Systems diagrams allow you to model the way in which complex systems work. They help you to think through the way in which the factors within a system interact and feed back upon themselves.
Using a systems diagram, you can analyze:
- How factors are related, and how one factor will change when another changes.
- How factors may feed back in either balancing loops or reinforcing loops.
- How external factors impact on the system.
- How gaps operate.
- How delay affects the system.
- All the complexities of a system.
[1] Senge, P. (1990). 'The Fifth Discipline: The Art and Practice of the Learning Organization,' New York: Doubleday.
You've accessed 1 of your 2 free resources.
Get unlimited access
Discover more content
Cog's ladder.
Understanding and Accelerating Group Formation
Reverse Brainstorming
A Different Approach to Brainstorming
Add comment
Comments (0)
Be the first to comment!

Get 20% off your first year of Mind Tools
Our on-demand e-learning resources let you learn at your own pace, fitting seamlessly into your busy workday. Join today and save with our limited time offer!
Sign-up to our newsletter
Subscribing to the Mind Tools newsletter will keep you up-to-date with our latest updates and newest resources.
Subscribe now
Business Skills
Personal Development
Leadership and Management
Most Popular
Newest Releases

Team Management Skills

5 Phrases That Kill Collaboration
Mind Tools Store
About Mind Tools Content
Discover something new today
How do i manage a hybrid team.
Adjusting your management style to a hybrid world
The Life Career Rainbow
Finding a Work-Life Balance That Suits You
How Emotionally Intelligent Are You?
Boosting Your People Skills
Self-Assessment
What's Your Leadership Style?
Learn About the Strengths and Weaknesses of the Way You Like to Lead
Recommended for you
Cash flow forecasting.
Forecasting the Impact of a Financial Decision
Business Operations and Process Management
Strategy Tools
Customer Service
Business Ethics and Values
Handling Information and Data
Project Management
Knowledge Management
Self-Development and Goal Setting
Time Management
Presentation Skills
Learning Skills
Career Skills
Communication Skills
Negotiation, Persuasion and Influence
Working With Others
Difficult Conversations
Creativity Tools
Self-Management
Work-Life Balance
Stress Management and Wellbeing
Coaching and Mentoring
Change Management
Team Management
Managing Conflict
Delegation and Empowerment
Performance Management
Leadership Skills
Developing Your Team
Talent Management
Problem Solving
Decision Making
Pain Points
Maths with David
Problem solving. draw diagram.
In mathematics, diagrams are often a useful way of organising information and help us to see relationships. A diagram can be a rough sketch, a number line, a tree diagram or two-way table, a Venn diagram, or any other drawing which helps us to tackle a problem.
Labels (e.g. letters for vertices of a polygon) are useful in a diagram to help us be able to refer to items of interest.
A diagram can be updated as we find out new information.
Examples of using a diagram to tackle a problem
First we will read all three examples and have a quick think about them and then we will look at how a diagram can help us with each one:
Restaurant Example
A restaurant offers a “business lunch” where people can choose either fish or chicken or vegetables for their main course, accompanied by a side portion of rice, chips, noodles or salad. How many different combined meals can they choose between?
Rectangle Area Example
To the nearest centimetre, the length and width of a rectangle is 10cm and 8cm.
- What are the limits of accuracy for the area of the rectangle?
- the lengths of the sides?
Prime Numbers Example
Masha says that if she writes out numbers in rows of six then all of the prime numbers will either be in the column that has 1 at the top, or they will be in the column that has 5 at the top. How can you find out if she is correct?
Worked Solutions to Examples
One way to tackle this would be to write out a list, being systematic to ensure that all combinations are considered.
Another is to draw out a diagram like the one below. As shown, you actually don’t need to finish the diagram in order to conclude how many combinations there are:
You could also use a 2-way table as shown below:
Drawing a rough sketch of the rectangle labelled with the boundaries of its side lengths can really help us to visualise the situation here:
It can then be helpful to draw sketches of the smallest possible rectangle and the largest possible rectangle:
We can now answer the questions, so (a) the smallest possible area is 7.5 x 9.5 = 71.25cm 2 and the largest “possible” area is 8.5 x 10.5 = 89.25cm 2 . So the limits of accuracy are [71.25,89.25) cm 2 .
For (b), we can see from the sketches that the difference between the minimum and the maximum values is 1cm in the case of both the width and the lenght. For part (ii) we simply subtract the numbers above to give 89.25-71.25 = 18cm 2 .
Here, listing out numbers, especially for the first few is going to be helpful. We should list them as specified in the question, and we can highlight the prime numbers:
Because we know that no even numbers other than 2 are prime, we know that further prime numbers cannot be in the second, fourth or sixth column. The third column keeps adding 6s, so it is adding multiples of 3 to multiples of 3, so the numbers will always be divisible by 3, so further numbers in this column cannot be prime. So she is correct that the prime numbers must be in the first or the fifth column.
31 Questions of increasing difficulty
1.) In a cement factory, cement bags are placed on pallets made of planks of wood and bricks. The number of bricks needed to make a pallet is calculated as being one more than the length of the plank in metres (as shown below):

a.) What length of pallet uses five bricks?
b.) If the pallet is 7m long, how many bricks are used in it?
The factory needs pallets with a total length of 15m for the next batch of cement. It has planks of wood that are 4m long and 3m long.
c.) What combinations of planks can they have?
d.) How many bricks would be needed for each combination?
2.) Sonia wants to plant an apple tree in her garden. She needs to make sure that there is a circular area of lawn with diameter 3m around the base of the tree, so that all of the fruit will fall onto the lawn area.
Below is a (not to scale) sketch of Sonia’s garden:
Where could the tree be placed to meet her requirements?
3.) The diagram below represents towns A and B in a mountainous region:
The mountain rescue helicopters from both towns will always be sent to rescue any casualty within a 25km radius of town A or town B. The fire and rescue team from town B will travel to any accident scene closer to town B than town A.
Shade the region that the helicopters and town B’s fire an rescue team will both cover.
4.) A rectangle has length (2x+3) and width (x-1).
a.) Write an expression for the perimeter of the rectangle.
b.) Write an expression for the area of the rectangle.
The area of the rectangle is 250cm 2 .
c.) How long is the longest side?
d.) What is the perimeter of the rectangle?
5.) The probability that Hannah catches the 6.30am train to the city is 0.7.
If she misses the train, she will be late for work.
The probability that the train will be late is 0.15.
If the train is late, she will be late for work.
What is the probability that Hannah will be on time for work on a particular day?
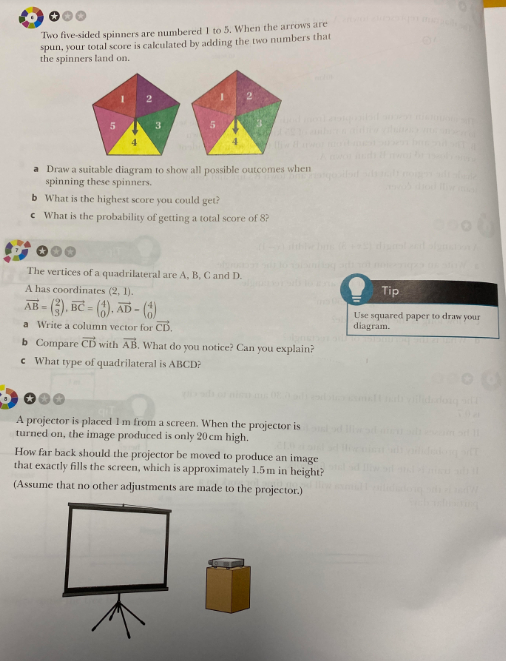
Worked Solutions to Questions
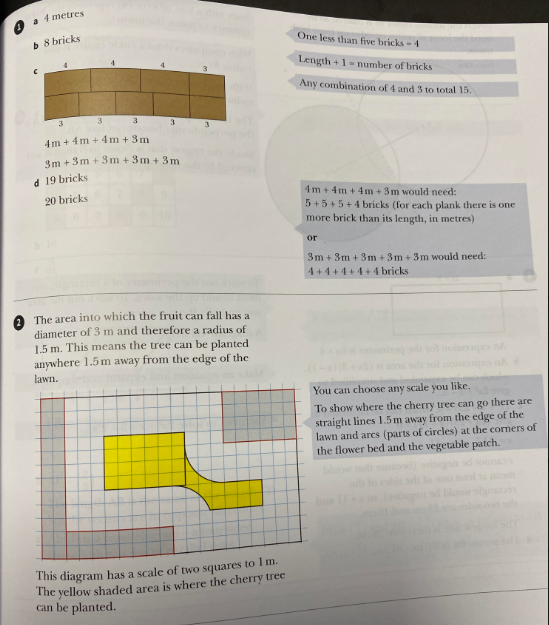
Share this:

- Already have a WordPress.com account? Log in now.
- Subscribe Subscribed
- Copy shortlink
- Report this content
- View post in Reader
- Manage subscriptions
- Collapse this bar

- Branding and Marketing
- Business and Life Planning
- wjr business beat
- Management and Operations
- social media
- Technology and Web
- Inspiration for Entrepreneurs

- Grow Your Business
- Manage Your Business
- Run Your Business Better
- Thought Leadership
How To Use a Fishbone Diagram To Resolve Startup Issues
Fishbone diagrams are tools used to help diagnose the cause of problems. They are also called cause-and-effect diagrams, fish disease, fish snap method, and Ishikawa diagrams.
Additionally, these diagrams are typically used in the problem-solving process to understand what could be causing an issue.
They help determine possible root causes of a problem by looking at many factors that may influence the situation.
A fishbone diagram is a style of process analysis that Japanese organizational theorist Kaoru Ishikawa first described in 1965. It is mainly used to record problems and brainstorm possible causes.
Although a fishbone diagram template can look complex, they are straightforward to use.

What is a fishbone diagram?
A fishbone diagram is a tool to help in the analysis phase of a project. They are used for brainstorming and determining whether root causes can be found and resolved.
A sample fishbone diagram might include categories, such as:
- Possible causes.
- Related causes.
- Contributing factors.
Most Popular: The Benefits of Encouraging Creativity and Innovation in the Workplace
Why use a fishbone diagram.
It helps users identify the relationship among possible causes for issues related to product design or process functionality and other types of problems.
In this way, it helps brainstorm and identifies areas where further investigation might be necessary.
In addition, it can help identify multiple potential problem sources rather than just one primary source.
Let’s take a look at some of the prominent reasons to use a fishbone diagram :
Brainstorming
Brainstorming is a method for generating ideas, mainly used to come up with creative ideas.
This fishbone diagram allows for brainstorming aimed at identifying causes of problems or improvements in a fishbone diagram.
Brainstorming in fishbone diagrams usually begins with ideation about potential causes within the fishbone diagram’s core.
Displays relationships openly
A fishbone diagram is an essential tool for any startup because it helps to show the problems you face and how to fix them.
However, fishbone diagrams aren’t just good for explaining what’s wrong with your product or service.
You can also use them to display relationships among different things connected to the same problem.
Provides stimulation for problem-solving
Problem-solving in a fishbone diagram is a graphical tool that uses brainstorming to solve problems.
Many organizational theorists believe the fishbone diagram aids in helping people to think clearly about a problem by structuring their thoughts in an orderly fashion.
Often, people use them to solve issues related to quality management and continuous improvement.
Maintains focus
When first creating fishbone diagrams , it might be easy to brainstorm all the potential causes you can think of for your particular problem.
However, once you begin writing them down, this list often looks pretty overwhelming. It leaves room for too many possibilities making it difficult to narrow down on something achievable.
To maintain focus when using fishbone diagrams, you can refer to techniques to help you reduce the number of possible causes while still coming up with enough ideas for fishbones.
How to use a fishbone diagram?
People have been using fishbone diagrams in startups since 1965, when Ishikawa developed it.
Moreover, companies from manufacturing plants to medical facilities still rely on the tool.
Therefore, when using fishbone diagrams:
- Decide on the fish (what you want the fish to explain).
- Decide on the bones (the factors that may influence your fish).
- Create branches out of each bone and label them appropriately.
StartupNation exclusive discounts and savings on Dell products and accessories: Learn more here.
How to create a fishbone diagram.
First of all, you will need to know what you want your diagram to be about. This could include who or what was involved with the process from start to finish.
They are constructed by first writing the problem you are trying to solve in the center of the diagram. Then you come up with several possible causes for this problem.
You then break each cause down into even smaller sub-causes and so on until you reach small enough sub-causes that can be solved themselves.
A fishbone diagram has five main parts:
- Problem title.
- Problem description/problem statement.
- Causes list (7 main categories).
- Sub-causes List (8 secondary categories).
- Effect/consequences list (7 secondary categories).
Tips to create a fishbone diagram
Here are some tips to consider when creating a fishbone diagram:
- Encourage everyone to take part in the brainstorming session.
- Use the graphic to keep the team’s attention on the causes.
- Use the “why” technique to determine the rationale for each reason, and you will get the answer.
- Always double-check your cause categories.
- On a dry erase board or a flip chart, try to design the fishbone diagram.
- On the other hand, using tools like Edraw will ensure that you do not make any mistakes..
As shown, the use of fishbone diagrams can be a critical tool for any startup to access and diagnose issues, find the root of a problem, help with brainstorming new solutions and stay focused on the subject at hand without spiraling out of control. Try using this method before to solve issues at your startup.
StartupNation exclusive discounts and savings on Dell products and accessories: Learn more here
- manage your business
Leave a Reply Cancel reply
You must be logged in to post a comment.
Related Posts

Innovate and Elevate: Essential Tips for Navigating the B2B Startup Landscape

Level Up Your Digital Skills: Free This Week with Verizon Small Business

5 Costs You Can Cut Without Killing Your Startup

5 Top Strategies to Grow Your Sole Proprietorship
IMAGES
VIDEO
COMMENTS
To perform a cause-and-effect analysis, follow these steps. 1. Start with a problem statement. The problem statement is usually placed in a box or another shape at the far right of your page. Draw a horizontal line, called a "spine" or "backbone," along the center of the page pointing to your problem statement. 2.
A fishbone diagram is a problem-solving approach that uses a fish-shaped diagram to model possible root causes of problems and troubleshoot possible solutions. It is also called an Ishikawa diagram, after its creator, Kaoru Ishikawa, as well as a herringbone diagram or cause-and-effect diagram. Fishbone diagrams are often used in root cause ...
A fishbone diagram, also known as cause and effect diagrams, Ishikawa diagram and Herringbone diagram, is a visualization tool used to find the root cause of a problem. It helps you group all the potential causes of a problem in a structured way to find the ultimate cause of your problem. Kaoru Ishikawa invented this diagram in the 1960s to use ...
Or, you can put it all out in a problem-solution map and save time and energy. A problem-solution map helps you find the root cause of the problem. Then, when you know the reasons, you can also find your ultimate solution. So, let's explore more about problem and solution maps and elements of the problem-solving process in the following guide ...
Tools to Aid Visual Problem Solving. While there is a myriad of tools to help you draw things, Creately is definitely one of the easiest ways to visualize your problem. We support mind maps, flowcharts, concept maps and 50+ other diagram types which you can use for visual problem-solving. Our professionally designed templates and productivity ...
4/ Leave to sit for 2 mins. 4/ Remove teabag. 5/ Add milk. 6/ Add sugar. 7/ Stir. So our problem solving flow chart needs to examine each of those steps to determine where the failure has occurred. We'll add a question shape (diamond), connect out problem statement to it using an arrow to check if we boiled the kettle.
The purpose of this model is to facilitate an organized process for examining, understanding, and responding to complex issues related to diversity and equity in schools. For best results, it is crucial to assemble a diverse team of stakeholders to work through this process. 1. Problem Identification
Problem-Solving Flowcharts is a graphical representation used to break down problem or process into smaller, manageable parts, identify the root causes and outline a step-by-step solution. It helps in visually organizing information and showing the relationships between various parts of the problem. This type of flowcharts consists of different ...
Finding a suitable solution for issues can be accomplished by following the basic four-step problem-solving process and methodology outlined below. Step. Characteristics. 1. Define the problem. Differentiate fact from opinion. Specify underlying causes. Consult each faction involved for information. State the problem specifically.
1. Identify and investigate the problem regarding student experiences and/or outcomes. 2. Identify questions about the problem. 3. Identify multiple sources of data to answer the questions and learn how school conditions may influence the problem. 4. Use the Data‐Driven Dialogue process to generate the priority issues for the equity goals. 5.
Visual problem-solving includes using visual aids like flowcharts, maps, diagrams, and sticky notes in your problem-solving process. Visual problem-solving helps you to: Understand the problem: Visuals reveal the way that different elements relate to each other, offering enhanced clarity. Simplify the problem: Visuals help identify past ...
Here's a step-by-step tutorial for making an Ishikawa Diagram: Step 1: Identify the problem and write it in a box at the top of the diagram. Step 2: To represent the main spine of the fishbone diagram, draw a horizontal arrow pointing to the problem box.
Interrelationship Diagrams (also known as Relations Diagrams) are simple diagrams that help you find the root causes of a problem, by helping you understand the relationships between all of the issues that you face. The technique is often associated with Six Sigma, but you can use it in many situations. Once you've created an Interrelationship ...
11 thoughts on " Equity issues in planning a problem solving lesson " radmathteacher says: July 14, 2011 at 8:07 pm. This is Aaron: ... First, let me discuss some of the positives in this lesson as it related to it be culturally equitable. The fact that this lesson is a little "out of the box" draws all students to an equal level of ...
1. Cause and effect diagrams are a powerful problem-solving technique that can help you identify the root cause of any issue, from small everyday annoyances to complex organizational problems. By following a systematic process of gathering data, analyzing it and then developing solutions, cause and effect diagrams can be used to effectively ...
Problem Solving - ConceptDraw Office suite is a software for the problem solving. The Seven Management and Planning Tools solution is a set of such tools for investigating complex problems. These tools are exemplary at organizing research, parsing complex problems, providing a structure for the details, helping managers make decisions, and organizing effective communications in a visual manner ...
Diagramming the multiple causes of the problem—social, economic, environmental—can help to clarify their relative importance. impact that the group hopes to change. Put it on the right side of a large piece of. newsprint. contributing to the problem/impact; draw arrows to the "impact.". Identify and list "indirect" threats or ...
Flowchart Maker and Online Diagram Software. draw.io is free online diagram software. You can use it as a flowchart maker, network diagram software, to create UML online, as an ER diagram tool, to design database schema, to build BPMN online, as a circuit diagram maker, and more. draw.io can import .vsdx, Gliffy™ and Lucidchart™ files .
Crisis Management: Issues related to crisis management, business continuity plans, disruption risk management, etc. 4. Ishikawa diagram: conclusion. Identifying the actual root causes is essential in the problem-solving process for rapid and sustainable improvement of an organization's efficiency.
Learn how to use Systems Diagrams - a useful problem-solving technique for finding out how complex systems work. ... a good systems diagram will show how changing a factor may feed back to affect itself! Drawing a systems diagram is a good way of starting to build a computer model. The technique helps you to map out the structure of the system ...
An Affinity Diagram can offer several benefits for team problem-solving, such as reducing complexity and chaos by breaking down large and diverse sets of data into manageable and meaningful groups ...
We can now answer the questions, so (a) the smallest possible area is 7.5 x 9.5 = 71.25cm 2 and the largest "possible" area is 8.5 x 10.5 = 89.25cm 2. So the limits of accuracy are [71.25,89.25) cm 2. For (b), we can see from the sketches that the difference between the minimum and the maximum values is 1cm in the case of both the width and ...
However, fishbone diagrams aren't just good for explaining what's wrong with your product or service. You can also use them to display relationships among different things connected to the same problem. Provides stimulation for problem-solving. Problem-solving in a fishbone diagram is a graphical tool that uses brainstorming to solve problems.