Best Practices: Creating VoiceThread Slides
While importing media into VoiceThread is very simple, there are nuanced methods for doing it best. This page provides best practices related to creating slides and comments in your VoiceThread.
1. Importing PowerPoint or Keynote Slides into VoiceThread 2. Setting Up Your Slides 3. Making Your Comments
Importing PowerPoint or Keynote Slides into a VoiceThread While you can import a PowerPoint file (.ppt) directly into VoiceThread, we recommend that you do not do it that way. Doing the import directly from PowerPoint may cause your slides to scale incorrectly, especially if you have images or illustrations in your slides.
Two Best Ways to Convert
- Save PowerPoint as a .pdf and then import the .pdf into VoiceThread
- Save PowerPoint as a series of jpeg images and then import the jpeg images into Voicethread
1. Save as PDF and then import to VoiceThread Both methods are better than importing a .ppt file directly, however, you will have to experiment a bit in order to determine which is best for you. We recommend trying this path:
- Save your .ppt file as a .pdf and then import it into VoiceThread.
- From one pdf, each slide of your PowerPoint will import as separate slides in your VoiceThread in one easy step.
- Be sure to view each slide to ensure it imported as expected.
2. Save slides as JPEG then import to VoiceThread Occasionally, you may have slides with illustrations or images on them that do not come in particularly well even importing the .pdf version. When this occurs, try the ‘Save As JPEG’ feature in PowerPoint.
- Save your .ppt file slides as JPEG formatted images (using the ‘Save As’ dropdown in PowerPoint).
- Each slide in your PowerPoint will save as a JPEG file. In this case, you would need to import each slide one at a time. This is why we recommend trying .pdf method first; it’s quicker to import the entire presentation.
Using either of these two methods, you will notice that your PowerPoint slides come in much clearer and crisper than the direct .ppt import into VoiceThread.
Back to Top.
Setting Up Your VoiceThread Slides
- Be sure to give your VoiceThread a title. This will help manage your VoiceThreads as you create more of them in the future.
- Give each slide a title . Again, this helps with organization as your VoiceThread content expands.
Making Your Comments
- Make comments one slide at a time.
- Only use multi-slide commenting to compare and contrast slides.
Back to Top.
- Center for Innovative Teaching and Learning

Using VoiceThread to Record Narration Over Slides
This guide summarizes a solution for instructors who need a tool to allow them to record narration over a PowerPoint presentation. This approach is ideal if you were planning to present slides in your face-to-face course.
To use VoiceThread, you need access to Blackboard, and a microphone of some kind (e.g. integrated into your computer or a headset) or a telephone. If you want to capture webcam video as part of your recording, you will of course need a webcam.
Here are the steps to create a recording with VoiceThread
These instructions are slightly different for Blackboard Original courses and Blackboard Ultra courses.
Blackboard Original Courses
- Login to Blackboard and access a specific course
- Click on a content area in your course menu, such as Content
- From the Build Menu , choose Build Content , then VoiceThread
- Provide a Title and Description (as needed) and click Submit
- You should now see the VoiceThread link
- Click the link you just created
- Choose Individual VT from the configuration menu
- Click the grey Create new VoiceThread on the top left of the screen
- From your computer, drag your PowerPoint presentation to the Add Media area (or click the plus sign, then My Computer to browse for your presentation)
- Enter a Title and Description for your VoiceThread video
- Wait while the presentation processes, this could take between 1 and 5 minutes depending on the size of the presentation
- Once the presentation is processed you will see that each slide is displayed separately. Click the Comment button at the top of the window to open the presentation.
- For any slide that you want to add audio, click the comment bubble at the center of the timeline and choose the microphone icon to begin recording (or use the telephone icon to record via your telephone if you do not have a microphone)
- When you finish your audio for that slide, you can either click the next slide arrow and keep recording or click the Stop Recording link
- Once you are finished recording audio, click Stop Recording , then Save
- Click the grey X at the top right to return to the share window
- Click the blue Share with class button then the next Share with class button.
The video will begin processing, and captions will be added automatically when they are ready.
You can click the Return to Course link and close the tab to return to your course Depending on the length of the video, you can return to the course and click the link to preview the video. This is the same view students will experience.
Blackboard Ultra Courses
- Click the plus icon to add content and choose Content Market
- Click the plus icon in the lower right corner of the VoiceThread tile
You can click the Return to Course link and close the tab to return to your course
Depending on the length of the video, you can return to the course and click the link to preview the video. This is the same view students will experience.
Phone: 815-753-0595 Email: [email protected]
Our websites may use cookies to personalize and enhance your experience. By continuing without changing your cookie settings, you agree to this collection. For more information, please see our University Websites Privacy Notice .
Knowledge Base
An overview of voicethread.
Last Revised 09/08/21 by SW
VoiceThread is a cloud-based platform that allows instructors and students to post, comment, and share multimedia content. This article describes applications, approaches, and best practices for using VoiceThread to enhance student-to-content, faculty-to-student, and student-to-student interactivity.
About VoiceThread
VoiceThread allows instructors and students to post, comment on, and share different types of multimedia content, such as PowerPoint slides, images, documents, and other audio-visual materials, into a presentation called a VoiceThread. Instructors and students have the option to comment on the VoiceThread slides using one of five commenting options: microphone, webcam, text, phone, and audio-/video-file upload.
VoiceThread is fully integrated into HuskyCT. Instructors and students create their individual accounts automatically by accessing VoiceThread via HuskyCT. Instructors can create VoiceThread assignments, grade them in VoiceThread. Grades will automatically transfer to the HuskyCT Grade Center.
Below is a brief video introduction to VoiceThread.
Why use VT?
The combination of content presentation and multimedia capabilities gives VoiceThread a unique interactive approach over traditional lecture capture tools and discussion boards. Numerous studies find VoiceThread an effective tool in the following HigherEd applications:
- Presenting multimedia content
- Sustaining learning communities
- Promoting active learning
- Encouraging student engagement
- Facilitating creativity
In working with UConn faculty, we find that instructors that use VoiceThread generally have positive views of the overall experience and that the user interface and basic functionalities are intuitive and easy to use.
What VT can be used for?
VoiceThread can be used in many different ways. Below are a few general categories with examples:
* If you would like to see VoiceThread in action in a HuskyCT course, please contact [email protected] to be enrolled in our Showcase Course.
Low-stake activities
These activities are normally ungraded and instructor-initiated by providing prompts and guidelines. The goal of these activities is to engage students with the content and each other. You may find traces of these activities throughout the entire span of the course, from orientation to learning module.
In the following example, the instructor used VT for introductions. You will see that the instructor used a video introduction of herself as an anchor slide and students commented directly on that video. Students participated using video, audio, and text comments.
* Note that if video comments are desired, consider using a video intro for yourself and specifying your requirements as well. You can also reorder student comments to prioritize those that are of better quality.
Discussions
Unlike traditional discussion boards that rely heavily on textual interactions, VT discussions allow students to participate in multiple different ways. If allowed, students can also upload their own evidence (multimedia materials or documents) to support their arguments. VT gives an instructor the ability to moderate discussion participation as well as engage with students privately. VT discussions can both be graded or ungraded.
In the following example, the instructor used VT for discussions. The instructor uploaded slides with discussion questions and has. You may also display specific instructions on the opening slide. Since VoiceThread is integrated with HuskyCT, a graded discussion forum can be built using VoiceThread's assignment feature.
The following VT is another example of VT used for discussions. It is an asynchronous panel discussion with just one slide with the discussion questions and a second slide with the bios for the panelists.
Student authentication
Since VT has the capability to present a person’s likeness through audio and video, it can be used along with the student photos in Student Admin to verify that students are who they say they are and that they are the ones submitting the work .
Asynchronous lectures
VT lectures are very similar to voice-over slide presentations in the sense that comments are directly overlaid on top of slides, making it easier for instructors to make future updates by replacing certain slides or comments without re-record the entire lecture. In fact, VoiceThread allows users to easily import a PowerPoint slide deck as content. VT also gives the instructor a rare opportunity to have students participate directly in the VT by leaving comments, which has the potential to help the instructor identify areas of confusion. In addition, by using the Assignment feature y ou can make certain lectures mandatory (graded) .
In the following example, you can see that the instructor uploaded a recorded lecture to VT, and the recording was done separately outside of VT (you may consider using the Kaltura Capture for this purpose). Within the lecture, the instructor integrated questions on her slides and encouraged her students to answer those questions in their comments. Student comments are displayed in the conversation panel as well as in the quick view window along the timeline.
* Kaltura is integrated with VoiceThread at UConn. You can import your own media directly from Kaltura into VoiceThread .
In this example, the instructor used a variety of content (e.g. slides, video, audio podcast, and documents) in this lecture. The instructor also included a few quiz questions in the end to encourage student engagement.
Guest lecture
Because of the asynchronous nature of VT, you can invite multiple users to collaboratively develop and comment on a VT.
Aside from a simple individual guest lecture, another example could be an asynchronous panel discussion, where a question or thought is presented on a series of slides and panel members respond to each prompt.
Student presentations
Students can easily coordinate efforts to work on presentations with VT. Instructors can create groups within VT to better facilitate this process. It helps grant every student in the group equal opportunity to participate and contribute to the presentation.
This is an example of a student presentation using VT. Students follow the same process to create a slide presentation and overlay their comments. You can also see other students' comments throughout the presentation.
Instructors can use VT to provide feedback to student work, such as papers, presentations, etc. using audio comments and the annotation tool .
In this example, you can see that the instructor used VT to provide feedback on an essay. She is also using the annotation tool to facilitate her feedback.
Course logistics
VT can also be used to revitalize some of the course logistics that are traditionally overlooked, such as a Q&A forum, walkthrough videos, exam preparation or review sessions, etc.
In this example, the instructor used VT for a syllabus walkthrough. You will see that the instructor used one single comment to cover all three pages of the syllabus.
VoiceThread has a blogging space where other instructors share their experiences using VT in their respective fields. If you are looking for inspiration, that would be a great place to explore.
Best Practices for Integrating VT into your Course
- Use a combination of slides, multimedia content, and documents in your VT presentation.
- Keep a VT presentation under 20 minutes. For longer presentations, consider inserting “reflection” slides, such as a discussion prompt or quiz question, to give students an opportunity to pause and reflect on what they have learned.
- Record short comments (around 1 min.) on your slides. This also makes it easier when performing updates in the future.
- Use a combination of webcam videos, audio, and text comments to establish sufficient instructor presence while not distracting students from the content of the presentation.
- Take advantage of the annotation tool .
- Enable student comments on your presentations, and periodically respond to some comments to increase teaching presence.
- When reusing a VT for different sections or semesters, make a copy of the VT and retitle it to reflect the section/semester. This way, you will have a clean VT without comments from your previous students, and you have the ability to retain your own comments when making a copy.
- Finalize your slides and documents before uploading them to VT since you won’t be able to make edits once VT has processed the upload.
- Tip: If you want to keep your comment but update the slide, be sure to download the comment onto your computer before substituting the slide as all comments will be deleted with the slide. You can re-upload your comment onto the updated slide.
- Secure a quiet and interruption-free environment for recording. Be mindful of how fast you speak. A clearly recorded soundtrack will generate fewer errors in the automated closed captions.
- Provide specific guidelines on how comments are expected to be made (e.g. number of comments per student, length, acceptable response format; video, audio, or text, etc.). Note that you can pre-set these requirements in a VT assignment.
- Provide netiquette guidelines with students. Create a safe, friendly, encouraging learning community for all the students.
- Model and demonstrate what a quality comment is or provide exemplary comments from other students.
- Tip: You can also reorder students’ comments to move the best ones to the top so that they are played first when students open the VT.
- Use Comment Moderation and Private Reply for private interactions or when the comments contain sensitive information. These comments will stay hidden from the rest of the class until the instructor reveals them.
- When recording one comment across multiple slides, make sure to disable Automatically Advance to the next slide in Playback Options to prevent the slides from advancing on their own.
- Consider using different Identities for different commenting purposes. For example, use your instructor identity to record comments for presentations, but switch to a moderator identity to respond to student comments.
Orienting students to VoiceThread
- Provide sufficient guidance for students. Depending on how you are using VT, direct students to Commenting on a VoiceThread and Completing a Graded Assignment .
- Consider creating a “low-stake” activity (e.g. introductions) to let students practice using VT.
Making VT accessible
Uploaded content.
- Slides and documents uploaded to VT are converted into individual images and lose any existing accessibility adjustments. We strongly recommend instructors supplement the VTs with accessible versions (in the form of attachments or links) of the uploaded slides or documents.
- Automatic machine captioning is made available for all UConn users. This means that VT will automatically caption your uploaded or recorded videos or audios including video and audio comments. Captions normally take 5-10 minutes to be generated and displayed once saved. Depending on the quality of the soundtrack, accuracy of the captions varies. We strongly recommend instructors review and edit the captions for obvious errors. Viewers can use the closed captions button on the player to toggle the feature on and off.
- Professional captioning is also available for instructors with official CSD accommodation requests . Please follow CSD guidelines to use this service.
VoiceThread Universal
The default interface of voicethread is not screen reader/keyboard accessible. voicethread does offer an accessible alternative, voicethread universal , for screen reader and keyboard users., tutorials & support.
- The IT Knowledge Base has step-by-step instructions on how to use VoiceThread in HuskyCT.
- VoiceThread has a robust training program consisting of video tutorials , how-to articles , and webinars . Help resources can be accessed by clicking the blue question mark icon on the lower right of your VoiceThread home page. We encourage you to take advantage of these resources to get the most out of VoiceThread.
For more information or assistance with VoiceThread, contact the Educational Technology Office at [email protected] or (860) 486-5052.
Please direct student support to the VoiceThread support email: [email protected] .
Related Posts
- Promoting Student Engagement in Your Online/DL Course
- Authentication of Students in Online and Distance Learning Courses
- Alternatives for Online Discussions
- Developing Engaging Online Discussions
DLS Tutorials
- DLS Teaching Station
- Public Domain Resources
- iMovie Basics
- Camera & Filming Tips
- Recommended Tutorials
- Slowing Down Video Playback in Google Drive
- Screen Recording Methods
- Music available through WU libraries
- Zoom Integration for Audacity
- Adobe Creative Cloud Overview
- Adobe Creative Cloud tutorials
- Graphic Design Tutorials
- Typography Tutorials, Free Fonts
- Infographics
- Academic Videos Online (AVON)
- Google Sites, Google Workspace
- Add, Drop, and Withdraw from a class
- Unofficial transcript
- Register for classes
- Update name and pronouns
- VoiceThread instructions (for everyone)
- VoiceThread Video Tutorial
- Setting up VoiceThread (for instructors)
- Screen Recording in Zoom
- Office of International Education tutorials
- DLS Staff Tutorials
Digital Learning Studio Hours
- Staffed Monday-Friday 8AM-5PM
- 24/7 access with Willamette ID Card
- [email protected]
- 503-375-5492
- Ford Hall 101
Our Online Resources
- DLS website
- Book the DLS
- Make Project Requests
- Language Learning Resources
- Canvas tutorials for instructors
- Canvas tutorials for students
This tutorial is available as a downloadable pdf if you prefer that format.
VoiceThread step-by-step instructions
- 1. What is VoiceThread?
- 2. Getting Started with VoiceThread
- 3. The Main Menu
- 4. Creating a VoiceThread
- 5. Editing Your VoiceThread
- 6. Commenting on a VoiceThread
- 7. Sharing Your VoiceThread with Your Class
- 8. Comment Moderation
VoiceThread is a living discussion space, a tool for successfully having recorded conversations over the cloud without the need for everyone to be there at the same time. Users are able to upload/record media into VoiceThread presentations, which can then be commented on. These comments can manipulate the media and the presentation to better bring up different points, making the commenter’s ability much more dynamic. Others can comment from here in response, and it becomes a full-on discussion over time.
All students at Willamette University are already signed up to use VoiceThread. There are two ways to sign in:
Method 1: Wise Site (being phased out): If you have a class that is using VoiceThread you should be able to log on to VoiceThread from that class’s WISE site. On the left in the list of tools there should be a tab labeled “VoiceThread.” Simply go there, and you should be taken to that class’s VoiceThread page and logged in as your Willamette account. If you go to VoiceThread proper (www.voicethread.com) and hit “sign in” it will automatically log you in to the same account that’s logged into the WISE site.
Method 2: Logging in through VoiceThread Proper: Go to www.voicethread.com and hit “sign in.” After that, hit the “Find my institution” button. In the box that will appear, search for Willamette University. This should lead you to the Willamette login page where you can sign in with your account name and password like you would any other Willamette site.
Before you do anything else, you’re going to want to make sure you’re on the VoiceThread site proper, not just the WISE extension. The WISE extension has issues recording; this goes for both creating VoiceThreads and commenting on them. Furthermore, the following information is intended for the VoiceThread site proper. WISE is the best way to log in but once you’ve logged in you’ll want to go to VoiceThread.com.
When you first log in and go to VoiceThread.com, you will be taken to the following screen. It will list all of the VoiceThreads you have access to (meaning you can at least comment on them). You can filter which class’s VoiceThreads you’re looking at by using the menu on the left under “courses”. You will be added to your courses the first time you access their VoiceThread through WISE.

Each presentation that you make/conversation that you start is itself called a VoiceThread, to clear up any confusion there. To create one, click the “Create” button in the top-left corner.

This will open up a new screen with a big “Add Media” button in the middle. Clicking that will bring up a list of options:
My Computer: Opens an explorer/finder window to find the file. Media Sources: Ignore this, my computer is better Audio Recording, Webcam Photo, Webcam Video: Exactly what they sound like. You’ll be prompted to allow access to your webcam/microphone.
URL: Provides a link to an external source, i.e. an article, YouTube video, etc.

Once you’ve gone ahead and added the media, you will be met with the following: For now we’re just going to focus
on the Title/Description - we will go over the Playback Options later. Title and description are both what they sound like. Tags will let you add things to make you VoiceThread easy to search for. You can edit these again at any time.
You have now created a simple VoiceThread, but chances are you’re going to want more than one slide. As soon as you first enter in your title, you will be taken to the following screen:

We will be going over commenting/sharing soon. For now, note the two “add media” buttons. True to their title, these buttons will bring you to the same “add media” menu as before, and you can repeat the same process.

Once you’ve done this, you can click and drag the slides to reorder them. You’ll also notice that whenever you hover over any of the slides, an edit icon appears in the bottom left corner of the preview and a delete icon in the bottom right. The edit icon will open a box that lets you add a title to the specific slide, and also add a link to access from that specific slide.
You’ll also notice the other edit icon at the top to the right of the title. This will let you edit the details you entered in for the VoiceThread, such as its title, description, etc.
Once you’ve left the editing screen, you can return at any time by hovering over your VoiceThread in the main menu and clicking the edit button in the bottom left corner.

Commenting is hands down the most important feature of a VoiceThread. This is what allows you and others to interact and respond to the media and really transform your VoiceThread from a simple presentation to a conversation over the cloud.
There are two ways to access the comment section:
- The main way to access the comment section is by clicking on the VoiceThread in your main menu. This works whether or not you can edit it.
- If you can edit it, you’ll notice near one of the “add media” buttons in the editing screen that there’s also a “comment” button.

On the bottom is the playback bar for comments and, if the original slide is a video or audio recording, for the original slide. Above that is the add comment button, shown with a speech bubble and a plus. To the right of the playback bar are two arrows that allow you to switch between slides. On the left side of the screen are all the other comments that have been made on that particular slide.
Adding a comment to the slide:
Clicking on the “add comment” button, a radial menu will pop up around it.

Going from left to right, the options are:
Text: Leave a simple text comment Phone: Enter your number, it will give you a phone call which acts as a mic Audio Recording: Exactly what it sounds like.
Video/Webcam Recording: Exactly what it sounds like.
File upload: Will let you respond with any audio or video file on your computer.
When doing an audio or video recording, you will be given a countdown to when you will have to start recording. It is also worth noting that during your video or audio recording, you can change slides, and if the slide’s media is a video, you can play, pause, and otherwise manipulate the media during the recording. This will show up when someone plays your comment.

When you hover over someone else’s comment, there’s also the option to make a private reply, shown by the comment bubble that’s shaped into a lock. Private replies are only visible to people who made the original comment. You can only make private replies on comments from other accounts.
There are a number of ways of sharing your VoiceThread. The quickest and easiest is to go to your main menu, find the list of classes/groups on the right, find your VoiceThread, and click and drag the VoiceThread into the group. In the following prompt, you can choose both what level of access the class you dragged it into will have, and whether to move it to the class (Share this VoiceThread) or make a copy and send that to the class (Copy and share this VoiceThread).

Another way to share is through the Share button. This can be found either when hovering over your VoiceThread’s Icon (it will appear as a right-facing arrow to the right of the edit button) or in the editing menu (there will be a big button at the top that says “Share” and has the same right-facing arrow icon). Both will open up the same menu. The easiest option is automatically selected: “Secure”. This will let you share it with any of your classes. Once you select the class, you will be able to select what permissions they have (view, comment, edit). Hit “Share” and it’s shared.

Comment moderation is useful if you want to be the only one who sees any of the comments made on your VoiceThread, or if you want to control what comments do or don’t go on. To get here, open the editing menu, where you’ll find the options button at the top right of the screen. Clicking on this will open a menu, from which you’ll want to select “playback settings.”

This will open up a new menu, from which you’ll want to select “Enable Comment Moderation.”

Once you’ve selected that, You will be able to select which comments can and can’t be seen by hovering over them in the comments section and hitting the icon that looks like an either closed or open eye. If the eye is open, anyone can see that comment. If it’s closed, only you can. All comments that were previously there are set to still be visible by all until changed, but new comments made are set to only be seen by you until changed.

This covers the basics of using VoiceThread for your class experience! If you have any questions, feel free to reach out to us at [email protected].
- << Previous: VoiceThread
- Next: VoiceThread Video Tutorial >>
- Last Updated: May 24, 2024 2:09 PM
- URL: https://libguides.willamette.edu/dls-tutorials
Willamette University Libraries
Javascript notice
Whale! It looks like you have Javascript for this browser disabled. This page uses Javascript to display menus and interactive content. Some elements on this page may not function properly until Javascript is enabled.
How to enable Javascript for your browser
- Mozilla Firefox
- Internet Explorer
The University of Alaska is an affirmative action/equal opportunity employer and educational institution. Contact information, applicable laws, and complaint procedures are included on UA's statement of nondiscrimination available at www.alaska.edu/nondiscrimination .
UAS is committed to providing accessible websites: www.uas.alaska.edu/policies/accessibility.html
Mailing Address
Use VoiceThread presentations
- Online & Hybrid Teaching
- Technology & Software
Last modified: June 11, 2024
Increase engagement and interaction in your course by using VoiceThread presentations and assignments.
What can you do with VoiceThread?
VoiceThread is a cloud-based tool for creating, sharing and commenting on presentations. When you create a VoiceThread, you can include video, audio, and uploaded media such as PowerPoint slides and PDFs and more. Both instructors and students can create VoiceThreads. Examples of VoiceThreads include:
- Uploading a PowerPoint presentation (or other media) and adding audio via the commenting feature. You can also use the drawing tool to mark up your content as you comment.
- Audio can be input via microphone, webcam or even by phone. Drawing tools are also available to create markup during the presentation. An instructor or student could create a presentation this way and then either allow or not allow further comments by viewers
- Within the Blackboard interface there are a variety of ways a Voicethread can be used, including as a gradeable assignment (see below).
- Your UAS licensed Voicethread account will be associated with your email: [email protected]. Once you've created a Voicethread you can post a link to it in any of your courses. In addition to using VoiceThread within Blackboard you can create VoiceThreads to share elsewhere.
- VoiceThread can be an interactive alternative to traditional discussion boards.
Video Tutorials
John Ingman, instructional designer for the Sitka Campus and resident VoiceThread guru, developed the following series of trainings on VoiceThread:
- VoiceThread Tutorial 1 - Introduction to VoiceThread and how to use it
- VoiceThread Tutorial 2 - Using groups and secure sharing
- VoiceThread Tutorial 3 - Moderating comments, private and threaded replies, and copying
- VoiceThread Tutorial 4 - VoiceThread and Blackboard
- VoiceThread Tutorial 5 - Advanced skills
You can also view these Tutorials from VoiceThread :
- Creating a VoiceThread
- How to Comment
- Commenting on a Video
- Sharing Your VoiceThread
- Comment Moderation
Examples and Inspiration
To see additional examples of VoiceThreads go to www.voicethread.com and click on "Browse" in the upper left. Examples are divided into categories including "Higher Education" which is further divided by subject. Some relevant examples:
- Bach and McCartney - Lecture Presentation
- Bone Density (commenting assignment)
Using VoiceThread with Blackboard
View a summary of how VoiceThread works through the Blackboard interface .
Using the VoiceThread UAS link within "Build Content" you will create a VoiceThread link then edit that to build the type of VoiceThread you want to include in your course.
There are four types of VoiceThread links that can be created using the Blackboard interface.
- Course View: A link to all the VoiceThread associated with that course
- Individual VT : a link to just one VoiceThread, e.g., a specific lecture or presentation.
- Home : Displays the full VoiceThread account of the person who clicks on the link: i.e., you’ll see your account, your students see their account
- Assignment Builder: Allows you to create a gradeable assignment. This may be assigning students to create a VoiceThread, assigning them to comment on a Voicethread, or assigning them to watch a VoiceThread from start to finish. (To see this option, you must set up grading and assign a point value when you first create the VoiceThread using the Blackboard tool.)
You can also go directly to VoiceThread and sign-on with your UA credentials at uas.voicethread.com . This allows you to create and share VoiceThreads, but does not allow you to create graded assignments.
Captioning VoiceThreads
You can add closed captioning to any video or audio slide, or to any video or audio comment. It can take up to 4 days for captioning to occur. The captions are machine-generated and will need editing, so allow time for captioning and editing. This PDF document on Using Closed Captioning includes instructions for:
- Viewing captions in VoiceThread
- How to add a caption to a slide or comment
- Editing captions
IT@JH University Information Systems
System resource guides for users
VoiceThread – Faculty & Student Guide
JHU’s VoiceThread browser-based platform transitions to the New VoiceThread in Summer 2024. See Overview of the New VoiceThread for some of the features we want you to learn about plus some additional resources to learn more.
VoiceThread is web-based presentation software that allows users to create and share interactive multimedia slideshows. VoiceThread presentations are used to showcase audio, video, images, and documents while allowing users to comment on them in a variety of ways. The result is an ongoing, asynchronous, digital conversation that can be easily shared with individuals, groups, and/or embedded into different websites.
Navigating the Site
Navigating a voicethread presentation, setting up your microphone.
- Using VoiceThread in a Canvas Course
Creating a VoiceThread
Adding a comment to a voicethread presentation, editing a voicethread, sharing a voicethread.
Go to https://jhu.voicethread.com/ and log in with your JHED ID and password.
For more detailed instructions on how to sign in, see Sign in jhu.voicethread.com .
You can also access VoiceThread in Canvas via its integration for Canvas courses.
Browse (top): Browse publicly available VoiceThreads Learning Center (top): Case studies, research, blog, tutorials, etc. Create a new VoiceThread (top): Create and edit your VoiceThreads VoiceThread Support (top right): you can find a link to get help with VoiceThread Courses, Groups, Threads, ThreadBoxes (left): Access to all your Courses, Groups, Threads and ThreadBoxes
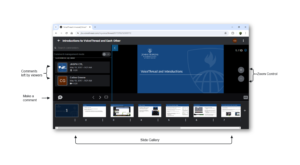
Identity icons (on the left side) indicate comments that have been left by viewers. Click the Make a Comment button (on the lower left) to leave a comment. At the bottom of the window, you can navigate to the next or previous slide, or show all slides (Gallery). You can also zoom in or out using the plus/minus bottoms on the right side of the slide.
If you intend to use the audio record feature, you will need a working microphone. Please see the following instructions to set up a microphone on your Mac or Windows .
VoiceThread How-To Documentation
Note that at this time the site has both New VoiceThread (New VT) and Legacy VoiceThread (Legacy VT) instructions. JHU will be using the New VoiceThread in Summer 2024.
See https://canvas.jhu.edu/faculty-resources/third-party-tools/third-party-tool-voicethread/
See https://voicethread.com/howto/creating-a-new-voicethread-2/ which contains a walkthrough on how to create a VoiceThread.
See https://voicethread.com/howto/how-to-comment/ .
See https://voicethread.com/howto/editing-an-existing-voicethread-2/
Any VoiceThread that you create is private by default. You can then decide who gets to see it and what level of permission they have. You can allow others to view, comment on, or edit your VoiceThreads. These permissions can be granted to specific individuals or to groups of people. You can also revoke sharing permissions at any time so that others can no longer access a shared VoiceThread.
Common ways to share:
- Using VoiceThread Groups
Getting Started with VoiceThread
Why use voicethread.
VoiceThread has many potential uses for both in-person and online classes. Plus, because both faculty and students have access to create VoiceThreads, students can create their own content for assignments.
- Narrate a PowerPoint presentation with audio or video.
- Pose a question or topic and use it as a visual discussion board.
- Encourage student to student interactions.
- Create digital stories by narrating over images, videos and slides. Or, create collaborative stories with VoiceThread's collaboration features.
- Upload video to VoiceThread and gather reflections.
- Practice a foreign language.
- Evaluate, review or critique an idea or a student presentation.
Accessing VoiceThread
Inside any blackboard site.
Once you open the tool in Blackboard, it will automatically log you in to their site.
- Go to a content area in Blackboard.
- Click on Tools.

- A new window will open to name the link and put in a description. You can attach documents, have it graded, select availability, select the dates available, and tracking. Click Submit.
- After you have created the link to VoiceThread, you will then click the link.
- Course View – takes you into your course group on VoiceThread
- Home - Homepage
- Individual VT – How you share specific threads
- Create a VoiceThread – students create a VoiceThread of some type
- Submit a Comment – can require an amount of comments
- Watch a VoiceThread – students just watch the VoiceThread
- Once you choose what type of link you want to show the students, you can create your VoiceThread with Audio, Video, and share documents on your computer.
Outside of the Blackboard System
- Navigate to und.voicethread.com.
- Click Sign in in the upper right corner.
- Enter your NDUS username and password, then click Sign In. *If you get a screen asking for Federation Consent , click Yes.
VoiceThread Web Application
VoiceThread is a cloud application, so there is no software to install. The only system requirement is an up-to-date version of Google Chrome or Mozilla Firefox. VoiceThread will run in your web browser and on almost any internet connection.
See the Web Application help articles for more information.
VoiceThread Mobile App
With VoiceThread Mobile, all of your content is available on your iOS or Android mobile device. Download the app and sign into your account to:
- Capture images from your camera or upload them from your photo library.
- Flip through slides with the flick of a finger and annotate while you narrate.
- Share VoiceThreads as easily as sending an email.
- Receive notifications for new comments on your VoiceThreads.
- Access the extensive catalog of existing content on VoiceThread.com.
See the Mobile App help articles for more information.
Attend a Workshop
TTaDA offers a variety of professional development workshops and events for faculty and staff focused around four competency areas: Personal & Professional Development, Policy & Procedure, Software & Technology and Teaching & Learning. Check out the Upcoming Sessions for available session dates and times. You can also attend a VoiceThread workshop or watch a recording of a previous workshop offered by VoiceThread.
We also offer workshops and specialized training to departments on a variety of topics. Please contact us for more information or to schedule a session.
Instructional Design Consult
A team of Instructional Designers are available to provide assistance to instructors, administrators and staff. Whether you need to develop a full course or program, review and revise an existing course, or flip all or part of your course, Instructional Designers are here to help. We provide instructional design assistance for fully online, flipped, hybrid, blended and traditional face-to-face courses. If instructors have any questions or concerns about a course, we are available in person, over the phone, by email, or through web-conferencing tools.
REQUEST A CONSULTATION
UND Tech Support
UND Tech Support provides support to students, faculty and staff to provide technology tools for success in and outside of the classroom.
By clicking any link on this page you are giving your consent for us to set cookies, Privacy Information .
What is VoiceThread for Education?
VoiceThread is a smart communications tool that digitizes discussion and learning

VoiceThread is a presentation tool that allows for storytelling with lots of mixed media sources, and for interaction between teacher and students.
It is a slides-based platform that allows you to upload images, videos, voice, text, and drawings. That project can then be shared with others who are able to effectively annotate it with rich media as well, including being able to add text, voice notes, images, links, video, and more.
So this is great for presenting to the class, in the room or remotely. But it's also a useful way to get students working collaboratively on projects that can be presented in a different way. Crucially, this can all be used in the future too.
Read on to find out everything you need to know about VoiceThread for education.
- Strategies for Assessing Students Remotely
- Best Digital Tools for Teachers
- What is Google Classroom?
What is VoiceThread?
VoiceThread is a tool for presenting via a number of platforms, including the web, iOS, Android, and Chrome. This lets teachers and students create slides-based presentations that can feature lots of rich media and be interacted with using a wide selection too.
For example, this could mean a slideshow with images and videos about a subject or project, set by the teachers. When sent out, using a simple link, this can then be made available for students to feedback and build on. It can provide a great way to learn and develop a point of knowledge, all done in class or remotely at the students' pace.

VoiceThread, as the name suggests, lets you voice record notes on slides so that it can be used as a way to offer students feedback on their projects or as a personal way to guide them through your presentation.
Tech & Learning Newsletter
Tools and ideas to transform education. Sign up below.
This is a useful teaching tool as when a project is complete, there are options to set privacy, sharing, comment moderation, embedding, and plenty more so it can be perfected for the school environment.
How does VoiceThread work?
VoiceThread offers a useful control platform for teachers. Using the administrative account, it is possible to adjust the security settings so that student work can remain private. That said, it is still difficult to restrict student access to the wider Ed.VoiceThread and VoiceThread communities.

VoiceThread is easy to use. Go to the top of the page and select Create. You can then select the plus Add Media option and pick from your device, or simply drag and drop files from your machine onto this page to upload into the project. You can then edit or delete via the thumbnail icons at the bottom, or drag and drop to re-order them.
Then you can select the Comment option to begin adding your touches to each slide. This ranges from text to voice to video and more from online. This is done using a clear and simple icon interface at the bottom of the screen.
For talking, for example, select the microphone icon and start talking – you can then click and highlight and draw on the screen to show what you're talking about. Use the bottom right arrow to go between slides, during your comment. When done, hit the red stop record icon then save once you're happy.
Next you can select Share to allow you to share with lots of options to suit all different platforms.
What are the best VoiceThread features?
VoiceThread is simple to use, despite giving a huge range of ways to communicate. Live linking is a helpful feature that allows you to place an active link in the comment on a slide so students can check into more depth using that option before coming back to the slide.
Hiding the comments using moderation is also a great feature. Since it allows only the VoiceThread creator to see comments, it forces students to be original in what they're saying. It also discourages reactive comments.

Tags are a great part of VoiceThread as it allows you to carry out a search based on keywords. You can then organize your VoiceThreads for quick access. For example, you could tag by subject, student, or term, and then quickly get to those specific presentations using the MyVoice tab.
To tag, look for the tag field in the Describe Your VoiceThread dialog box under the title and description fields. A good tip is to keep tags to a minimum so you don't end up searching through tags to then search through the content itself.
How much does VoiceThread cost?
VoiceThread allows students to participate in a conversation for free by simply creating an account. But to create projects you are required to have a paid subscription account.
A single educator license for K12 is charged at $79 per year or $15 per month. This includes an Ed.VoiceThread membership, 50 student accounts, a virtual class organization to hold the accounts, a manager to create and manage student accounts, and 100 export credits per year.
Go for a school or district wide license and that is charged at a tailored rate for which you need to contact the company.
Luke Edwards is a freelance writer and editor with more than two decades of experience covering tech, science, and health. He writes for many publications covering health tech, software and apps, digital teaching tools, VPNs, TV, audio, smart home, antivirus, broadband, smartphones, cars and much more.
Science Buddies: How to Use It to Teach Science
IXL Lesson Plan
4 AI Tools I Actually Use As An Educator
Most Popular
Academic Resources
- Academic Calendar
- Academic Catalog
- Academic Success
- BlueM@il (Email)
- Campus Connect
- DePaul Central
- Desire2Learn (D2L)
Campus Resources
- Campus Security
- Campus Maps
University Resources
- Technology Help Desk
Information For
- Alumni & Friends
- Current Students
- Faculty & Staff
- Course Home
- Discussions
- Submissions
- Adding a VoiceThread Link
Creating a VoiceThread
- Sharing a VoiceThread
- Teaching at DePaul
- Support Services
- Teaching Guides
- Technology Tools
Teaching Commons > Teaching Guides > Technology > Desire2Learn > Tools > VoiceThread > Creating a VoiceThread
Once a VoiceThread link has been added to a class, instructors can choose a display option for the link. These options depend on the purpose of the VoiceThread and the way that students will interact with it.
Create a VoiceThread for Discussion
- Create a VoiceThread for Student Presentations
Adjust Playback Settings
See the VoiceThread support page for videos on creating presentations.
If VoiceThread will be used for discussions, the display option to choose is Individual VT. When students select the VoiceThread link, they will see just this one VoiceThread, to which they will be able to add comments.
- After VoiceThread has been added to Content (see Adding VoiceThread ), select Individual VT .
Note: If the VoiceThread already exists, see Sharing a VoiceThread for information on re-populating a previously created VoiceThread.
- Select the type of media to use for the start of the VoiceThread [A].
- Upload or record as needed based on the selection.

- Enter a title for the VoiceThread [A].
- (Optional) Add more media [B].

- (Optional) Add audio, video, or another kind of comment to the VoiceThread [A].

- Provide students with instructions for Adding Comments to a VoiceThread Discussion .
Use VoiceThread for Student Presentations
If VoiceThread will be used for class presentations, the display option to choose is Course View. This will show the collection of VoiceThreads that have been shared with the course. Anything that has not yet been explicitly shared with the course will not appear. (See Sharing a VoiceThread for more information.) Students will be able to add comments to individual presentations when selected.
- After VoiceThread has been added to Content (see Adding VoiceThread ), select Course View .
- When students use the VoiceThread link, they will be shown all of the VoiceThreads that have been added to the class or shared with the class.
- Provide students with the instructions for Creating a VoiceThread Presentation .
- From an individual VoiceThread, select the menu [A].

- Select Options .
- From the dropdown menu, select Playback Settings
- Change playback settings for a VoiceThread depending on its purpose:
- If the VoiceThread is being used for a discussion , leave the " Enable Threaded Commenting" box selected.
- If the VoiceThread is being used as a presentation , select the " Automatically advance to the next slide after __ seconds box" and enter a number in the text box. (This is the number of seconds between when the comment ends and the presentation advances to the next slide. For fast-moving presentations, it is recommended to enter 0.)
- If students should not be able to download the original presentation slides , de-select the " Allow others to download original media" . This option allows students to download the PowerPoint file only, not any narrations.
- Select Save when done.
Note: Detailed information on each playback setting option is available on VoiceThread's website .
If a VoiceThread is created within a D2L class, it will automatically be shared with that class. For information on how to share a previously-created VoiceThread with a class, see Sharing a VoiceThread.

Using VoiceThread for Special Education Classes
By VoiceThread
This is a guest post by Special Education teacher and VoiceThreader, Lauren Andersen.
As a special education teacher of students with severe and multiple disabilities, it has been a challenge to find appropriate technological resources that meet my each and every one of students where they are at and help take them to the next level.
Since learning about VoiceThread in a technology course at Columbia University many years ago, VoiceThread has become my top resource when creating lessons for my students, developing training modules for my teacher assistants, teaching online graduate courses, and encouraging collaboration among a group of individuals.
When thrust into the previously uncharted “online learning” mandate that our country has come to know, VoiceThread has enabled me to become even more versatile and reach ALL of my learners—wherever they are. My students can see me and hear me. At the same time, they can also see visuals that I embedded and the presentation that I have created. In turn, they have the ability to respond by recording videos, recording a voice message, or even typing out words and/or adding links—whatever works best for them, individually.
Using VoiceThread, I have been able to record read alouds by showing pages of books and recording me reading them. I have been able to make stories, too. Over the weekend, I made pizza for dinner and I documented every step of the process by taking pictures. I made a simple Google Slides presentation, downloaded it as a PDF, and uploaded it to VoiceThread. From there, I was able to record myself, pose questions on each slide, and write text comments including to links to their favorite pizza making game on ABCya. This trifecta multi-sensory experience is simply not an option on most technology resources today. Though it is something that is essential to the learning process for my special learners. You can check out my pizza-making lesson here:
When I’m not working with students with severe disabilities, I’m thinking of ways to train and teach the people with whom I have the great pleasure of working with: paraprofessionals and preservice teachers.
In New York State, paraprofessionals are required to engage in professional development for a certain amount of hours. Using VoiceThread, I have created many training modules that can be used to train teacher assistants and also may serve as an integral professional development tool.
Though I am just a teacher, I have often thought about how VoiceThread can streamline the process of a new hire—particularly if that new-hire starts in my classroom as a teacher aide or assistant. Using VoiceThread, essential documents can be uploaded, discussed, and questions can be posed—entirely remotely and before they even set foot in my room. After all, my students need consistency and predictability, so providing this type of information to paraprofessionals in my classroom is critical. In regard to new hires, basic workplace training certainly seems easy if all you have to do is share a link. That’s VoiceThread!
Finally, the most incredible part of VoiceThread is its ease of use. Time is precious and valuable. So is our students’ learning. Use VoiceThread to create multi-sensory material that will be yours—forever.
**_About the Author: ** Lauren Andersen is a certified doctoral candidate at Teachers College, Columbia University. She is a full time elementary special education teacher on Long Island and teaches classes as an adjunct instructor at Columbia University and Hunter College in the department of special education. Follow Lauren on Twitter at_ @AndersenLauren1
The Center for Educational Resources (CER) is now known as the Center for Teaching Excellence and Innovation (CTEI). Same great staff, same great service.
VoiceThread
VoiceThread is web-based presentation software that allows users to create and share interactive multimedia slideshows. VoiceThread presentations are used to showcase audio, video, images, and documents while allowing users to comment on them in a variety of different ways. The result is a digital conversation that can be easily shared with individuals, groups, and/or embedded into different websites, including Canvas.
Instructors, for face-to-face, online, or hybrid courses may want to consider using voice thread to:
- share lecture slides or visual materials, with or without audio commentary
- ask students to comment on or respond to questions about those materials
- ask students to create, share, and peer review presentations.
Getting started
You can access VoiceThread using the following link logging in with your JHED ID and password.
https://jhu.voicethread.com
VoiceThread and Canvas
You can link the VoiceThread tool to your course Canvas site to share presentations with their students or have them create their own. To get started enabling VoiceThread in your Blackboard course, review these directions .
Where to go for help
If you’re having trouble getting your account set up or for other technical support, you can review solutions on the VoiceThread support page or contact [email protected] for assistance.
If you’d like help figuring out how to use VoiceThread in your courses, please contact us at [email protected] .
Additional Resources
- Guide to creating, sharing, and commenting on VoiceThreads
- Strategies for Using Voice Thread (coming soon)
- Innovative Instructor article on VoiceThread
- Getting Started with VoiceThread
Learning to Code Collaboratively with VoiceThread
By V o i c e T h r e a d George
Learning to write code doesn’t need to be an isolated experience. With VoiceThread, writing code isn’t just about turning your ideas into lines of text; it’s about sparking discussions, sharing insights, and collaborating with peers and instructors. VoiceThread is all asynchronous, so you can lock-in when you’re in the zone and then share and collaborate once you’re ready, so you don’t have the hassle of trying to schedule meeting time.
Instructors can create presentations and tutorials and upload them to VoiceThread for some direct instruction in the form of lectures and review lessons, but students can use VoiceThread as collaborative spaces too.
Use Case 1: Snippets with Doodle Tool
Students can upload snippets of their code to VoiceThread then record their explanations and questions as they use VoiceThread’s doodle tool to highlight specific parts of the code and dive deep into the logic behind it. Picture students circling a tricky algorithm or underlining a crucial variable, all while explaining their thought process. Other students and the instructor can jump in, leaving comments and suggestions for revisions or alternative coding approaches. It’s like having a virtual brainstorming session where everyone’s ideas are heard and valued.

Use Case 2: Screencast Analysis
Uploading snippets can be really useful, but you can also take a screencast video of your code and upload the video files as slides on VoiceThread. Students and teachers can upload screen recordings of their code in action, walking through each line and dissecting their approach. It’s like having a front-row seat to the coding process, complete with live commentary. When students submit their work via a “create” assignment, the instructor can easily jump in for the critique and grading. If the instructor has set up the assignment with the “student gallery” feature turned on, other students in the class can join the discussion too. They can offer peer-review feedback right on VoiceThread, creating a dynamic feedback loop where everyone learns from each other’s successes and struggles.
VoiceThread isn’t just a platform; it’s a virtual playground for coding enthusiasts. Whether you’re doodling on code snippets or analyzing screencasts, VoiceThread can help by fostering collaboration, feedback, and growth every step of the way.
IMAGES
VIDEO
COMMENTS
conversational practice. professional development. rich assessment. safe and accountable. Transforming media into collaborative spaces with video, voice, and text commenting.
Learn to create an online lecture quickly and easily using Voicethread. This is a beginner's guide. Learn how to add your presentation slides, reorder them...
While importing media into VoiceThread is very simple, there are nuanced methods for doing it best. This page provides best practices related to creating slides and comments in your VoiceThread. 1. Importing PowerPoint or Keynote Slides into VoiceThread. 2. Setting Up Your Slides. 3. Making Your Comments. While you can import a PowerPoint file ...
Creating a VoiceThread is always a simple two step process: 1. Add your media. 2. Comment. For flipped content, this process may involve uploading a PowerPoint presentation that you already use, then narrating your mini-lecture over each slide. If you don't use PowerPoint, you can always upload images, movie files, import Khan Academy videos ...
The best VoiceThread tips and tricks for teaching take the already impressively feature rich presentation platform and make it even better for teachers and students. While VoiceThread does a great job of incorporating rich media both for presenting and for feedback, there are great ways in which other teachers are already using this platform to ...
Create the VoiceThread presentation: Click the link you just created; Choose Individual VT from the configuration menu; Click the grey Create new VoiceThread on the top left of the screen; From your computer, drag your PowerPoint presentation to the Add Media area (or click the plus sign, then My Computer to browse for your presentation)
Go to Voicethread (bookmark the site). MyVoice -- VoiceThreads you have created, tutorials and an intro to Voicethread; Browse -- explore some Voicethread to see what kinds of things you can do; Create -- practice creating a Voicethread (but only one -- you have limited space and number of Voicethreads with your free account); Voicethread is extremely easy to use.
1. To access existing VoiceThread presentations, click the Home icon on the upper left of the screen. You can then select any VoiceThread presentation from the thumbnail list. 2. By clicking on the three horizontal bars [1]. You can organize your existing VoiceThread presentation (thumbnail) list by All, Owned by me, Shared with me, Title ...
About VoiceThread. VoiceThread allows instructors and students to post, comment on, and share different types of multimedia content, such as PowerPoint slides, images, documents, and other audio-visual materials, into a presentation called a VoiceThread. Instructors and students have the option to comment on the VoiceThread slides using one of ...
VoiceThread is a living discussion space, a tool for successfully having recorded conversations over the cloud without the need for everyone to be there at the same time. Users are able to upload/record media into VoiceThread presentations, which can then be commented on. These comments can manipulate the media and the presentation to better ...
VoiceThread is a cloud-based tool for creating, sharing and commenting on presentations. When you create a VoiceThread, you can include video, audio, and uploaded media such as PowerPoint slides and PDFs and more. Both instructors and students can create VoiceThreads. Examples of VoiceThreads include:
For 17 years VoiceThread has been giving people a way to make their interactions online warmer and more "human-centric.". Now the biggest update in our history is ready for you to give it a whirl! Just go to your display preferences page and select "New VoiceThread.". We're big fans of self-paced change, so you can also go back to the ...
VoiceThread is web-based presentation software that allows users to create and share interactive multimedia slideshows. VoiceThread presentations are used to showcase audio, video, images, and documents while allowing users to comment on them in a variety of ways. The result is an ongoing, asynchronous, digital conversation that can be easily ...
Overview. VoiceThread is a multimedia, collaborative tool that allows instructors to upload different types of media-images, documents, videos, slides- into a presentation (called a VoiceThread itself). The instructor and students can then comment on each individual "slide" using text, audio, or video comments.
VoiceThread is an interactive tool that allows students and faculty to share a wide variety of media (images, PDFs, slides, video, and more) and to share text, audio, and video comments on that media quickly and easily. ... Narrate a PowerPoint presentation with audio or video. Pose a question or topic and use it as a visual discussion board.
published 2 June 2021. VoiceThread is a smart communications tool that digitizes discussion and learning. (Image credit: VoiceThread) VoiceThread is a presentation tool that allows for storytelling with lots of mixed media sources, and for interaction between teacher and students. It is a slides-based platform that allows you to upload images ...
If the VoiceThread is being used as a presentation, select the "Automatically advance to the next slide after __ seconds box" and enter a number in the text box. (This is the number of seconds between when the comment ends and the presentation advances to the next slide. For fast-moving presentations, it is recommended to enter 0.)
Using VoiceThread for Special Education Classes. ... At the same time, they can also see visuals that I embedded and the presentation that I have created. In turn, they have the ability to respond by recording videos, recording a voice message, or even typing out words and/or adding links—whatever works best for them, individually.
VoiceThread is web-based presentation software that allows users to create and share interactive multimedia slideshows. VoiceThread presentations are used to showcase audio, video, images, and documents while allowing users to comment on them in a variety of different ways. The result is a digital conversation that can be easily shared with ...
VoiceThread is all asynchronous, so you can lock-in when you're in the zone and then share and collaborate once you're ready, so you don't have the hassle of trying to schedule meeting time. Instructors can create presentations and tutorials and upload them to VoiceThread for some direct instruction in the form of lectures and review ...
Click the yellow "Start Assignment" button on the right. To start building a new VoiceThread, click on the source from which you would like to upload or import media, and wait for that media to process. Click "Continue" at the bottom of the screen to go to the commenting options. If you have already created the VoiceThread you want to ...
Welcome to the real virtual. Adobe Connect gives you complete control over your virtual sessions, with the ability to create stunning, custom experiences. Adobe Connect helps deliver engaging training and learning sessions, highly customized, branded, and engagement-led webinars, as well as reliable, personalized, high-quality meetings.
Creating a new VoiceThread. Uploading files from your computer. Importing media from other VoiceThreads. Importing media from another website. Importing media from other services. Using your webcam to create a slide. Using your microphone to create an audio slide. Number of slides a VoiceThread can contain. Adding a title, description, and tags.